
Installation Instructions
Page 2
Installation Instructions CONTENTS General information Important Safety Instructions 3 Electrical Requirements 3 Damage - Shipment/Installation 4 Parts Included 4 Tools You Will Need 5 Mounting Space 5 Step-by-step installation guide Placement of The Mounting Plate 6-8 Removing the Mounting Plate 6 Finding the Wall Studs 6 ...
Installation Instructions CONTENTS General information Important Safety Instructions 3 Electrical Requirements 3 Damage - Shipment/Installation 4 Parts Included 4 Tools You Will Need 5 Mounting Space 5 Step-by-step installation guide Placement of The Mounting Plate 6-8 Removing the Mounting Plate 6 Finding the Wall Studs 6 ...
Installation Instructions
Page 4
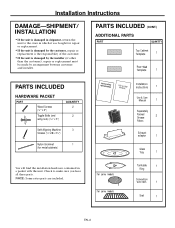
... is damaged in shipment, return the unit to make sure you have all these parts. Check to the store in a packet with the unit. PARTS INCLUDED (CONT.) ADDITIONAL PARTS PART QUANTITY Top Cabinet Template 1 Rear Wall Template 1 PARTS INCLUDED HARDWARE PACKET PART Wood Screws (1⁄4" x 2") Toggle Bolts (and wing nuts) (3⁄16" x 3") QUANTITY 2 2 Self-Aligning Machine...
... is damaged in shipment, return the unit to make sure you have all these parts. Check to the store in a packet with the unit. PARTS INCLUDED (CONT.) ADDITIONAL PARTS PART QUANTITY Top Cabinet Template 1 Rear Wall Template 1 PARTS INCLUDED HARDWARE PACKET PART Wood Screws (1⁄4" x 2") Toggle Bolts (and wing nuts) (3⁄16" x 3") QUANTITY 2 2 Self-Aligning Machine...

Installation Instructions
Page 24
...EVENLY SPACED TOGGLE BOLTS IN THE MOUNTING PLATE AREA. 3/8" 3/8" 13-3/8" 3/8" 2" 1/2" Part No.:316902475 4-1/2" 8-1/4" 13-3/8" 3/8" 3/8" 3/8" 3/8" 9-27/32" 2" 2" 12-1/2" 6-1/4"... China Remove the template from the rear wall. 5. Review the Installation Instruction book for the supplied toggle bolts. 3. Part No.:316902476 3/8" TO EDGE 12" 4" Trim the rear wall template along the dotted line. Locate and...
...EVENLY SPACED TOGGLE BOLTS IN THE MOUNTING PLATE AREA. 3/8" 3/8" 13-3/8" 3/8" 2" 1/2" Part No.:316902475 4-1/2" 8-1/4" 13-3/8" 3/8" 3/8" 3/8" 3/8" 9-27/32" 2" 2" 12-1/2" 6-1/4"... China Remove the template from the rear wall. 5. Review the Installation Instruction book for the supplied toggle bolts. 3. Part No.:316902476 3/8" TO EDGE 12" 4" Trim the rear wall template along the dotted line. Locate and...

Complete Owner s Guide
Page 1
All about the Use &Care of your Microwave Oven 316495188 (October, 2016) TABLE OF CONTENTS WELCOME & CONGRATULATIONS 2 IMPORTANT SAFETY INSTRUCTIONS 2 PART NAMES 8 CONTROL PANEL 9 BEFORE OPERATING 10 MANUAL COOKING 11 AUTO COOKING 17 COOKING CHARTS 19 CONVENIENT FEATURES 21 CLEANING AND CARE 23 SERVICE CALL CHECK 27 SPECIFICATIONS 27 WARRANTY 28 www.frigidaire.com USA 1-800-374-4432 www.frigidaire.ca Canada 1-800-265-8352
All about the Use &Care of your Microwave Oven 316495188 (October, 2016) TABLE OF CONTENTS WELCOME & CONGRATULATIONS 2 IMPORTANT SAFETY INSTRUCTIONS 2 PART NAMES 8 CONTROL PANEL 9 BEFORE OPERATING 10 MANUAL COOKING 11 AUTO COOKING 17 COOKING CHARTS 19 CONVENIENT FEATURES 21 CLEANING AND CARE 23 SERVICE CALL CHECK 27 SPECIFICATIONS 27 WARRANTY 28 www.frigidaire.com USA 1-800-374-4432 www.frigidaire.ca Canada 1-800-265-8352

Complete Owner s Guide
Page 4
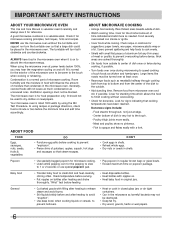
... does cause interference to radio or television reception, which are on , the user is not responsible for ISM Equipment pursuant to part 18 of FCC Rules, which can touch electrical parts involving risk of the radio or television. • Relocate the microwave oven with metal scouring pads. It has been type tested...
... does cause interference to radio or television reception, which are on , the user is not responsible for ISM Equipment pursuant to part 18 of FCC Rules, which can touch electrical parts involving risk of the radio or television. • Relocate the microwave oven with metal scouring pads. It has been type tested...
Complete Owner s Guide
Page 6
... to bottom and from the center of the microwave oven to be warm to the outside. • Add standing time. A good microwave cookbook is a normal part of dish. • Watch cooking time. Condensation is a valuable asset. Large items like roasts must not be destroyed. • Deep fat fry. • Dry wood...
... to bottom and from the center of the microwave oven to be warm to the outside. • Add standing time. A good microwave cookbook is a normal part of dish. • Watch cooking time. Condensation is a valuable asset. Large items like roasts must not be destroyed. • Deep fat fry. • Dry wood...

Complete Owner s Guide
Page 8
PART NAMES Microwave features Front View 8 1 2 3 4 6 5 11 7 Bottom View 9 1 Window 2 Interlock system 3 Door assembly 4 Turntable ring assembly 5 Turntable Shaft 6 Turntable glass tray 7 Control panel 8 Ventilation openings (on top) 9 Surface lights 10 Ventilation filters 11 Waveguide cover: Do NOT REMOVE 10 8
PART NAMES Microwave features Front View 8 1 2 3 4 6 5 11 7 Bottom View 9 1 Window 2 Interlock system 3 Door assembly 4 Turntable ring assembly 5 Turntable Shaft 6 Turntable glass tray 7 Control panel 8 Ventilation openings (on top) 9 Surface lights 10 Ventilation filters 11 Waveguide cover: Do NOT REMOVE 10 8
Complete Owner s Guide
Page 10
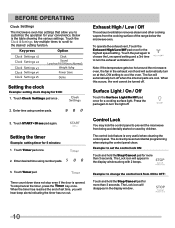
... timer has run out. The fan will disappear in the display window along with 2 beeps. 3. The Lock icon will automatically turn off when the internal parts are cool. Touch Timer pad once. 2. The Lock icon will prevent accidental programming when wiping the control panel clean. Example: to change the control lock...
... timer has run out. The fan will disappear in the display window along with 2 beeps. 3. The Lock icon will automatically turn off when the internal parts are cool. Touch Timer pad once. 2. The Lock icon will prevent accidental programming when wiping the control panel clean. Example: to change the control lock...
Complete Owner s Guide
Page 16
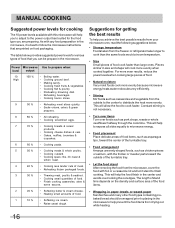
... pieces of the turntable tray. • Let the food stand After removing the food from the microwave, cover the food with the thicker or meatier parts toward the outside to the center to distribute the heat more evenly when cooked together. Constant stirring is best to the power output best suited...
... pieces of the turntable tray. • Let the food stand After removing the food from the microwave, cover the food with the thicker or meatier parts toward the outside to the center to distribute the heat more evenly when cooked together. Constant stirring is best to the power output best suited...
Complete Owner s Guide
Page 23
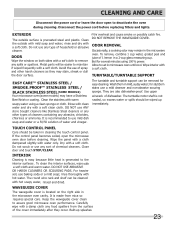
.../50 solution of water and vinegar. Wash them in the microwave oven cavity. For heavier soil, use a mild cleanser and non-abrasive scouring sponge. Metal parts will be easier to set in a 2-cup glass measuring cup. The round wire rack and shelf can be cleaned with hot soapy water, rinsed and...
.../50 solution of water and vinegar. Wash them in the microwave oven cavity. For heavier soil, use a mild cleanser and non-abrasive scouring sponge. Metal parts will be easier to set in a 2-cup glass measuring cup. The round wire rack and shelf can be cleaned with hot soapy water, rinsed and...

Complete Owner s Guide
Page 24
... filters, slide the filter to damage the LED light. 6. Re-install LED light cover and mounting screw. 7. Vent exhaust filter part number 5304478913 To order parts call 800-599-7569.Then reconnect the harness. 2. Unplug the microwave oven or turn the power back on the filter will drop ...or turn off power at least once every month. Surface lights Front 1. Unplug the LED light from the harness, replace with part 5304499540.To order parts call 800-599-7569 Surface light replacement To avoid risk of personal injury or property damage, do not operate oven hood without filters...
... filters, slide the filter to damage the LED light. 6. Re-install LED light cover and mounting screw. 7. Vent exhaust filter part number 5304478913 To order parts call 800-599-7569.Then reconnect the harness. 2. Unplug the microwave oven or turn the power back on the filter will drop ...or turn off power at least once every month. Surface lights Front 1. Unplug the LED light from the harness, replace with part 5304499540.To order parts call 800-599-7569 Surface light replacement To avoid risk of personal injury or property damage, do not operate oven hood without filters...

Complete Owner s Guide
Page 25
... of charcoal filter to 12 months depending on use. 1 . Disconnect the power cord before replacing filters and lights. Charcoal filter replacement Charcoal filter part number 5304464577 To order parts call 800-599-7569 5. P ull the vent grill away from the unit. 7. Press the bottom of the filter inwards, then pull it into...
... of charcoal filter to 12 months depending on use. 1 . Disconnect the power cord before replacing filters and lights. Charcoal filter replacement Charcoal filter part number 5304464577 To order parts call 800-599-7569 5. P ull the vent grill away from the unit. 7. Press the bottom of the filter inwards, then pull it into...

Complete Owner s Guide
Page 26
... pulling the cover forward. 4. When re-installing mounting screw be careful not to deactivate the oven during cleaning. Reconnect LED light to the bracket with part 5304499540. To order parts call 800-599-7569. 6.Replace the charcoal filter (if installed).
... pulling the cover forward. 4. When re-installing mounting screw be careful not to deactivate the oven during cleaning. Reconnect LED light to the bracket with part 5304499540. To order parts call 800-599-7569. 6.Replace the charcoal filter (if installed).
Complete Owner s Guide
Page 27
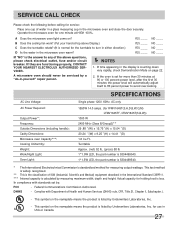
.../or circuit breaker. If time appearing in the microwave oven warm? Turntable Approx. (net) 52 lb, (gross) 58 lb 1*1.5W LED, the part number is 5304499540. 1*1.5W LED, the part number is the answer to any of ISM (Industrial, Scientific and Medical) equipment described in the International Standard CISPR11. *** Internal capacity is...
.../or circuit breaker. If time appearing in the microwave oven warm? Turntable Approx. (net) 52 lb, (gross) 58 lb 1*1.5W LED, the part number is 5304499540. 1*1.5W LED, the part number is the answer to any of ISM (Industrial, Scientific and Medical) equipment described in the International Standard CISPR11. *** Internal capacity is...

Complete Owner s Guide
Page 28
... 2. Rust on the interior or exterior of this warranty. 5. Food loss due to obtain and keep all costs for repairing or replacing any parts of the unit. 4. use of Electrolux Home Products, Inc. In the USA, your appliance. 9. Electrolux authorizes no person to any obligations ... not limited to establish the warranty period should service be obtained by Electrolux Major Appliances North America, a division of parts other than genuine Electrolux parts or parts obtained from persons other than in the USA and Canada. Damages to use or used and maintained in China PN.:...
... 2. Rust on the interior or exterior of this warranty. 5. Food loss due to obtain and keep all costs for repairing or replacing any parts of the unit. 4. use of Electrolux Home Products, Inc. In the USA, your appliance. 9. Electrolux authorizes no person to any obligations ... not limited to establish the warranty period should service be obtained by Electrolux Major Appliances North America, a division of parts other than genuine Electrolux parts or parts obtained from persons other than in the USA and Canada. Damages to use or used and maintained in China PN.:...


