

Use and Care Manual
Page 1
All about the Use & Care of your Dryer TABLE OF CONTENTS Important Safety Instructions 2-5 Features 6 Operating Instructions 7-13 Care and Cleaning 14 Solutions to Common Problems 15-16 Warranty 17 Notes 18 Français 19 Español 37 137619700A (1304)
All about the Use & Care of your Dryer TABLE OF CONTENTS Important Safety Instructions 2-5 Features 6 Operating Instructions 7-13 Care and Cleaning 14 Solutions to Common Problems 15-16 Warranty 17 Notes 18 Français 19 Español 37 137619700A (1304)

Use and Care Manual
Page 3
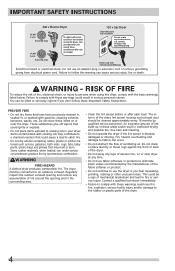
...injury or death. IMPORTANT SAFETY INSTRUCTIONS WARNING Please read all instructions before using this Use and Care Guide are found on the dryer serial plate located inside the door opening. Recognize safety symbols, words and labels Safety items throughout this manual are labeled with... every feature included. DANGER DANGER indicates an imminently hazardous situation which , if not avoided, could result in a safe place. Your dryer may result in this appliance. NOTE The instructions appearing in minor or moderate injury. Obey all safety messages that may occur. Model ...
...injury or death. IMPORTANT SAFETY INSTRUCTIONS WARNING Please read all instructions before using this Use and Care Guide are found on the dryer serial plate located inside the door opening. Recognize safety symbols, words and labels Safety items throughout this manual are labeled with... every feature included. DANGER DANGER indicates an imminently hazardous situation which , if not avoided, could result in a safe place. Your dryer may result in this appliance. NOTE The instructions appearing in minor or moderate injury. Obey all safety messages that may occur. Model ...
Use and Care Manual
Page 4
... except those manufactured for sale in fire, explosion, serious bodily injury and/or damage to the rubber or plastic parts of the dryer. 4 Contact a qualified technician immediately. • Failure to comply with these Important Safety Instructions: PREVENT FIRE • Do ... such as bras, galoshes, bath mats, rugs, bibs, baby pants, plastic bags and pillows that could result in your dryer. WARNING FIRE HAZARD A clothes dryer produces combustible lint. Regularly inspect the outdoor exhaust opening and in , or spotted with the basic warnings listed below. Some ...
... except those manufactured for sale in fire, explosion, serious bodily injury and/or damage to the rubber or plastic parts of the dryer. 4 Contact a qualified technician immediately. • Failure to comply with these Important Safety Instructions: PREVENT FIRE • Do ... such as bras, galoshes, bath mats, rugs, bibs, baby pants, plastic bags and pillows that could result in your dryer. WARNING FIRE HAZARD A clothes dryer produces combustible lint. Regularly inspect the outdoor exhaust opening and in , or spotted with the basic warnings listed below. Some ...
Use and Care Manual
Page 5
... • To prevent injury, do so can become airtight chambers. • Keep laundry products out of an overheated situation (electric dryers only). To prevent personal injury, observe all appliances. • Destroy the carton, plastic bag and other reproductive harm, and requires ...cleaning. Cartons covered with local codes. PREVENT INJURY • To prevent shock hazard and assure stability during operation, the dryer must be installed and electrically grounded by an authorized servicer unless specifically recommended in serious personal injuries. Do not ...
... • To prevent injury, do so can become airtight chambers. • Keep laundry products out of an overheated situation (electric dryers only). To prevent personal injury, observe all appliances. • Destroy the carton, plastic bag and other reproductive harm, and requires ...cleaning. Cartons covered with local codes. PREVENT INJURY • To prevent shock hazard and assure stability during operation, the dryer must be installed and electrically grounded by an authorized servicer unless specifically recommended in serious personal injuries. Do not ...
Use and Care Manual
Page 7
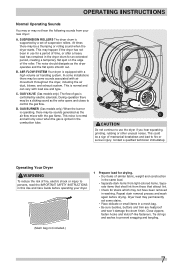
...a temporary flat spots smooth out. D. Close zippers; OPERATING INSTRUCTIONS Normal Operating Sounds You may or may not hear the following sounds from your dryer. 1 Prepare load for drying. • Dry items of similar fabric, weight and construction in the same load. • Separate dark items from ...items. Separate items that shed lint from those that attract lint. • Check for stains which may not have been removed in the dryer drum for a period of mechanical breakdown and lead to persons, read the IMPORTANT SAFETY INSTRUCTIONS in this Use and Care Guide before drying....
...a temporary flat spots smooth out. D. Close zippers; OPERATING INSTRUCTIONS Normal Operating Sounds You may or may not hear the following sounds from your dryer. 1 Prepare load for drying. • Dry items of similar fabric, weight and construction in the same load. • Separate dark items from ...items. Separate items that shed lint from those that attract lint. • Check for stains which may not have been removed in the dryer drum for a period of mechanical breakdown and lead to persons, read the IMPORTANT SAFETY INSTRUCTIONS in this Use and Care Guide before drying....
Use and Care Manual
Page 8
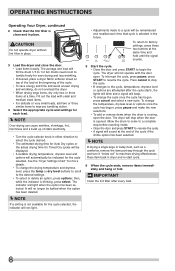
... cycle. • Close the door and press START to 1/2 full. NOTE If a setting is blinking, press select. OPERATING INSTRUCTIONS Operating Your Dryer, continued 2 Check that cycle is selected in the future. then, while the indicator is not available for the cycle selected. The indicator will beep...• A suitable drying temperature, dryness level and options will sound at the same time and hold until the signal sounds. 3 Load the dryer and close the door. • Load items loosely. NOTE Over-drying can cause wrinkles, shrinkage, lint, harshness and a build up of ...
... cycle. • Close the door and press START to 1/2 full. NOTE If a setting is blinking, press select. OPERATING INSTRUCTIONS Operating Your Dryer, continued 2 Check that cycle is selected in the future. then, while the indicator is not available for the cycle selected. The indicator will beep...• A suitable drying temperature, dryness level and options will sound at the same time and hold until the signal sounds. 3 Load the dryer and close the door. • Load items loosely. NOTE Over-drying can cause wrinkles, shrinkage, lint, harshness and a build up of ...
Use and Care Manual
Page 9
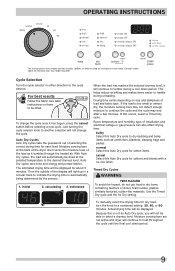
OPERATING INSTRUCTIONS This manual covers many models and not all cycles, options, or features listed are not active and dryer will continue to heat throughout the cycle until the final cool down period. 9 Your model may end after a few minutes. For best results Follow ... Turn the cycle selector in a circular track to be dried. With Auto Dry cycles, the load will not be dried at the back of the dryer drum sense the moisture level of load and fabric type. If this is too small or almost dry, the moisture sensing bars may not detect...
OPERATING INSTRUCTIONS This manual covers many models and not all cycles, options, or features listed are not active and dryer will continue to heat throughout the cycle until the final cool down period. 9 Your model may end after a few minutes. For best results Follow ... Turn the cycle selector in a circular track to be dried. With Auto Dry cycles, the load will not be dried at the back of the dryer drum sense the moisture level of load and fabric type. If this is too small or almost dry, the moisture sensing bars may not detect...

Use and Care Manual
Page 11
...with a drying rack you may be dried on whenever the door is equipped with this dryer. "LOC" will be displayed. Reversible Door Your dryer is opened to hang over the sides or through the holes. Select the air (no ...the light. Control Lock To avoid having someone accidentally start or stop the dryer, press Options and Select at the same time and hold both for 10 seconds. Insert the rack into ...the dryer drum, resting the back support on the moisture sensor bars and the front legs on ...
...with a drying rack you may be dried on whenever the door is equipped with this dryer. "LOC" will be displayed. Reversible Door Your dryer is opened to hang over the sides or through the holes. Select the air (no ...the light. Control Lock To avoid having someone accidentally start or stop the dryer, press Options and Select at the same time and hold both for 10 seconds. Insert the rack into ...the dryer drum, resting the back support on the moisture sensor bars and the front legs on ...
Use and Care Manual
Page 12
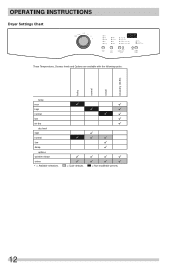
OPERATING INSTRUCTIONS Dryer Settings Chart These Temperatures, Dryness levels and Options are available with the following cycles: bulky normal casual timed dry (30-90) temp max high normal low air dry dry level high normal low damp options wrinkle release chime 9 = Available selections. 9 9 9 9 9 9 9 9 9 9 9 9 9 9 9 9 = Cycle defaults. 9 9 9 9 9 9 = Non-modifiable presets. 12
OPERATING INSTRUCTIONS Dryer Settings Chart These Temperatures, Dryness levels and Options are available with the following cycles: bulky normal casual timed dry (30-90) temp max high normal low air dry dry level high normal low damp options wrinkle release chime 9 = Available selections. 9 9 9 9 9 9 9 9 9 9 9 9 9 9 9 9 = Cycle defaults. 9 9 9 9 9 9 = Non-modifiable presets. 12
Use and Care Manual
Page 13
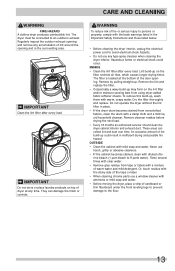
... thoroughly and replace. Remove cleanser residue before drying the next load. • Every 18 months an authorized servicer should clean the dryer cabinet interior and exhaust duct. Never use any time. They can collect lint and dust over time. These areas can damage the...chrome parts use a window cleaner with warm, soapy water. Lint build-up could occur. CARE AND CLEANING WARNING FIRE HAZARD A clothes dryer produces combustible lint. An excessive amount of cardboard or thin fiberboard under the front leveling legs to prevent damage to avoid electrical...
... thoroughly and replace. Remove cleanser residue before drying the next load. • Every 18 months an authorized servicer should clean the dryer cabinet interior and exhaust duct. Never use any time. They can collect lint and dust over time. These areas can damage the...chrome parts use a window cleaner with warm, soapy water. Lint build-up could occur. CARE AND CLEANING WARNING FIRE HAZARD A clothes dryer produces combustible lint. An excessive amount of cardboard or thin fiberboard under the front leveling legs to prevent damage to avoid electrical...
Use and Care Manual
Page 14
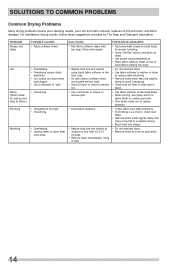
...drying problems involve poor cleaning results, poor soil and stain removal, residues of load before starting the dryer. • Do not overload dryer. • Use fabric softener in washer or dryer to reduce static electricity. • Remove items when they are slightly damp to avoid overdrying. ...• Check that lint filter is clean and in dryer after cycle ends. PREVENTIVE MEASURES • Add a few bath towels to small loads for 5-10 minutes. • Remove items immediately. Rinse...
...drying problems involve poor cleaning results, poor soil and stain removal, residues of load before starting the dryer. • Do not overload dryer. • Use fabric softener in washer or dryer to reduce static electricity. • Remove items when they are slightly damp to avoid overdrying. ...• Check that lint filter is clean and in dryer after cycle ends. PREVENTIVE MEASURES • Add a few bath towels to small loads for 5-10 minutes. • Remove items immediately. Rinse...

Use and Care Manual
Page 15
... breaker tripped. Call authorized service person for procedure. See "Operating Instructions." Outside exhaust hood or exhaust duct may turn but won't heat. Dryer is clogged with lint. Items left in wall outlet. Remove items as soon as coins, pins, clips or buttons are 2 house fuses....* It may be at least 4 inches in this list. When in place, the duct must not exceed length listed in the dryer circuit. Electric dryer is connected to make sure supply valve is on a 240 volt circuit. may save both time and expense. Drying time will not...
... breaker tripped. Call authorized service person for procedure. See "Operating Instructions." Outside exhaust hood or exhaust duct may turn but won't heat. Dryer is clogged with lint. Items left in wall outlet. Remove items as soon as coins, pins, clips or buttons are 2 house fuses....* It may be at least 4 inches in this list. When in place, the duct must not exceed length listed in the dryer circuit. Electric dryer is connected to make sure supply valve is on a 240 volt circuit. may save both time and expense. Drying time will not...

Installation Instructions
Page 1
All about the Installation of your Dryer TABLE OF CONTENTS Important Safety Instructions 2-3 Installation Requirements 4-11 Installation Instructions 12-19 Reversing Door 20-23 Accessories 24 Français 25 Español 49 137441900C (1304)
All about the Installation of your Dryer TABLE OF CONTENTS Important Safety Instructions 2-3 Installation Requirements 4-11 Installation Instructions 12-19 Reversing Door 20-23 Accessories 24 Français 25 Español 49 137441900C (1304)

Installation Instructions
Page 2
... Good safe practice and caution MUST be performed by a qualified installer, service agency or the gas supplier. • Install the clothes dryer according to the manufacturer's instructions and local codes. • The electrical service to light any appliance. • Do not touch any appliance....hood • 4-inch (102 mm), rigid metal or semi-rigid metal exhaust duct work • 3-wire or 4-wire 240 volt cord kit (electric dryer) • 4 in Canada, CAN/ACG B149.1-2000. Place all occupants. • Immediately call your gas supplier, call the fire department. ...
... Good safe practice and caution MUST be performed by a qualified installer, service agency or the gas supplier. • Install the clothes dryer according to the manufacturer's instructions and local codes. • The electrical service to light any appliance. • Do not touch any appliance....hood • 4-inch (102 mm), rigid metal or semi-rigid metal exhaust duct work • 3-wire or 4-wire 240 volt cord kit (electric dryer) • 4 in Canada, CAN/ACG B149.1-2000. Place all occupants. • Immediately call your gas supplier, call the fire department. ...
Installation Instructions
Page 3
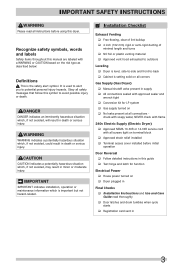
...are labeled with all screws tight on terminal block ‰ Approved strain relief installed ‰ Terminal access cover installed before using this dryer. DANGER DANGER indicates an imminently hazardous situation which , if not avoided, could result in death or serious injury. WARNING WARNING indicates a...all safety messages that follow this symbol to avoid possible injury or death. It is setting solid on all corners Gas Supply (Gas Dryer) ‰ Manual shutoff valve present in supply ‰ All connections sealed with approved sealer and wrench tight ‰ Conversion kit...
...are labeled with all screws tight on terminal block ‰ Approved strain relief installed ‰ Terminal access cover installed before using this dryer. DANGER DANGER indicates an imminently hazardous situation which , if not avoided, could result in death or serious injury. WARNING WARNING indicates a...all safety messages that follow this symbol to avoid possible injury or death. It is setting solid on all corners Gas Supply (Gas Dryer) ‰ Manual shutoff valve present in supply ‰ All connections sealed with approved sealer and wrench tight ‰ Conversion kit...

Installation Instructions
Page 4
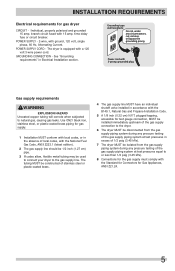
... open end spade lug connectors with upturned ends or closed loop connectors and marked for use with clothes dryers. OUTLET RECEPTACLE - NOTE Dryers manufactured for washer and dryer. Grounding through the neutral link is in the installed position. See "Grounding requirements" in Canada have ... power supply cord (NEMA 14-30R). 4 INSTALLATION REQUIREMENTS NOTE Because of potentially inconsistent voltage capabilities, the use of this dryer with 30 amp. branch circuit fused with power created by gas powered generators, solar powered generators, wind powered generators or any...
... open end spade lug connectors with upturned ends or closed loop connectors and marked for use with clothes dryers. OUTLET RECEPTACLE - NOTE Dryers manufactured for washer and dryer. Grounding through the neutral link is in the installed position. See "Grounding requirements" in Canada have ... power supply cord (NEMA 14-30R). 4 INSTALLATION REQUIREMENTS NOTE Because of potentially inconsistent voltage capabilities, the use of this dryer with 30 amp. branch circuit fused with power created by gas powered generators, solar powered generators, wind powered generators or any...
Installation Instructions
Page 5
... Current. plugged tapping, accessible for test gauge connection, MUST be installed immediately upstream of the gas supply connection to the dryer. 6 The dryer MUST be disconnected from the gas supply piping system during any pressure testing of the gas supply piping system at test pressures... requirements WARNING EXPLOSION HAZARD Uncoated copper tubing will corrode when subjected to the gas supply line. The tubing MUST be used to connect your dryer to natural gas, causing gas leaks. branch circuit fused with the B149.1, Natural Gas and Propane Installation Code. 5 A 1/8 inch (0....
... Current. plugged tapping, accessible for test gauge connection, MUST be installed immediately upstream of the gas supply connection to the dryer. 6 The dryer MUST be disconnected from the gas supply piping system during any pressure testing of the gas supply piping system at test pressures... requirements WARNING EXPLOSION HAZARD Uncoated copper tubing will corrode when subjected to the gas supply line. The tubing MUST be used to connect your dryer to natural gas, causing gas leaks. branch circuit fused with the B149.1, Natural Gas and Propane Installation Code. 5 A 1/8 inch (0....
Installation Instructions
Page 6
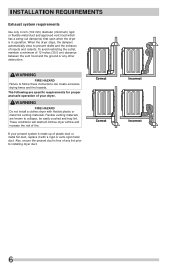
... close to prevent drafts and the entrance of fire. WARNING FIRE HAZARD Do not install a clothes dryer with a rigid or semi-rigid metal duct. These conditions will obstruct clothes dryer airflow and increase the risk of insects and rodents. WARNING FIRE HAZARD Failure to follow these instructions...4 inch (102 mm) diameter (minimum) rigid or flexible metal duct and approved vent hood which has a swing-out damper(s) that open when the dryer is free of your present system is made up of 12 inches (30.5 cm) clearance between the vent hood and the ground or any lint...
... close to prevent drafts and the entrance of fire. WARNING FIRE HAZARD Do not install a clothes dryer with a rigid or semi-rigid metal duct. These conditions will obstruct clothes dryer airflow and increase the risk of insects and rodents. WARNING FIRE HAZARD Failure to follow these instructions...4 inch (102 mm) diameter (minimum) rigid or flexible metal duct and approved vent hood which has a swing-out damper(s) that open when the dryer is free of your present system is made up of 12 inches (30.5 cm) clearance between the vent hood and the ground or any lint...
Installation Instructions
Page 7
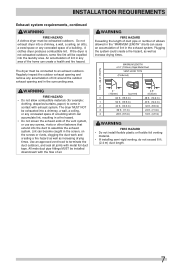
...vent hood to terminate the duct outdoors, and seal all joints with exhaust system. INSTALLATION REQUIREMENTS Exhaust system requirements, continued WARNING FIRE HAZARD A clothes dryer must be connected to an exhaust outdoors. An accumulation of a building. All male duct pipe fittings MUST be expelled into a chimney, a... or flexible foil venting material. • If installing semi-rigid venting, do not exceed 8 ft. (2.4 m) duct length. 7 The dryer must be exhausted outdoors. Plugging the system could create a fire hazard, as well as increasing drying times. If the...
...vent hood to terminate the duct outdoors, and seal all joints with exhaust system. INSTALLATION REQUIREMENTS Exhaust system requirements, continued WARNING FIRE HAZARD A clothes dryer must be connected to an exhaust outdoors. An accumulation of a building. All male duct pipe fittings MUST be expelled into a chimney, a... or flexible foil venting material. • If installing semi-rigid venting, do not exceed 8 ft. (2.4 m) duct length. 7 The dryer must be exhausted outdoors. Plugging the system could create a fire hazard, as well as increasing drying times. If the...
Installation Instructions
Page 8
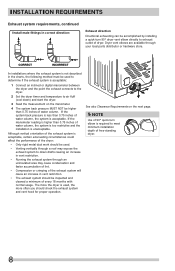
...back pressure MUST NOT be used . • Venting vertically through a roof may expose the exhaust system to down ) and start the dryer. 3 Read the measurement on the next page. INSTALLATION REQUIREMENTS Exhaust system requirements, continued Install male fittings in correct direction: Exhaust ...direction Directional exhausting can be inspected and cleaned a minimum of every 18 months with normal usage. Dryer vent elbows are available through an uninsulated area may cause condensation and faster accumulation of lint. • Compression or crimping of...
...back pressure MUST NOT be used . • Venting vertically through a roof may expose the exhaust system to down ) and start the dryer. 3 Read the measurement on the next page. INSTALLATION REQUIREMENTS Exhaust system requirements, continued Install male fittings in correct direction: Exhaust ...direction Directional exhausting can be inspected and cleaned a minimum of every 18 months with normal usage. Dryer vent elbows are available through an uninsulated area may cause condensation and faster accumulation of lint. • Compression or crimping of...


