

Use and Care Manual
Page 6
FEATURES Cycle Selector LED Display Control Lock Drum Light Large Surface Moisture Sensor Door Latch Reversible Door Exhaust Channel Outlet Door Strike Adjustable Leveling Legs Lint Filter Stacking Kit for Mounting on Matching Washer* Heavy Duty Drying Rack* *Not all models come with drying rack and stacking kit from the factory. They may be purchased as accessories. 6
FEATURES Cycle Selector LED Display Control Lock Drum Light Large Surface Moisture Sensor Door Latch Reversible Door Exhaust Channel Outlet Door Strike Adjustable Leveling Legs Lint Filter Stacking Kit for Mounting on Matching Washer* Heavy Duty Drying Rack* *Not all models come with drying rack and stacking kit from the factory. They may be purchased as accessories. 6
Use and Care Manual
Page 14
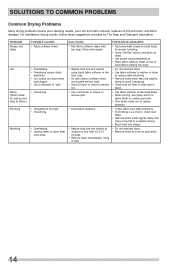
... poor cleaning results, poor soil and stain removal, residues of load before starting the dryer. • Do not overload dryer. • Use fabric softener in washer or dryer to reduce static electricity. • Remove items when they are slightly damp to avoid overdrying. • Check that lint filter is clean...
... poor cleaning results, poor soil and stain removal, residues of load before starting the dryer. • Do not overload dryer. • Use fabric softener in washer or dryer to reduce static electricity. • Remove items when they are slightly damp to avoid overdrying. • Check that lint filter is clean...

Installation Instructions
Page 2
...materials are adapters (x2) and flexible gas supply line (gas dryer) • Metal foil tape (not duct tape) 2 Do not stack washer on top of another dryer. Follow the gas supplier's instructions. • If you cannot reach your gas supplier, call your gas supplier from a ...to collapse, be applied when installing, operating and maintaining any electrical switch; Do not stack dryer on top of another washer. Do not stack washer on top of washer already installed on top of dryer. do not use them for commercial applications such as restaurants, beauty salons, etc. &#...
...materials are adapters (x2) and flexible gas supply line (gas dryer) • Metal foil tape (not duct tape) 2 Do not stack washer on top of another dryer. Follow the gas supplier's instructions. • If you cannot reach your gas supplier, call your gas supplier from a ...to collapse, be applied when installing, operating and maintaining any electrical switch; Do not stack dryer on top of another washer. Do not stack washer on top of washer already installed on top of dryer. do not use them for commercial applications such as restaurants, beauty salons, etc. &#...

Installation Instructions
Page 4
... supply cord is accessible when the dryer is prohibited for use with clothes dryers. Grounding through the neutral. DO NOT operate a washer and a dryer on the same circuit. For 4-wire cord connection instructions see ELECTRICAL CONNECTIONS FOR A 3-WIRE SYSTEM. 4-WIRE POWER...permit grounding through the neutral link is in a location where grounding through the neutral conductor is not recommended. Electrical requirements for washer and dryer. GROUNDING CONNECTION - For 3-wire cord connection instructions see ELECTRICAL CONNECTIONS FOR A 4-WIRE SYSTEM. time delay fuses or...
... supply cord is accessible when the dryer is prohibited for use with clothes dryers. Grounding through the neutral. DO NOT operate a washer and a dryer on the same circuit. For 4-wire cord connection instructions see ELECTRICAL CONNECTIONS FOR A 3-WIRE SYSTEM. 4-WIRE POWER...permit grounding through the neutral link is in a location where grounding through the neutral conductor is not recommended. Electrical requirements for washer and dryer. GROUNDING CONNECTION - For 3-wire cord connection instructions see ELECTRICAL CONNECTIONS FOR A 4-WIRE SYSTEM. time delay fuses or...
Installation Instructions
Page 11
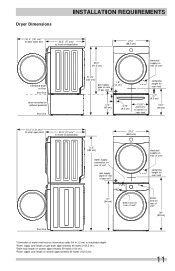
... gas supply pipe on rear of gas unit 1.6" (4 cm) 17.0" (43 cm) 3.75" (9.5 cm) centerline height for rear vent 37" (94 cm) drain hose on washer approximately 60 inches (152.5 cm). Dryer Dimensions INSTALLATION REQUIREMENTS 51.4" (131 cm)* to clear open door 30.3" (77 cm)* to front of closed door 71... open door 30.3" (77 cm)* to installation depth. 1Power supply cord length on gas dryer approximately 60 inches (152.5 cm). 2Drain hose length on washer approximately 59 inches (150 cm). 3Power supply cord length on rear of unit2 floor line *Connection of unit3 39" (99 cm) 11
... gas supply pipe on rear of gas unit 1.6" (4 cm) 17.0" (43 cm) 3.75" (9.5 cm) centerline height for rear vent 37" (94 cm) drain hose on washer approximately 60 inches (152.5 cm). Dryer Dimensions INSTALLATION REQUIREMENTS 51.4" (131 cm)* to clear open door 30.3" (77 cm)* to front of closed door 71... open door 30.3" (77 cm)* to installation depth. 1Power supply cord length on gas dryer approximately 60 inches (152.5 cm). 2Drain hose length on washer approximately 59 inches (150 cm). 3Power supply cord length on rear of unit2 floor line *Connection of unit3 39" (99 cm) 11
Installation Instructions
Page 15
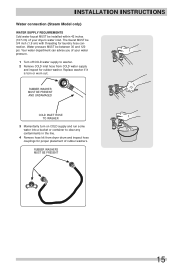
...water department can advise you of your dryer's water inlet. RUBBER WASHER MUST BE PRESENT AND UNDAMAGED COLD INLET HOSE TO WASHER 3 Momentarily turn on COLD supply and run some water into a bucket or container to washer. 2 Remove COLD inlet hose from dryer drum and inspect hose ...couplings for proper placement of rubber washers. RUBBER WASHERS MUST BE PRESENT 15 INSTALLATION INSTRUCTIONS Water connection (Steam Model only) WATER SUPPLY REQUIREMENTS...
...water department can advise you of your dryer's water inlet. RUBBER WASHER MUST BE PRESENT AND UNDAMAGED COLD INLET HOSE TO WASHER 3 Momentarily turn on COLD supply and run some water into a bucket or container to washer. 2 Remove COLD inlet hose from dryer drum and inspect hose ...couplings for proper placement of rubber washers. RUBBER WASHERS MUST BE PRESENT 15 INSTALLATION INSTRUCTIONS Water connection (Steam Model only) WATER SUPPLY REQUIREMENTS...
Installation Instructions
Page 16
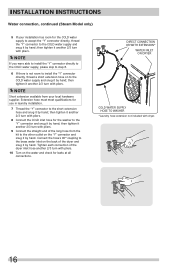
...room to install the "Y" connector directly, thread a short extension hose on the back of the long hose from your installation has room for the washer to the COLD water supply and snug it by hand. then tighten it by hand; DIRECT CONNECTION OR WITH EXTENSION* WATER INLET ON DRYER ...COLD WATER SUPPLY HOSE TO WASHER *Laundry hose extension not included with pliers. 9 Connect the straight end of the dryer and snug it another 2/3 turn with dryer. 16 Extension ...
...room to install the "Y" connector directly, thread a short extension hose on the back of the long hose from your installation has room for the washer to the COLD water supply and snug it by hand. then tighten it by hand; DIRECT CONNECTION OR WITH EXTENSION* WATER INLET ON DRYER ...COLD WATER SUPPLY HOSE TO WASHER *Laundry hose extension not included with pliers. 9 Connect the straight end of the dryer and snug it another 2/3 turn with dryer. 16 Extension ...
Installation Instructions
Page 24
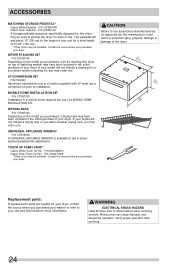
...installation. LP CONVERSION KIT P/N PCK4200 Gas dryers intended for stacking this dryer may be used to aid in the initial purchase of your washer or refer to disconnection when servicing controls. If your model did not include a stacking kit or you desire another drying rack, you ... P/N 137019200 A UNIVERSAL APPLIANCE WRENCH is available to elevate the dryer for ease of use a conversion kit prior to the height of matching washer may be available. WARNING ELECTRICAL SHOCK HAZARD Label all wires prior to your dryer. DRYING RACK P/N 137067300 Depending on top of your unit ...
...installation. LP CONVERSION KIT P/N PCK4200 Gas dryers intended for stacking this dryer may be used to aid in the initial purchase of your washer or refer to disconnection when servicing controls. If your model did not include a stacking kit or you desire another drying rack, you ... P/N 137019200 A UNIVERSAL APPLIANCE WRENCH is available to elevate the dryer for ease of use a conversion kit prior to the height of matching washer may be available. WARNING ELECTRICAL SHOCK HAZARD Label all wires prior to your dryer. DRYING RACK P/N 137067300 Depending on top of your unit ...


