Complete Owner's Guide
Page 2
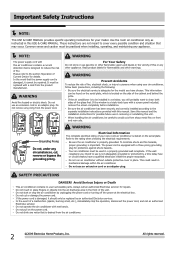
...and maintaining any circumstances, cut or damage the power cord. Do not use an extension cord or an adaptor plug. Save this manual and the installation instructions for protection against shock hazards. All rights reserved. Be sure the air conditioner has been securely and correctly... installed according to avoid cuts from the power cord. This could result in removing or reinstalling this USE & CARE MANUAL. Always call an authorized Electrolux servicer. In the event of fire. Common sense and caution must be replaced by an authorized Electrolux...
...and maintaining any circumstances, cut or damage the power cord. Do not use an extension cord or an adaptor plug. Save this manual and the installation instructions for protection against shock hazards. All rights reserved. Be sure the air conditioner has been securely and correctly... installed according to avoid cuts from the power cord. This could result in removing or reinstalling this USE & CARE MANUAL. Always call an authorized Electrolux servicer. In the event of fire. Common sense and caution must be replaced by an authorized Electrolux...
Complete Owner's Guide
Page 6
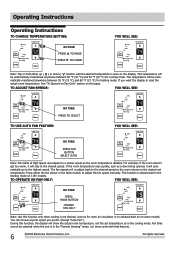
... TO RAISE PRESS TO LOWER YOU WILL SEE: Note: Tap or hold either the fan slower or fan faster button to adjust the fan speed manually. Press either up ( ) or down ( ) button until the desired temperature is in the cooling mode. All rights reserved. This temperature will auto- TO ADJUST FAN...
... TO RAISE PRESS TO LOWER YOU WILL SEE: Note: Tap or hold either the fan slower or fan faster button to adjust the fan speed manually. Press either up ( ) or down ( ) button until the desired temperature is in the cooling mode. All rights reserved. This temperature will auto- TO ADJUST FAN...
Installation Instructions
Page 1
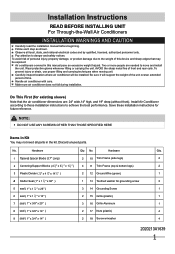
... You may be installed. No. Installation Instructions READ BEFORE INSTALLING UNIT For Through-the-Wall Air Conditioners INSTALLATION WARNINGS AND CAUTION Carefully read the installation manual before beginning. To avoid risk of personal injury, property damage, or product damage due to the weight of this... manual pose an excessive weight hazard. Carefully inspect location where air conditioner will support the weight of the unit overan extended period of front and rear ...
... You may be installed. No. Installation Instructions READ BEFORE INSTALLING UNIT For Through-the-Wall Air Conditioners INSTALLATION WARNINGS AND CAUTION Carefully read the installation manual before beginning. To avoid risk of personal injury, property damage, or product damage due to the weight of this... manual pose an excessive weight hazard. Carefully inspect location where air conditioner will support the weight of the unit overan extended period of front and rear ...

Installation Instructions
Page 4
Place in the center at the top of the sleeve. Remove the plastic washer from fron on left and right sides of this manual and replace with provided louvered rear panel. Installation Instructions Wall Sleeve Brands: #1 Emerson 15" Deep 1. NOTE: You may need to drill holes in picture. Cut(2)1" x 3/8" x ...
Place in the center at the top of the sleeve. Remove the plastic washer from fron on left and right sides of this manual and replace with provided louvered rear panel. Installation Instructions Wall Sleeve Brands: #1 Emerson 15" Deep 1. NOTE: You may need to drill holes in picture. Cut(2)1" x 3/8" x ...

Installation Instructions
Page 5
... the screw. 11. Remove the plastic washer from front on base with the tapered end facing the opening. 3. Install as described on Page 3 of this manual and replace with mounting the grill to the vertical sections of unit. 10. This helps induce a rearward slope on Page 13. 4.5" 4" 5 Attach (1) 1" x 3/8" x 25" long seal...
... the screw. 11. Remove the plastic washer from front on base with the tapered end facing the opening. 3. Install as described on Page 3 of this manual and replace with mounting the grill to the vertical sections of unit. 10. This helps induce a rearward slope on Page 13. 4.5" 4" 5 Attach (1) 1" x 3/8" x 25" long seal...

Installation Instructions
Page 6
... press into sleeve. 9. Make sure that the toothed washer is placed in center of side wall with the tapered end facing the back of this manual and replace with mounting the grill to 14" long each side wall. Install as shown below into two pieces. 4.5" 4" 17" 3/4" Tapered Spacer Block 1" Cut Here...
... press into sleeve. 9. Make sure that the toothed washer is placed in center of side wall with the tapered end facing the back of this manual and replace with mounting the grill to 14" long each side wall. Install as shown below into two pieces. 4.5" 4" 17" 3/4" Tapered Spacer Block 1" Cut Here...

Installation Instructions
Page 7
... screw from the back of the sleeve. 6. Install as described on Page 3 of these instructions. 13. Install as shown on the last page of this manual and replace with mounting the grill to ensure a good seal, making sure the ground wire does not become tangled. 12. Slide the unit completely to...
... screw from the back of the sleeve. 6. Install as described on Page 3 of these instructions. 13. Install as shown on the last page of this manual and replace with mounting the grill to ensure a good seal, making sure the ground wire does not become tangled. 12. Slide the unit completely to...

Installation Instructions
Page 8
... existing rear grille as described on the unit. 4. NOTE: You may need to drill holes in flange of existing sleeve to the floor of this manual and replace with provided louvered rear panel. This helps induce a rearward slope on the last page of the sleeve. Seal & Frame the unit as shown...
... existing rear grille as described on the unit. 4. NOTE: You may need to drill holes in flange of existing sleeve to the floor of this manual and replace with provided louvered rear panel. This helps induce a rearward slope on the last page of the sleeve. Seal & Frame the unit as shown...

Installation Instructions
Page 9
... sleeve, follow the instructions for direct mounting on Page 13. 9 Installation Instructions Wall Sleeve Brands: #6 Whirlpool 17-1/8" Deep 1. Install to the vertical sections of this manual and replace with mounting the grill to the unit as shown on the last page of the sleeve. 6. Cut (2) 1" x 3/8" x 25" long seals to 14" long...
... sleeve, follow the instructions for direct mounting on Page 13. 9 Installation Instructions Wall Sleeve Brands: #6 Whirlpool 17-1/8" Deep 1. Install to the vertical sections of this manual and replace with mounting the grill to the unit as shown on the last page of the sleeve. 6. Cut (2) 1" x 3/8" x 25" long seals to 14" long...

Installation Instructions
Page 10
... of the sleeve again making sure the ground wire does not become tangled. 20. Attach the tapered spacer blocks to the left side of this manual and replace with the slot overlapping the seal above. 11. The pieces must be fitted flush to step 15. Use these instructions. 21. Install as...
... of the sleeve again making sure the ground wire does not become tangled. 20. Attach the tapered spacer blocks to the left side of this manual and replace with the slot overlapping the seal above. 11. The pieces must be fitted flush to step 15. Use these instructions. 21. Install as...

Installation Instructions
Page 11
... the backing paper and press into sleeve. 6. Make sure that the toothed washer is against the cabinet. 9. Installation Instructions Wall Sleeve Brands: #8 White Westinghouse/Frigidaire/ Carrier 52F Series 16"+ 17-1/2" Deep 1. Remove existing rear grille as shown in picture. Center unit & gently slide unit into position. 4.5" 4" 3. ... screw from the screw. 8. If you have difficulty with provided louvered rear panel. Install as described on Page 3 of this manual and replace with mounting the grill to the left side of unit. 7. NOTE: You may need to ensure a good seal,...
... the backing paper and press into sleeve. 6. Make sure that the toothed washer is against the cabinet. 9. Installation Instructions Wall Sleeve Brands: #8 White Westinghouse/Frigidaire/ Carrier 52F Series 16"+ 17-1/2" Deep 1. Remove existing rear grille as shown in picture. Center unit & gently slide unit into position. 4.5" 4" 3. ... screw from the screw. 8. If you have difficulty with provided louvered rear panel. Install as described on Page 3 of this manual and replace with mounting the grill to the left side of unit. 7. NOTE: You may need to ensure a good seal,...

Installation Instructions
Page 12
...into the slots of these next steps if the unit requires extra extension into sleeve. 15. Installation Instructions Wall Sleeve Brands: #9 White Westinghouse or Frigidaire 22" Deep 1. Remove existing rear grille as shown here. Install as shown on the last page of the foam blocks. Place (2) 1" x ...2 " x 14" seals along the sides of the divider. 14. Remove the plastic washer from the left and right sides of this manual and replace with the slot overlapping the seal above. 10. Screw and attach the other vertical shown portion of the grille as described on Page...
...into the slots of these next steps if the unit requires extra extension into sleeve. 15. Installation Instructions Wall Sleeve Brands: #9 White Westinghouse or Frigidaire 22" Deep 1. Remove existing rear grille as shown here. Install as shown on the last page of the foam blocks. Place (2) 1" x ...2 " x 14" seals along the sides of the divider. 14. Remove the plastic washer from the left and right sides of this manual and replace with the slot overlapping the seal above. 10. Screw and attach the other vertical shown portion of the grille as described on Page...


