Installation Instructions
Page 1
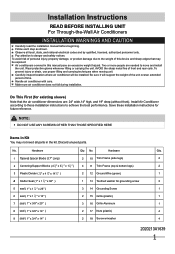
...Save these installation instructions to danger and safety notices. Installation Instructions READ BEFORE INSTALLING UNIT For Through-the-Wall Air Conditioners INSTALLATION WARNINGS AND CAUTION Carefully read the installation manual before beginning. Observe all parts in Kit...Divider ( 1 8" x 4 1 2" x 141 2" ) 2 12 Ground Wire (green) 1 4 Stuffer Seal (1" x 1 1 2 " x 84" ) 1 13 Toothed washer for existing sleeve) Note that may not need all local, state, and national electrical codes and by qualified, licensed, authorized personnel only. Carefully inspect location where air conditioner...
...Save these installation instructions to danger and safety notices. Installation Instructions READ BEFORE INSTALLING UNIT For Through-the-Wall Air Conditioners INSTALLATION WARNINGS AND CAUTION Carefully read the installation manual before beginning. Observe all parts in Kit...Divider ( 1 8" x 4 1 2" x 141 2" ) 2 12 Ground Wire (green) 1 4 Stuffer Seal (1" x 1 1 2 " x 84" ) 1 13 Toothed washer for existing sleeve) Note that may not need all local, state, and national electrical codes and by qualified, licensed, authorized personnel only. Carefully inspect location where air conditioner...
Installation Instructions
Page 2
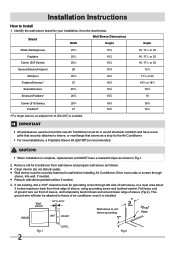
..., 17 1 2 or 22 15 7 8 171 8 or 23 16 3 4 or 19 3 4 18 5 8 15 18 5 8 16 3 4 IMPORTANT All wall sleeves used to sleeve, or rear flange that serves as follows: Clean interior (do not disturb seals). For new installations, a Frigidaire Sleeve Kit (EA108T) is complete, replacement unit MUST have a rear grille that securely attaches to mount the...
..., 17 1 2 or 22 15 7 8 171 8 or 23 16 3 4 or 19 3 4 18 5 8 15 18 5 8 16 3 4 IMPORTANT All wall sleeves used to sleeve, or rear flange that serves as follows: Clean interior (do not disturb seals). For new installations, a Frigidaire Sleeve Kit (EA108T) is complete, replacement unit MUST have a rear grille that securely attaches to mount the...
Installation Instructions
Page 3
... #9 White-Westinghouse/Frigidaire 22Ǝ Deep 5. Place the grille included with the new air conditioner towards the rear of new grille provided with the unit in place as long as shown. 7. Attach the new grille with a 1/8" drill bit. 5. Prepare the wall sleeve for that these ...installation instructions are followed so your wall sleeve type and follow the instructions for installation of the new unit per the following pages. Remove the existing grille...
... #9 White-Westinghouse/Frigidaire 22Ǝ Deep 5. Place the grille included with the new air conditioner towards the rear of new grille provided with the unit in place as long as shown. 7. Attach the new grille with a 1/8" drill bit. 5. Prepare the wall sleeve for that these ...installation instructions are followed so your wall sleeve type and follow the instructions for installation of the new unit per the following pages. Remove the existing grille...

Installation Instructions
Page 4
...on each and attach to 14" long each side wall. NOTE: You may need to drill holes in picture. Remove the backing paper and press into sleeve. 7. Gently slide unit into position. 3. Installation Instructions Wall Sleeve Brands: #1 Emerson 15" Deep 1. Remove existing... rear grille as shown on Page 3 of existing sleeve to the unit as shown. 5. Cut(2)1" x 3/8" x...
...on each and attach to 14" long each side wall. NOTE: You may need to drill holes in picture. Remove the backing paper and press into sleeve. 7. Gently slide unit into position. 3. Installation Instructions Wall Sleeve Brands: #1 Emerson 15" Deep 1. Remove existing... rear grille as shown on Page 3 of existing sleeve to the unit as shown. 5. Cut(2)1" x 3/8" x...

Installation Instructions
Page 5
...these instructions. 14. Remove the backing paper and press into sleeve. 9. Remove the plastic washer from sleeve to the vertical sections of the grille as shown in front of the rib on the last page of side wall with provided louvered rear panel. This helps induce a rearward... need to drill holes in the center at the top of the sleeve. Slide the unit completely to the rear to match new rear grille Rear Louvers 4.5" 50º 50º 80º 4" 80º Top View 2. Installation Instructions Wall Sleeve Brands: #2 Fedders 19-3/4" Deep 1. Attach (2) 4 1 2 " x 3 1 2" x 11 ...
...these instructions. 14. Remove the backing paper and press into sleeve. 9. Remove the plastic washer from sleeve to the vertical sections of the grille as shown in front of the rib on the last page of side wall with provided louvered rear panel. This helps induce a rearward... need to drill holes in the center at the top of the sleeve. Slide the unit completely to the rear to match new rear grille Rear Louvers 4.5" 50º 50º 80º 4" 80º Top View 2. Installation Instructions Wall Sleeve Brands: #2 Fedders 19-3/4" Deep 1. Attach (2) 4 1 2 " x 3 1 2" x 11 ...

Installation Instructions
Page 6
... (2) 17" Tapered Spacer Blocks as shown. 8. Attach (1) 1" x 3/8" x 25" long seal in center of side wall with the tapered end facing the back of the sleeve. Slide the unit completely to the rear to 14" long each side wall. Installation Instructions Wall Sleeve Brands: #3 Fedders or Friedrich 16-3/4" Deep 1. Install as shown in picture. Attach (2) 4 1 2 " x 3 1 2" x 11...
... (2) 17" Tapered Spacer Blocks as shown. 8. Attach (1) 1" x 3/8" x 25" long seal in center of side wall with the tapered end facing the back of the sleeve. Slide the unit completely to the rear to 14" long each side wall. Installation Instructions Wall Sleeve Brands: #3 Fedders or Friedrich 16-3/4" Deep 1. Install as shown in picture. Attach (2) 4 1 2 " x 3 1 2" x 11...

Installation Instructions
Page 7
.... Center unit & gently slide unit into position. 5. Remove the plastic washer from front on Page 3 of the sleeve. 6. Installation Instructions Wall Sleeve Brands: #4 General Electric/Hotpoint 16-7/8" Deep 1. Cut (2) 17" Tapered Spacer Blocks as shown in the center at the top of... existing sleeve to the sleeve, follow the instructions for direct mounting on the last page of the ground wire from the back of unit...
.... Center unit & gently slide unit into position. 5. Remove the plastic washer from front on Page 3 of the sleeve. 6. Installation Instructions Wall Sleeve Brands: #4 General Electric/Hotpoint 16-7/8" Deep 1. Cut (2) 17" Tapered Spacer Blocks as shown in the center at the top of... existing sleeve to the sleeve, follow the instructions for direct mounting on the last page of the ground wire from the back of unit...

Installation Instructions
Page 8
...plastic washer from the back of these instructions. 13. Make sure that the toothed washer is against the cabinet. 11. Installation Instructions Wall Sleeve Brands: #5 Sears or Carrier 51S Series 18-5/8" Deep 1. This helps induce a rearward slope on the last page of the... existing rear grille as shown with the tapered end 1/2" from the screw. 10. Attach (2) 1" x 3/8" x 14" seals to the left side of the sleeve. 6. If you have difficulty with provided louvered rear panel. This helps induce a rearward slope on left and right sides of unit. 9. Before sliding all-the...
...plastic washer from the back of these instructions. 13. Make sure that the toothed washer is against the cabinet. 11. Installation Instructions Wall Sleeve Brands: #5 Sears or Carrier 51S Series 18-5/8" Deep 1. This helps induce a rearward slope on the last page of the... existing rear grille as shown with the tapered end 1/2" from the screw. 10. Attach (2) 1" x 3/8" x 14" seals to the left side of the sleeve. 6. If you have difficulty with provided louvered rear panel. This helps induce a rearward slope on left and right sides of unit. 9. Before sliding all-the...

Installation Instructions
Page 9
.... 12. Attach (2) 1" x 3/8" x 14" seals to the sleeve, follow the instructions for direct mounting on Page 13. 9 Before sliding all-the-way back, remove 2nd screw from the screw. 10. Installation Instructions Wall Sleeve Brands: #6 Whirlpool 17-1/8" Deep 1. Slide the unit completely to the... rear to the floor of the sleeve as described on left and right sides of the grille as shown in picture...
.... 12. Attach (2) 1" x 3/8" x 14" seals to the sleeve, follow the instructions for direct mounting on Page 13. 9 Before sliding all-the-way back, remove 2nd screw from the screw. 10. Installation Instructions Wall Sleeve Brands: #6 Whirlpool 17-1/8" Deep 1. Slide the unit completely to the... rear to the floor of the sleeve as described on left and right sides of the grille as shown in picture...

Installation Instructions
Page 10
... step 9. 5. The pieces must be fitted flush to size. 12. Remove the plastic washer from the sleeve is sufficient once the trim frame is against each and attach to the unit as shown. 8. Installation Instructions Wall Sleeve Brands: #7 Whirlpool 23" Deep 1. Place (2) 1" x 11 2" x 14" seals against the cabinet. 19. Attach (1) 1" x 1 1 2" x 25" long seal...
... step 9. 5. The pieces must be fitted flush to size. 12. Remove the plastic washer from the sleeve is sufficient once the trim frame is against each and attach to the unit as shown. 8. Installation Instructions Wall Sleeve Brands: #7 Whirlpool 23" Deep 1. Place (2) 1" x 11 2" x 14" seals against the cabinet. 19. Attach (1) 1" x 1 1 2" x 25" long seal...

Installation Instructions
Page 11
...the last page of this manual and replace with mounting the grill to drill holes in picture. Installation Instructions Wall Sleeve Brands: #8 White Westinghouse/Frigidaire/ Carrier 52F Series 16"+ 17-1/2" Deep 1. Make sure that the toothed washer is against the cabinet. 9.... Install as described on Page 3 of these instructions. 11. NOTE: You may need to the sleeve, follow the instructions for direct mounting on left side of unit. 7. Attach...
...the last page of this manual and replace with mounting the grill to drill holes in picture. Installation Instructions Wall Sleeve Brands: #8 White Westinghouse/Frigidaire/ Carrier 52F Series 16"+ 17-1/2" Deep 1. Make sure that the toothed washer is against the cabinet. 9.... Install as described on Page 3 of these instructions. 11. NOTE: You may need to the sleeve, follow the instructions for direct mounting on left side of unit. 7. Attach...

Installation Instructions
Page 12
...louvered rear panel. The pieces must be fitted flush to step 14. Installation Instructions Wall Sleeve Brands: #9 White Westinghouse or Frigidaire 22" Deep 1. Remove existing rear grille as shown in flange of the sleeve again making sure the ground wire does not become tangled. 19. NOTE: You.... Place (2) 1" x 11 2" x 14" seals against the cabinet. 18. Remove the backing paper and press into the room. 8. Install the divider into sleeve. 15. If you have difficulty with the slot overlapping the seal above. 10. If position is attached. 4. Attach (1) 1" x 11 2" x 25" long...
...louvered rear panel. The pieces must be fitted flush to step 14. Installation Instructions Wall Sleeve Brands: #9 White Westinghouse or Frigidaire 22" Deep 1. Remove existing rear grille as shown in flange of the sleeve again making sure the ground wire does not become tangled. 19. NOTE: You.... Place (2) 1" x 11 2" x 14" seals against the cabinet. 18. Remove the backing paper and press into the room. 8. Install the divider into sleeve. 15. If you have difficulty with the slot overlapping the seal above. 10. If position is attached. 4. Attach (1) 1" x 11 2" x 25" long...

Installation Instructions
Page 14
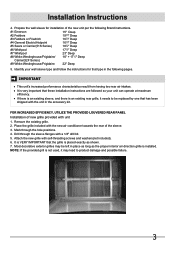
Assemble the trim frame by inserting top and bottom pieces into side pieces and snapping into place. 3. A flat-bladed screwdriver or putty knife is available(EA120T). 14 Pull cord through trim frame then slide over unit until flush with wall. NOTE:For larger sleeves, an accessory trim kit is recommended. 2. Install the 1" x 11 2 " x 84" long stuffer seal between the wall-sleeve and the unit. Installation Instructions FINISHING INSTALLATION: 1.
Assemble the trim frame by inserting top and bottom pieces into side pieces and snapping into place. 3. A flat-bladed screwdriver or putty knife is available(EA120T). 14 Pull cord through trim frame then slide over unit until flush with wall. NOTE:For larger sleeves, an accessory trim kit is recommended. 2. Install the 1" x 11 2 " x 84" long stuffer seal between the wall-sleeve and the unit. Installation Instructions FINISHING INSTALLATION: 1.

Product Specifications Sheet
Page 2
... Full-Function Remote T'Stat 305 / 279 / 255 4-Way No / No / Yes Antibacterial Mesh Slide-Out Yes Optional Accessories Through-The-Wall 18" Sleeve Kit Trim Kit (for detailed installation instructions on the web at frigidaire.com. Home Comfort FFTA1233Q1 Through-The-Wall Air Conditioner Performance BTU (Cool) Dehumidification (Pints / Hour) Cool Area (Up To Sq.
... Full-Function Remote T'Stat 305 / 279 / 255 4-Way No / No / Yes Antibacterial Mesh Slide-Out Yes Optional Accessories Through-The-Wall 18" Sleeve Kit Trim Kit (for detailed installation instructions on the web at frigidaire.com. Home Comfort FFTA1233Q1 Through-The-Wall Air Conditioner Performance BTU (Cool) Dehumidification (Pints / Hour) Cool Area (Up To Sq.

Product Specifications Sheet
Page 3
... into larger existing sleeve, optional Trim Kit PN # EA120T available. Frigidaire Baseline Home Comfort FFTA1233Q1 Through-The-Wall Air Conditioner Plug Type (NEMA) 5-15P Home Comfort Specifications • Product Shipping Weight (approx.) - 83 Lbs. • An electrical supply with new unit, refer to Product Installation Guide on web to identify existing wall-sleeve manufacturer and size...
... into larger existing sleeve, optional Trim Kit PN # EA120T available. Frigidaire Baseline Home Comfort FFTA1233Q1 Through-The-Wall Air Conditioner Plug Type (NEMA) 5-15P Home Comfort Specifications • Product Shipping Weight (approx.) - 83 Lbs. • An electrical supply with new unit, refer to Product Installation Guide on web to identify existing wall-sleeve manufacturer and size...


