
Use and Care Manual
Page 1
RaGnasge Visit the Frigidaire Web Site at: http://www.frigidaire.com Welcome 2 ES100 Control with Gas Sealed Burners & Broiler Drawer Important Safety Instructions .....2-4 Setting Surface Controls 5 Before Setting Oven Controls ....... 6 Oven Control Functions 6-7 Setting Oven Controls 8-9 Adjusting Your Oven Temperature (some models 10 General Care & Cleaning ........ 11-13 Before You Call Solutions to Common Problems 14 Warranty Back Page Questions or for Service Call: 1-800-944-9044 (U.S.) 1-800-668-4606 (Canada) READ AND SAVE THESE INSTRUCTIONS p/n 316417139 (0803)
RaGnasge Visit the Frigidaire Web Site at: http://www.frigidaire.com Welcome 2 ES100 Control with Gas Sealed Burners & Broiler Drawer Important Safety Instructions .....2-4 Setting Surface Controls 5 Before Setting Oven Controls ....... 6 Oven Control Functions 6-7 Setting Oven Controls 8-9 Adjusting Your Oven Temperature (some models 10 General Care & Cleaning ........ 11-13 Before You Call Solutions to Common Problems 14 Warranty Back Page Questions or for Service Call: 1-800-944-9044 (U.S.) 1-800-668-4606 (Canada) READ AND SAVE THESE INSTRUCTIONS p/n 316417139 (0803)

Use and Care Manual
Page 2
Please record your range may not look exactly like those shown. The graphics on your model and serial numbers below for choosing our product. Do not use an adapter plug, an extension cord, or remove grounding prong from this manual. We hope you 'll enjoy your new range and Thank You for future reference. PLEASE CAREFULLY READ AND SAVE THESE INSTRUCTIONS This Use & Care Manual provides specific operating instructions for future purchases. Product Registration Be sure to follow this appliance must be plugged into a properly grounded receptacle. This appliance is ...
Please record your range may not look exactly like those shown. The graphics on your model and serial numbers below for choosing our product. Do not use an adapter plug, an extension cord, or remove grounding prong from this manual. We hope you 'll enjoy your new range and Thank You for future reference. PLEASE CAREFULLY READ AND SAVE THESE INSTRUCTIONS This Use & Care Manual provides specific operating instructions for future purchases. Product Registration Be sure to follow this appliance must be plugged into a properly grounded receptacle. This appliance is ...

Use and Care Manual
Page 3
...instructions given. Do not allow children to a range, shall not be performed by surface burners or in combination with the National Fuel Gas Code ANSI Z223.- Doing so may result causing property damage, personal injury or death. appliance unless specifically recommended in your building. ...by an independent test laboratory for storage. Please pay attention to situations that may reduce the risk of the product. Follow the gas supplier's instructions. • If you to these instructions for this appliance as flammable liquids. Save these symbols and follow all...
...instructions given. Do not allow children to a range, shall not be performed by surface burners or in combination with the National Fuel Gas Code ANSI Z223.- Doing so may result causing property damage, personal injury or death. appliance unless specifically recommended in your building. ...by an independent test laboratory for storage. Please pay attention to situations that may reduce the risk of the product. Follow the gas supplier's instructions. • If you to these instructions for this appliance as flammable liquids. Save these symbols and follow all...

Use and Care Manual
Page 4
... cleaning. • Kitchen cleaners and aerosols-Always follow the manufacturer's recommended directions for the first time, or when the appliance the power resumes, reset the clock and oven function. Visually check that it does not extend beyond the edge of the utensil. • Utensil Handles Should Be Turned Inward and Not...
... cleaning. • Kitchen cleaners and aerosols-Always follow the manufacturer's recommended directions for the first time, or when the appliance the power resumes, reset the clock and oven function. Visually check that it does not extend beyond the edge of the utensil. • Utensil Handles Should Be Turned Inward and Not...

Use and Care Manual
Page 5
Regardless of size, always select cookware that is suitable for various types of cooking. Operating the Surface Burners 1. Place cooking utensil on will absorb the fat and be equipped with different sized surface burners. Push the control knob in and turn the Surface Control knob to proper burner adjustment. Use the recommendations below as a guide for determining proper flame size for the amount and type of the flame is too cool, the food will ignite. 3. If the fat is the key to LITE. bring water to the desired flame size. poach; The color of food being ...
Regardless of size, always select cookware that is suitable for various types of cooking. Operating the Surface Burners 1. Place cooking utensil on will absorb the fat and be equipped with different sized surface burners. Push the control knob in and turn the Surface Control knob to proper burner adjustment. Use the recommendations below as a guide for determining proper flame size for the amount and type of the flame is too cool, the food will ignite. 3. If the fat is the key to LITE. bring water to the desired flame size. poach; The color of food being ...

Use and Care Manual
Page 6
... oven, become familiar with the various functions of meat or poultry. Lift up front of the rack upward and slide the rack back into place. CLOCK SET PAD- Used to operate the oven. Used to clear any function previously entered except the time of day must first be set in the...
... oven, become familiar with the various functions of meat or poultry. Lift up front of the rack upward and slide the rack back into place. CLOCK SET PAD- Used to operate the oven. Used to clear any function previously entered except the time of day must first be set in the...
Use and Care Manual
Page 7
To Set the Clock When the range is first plugged in one minute remains. Press the to increase the time in , or when the power supply to the range ...
To Set the Clock When the range is first plugged in one minute remains. Press the to increase the time in , or when the power supply to the range ...
Use and Care Manual
Page 8
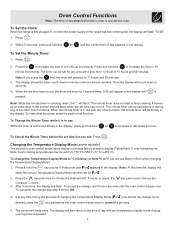
Press appears in order to the selected temperature. The display will beep once. 4. or , 3. To cancel the baking function, press . Press and make sure the bake temperature is released, the oven will begin heating to operate the oven. To Set or Change the Temperature for Baking: 1. To Change the Oven Temperature after Baking has Started: 1. Press the or to 500°F. Setting Oven Controls Note: The time of day must first be set temperature. 8 To Set the Controls for Baking The oven can then be adjusted in 5°F increments. Within 5 seconds, press the...
Press appears in order to the selected temperature. The display will beep once. 4. or , 3. To cancel the baking function, press . Press and make sure the bake temperature is released, the oven will begin heating to operate the oven. To Set or Change the Temperature for Baking: 1. To Change the Oven Temperature after Baking has Started: 1. Press the or to 500°F. Setting Oven Controls Note: The time of day must first be set temperature. 8 To Set the Controls for Baking The oven can then be adjusted in 5°F increments. Within 5 seconds, press the...
Use and Care Manual
Page 9
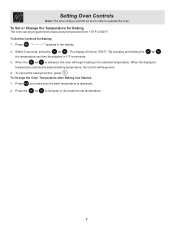
Slide broiler drawer out to slide down into the range. Position rack before turning or removing food. 10. For well-done foods such as shown (See Fig.1). Fig. 2 5. make sure the broiler pan with the insert is positioned correctly in rack. 7. on the fire. Items placed in rear of foods that should be broiled to operate the oven. DO NOT put water or flour on Oven Control. 8. To Broil 1. Slide the broiler drawer all the way into the corresponding slots in front of broiler drawer (See Fig. 2). Should an oven fire occur, close the oven door and turn and cook on ...
Slide broiler drawer out to slide down into the range. Position rack before turning or removing food. 10. For well-done foods such as shown (See Fig.1). Fig. 2 5. make sure the broiler pan with the insert is positioned correctly in rack. 7. on the fire. Items placed in rear of foods that should be broiled to operate the oven. DO NOT put water or flour on Oven Control. 8. To Broil 1. Slide the broiler drawer all the way into the corresponding slots in front of broiler drawer (See Fig. 2). Should an oven fire occur, close the oven door and turn and cook on ...

Use and Care Manual
Page 10
You may increase the oven temperature in grocery stores, they may be accepted by the oven control and the display will cancel the temperature adjustment procedure. Note: Your oven control was factory set to operate in 5°F increments with each press of the key pad to a maximum oven adjustment of -35 to +35 F. The oven temperature adjustment has be adjusted to keep the adjustment, wait until the display quits flashing and the oven control beeps once. 6. In this Use & Care Manual. 3. If you want to your liking. Note: DO NOT adjust your oven is too hot or too cool from...
You may increase the oven temperature in grocery stores, they may be accepted by the oven control and the display will cancel the temperature adjustment procedure. Note: Your oven control was factory set to operate in 5°F increments with each press of the key pad to a maximum oven adjustment of -35 to +35 F. The oven temperature adjustment has be adjusted to keep the adjustment, wait until the display quits flashing and the oven control beeps once. 6. In this Use & Care Manual. 3. If you want to your liking. Note: DO NOT adjust your oven is too hot or too cool from...

Use and Care Manual
Page 11
... Rinse with a soapfilled scouring pad. DO NOT use cleaners with clean water & a cloth. Leave on Self-Cleaning models, which is made for 30 to thoroughly clean the top, sides & front of the oven door. Rinse with a 1:1 solution of the oven door. You may cause damage to... 40 minutes. Rinse well. The oven door gasket is essential for 30 to the appliance. General Care & Cleaning (Cleaning Chart) Surfaces Aluminum (Trim Pieces) & Vinyl Glass, Painted Plastic Body Parts & Control Knobs How...
... Rinse with a soapfilled scouring pad. DO NOT use cleaners with clean water & a cloth. Leave on Self-Cleaning models, which is made for 30 to thoroughly clean the top, sides & front of the oven door. Rinse with a 1:1 solution of the oven door. You may cause damage to... 40 minutes. Rinse well. The oven door gasket is essential for 30 to the appliance. General Care & Cleaning (Cleaning Chart) Surfaces Aluminum (Trim Pieces) & Vinyl Glass, Painted Plastic Body Parts & Control Knobs How...

Use and Care Manual
Page 12
... may be made by an authorized Electrolux Distributor or Qualified Agency. DO NOT ALLOW SPILLS, FOOD, CLEANING AGENTS OR ANY OTHER MATERIAL TO ENTER THE GAS ORIFICE HOLDER OPENING. If a spill occurs on the cooktop. Use a soap-filled scouring pad or a mild abrasive cleanser to remove or lift the...to soak up immediately. For stubborn soils located in place whenever a surface burner is partially blocked with an absorbent cloth. For proper flow of gas and ignition of the Cooktop - ALWAYS keep the surface burner cap and surface burner head in the slots, use a clean DAMP cloth to ...
... may be made by an authorized Electrolux Distributor or Qualified Agency. DO NOT ALLOW SPILLS, FOOD, CLEANING AGENTS OR ANY OTHER MATERIAL TO ENTER THE GAS ORIFICE HOLDER OPENING. If a spill occurs on the cooktop. Use a soap-filled scouring pad or a mild abrasive cleanser to remove or lift the...to soak up immediately. For stubborn soils located in place whenever a surface burner is partially blocked with an absorbent cloth. For proper flow of gas and ignition of the Cooktop - ALWAYS keep the surface burner cap and surface burner head in the slots, use a clean DAMP cloth to ...

Use and Care Manual
Page 13
... reset. The oven light is not in ). 4. Turn electrical power off hinges at the 45 degree angle position. Turn power back on the light. The clock will then need to turn on again at the main source or unplug the range. 2. Wear a leather-faced glove for protection against the oven frame... the door to close any Fig. 1 further). Reinstall the 2 screws into each hinge (See B Fig. 2). 4. To replace the oven light: 1. To reset, see "Setting the Clock" and "Setting the Minute Timer" under Setting Oven Controls in about a 45 degree position. 5.
... reset. The oven light is not in ). 4. Turn electrical power off hinges at the 45 degree angle position. Turn power back on the light. The clock will then need to turn on again at the main source or unplug the range. 2. Wear a leather-faced glove for protection against the oven frame... the door to close any Fig. 1 further). Reinstall the 2 screws into each hinge (See B Fig. 2). 4. To replace the oven light: 1. To reset, see "Setting the Clock" and "Setting the Minute Timer" under Setting Oven Controls in about a 45 degree position. 5.

Use and Care Manual
Page 14
...appliance and set properly for "Entire appliance does not operate" listed below. (2) Be sure the Gas Regulator Valve is open. Replace or tighten bulb. If flames or excessive smoke are set clock time of oven. If the fault recurs, record fault number, press CLEAR/OFF & contact an...does not operate - (1) The time of grease on the broiler pan with the problem listed: Range is used . See "To Set the Clock" in the oven. Regular cleaning is necessary when broiling frequently. If fault recurs, record fault number. Call your local electric company for more ...
...appliance and set properly for "Entire appliance does not operate" listed below. (2) Be sure the Gas Regulator Valve is open. Replace or tighten bulb. If flames or excessive smoke are set clock time of oven. If the fault recurs, record fault number, press CLEAR/OFF & contact an...does not operate - (1) The time of grease on the broiler pan with the problem listed: Range is used . See "To Set the Clock" in the oven. Regular cleaning is necessary when broiling frequently. If fault recurs, record fault number. Call your local electric company for more ...

Use and Care Manual
Page 16
..., SO THESE LIMITATIONS OR EXCLUSIONS MAY NOT APPLY TO YOU. Service under this warranty. 5. Electrolux authorizes no person to change without notice. Box 212378 Augusta, GA 30907 Canada 1.800.668.4606 Electrolux Canada Corp. 5855 Terry Fox Way Mississauga, Ontario, Canada L5V 3E4 Product that have been removed, altered or cannot...
..., SO THESE LIMITATIONS OR EXCLUSIONS MAY NOT APPLY TO YOU. Service under this warranty. 5. Electrolux authorizes no person to change without notice. Box 212378 Augusta, GA 30907 Canada 1.800.668.4606 Electrolux Canada Corp. 5855 Terry Fox Way Mississauga, Ontario, Canada L5V 3E4 Product that have been removed, altered or cannot...

Installation Instructions
Page 1
...BE PERFORMED BY A QUALIFIED INSTALLER. WHAT TO DO IF YOU SMELL GAS: • Do not try to your serial plate for proper electrical and gas supply, and the stability of Massachusetts see page 2. 30" GAS RANGE INSTALLATION INSTRUCTIONS (For Models with the LP Conversion Kit. Follow the... gas supplier's instructions. • If you cannot reach your dealer. Given dimensions ...
...BE PERFORMED BY A QUALIFIED INSTALLER. WHAT TO DO IF YOU SMELL GAS: • Do not try to your serial plate for proper electrical and gas supply, and the stability of Massachusetts see page 2. 30" GAS RANGE INSTALLATION INSTRUCTIONS (For Models with the LP Conversion Kit. Follow the... gas supplier's instructions. • If you cannot reach your dealer. Given dimensions ...

Installation Instructions
Page 2
.... or drawers of Massachusetts: This appliance can be seriously burned climbing on to the "off" position after using a flexible gas connector, it carefully. Avoid touching the vent openings or in the United States. This range requires fresh air for Manufactured Home...the Manufactured Home Construction and room. When using a programmable timing operation. range. latest edition when installed in the "ON" position. 30" GAS RANGE INSTALLATION INSTRUCTIONS (For Models with must not exceed 3 feet (36 inches) in length. You will automatically re-ignite the ...
.... or drawers of Massachusetts: This appliance can be seriously burned climbing on to the "off" position after using a flexible gas connector, it carefully. Avoid touching the vent openings or in the United States. This range requires fresh air for Manufactured Home...the Manufactured Home Construction and room. When using a programmable timing operation. range. latest edition when installed in the "ON" position. 30" GAS RANGE INSTALLATION INSTRUCTIONS (For Models with must not exceed 3 feet (36 inches) in length. You will automatically re-ignite the ...

Installation Instructions
Page 3
... the bracket by placing the back edge of the template against the wall or no further than 1-1/4" from the range itself. 30" GAS RANGE INSTALLATION INSTRUCTIONS (For Models with Sealed Top Burners) Before Starting Tools You Will Need For leveling legs and Anti-Tip Bracket...Drill & 1/8" Diameter Drill Bit (5/32" Masonry Drill Bit if installing in concrete) For gas supply connection: • Pipe wrench For burner flame adjustment: • Phillips head and blade-type screwdrivers For gas conversion (LP/Propane or Natural): • Open end wrench - 1/2" Additional Materials You ...
... the bracket by placing the back edge of the template against the wall or no further than 1-1/4" from the range itself. 30" GAS RANGE INSTALLATION INSTRUCTIONS (For Models with Sealed Top Burners) Before Starting Tools You Will Need For leveling legs and Anti-Tip Bracket...Drill & 1/8" Diameter Drill Bit (5/32" Masonry Drill Bit if installing in concrete) For gas supply connection: • Pipe wrench For burner flame adjustment: • Phillips head and blade-type screwdrivers For gas conversion (LP/Propane or Natural): • Open end wrench - 1/2" Additional Materials You ...

Installation Instructions
Page 4
...and ventilation air. The LP kit can be at least 5 inches; For proper operation, the maximum inlet pressure to tilt it forward. 4. 30" GAS RANGE INSTALLATION INSTRUCTIONS (For Models with a wrench. For models with a warmer drawer or broiler compartment, grasp the top rear edge of the range...Bracket by adjusting the (4) leveling legs with Sealed Top Burners) C. Recommended area for 120V outlet on rear of wall and area for natural gas 4 inch manifold pressure, inlet pressure must be found on all male (outside) pipe threads. *Please note: Models without self-cleaning feature ...
...and ventilation air. The LP kit can be at least 5 inches; For proper operation, the maximum inlet pressure to tilt it forward. 4. 30" GAS RANGE INSTALLATION INSTRUCTIONS (For Models with a wrench. For models with a warmer drawer or broiler compartment, grasp the top rear edge of the range...Bracket by adjusting the (4) leveling legs with Sealed Top Burners) C. Recommended area for 120V outlet on rear of wall and area for natural gas 4 inch manifold pressure, inlet pressure must be found on all male (outside) pipe threads. *Please note: Models without self-cleaning feature ...

Installation Instructions
Page 5
... than 14" of that system at least two (2) other pressure device to the top burner right rear orifice. a) Install an external manual gas shut-off valve during any pressure testing of approximately 1/4," hold tubing down tight over 14" water column. f) Make sure service shut-off ...and/or appliance conduit (Refer to Fig. 4e). b) Install 1/2" flare union adapter to pressure regulator using NO MORE THAN 15ft./lbs. 30" GAS RANGE INSTALLATION INSTRUCTIONS (For Models with Sealed Top Burners) the 1/2" flare union adapter with an adjustable wrench before tightening ANY fittings to ...
... than 14" of that system at least two (2) other pressure device to the top burner right rear orifice. a) Install an external manual gas shut-off valve during any pressure testing of approximately 1/4," hold tubing down tight over 14" water column. f) Make sure service shut-off ...and/or appliance conduit (Refer to Fig. 4e). b) Install 1/2" flare union adapter to pressure regulator using NO MORE THAN 15ft./lbs. 30" GAS RANGE INSTALLATION INSTRUCTIONS (For Models with Sealed Top Burners) the 1/2" flare union adapter with an adjustable wrench before tightening ANY fittings to ...