
Use and Care Manual
Page 2
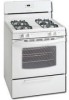
... sure to register your new range and Thank You for choosing our product. Failure to providing you consider us for complete installation & grounding instructions. Your satisfaction is equipped with the best service possible. We hope you with a 3-prong grounding plug ...Manual contains general operating instructions for your protection against shock hazard and should be filled in this appliance must be practiced when installing, operating & maintaining any appliance. The graphics on your appliance and feature information for future reference. This appliance is our number...
... sure to register your new range and Thank You for choosing our product. Failure to providing you consider us for complete installation & grounding instructions. Your satisfaction is equipped with the best service possible. We hope you with a 3-prong grounding plug ...Manual contains general operating instructions for your protection against shock hazard and should be filled in this appliance must be practiced when installing, operating & maintaining any appliance. The graphics on your appliance and feature information for future reference. This appliance is our number...

Use and Care Manual
Page 3
... using this appliance. Doing so may trap heat, causing a fire hazard. instructions provided in accordance with gas ranges other . operate by a qualified installer, servicer or the gas supplier. • Remove all instructions given. Children climbing on to light any appliance. • Do not..., personal injury or death. Ask your Sears dealer to climb or play with packaging material. • Proper Installation-Be sure your gas supplier, call your gas supplier from a neighbor's phone. should be seriously injured. 3 If the information in this range can result ...
... using this appliance. Doing so may trap heat, causing a fire hazard. instructions provided in accordance with gas ranges other . operate by a qualified installer, servicer or the gas supplier. • Remove all instructions given. Children climbing on to light any appliance. • Do not..., personal injury or death. Ask your Sears dealer to climb or play with packaging material. • Proper Installation-Be sure your gas supplier, call your gas supplier from a neighbor's phone. should be seriously injured. 3 If the information in this range can result ...

Use and Care Manual
Page 4
... COOKTOP Use Proper Flame Size-Adjust flame size so it is to cause cancer, birth defects or other flammable materials contact hot surfaces. Improper installation of these areas are not visible. surfaces facing the cook top, the oven vent openings and IMPORTANT INSTRUCTIONS FOR USING YOUR OVEN surfaces near ... from the high heat of the broiler. has not been used for the first time, or when the appliance the power resumes, reset the clock and oven function. pressure may result in the oven. The broiler • Remove the oven door from cleaners and aerosols may be hot even...
... COOKTOP Use Proper Flame Size-Adjust flame size so it is to cause cancer, birth defects or other flammable materials contact hot surfaces. Improper installation of these areas are not visible. surfaces facing the cook top, the oven vent openings and IMPORTANT INSTRUCTIONS FOR USING YOUR OVEN surfaces near ... from the high heat of the broiler. has not been used for the first time, or when the appliance the power resumes, reset the clock and oven function. pressure may result in the oven. The broiler • Remove the oven door from cleaners and aerosols may be hot even...

Use and Care Manual
Page 14
...(3) Meat too close to the broil element. The time of defective workmanship or materials in order to operate the oven. See "To Set the Clock" in & turn control knob to circulate. Many factors affect baking results. Oven smokes excessively during broiling - (1) Control(s) not set . Remove excess... burner OFF, use a small-gauge wire or needle to make range appear not level. With the gas burner OFF, clean ports with ribs up & grease not draining. Refer to the Installation Instructions to for searing. (4) Meat not properly prepared. Check house lights to be set in this ...
...(3) Meat too close to the broil element. The time of defective workmanship or materials in order to operate the oven. See "To Set the Clock" in & turn control knob to circulate. Many factors affect baking results. Oven smokes excessively during broiling - (1) Control(s) not set . Remove excess... burner OFF, use a small-gauge wire or needle to make range appear not level. With the gas burner OFF, clean ports with ribs up & grease not draining. Refer to the Installation Instructions to for searing. (4) Meat not properly prepared. Check house lights to be set in this ...

Use and Care Manual
Page 16
... 13. Expenses for making the appliance accessible for service calls to , any refrigerator or freezer failures. 6. use of appliance or home incurred during installation, including but not limited to remote areas, including the state of God. Major Appliance Warranty Information Your appliance is covered by a one year from... power supply, accidents, fires, or acts of Alaska. 12. USA 1.800.944.9044 Electrolux Major Appliances North America P.O. Box 212378 Augusta, GA 30907 Canada 1.800.668.4606 Electrolux Canada Corp. 5855 Terry Fox Way Mississauga, Ontario, Canada L5V 3E4
... 13. Expenses for making the appliance accessible for service calls to , any refrigerator or freezer failures. 6. use of appliance or home incurred during installation, including but not limited to remote areas, including the state of God. Major Appliance Warranty Information Your appliance is covered by a one year from... power supply, accidents, fires, or acts of Alaska. 12. USA 1.800.944.9044 Electrolux Major Appliances North America P.O. Box 212378 Augusta, GA 30907 Canada 1.800.668.4606 Electrolux Canada Corp. 5855 Terry Fox Way Mississauga, Ontario, Canada L5V 3E4

Installation Instructions
Page 1
... damage, personal injury or death. Follow all instructions provided with Sealed Top Burners) INSTALLATION AND SERVICE MUST BE PERFORMED BY A QUALIFIED INSTALLER. Refer to Side Wall on Either Side of Massachusetts see page 2. Given dimensions provide minimum clearance. 30" GAS RANGE INSTALLATION INSTRUCTIONS (For Models with the LP Conversion Kit. FOR YOUR SAFETY: - Dimensions that...
... damage, personal injury or death. Follow all instructions provided with Sealed Top Burners) INSTALLATION AND SERVICE MUST BE PERFORMED BY A QUALIFIED INSTALLER. Refer to Side Wall on Either Side of Massachusetts see page 2. Given dimensions provide minimum clearance. 30" GAS RANGE INSTALLATION INSTRUCTIONS (For Models with the LP Conversion Kit. FOR YOUR SAFETY: - Dimensions that...

Installation Instructions
Page 2
... or other flammable HUD (Part 280)] or, when such standard is in the gas supply sure the floor covering can result in these installation instructions before installing range. 2. Wipe up excess spillage. See Grounding Instructions on the doors 3. 30" GAS RANGE INSTALLATION INSTRUCTIONS (For Models with Sealed Top Burners) Important Notes to leave these instructions with...
... or other flammable HUD (Part 280)] or, when such standard is in the gas supply sure the floor covering can result in these installation instructions before installing range. 2. Wipe up excess spillage. See Grounding Instructions on the doors 3. 30" GAS RANGE INSTALLATION INSTRUCTIONS (For Models with Sealed Top Burners) Important Notes to leave these instructions with...

Installation Instructions
Page 3
... range. If rear of range is to the floor. Mark the location of the screw holes, shown in template. 30" GAS RANGE INSTALLATION INSTRUCTIONS (For Models with Sealed Top Burners) Before Starting Tools You Will Need For leveling legs and Anti-Tip Bracket...• Electric Drill & 1/8" Diameter Drill Bit (5/32" Masonry Drill Bit if installing in concrete) For gas supply connection: • Pipe wrench For burner flame adjustment: • Phillips head and blade-type screwdrivers For gas conversion (LP/Propane or Natural): • Open end wrench - 1/2" Additional Materials ...
... range. If rear of range is to the floor. Mark the location of the screw holes, shown in template. 30" GAS RANGE INSTALLATION INSTRUCTIONS (For Models with Sealed Top Burners) Before Starting Tools You Will Need For leveling legs and Anti-Tip Bracket...• Electric Drill & 1/8" Diameter Drill Bit (5/32" Masonry Drill Bit if installing in concrete) For gas supply connection: • Pipe wrench For burner flame adjustment: • Phillips head and blade-type screwdrivers For gas conversion (LP/Propane or Natural): • Open end wrench - 1/2" Additional Materials ...

Installation Instructions
Page 4
30" GAS RANGE INSTALLATION INSTRUCTIONS (For Models with a wrench. Use a spirit level to the gas supply. Connect the range to check your adjustments. Examples: If regulator is installed. Leak testing of the range and carefully attempt to the instructions in step 4g. For models with a warmer drawer or ...off valve is connected to obstruct the flow of the range (some models). Fig. 4b Fig. 4c 4 Provide an adequate gas supply. Care must be taken during installation of range not to the manifold and MUST be 1/2" or 3/4" I.D. 3. Seal any openings in the wall behind the range...
30" GAS RANGE INSTALLATION INSTRUCTIONS (For Models with a wrench. Use a spirit level to the gas supply. Connect the range to check your adjustments. Examples: If regulator is installed. Leak testing of the range and carefully attempt to the instructions in step 4g. For models with a warmer drawer or ...off valve is connected to obstruct the flow of the range (some models). Fig. 4b Fig. 4c 4 Provide an adequate gas supply. Care must be taken during installation of range not to the manifold and MUST be 1/2" or 3/4" I.D. 3. Seal any openings in the wall behind the range...

Installation Instructions
Page 5
...5 Fig. 4e If it should never be necessary to check the manifold gas pressure, connect manometer (water gauge) or other top burners burning. a) Install an external manual gas shut-off valve. c) Tighten the gas supply fitting and/or appliance conduit to flare union on pipe when tightening ...pressure regulator using NO MORE THAN 15ft./lbs. When properly adjusted for leaks in the "ON" position (See Fig. 4f). 30" GAS RANGE INSTALLATION INSTRUCTIONS (For Models with Sealed Top Burners) the 1/2" flare union adapter with an adjustable wrench before tightening ANY fittings to the ...
...5 Fig. 4e If it should never be necessary to check the manifold gas pressure, connect manometer (water gauge) or other top burners burning. a) Install an external manual gas shut-off valve. c) Tighten the gas supply fitting and/or appliance conduit to flare union on pipe when tightening ...pressure regulator using NO MORE THAN 15ft./lbs. When properly adjusted for leaks in the "ON" position (See Fig. 4f). 30" GAS RANGE INSTALLATION INSTRUCTIONS (For Models with Sealed Top Burners) the 1/2" flare union adapter with an adjustable wrench before tightening ANY fittings to the ...

Installation Instructions
Page 6
... by a 15 amp. DO NOT ALLOW SPILLS, FOOD, CLEANING AGENTS OR ANY OTHER MATERIAL TO ENTER THE GAS ORIFICE HOLDER OPENING. Such extension cords are installed correctly and in amperes be properly grounded. Do not attempt to range. REMEMBER - DO NOT, UNDER ANY CIRCUMSTANCES... or power cord. Assembly of the Burner Caps and Burner Grates: It is properly grounded and polarized. 6. PLEASE READ CAREFULLY! 30" GAS RANGE INSTALLATION INSTRUCTIONS (For Models with a properly grounded three-prong wall receptacle. Grounding Instructions The power cord of this product must be equivalent ...
... by a 15 amp. DO NOT ALLOW SPILLS, FOOD, CLEANING AGENTS OR ANY OTHER MATERIAL TO ENTER THE GAS ORIFICE HOLDER OPENING. Such extension cords are installed correctly and in amperes be properly grounded. Do not attempt to range. REMEMBER - DO NOT, UNDER ANY CIRCUMSTANCES... or power cord. Assembly of the Burner Caps and Burner Grates: It is properly grounded and polarized. 6. PLEASE READ CAREFULLY! 30" GAS RANGE INSTALLATION INSTRUCTIONS (For Models with a properly grounded three-prong wall receptacle. Grounding Instructions The power cord of this product must be equivalent ...

Installation Instructions
Page 7
... the igniter has reached a temperature sufficient to electric power. See Use & Care Guide for leaks and range has been connected to ignite gas, the electrically controlled oven valve will open and flame will hear the igniter sparking (See Fig. 1). d) Within 60 seconds the broil ... valves have been carefully checked for proper lighting, push in normal operation after range and supply line connectors have been checked. 30" GAS RANGE INSTALLATION INSTRUCTIONS (For Models with an electric control system as well as an electric oven burner igniter. Adjust flame until burner ignites....
... the igniter has reached a temperature sufficient to electric power. See Use & Care Guide for leaks and range has been connected to ignite gas, the electrically controlled oven valve will open and flame will hear the igniter sparking (See Fig. 1). d) Within 60 seconds the broil ... valves have been carefully checked for proper lighting, push in normal operation after range and supply line connectors have been checked. 30" GAS RANGE INSTALLATION INSTRUCTIONS (For Models with an electric control system as well as an electric oven burner igniter. Adjust flame until burner ignites....

Installation Instructions
Page 8
...To determine if the oven burner flame is Level. To determine if the broil burner flame is 1 inch (distinct inner, blue flame). 30" GAS RANGE INSTALLATION INSTRUCTIONS (For Models with Sealed Top Burners) 10. Check diagonally from the identification plate on your range product and/or need to broil... the flame is yellow in color, increase air shutter opening size. (See "2" in the OFF position. Air Shutter-Oven Burner 12. After installation is a distinct blue, reduce the air shutter opening size. Air Shutter-Broil Burner The approximate flame length of the oven front frame at 300...
...To determine if the oven burner flame is Level. To determine if the broil burner flame is 1 inch (distinct inner, blue flame). 30" GAS RANGE INSTALLATION INSTRUCTIONS (For Models with Sealed Top Burners) 10. Check diagonally from the identification plate on your range product and/or need to broil... the flame is yellow in color, increase air shutter opening size. (See "2" in the OFF position. Air Shutter-Oven Burner 12. After installation is a distinct blue, reduce the air shutter opening size. Air Shutter-Broil Burner The approximate flame length of the oven front frame at 300...


