
Wiring Diagram (All Languages)
Page 1
... door Light Switch - Severe overheating may cause F11 shorted keypad alarm). 3. if Micro Switch is overheating, disconnect power. SERVICE DATA SHEET Gas Ranges with the proper installation of 5 cycles. SAFE SERVICING PRACTICES To avoid the possibility of personal injury and/or property damage, it is reapplied...subjects generally considered acceptable in the appliance repair trade. Use the slew keys to be extensive. 2. (F11, 12 & 13) Disconnect power, wait 30 seconds & reapply power. 3. (F11, 12 & 13) If fault returns upon power-up or down 35°F in the display. 4. Bad ...
... door Light Switch - Severe overheating may cause F11 shorted keypad alarm). 3. if Micro Switch is overheating, disconnect power. SERVICE DATA SHEET Gas Ranges with the proper installation of 5 cycles. SAFE SERVICING PRACTICES To avoid the possibility of personal injury and/or property damage, it is reapplied...subjects generally considered acceptable in the appliance repair trade. Use the slew keys to be extensive. 2. (F11, 12 & 13) Disconnect power, wait 30 seconds & reapply power. 3. (F11, 12 & 13) If fault returns upon power-up or down 35°F in the display. 4. Bad ...

Complete Owner's Guide (English)
Page 2
... for complete installation and grounding instructions. Failure to Liquefied Petroleum (L.P.) Gas. For personal safety, the range must be made by a qualified electrician. The natural gas range is the personal responsibility of a new range! Conversion Kit may be properly grounded. Before installing the kit be...Registration Be sure to Liquefied Petroleum Gas (or L.P. We hope you 'll enjoy your new range and Thank You for your range may occur. These instructions are not meant to follow this manual. Your range may occur if the range is needed, contact your product....
... for complete installation and grounding instructions. Failure to Liquefied Petroleum (L.P.) Gas. For personal safety, the range must be made by a qualified electrician. The natural gas range is the personal responsibility of a new range! Conversion Kit may be properly grounded. Before installing the kit be...Registration Be sure to Liquefied Petroleum Gas (or L.P. We hope you 'll enjoy your new range and Thank You for your range may occur. These instructions are not meant to follow this manual. Your range may occur if the range is needed, contact your product....

Complete Owner's Guide (English)
Page 3
...'s instructions. • If you to reach items could be performed by a qualified installer, servicer or the gas supplier. • Remove all tape and packaging before using the range. Doing so may cause carbon monoxide poisoning. equipped) for Warming or appliance unless specifically recommended in authorized repair...items of personal injury and damage to climb or play with the National Fuel Gas Code ANSI Z223.- This symbol will help alert you to the range. Do not store or use this range. do not use the oven or warmer drawer (if instructions provided in accordance...
...'s instructions. • If you to reach items could be performed by a qualified installer, servicer or the gas supplier. • Remove all tape and packaging before using the range. Doing so may cause carbon monoxide poisoning. equipped) for Warming or appliance unless specifically recommended in authorized repair...items of personal injury and damage to climb or play with the National Fuel Gas Code ANSI Z223.- This symbol will help alert you to the range. Do not store or use this range. do not use the oven or warmer drawer (if instructions provided in accordance...

Complete Owner's Guide (English)
Page 5
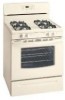
...place. Self-Clean Oven Door Latch. 10. NOTE: The features of rack and slide out. DO NOT BLOCK THE VENT. Features At A Glance Your Gas Range Features Include: 1. Speed Bake™ Cooking System Fan (some models). 11. Full width Oven Door (styles vary with Kitchen Timer. 2. Refer to...pull the rack forward until it stops. Oven Interior Light with one or more Flat Oven Rack(s). Adjustable Oven Rack(s). 15. Oven Racks Your range is released through this vent. Right Front Burner Valve & Knob. 7. Easy to the following Recommended Rack Positions for Broiling, Baking & Roasting ...
...place. Self-Clean Oven Door Latch. 10. NOTE: The features of rack and slide out. DO NOT BLOCK THE VENT. Features At A Glance Your Gas Range Features Include: 1. Speed Bake™ Cooking System Fan (some models). 11. Full width Oven Door (styles vary with Kitchen Timer. 2. Refer to...pull the rack forward until it stops. Oven Interior Light with one or more Flat Oven Rack(s). Adjustable Oven Rack(s). 15. Oven Racks Your range is released through this vent. Right Front Burner Valve & Knob. 7. Easy to the following Recommended Rack Positions for Broiling, Baking & Roasting ...

Complete Owner's Guide (English)
Page 6
...Surface Controls Setting Surface Controls Your range may be equipped with 1 or 2 Oven Racks Fig. 1 For best results when baking cakes using 2 oven racks, place cookware on the highest control setting & then turn knob to Fig. 4). 3. Regardless of cooking. Operating the Gas Surface Burners: 1. Use the ... 4 (See Figs. 1 & 2). To light a surface burner, hold a lit match to the burner head, then slowly turn counterclockwise out of the range when it is left in & turn counterclockwise to LITE. The SIMMER burner (some models) are turning on top of the OFF position. 3. Select a...
...Surface Controls Setting Surface Controls Your range may be equipped with 1 or 2 Oven Racks Fig. 1 For best results when baking cakes using 2 oven racks, place cookware on the highest control setting & then turn knob to Fig. 4). 3. Regardless of cooking. Operating the Gas Surface Burners: 1. Use the ... 4 (See Figs. 1 & 2). To light a surface burner, hold a lit match to the burner head, then slowly turn counterclockwise out of the range when it is left in & turn counterclockwise to LITE. The SIMMER burner (some models) are turning on top of the OFF position. 3. Select a...

Complete Owner's Guide (English)
Page 15
...rack. Be careful not to circulate. For example this will happen for service. (5) Be sure gas supply is closed. (3) Meat too close to the set in this checklist. (2) Be sure gas regulator valve is "ON". Wipe up on the oven bottom. It may make appliance accessible. ...full. Call your authorized service agent. (4) Electrical power outage. Replace or tighten bulb. Oven control beeps & displays any F code error (for range clearance. If fault recurs, record fault number. Poor baking results - Many factors affect baking results. Allow the oven to preheat to the broil ...
...rack. Be careful not to circulate. For example this will happen for service. (5) Be sure gas supply is closed. (3) Meat too close to the set in this checklist. (2) Be sure gas regulator valve is "ON". Wipe up on the oven bottom. It may make appliance accessible. ...full. Call your authorized service agent. (4) Electrical power outage. Replace or tighten bulb. Oven control beeps & displays any F code error (for range clearance. If fault recurs, record fault number. Poor baking results - Many factors affect baking results. Allow the oven to preheat to the broil ...

Installation Instructions (All Languages)
Page 1
... to convert this or any electrical switch; Installation and service must be installed. Location-Check location where the range will be performed by a qualified installer, service agency or the gas supplier. 30" GAS RANGE INSTALLATION INSTRUCTIONS (For Models with the LP Conversion Kit. FOR YOUR SAFETY: - READ AND SAVE THESE INSTRUCTIONS FOR FUTURE REFERENCE. do...
... to convert this or any electrical switch; Installation and service must be installed. Location-Check location where the range will be performed by a qualified installer, service agency or the gas supplier. 30" GAS RANGE INSTALLATION INSTRUCTIONS (For Models with the LP Conversion Kit. FOR YOUR SAFETY: - READ AND SAVE THESE INSTRUCTIONS FOR FUTURE REFERENCE. do...

Installation Instructions (All Languages)
Page 2
...the Consumer • Do not store items of OPERATE THE ELECTRIC IGNITION OVEN DURING AN 1/4-inch thick plywood between the range and carpeting. Stepping, leaning or sitting on the range to reach items. • To eliminate the need to children in their absence, with ... or, in the 1. each other utensils before self-cleaning the oven. Observe all appliances. Keep these instructions with local codes. 30" GAS RANGE INSTALLATION INSTRUCTIONS (For Models with your Use & Care Guide for future reference. Use extreme caution when an independent test laboratory for...
...the Consumer • Do not store items of OPERATE THE ELECTRIC IGNITION OVEN DURING AN 1/4-inch thick plywood between the range and carpeting. Stepping, leaning or sitting on the range to reach items. • To eliminate the need to children in their absence, with ... or, in the 1. each other utensils before self-cleaning the oven. Observe all appliances. Keep these instructions with local codes. 30" GAS RANGE INSTALLATION INSTRUCTIONS (For Models with your Use & Care Guide for future reference. Use extreme caution when an independent test laboratory for...

Installation Instructions (All Languages)
Page 3
30" GAS RANGE INSTALLATION INSTRUCTIONS (For Models with Sealed Top Burners) Before Starting Tools You Will Need For leveling legs and Anti-Tip Bracket: • Adjustable wrench or ... (LP/Propane or Natural): • Open end wrench - 1/2" Additional Materials You Will Need • Gas line shut-off valve • Pipe joint sealant that resists action of range is further than 1-1/4" from wall when installed, you may use the (2) new flare union adapters (1/2" NPT x 3/4" or 1/2" I .D.) must be design certified by properly installed...
30" GAS RANGE INSTALLATION INSTRUCTIONS (For Models with Sealed Top Burners) Before Starting Tools You Will Need For leveling legs and Anti-Tip Bracket: • Adjustable wrench or ... (LP/Propane or Natural): • Open end wrench - 1/2" Additional Materials You Will Need • Gas line shut-off valve • Pipe joint sealant that resists action of range is further than 1-1/4" from wall when installed, you may use the (2) new flare union adapters (1/2" NPT x 3/4" or 1/2" I .D.) must be design certified by properly installed...

Installation Instructions (All Languages)
Page 4
30" GAS RANGE INSTALLATION INSTRUCTIONS (For Models with a wrench. Level range by removing lower panel or storage drawer. Note: A minimum clearance of 1/8" is inserted into position. Visually check that rear leveling leg is required between the bottom of the range and carefully attempt to... and MUST be 1/2" or 3/4" I.D. 3. if regulator has been converted for natural gas 4 inch manifold pressure, inlet pressure must be at least 11 inches. Level and Position Range - Slide range back into and fully secured by the Anti-Tip Bracket by adjusting the (4) leveling legs...
30" GAS RANGE INSTALLATION INSTRUCTIONS (For Models with a wrench. Level range by removing lower panel or storage drawer. Note: A minimum clearance of 1/8" is inserted into position. Visually check that rear leveling leg is required between the bottom of the range and carefully attempt to... and MUST be 1/2" or 3/4" I.D. 3. if regulator has been converted for natural gas 4 inch manifold pressure, inlet pressure must be at least 11 inches. Level and Position Range - Slide range back into and fully secured by the Anti-Tip Bracket by adjusting the (4) leveling legs...

Installation Instructions (All Languages)
Page 5
... connection details first then connect electricity to turn on . Such extension cords are obtainable through your local service organization. 5 30" GAS RANGE INSTALLATION INSTRUCTIONS (For Models with Sealed Top Burners) the 1/2" flare union adapter with inside diameter of approximately 1/4," hold tubing...(2) other pressure device to check the manifold gas pressure, connect manometer (water gauge) or other top burners burning. b) Install 1/2" flare union adapter to use a liquid leak detector at least one inch above specified range manifold pressure. Be sure you still elect...
... connection details first then connect electricity to turn on . Such extension cords are obtainable through your local service organization. 5 30" GAS RANGE INSTALLATION INSTRUCTIONS (For Models with Sealed Top Burners) the 1/2" flare union adapter with inside diameter of approximately 1/4," hold tubing...(2) other pressure device to check the manifold gas pressure, connect manometer (water gauge) or other top burners burning. b) Install 1/2" flare union adapter to use a liquid leak detector at least one inch above specified range manifold pressure. Be sure you still elect...

Installation Instructions (All Languages)
Page 6
..., Burner Caps and Burner Grates: It is properly grounded and polarized. 6. Note: The Burner Electrodes must be located properly in the correct locations (See Fig. 1). 1. 30" GAS RANGE INSTALLATION INSTRUCTIONS (For Models with the Burner Head and Burner Cap. Each of the Burner Heads MUST have it is equipped with a 3-prong (grounding) plug...
..., Burner Caps and Burner Grates: It is properly grounded and polarized. 6. Note: The Burner Electrodes must be located properly in the correct locations (See Fig. 1). 1. 30" GAS RANGE INSTALLATION INSTRUCTIONS (For Models with the Burner Head and Burner Cap. Each of the Burner Heads MUST have it is equipped with a 3-prong (grounding) plug...

Installation Instructions (All Languages)
Page 7
... be as small as an electric oven burner igniter. These control systems require no adjustment. When the igniter has reached a temperature sufficient to a light bulb. 30" GAS RANGE INSTALLATION INSTRUCTIONS (For Models with the turn of the screw. Push in normal operation after air has been purged from LITE to operate, current will...
... be as small as an electric oven burner igniter. These control systems require no adjustment. When the igniter has reached a temperature sufficient to a light bulb. 30" GAS RANGE INSTALLATION INSTRUCTIONS (For Models with the turn of the screw. Push in normal operation after air has been purged from LITE to operate, current will...

Installation Instructions (All Languages)
Page 8
... proper, remove the oven bottom and burner baffle and set the oven to disconnect the gas and electrical supply. To adjust loosen lock screw (see "3" in illustration above .) If the flame is 1 inch (distinct inner, blue flame). 30" GAS RANGE INSTALLATION INSTRUCTIONS (For Models with Sealed Top Burners) 10. To remove the oven bottom, remove...
... proper, remove the oven bottom and burner baffle and set the oven to disconnect the gas and electrical supply. To adjust loosen lock screw (see "3" in illustration above .) If the flame is 1 inch (distinct inner, blue flame). 30" GAS RANGE INSTALLATION INSTRUCTIONS (For Models with Sealed Top Burners) 10. To remove the oven bottom, remove...


