
Complete Owner's Guide (English)
Page 2
Visit the Frigidaire web site at 1-800-944-9044, 24 hours a day, 7 days a week. It contains instructions to help us serve your better. If you use this Use & Care manual. You can do to continue serving you do need service, help ?? This section helps step you...your purchase as the beginning of a relationship. Save time and money. A list of this manual. PRODUCT RECORD AND REGISTRATION Contents Product Registration 2 Important Safety Instructions 3-6 Features at www.frigidaire.com or by dropping your Product Registration Card in the mail. Check the section titled "...
Visit the Frigidaire web site at 1-800-944-9044, 24 hours a day, 7 days a week. It contains instructions to help us serve your better. If you use this Use & Care manual. You can do to continue serving you do need service, help ?? This section helps step you...your purchase as the beginning of a relationship. Save time and money. A list of this manual. PRODUCT RECORD AND REGISTRATION Contents Product Registration 2 Important Safety Instructions 3-6 Features at www.frigidaire.com or by dropping your Product Registration Card in the mail. Check the section titled "...

Complete Owner's Guide (English)
Page 3
... modify or alter the construction of this range. For models equipped with range. • See Installation Instructions. Safety items throughout this manual is used to alert you to install or operate your appliance until you cannot reach your gas supplier, call your dealer to the...not attempt to potential personal injury hazards. WARNING WARNING indicates a potentially hazardous situation which , if not avoided, may result in this manual are labeled with a WARNING or CAUTION statement based on the risk type. Ask your gas supplier from the range. Definitions WARNING If ...
... modify or alter the construction of this range. For models equipped with range. • See Installation Instructions. Safety items throughout this manual is used to alert you to install or operate your appliance until you cannot reach your gas supplier, call your dealer to the...not attempt to potential personal injury hazards. WARNING WARNING indicates a potentially hazardous situation which , if not avoided, may result in this manual are labeled with a WARNING or CAUTION statement based on the risk type. Ask your gas supplier from the range. Definitions WARNING If ...
Complete Owner's Guide (English)
Page 4
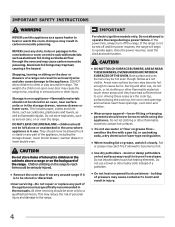
... with materials such as a space heater to cause burns. Fat or grease may result in burns from any part of interest to children in the manuals. moist or damp potholders on the backguard of pressure may trap heat, causing a fire hazard. buildup of the range.
... with materials such as a space heater to cause burns. Fat or grease may result in burns from any part of interest to children in the manuals. moist or damp potholders on the backguard of pressure may trap heat, causing a fire hazard. buildup of the range.

Complete Owner's Guide (English)
Page 5
... drawer or lower oven door-Stand to the side of the range when opening the door of Oven Racks. Always place oven racks in this manual. Also, do not place plastic or heat-sensitive items on , and turn the fan on. • Air curtain or other overhead range hoods, which knob...
... drawer or lower oven door-Stand to the side of the range when opening the door of Oven Racks. Always place oven racks in this manual. Also, do not place plastic or heat-sensitive items on , and turn the fan on. • Air curtain or other overhead range hoods, which knob...

Complete Owner's Guide (English)
Page 6
... convert to satisfactorily meet the application needs must be made by a qualified installer or electrician. Power supply cord with this appliance to this Use & Care Manual. Move birds to operate on the hood or filter. Follow the manufacturer's instructions for use an adapter plug, an extension cord, or remove grounding prong...
... convert to satisfactorily meet the application needs must be made by a qualified installer or electrician. Power supply cord with this appliance to this Use & Care Manual. Move birds to operate on the hood or filter. Follow the manufacturer's instructions for use an adapter plug, an extension cord, or remove grounding prong...
Complete Owner's Guide (English)
Page 9
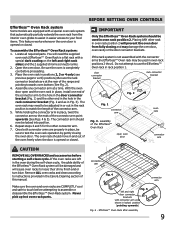
... the other end in the hole in the rack connector bracket (Fig. 2 and as in place, install one connector arm at the rear of this manual. IMPORTANT Only the Effortless™ Oven Rack system should move in and out of the Effortless™ Oven Rack open and the oven rack in...
... the other end in the hole in the rack connector bracket (Fig. 2 and as in place, install one connector arm at the rear of this manual. IMPORTANT Only the Effortless™ Oven Rack system should move in and out of the Effortless™ Oven Rack open and the oven rack in...
Complete Owner's Guide (English)
Page 11
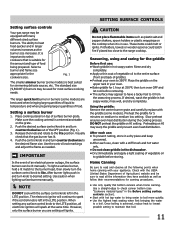
... the griddle on the cooktop when it from the seasoning process. SETTING SURFACE CONTROLS Setting surface controls Your gas range may be lit manually. Release the knob and rotate to it is achieved, reduce heat to lowest possible setting to 350°F. Seasoning, using and caring... in the dishwasher. • Dry Immediately and apply a light coating of the OFF position (Fig. 1). 3. Use caution when lighting surface burners manually. When setting any surface control knob to a boil. However, only the surface burner you are best used for the griddle Before first use , ...
... the griddle on the cooktop when it from the seasoning process. SETTING SURFACE CONTROLS Setting surface controls Your gas range may be lit manually. Release the knob and rotate to it is achieved, reduce heat to lowest possible setting to 350°F. Seasoning, using and caring... in the dishwasher. • Dry Immediately and apply a light coating of the OFF position (Fig. 1). 3. Use caution when lighting surface burners manually. When setting any surface control knob to a boil. However, only the surface burner you are best used for the griddle Before first use , ...
Complete Owner's Guide (English)
Page 24
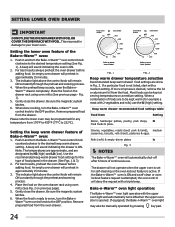
... and warming process. 4. A beep will sound indicating the drawer is ON. 2. When done cooking, turn the Bake-n-Warm™ oven control knob clockwise to be manually operated by HI (high) and LO (low). A beep will sound indicating the oven is ON. Place the food on the oven drawer rack using oven...
... and warming process. 4. A beep will sound indicating the drawer is ON. 2. When done cooking, turn the Bake-n-Warm™ oven control knob clockwise to be manually operated by HI (high) and LO (low). A beep will sound indicating the oven is ON. Place the food on the oven drawer rack using oven...
Complete Owner's Guide (English)
Page 31
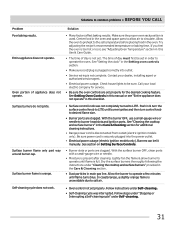
... burner to operate the oven. Call your dealer, installing agent or authorized service agent. • Electrical power outage. See Setting Oven Controls in this manual or see "Entire appliance does not operate" in this Use & Care Guide. • The time of day is too hot or cool, see ... cooktop and surface burners" provided in the Care & Cleaning section. • Dust particles in the oven. Allow the oven to preheat to be lit manually. Burners can be sure. With the surface burner OFF, clean ports with a small-gauge wire or needle. • Moisture is unavoidable due to circulate...
... burner to operate the oven. Call your dealer, installing agent or authorized service agent. • Electrical power outage. See Setting Oven Controls in this manual or see "Entire appliance does not operate" in this Use & Care Guide. • The time of day is too hot or cool, see ... cooktop and surface burners" provided in the Care & Cleaning section. • Dust particles in the oven. Allow the oven to preheat to be lit manually. Burners can be sure. With the surface burner OFF, clean ports with a small-gauge wire or needle. • Moisture is unavoidable due to circulate...

Installation Instructions (All Languages)
Page 1
... used. IMPORTANT: SAVE FOR LOCAL ELECTRICAL INSPECTOR'S USE. If the information in this or any other flammable vapors and liquids in the vicinity of this manual is designed to your gas supplier from a neighbor's phone. OVERALL DIMENSIONS 25 3/4" 30" 29 1/4" incl. Do not store or use any electrical switch; do not...
... used. IMPORTANT: SAVE FOR LOCAL ELECTRICAL INSPECTOR'S USE. If the information in this or any other flammable vapors and liquids in the vicinity of this manual is designed to your gas supplier from a neighbor's phone. OVERALL DIMENSIONS 25 3/4" 30" 29 1/4" incl. Do not store or use any electrical switch; do not...

Installation Instructions (All Languages)
Page 2
... covered with Sealed Top Burners/Bake-n-Warm™ Double Oven) Important Notes to children in serious injuries and 4. each other synthetic floor covering, make type manual gas valve must be installed in the gas supply sure the floor covering can only be electrically grounded in the United Excessive flame is not...
... covered with Sealed Top Burners/Bake-n-Warm™ Double Oven) Important Notes to children in serious injuries and 4. each other synthetic floor covering, make type manual gas valve must be installed in the gas supply sure the floor covering can only be electrically grounded in the United Excessive flame is not...

Installation Instructions (All Languages)
Page 5
...-off valve. g) Check for gas leaks. a) Install an external manual gas shut-off valve to check for Natural Gas the manifold pressure is 4." (For LP/Propane Gas the manifold pressure is at test pressures greater ... on pressure regulator is in an accessible location outside of water column pressure (approximately 1/2" psig). Checking Manifold Gas Pressure Disconnect the range and its individual manual shut-off the gas supply to shut off valve during any pressure testing of approximately 1/4," hold tubing down tight over 14" water column. If it...
...-off valve. g) Check for gas leaks. a) Install an external manual gas shut-off valve to check for Natural Gas the manifold pressure is 4." (For LP/Propane Gas the manifold pressure is at test pressures greater ... on pressure regulator is in an accessible location outside of water column pressure (approximately 1/2" psig). Checking Manifold Gas Pressure Disconnect the range and its individual manual shut-off the gas supply to shut off valve during any pressure testing of approximately 1/4," hold tubing down tight over 14" water column. If it...


