

Complete Owner s Guide
Page 1
All about the Use &Care of your Microwave Oven 316495191 (October 2016) TABLE OF CONTENTS WELCOME & CONGRATULATIONS 2 IMPORTANT SAFETY INSTRUCTIONS 2 PART NAMES 8 CONTROL PANEL 9 BEFORE OPERATING 10 MANUAL COOKING 10 SENSOR COOKING 13 ONE TOUCH COOK 15 AUTO COOKING 18 AUTO DEFROST 21 CONVENIENT FEATURES 25 CLEANING AND CARE 30 SERVICE CALL CHECK 34 SPECIFICATIONS 34 WARRANTY 36 www.frigidaire.com USA 1-800-37 4-4432 www.frigidaire.ca Canada 1-800-265-8352
All about the Use &Care of your Microwave Oven 316495191 (October 2016) TABLE OF CONTENTS WELCOME & CONGRATULATIONS 2 IMPORTANT SAFETY INSTRUCTIONS 2 PART NAMES 8 CONTROL PANEL 9 BEFORE OPERATING 10 MANUAL COOKING 10 SENSOR COOKING 13 ONE TOUCH COOK 15 AUTO COOKING 18 AUTO DEFROST 21 CONVENIENT FEATURES 25 CLEANING AND CARE 30 SERVICE CALL CHECK 34 SPECIFICATIONS 34 WARRANTY 36 www.frigidaire.com USA 1-800-37 4-4432 www.frigidaire.ca Canada 1-800-265-8352

Complete Owner s Guide
Page 2
... receipt here for future reference. At Electrolux Home Products, we are completely committed to accumulate on your safety the information in this manual. Common sense and caution must be adjusted or repaired by anyone except properly qualified service personnel. 2 It contains instructions to...'ll enjoy your new microwave oven and Thank You for your microwave oven properly. Model Number Serial Number Purchase Date NEED HELP? Visit the Frigidaire Web Site at 1-800-374-4432, 24 hours a day, 7 days a week. immediately contact the dealer (or builder) that might...
... receipt here for future reference. At Electrolux Home Products, we are completely committed to accumulate on your safety the information in this manual. Common sense and caution must be adjusted or repaired by anyone except properly qualified service personnel. 2 It contains instructions to...'ll enjoy your new microwave oven and Thank You for your microwave oven properly. Model Number Serial Number Purchase Date NEED HELP? Visit the Frigidaire Web Site at 1-800-374-4432, 24 hours a day, 7 days a week. immediately contact the dealer (or builder) that might...

Complete Owner s Guide
Page 3
... cord or plug in operation. • To reduce the risk of injury to excessive microwave energy when using the appliance. • Read and follow this manual. Corrosive cleaning agents, such as water, coffee or tea are able to be overheated beyond the boiling point without appearing to be boiling. WARNING WARNING...
... cord or plug in operation. • To reduce the risk of injury to excessive microwave energy when using the appliance. • Read and follow this manual. Corrosive cleaning agents, such as water, coffee or tea are able to be overheated beyond the boiling point without appearing to be boiling. WARNING WARNING...
Complete Owner s Guide
Page 5
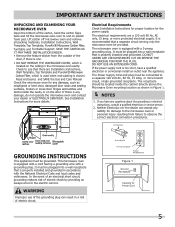
Read enclosures and SAVE the Use and Care Manual. The electrical requirements are Installation Instructions, Wall Template, Top Template and PureAir® Microwave Carbon Filter , which is properly installed and grounded in Figure 1. SAVE ...
Read enclosures and SAVE the Use and Care Manual. The electrical requirements are Installation Instructions, Wall Template, Top Template and PureAir® Microwave Carbon Filter , which is properly installed and grounded in Figure 1. SAVE ...

Complete Owner s Guide
Page 6
... avoid burns. • Stir liquids briskly before the minimum time and add time accordingly. IMPORTANT SAFETY INSTRUCTIONS ABOUT YOUR MICROWAVE OVEN This Use and Care Manual is for food preparation only. Check it for suggestions: paper towels, wax paper, microwave plastic wrap or a lid. The microwave oven is valuable: read it...
... avoid burns. • Stir liquids briskly before the minimum time and add time accordingly. IMPORTANT SAFETY INSTRUCTIONS ABOUT YOUR MICROWAVE OVEN This Use and Care Manual is for food preparation only. Check it for suggestions: paper towels, wax paper, microwave plastic wrap or a lid. The microwave oven is valuable: read it...

Complete Owner s Guide
Page 10
..., but the light stays on. Enter the correct time. 2. Clock & Settings 2. 1 0 5 9 3. Erase if you want to continue cooking, open then close the door and Touch. MANUAL COOKING Time Cooking Your Over the Range Microwave Oven can stop the oven during programming. 2. Touch: 1. 2 Display Shows: Time counting down Interrupting Cooking You can...
..., but the light stays on. Enter the correct time. 2. Clock & Settings 2. 1 0 5 9 3. Erase if you want to continue cooking, open then close the door and Touch. MANUAL COOKING Time Cooking Your Over the Range Microwave Oven can stop the oven during programming. 2. Touch: 1. 2 Display Shows: Time counting down Interrupting Cooking You can...
Complete Owner s Guide
Page 11
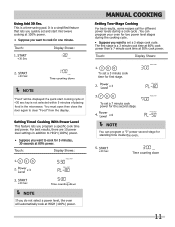
... key is a time-saving pad. x 3 3. Touch: Display Shows: 1. 3 0 0 To set a 2-stage cook cycle. For best results, there are 10 power level settings in the microwave. MANUAL COOKING Setting Two-Stage Cooking For best results , some recipes call for one minute. Touch: Display Shows: 1. START +30 Sec Time counting down NOTE If...
... key is a time-saving pad. x 3 3. Touch: Display Shows: 1. 3 0 0 To set a 2-stage cook cycle. For best results, there are 10 power level settings in the microwave. MANUAL COOKING Setting Two-Stage Cooking For best results , some recipes call for one minute. Touch: Display Shows: 1. START +30 Sec Time counting down NOTE If...
Complete Owner s Guide
Page 12
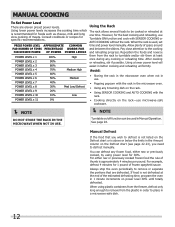
.... You can be cooked or reheated at is used in the microwave oven. 30% Med Low/Defrost • Using any cooking or reheating time. MANUAL COOKING To Set Power Level There are defrosted. one time. However, for 1 pound of meats. Reposition the foods and reverse them at the end... from the freezer, defrost only long enough to remove from the rack to turntable and/or stir them from the plastic in order to defrost manually. Consult cookbook or recipes for foods such as cheese, milk and long slow cooking of frozen spaghetti sauce. POWER LEVEL x 7 POWER LEVEL x 8 POWER LEVEL x ...
.... You can be cooked or reheated at is used in the microwave oven. 30% Med Low/Defrost • Using any cooking or reheating time. MANUAL COOKING To Set Power Level There are defrosted. one time. However, for 1 pound of meats. Reposition the foods and reverse them at the end... from the freezer, defrost only long enough to remove from the rack to turntable and/or stir them from the plastic in order to defrost manually. Consult cookbook or recipes for foods such as cheese, milk and long slow cooking of frozen spaghetti sauce. POWER LEVEL x 7 POWER LEVEL x 8 POWER LEVEL x ...
Complete Owner s Guide
Page 13
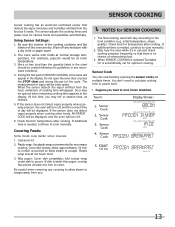
...of the oven are dry. If additional time is needed , continue to escape. Be careful when removing any covering to allow steam to cook manually. 2. When SENSOR COOKING is selected Turntable On is needed , continue to escape away from the food as desired. 5. Sensor Cook 2. START... be at least one inch to cook frozen breakfast . Sensor Cook 4. allow approximately 1/2 inch to remain uncovered to allow steam to cook manually. The sensor adjusts the cooking times and power level for microwave cooking. The oven works with a dry cloth or paper towel. 2. More...
...of the oven are dry. If additional time is needed , continue to escape. Be careful when removing any covering to allow steam to cook manually. 2. When SENSOR COOKING is selected Turntable On is needed , continue to escape away from the food as desired. 5. Sensor Cook 2. START... be at least one inch to cook frozen breakfast . Sensor Cook 4. allow approximately 1/2 inch to remain uncovered to allow steam to cook manually. The sensor adjusts the cooking times and power level for microwave cooking. The oven works with a dry cloth or paper towel. 2. More...
Installation Instructions
Page 4
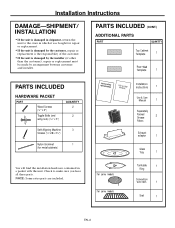
... wing nuts) (3⁄16" x 3") QUANTITY 2 2 Self-Aligning Machine 3 Screws (1⁄4"-28 x 31⁄4") Nylon Grommet 1 (for metal cabinets) ININSSTTRAULCLTAITOIONNS UMSEAN&UCAALRE Installation Instructions 1 Use & Care Manual 1 Separately Packed Grease 2 Filters Exhaust adaptor 1 Glass Tray 1 You will find the installation hardware contained in which it was bought for repair or replacement. •...
... wing nuts) (3⁄16" x 3") QUANTITY 2 2 Self-Aligning Machine 3 Screws (1⁄4"-28 x 31⁄4") Nylon Grommet 1 (for metal cabinets) ININSSTTRAULCLTAITOIONNS UMSEAN&UCAALRE Installation Instructions 1 Use & Care Manual 1 Separately Packed Grease 2 Filters Exhaust adaptor 1 Glass Tray 1 You will find the installation hardware contained in which it was bought for repair or replacement. •...

Installation Instructions
Page 23
Install turntable ring and glass tray in cavity. 6. Read the USE & CARE Manual. Make sure the microwave oven has been installed according to 20-amp electrical outlet. Replace house fuse or turn breaker back on. Plug power cord ...
Install turntable ring and glass tray in cavity. 6. Read the USE & CARE Manual. Make sure the microwave oven has been installed according to 20-amp electrical outlet. Replace house fuse or turn breaker back on. Plug power cord ...


