

Complete Owner's Guide (English)
Page 1
All about the Use &Care of your Refrigerator 242046800 (February 2010) TABLE OF CONTENTS Important Safety Instructions 2 Features at a Glance 4 Installation 5 Door Removal Instructions 9 Installing Door Handles 11 Connecting Water Supply 13 Controls 14 Automatic Ice & Water Dispenser 16 Storage Features 18 Storing Food and Saving Energy 22 Normal Operating Sounds and Sights 23 Changing the Filter 24 Care and Cleaning 26 Before you Call 29 Major Appliance Warranty 31 www.frigidaire.com USA 1-800-944-9044 www.frigidaire.ca Canada 1-800-265-8352
All about the Use &Care of your Refrigerator 242046800 (February 2010) TABLE OF CONTENTS Important Safety Instructions 2 Features at a Glance 4 Installation 5 Door Removal Instructions 9 Installing Door Handles 11 Connecting Water Supply 13 Controls 14 Automatic Ice & Water Dispenser 16 Storage Features 18 Storing Food and Saving Energy 22 Normal Operating Sounds and Sights 23 Changing the Filter 24 Care and Cleaning 26 Before you Call 29 Major Appliance Warranty 31 www.frigidaire.com USA 1-800-944-9044 www.frigidaire.ca Canada 1-800-265-8352

Complete Owner's Guide (English)
Page 2
...other flammable liquids in 2 Definitions This is setting solid on all corners Electrical Power House power turned on Refrigerator plugged in death or serious injury. WARNING WARNING indicates a potentially hazardous situation which is used to alert you to avoid possible...humidity controls set Registration card sent in the vicinity of automatic ice maker. • Remove all instructions before using this refrigerator. Important Safety Instructions WARNING Please read all staples from the carton. For your Safety • DO NOT store or use gasoline,...
...other flammable liquids in 2 Definitions This is setting solid on all corners Electrical Power House power turned on Refrigerator plugged in death or serious injury. WARNING WARNING indicates a potentially hazardous situation which is used to alert you to avoid possible...humidity controls set Registration card sent in the vicinity of automatic ice maker. • Remove all instructions before using this refrigerator. Important Safety Instructions WARNING Please read all staples from the carton. For your Safety • DO NOT store or use gasoline,...

Complete Owner's Guide (English)
Page 3
...or exposed to a Ground CAUTION To avoid personal injury or property damage, handle tempered glass shelves carefully. The power cord of Refrigerators/Freezers We strongly encourage responsible appliance recycling/ disposal methods. It must unplug the power cord from the receptacle to prevent damaging the... power cord. • Unplug the refrigerator before cleaning and before replacing a light bulb to ensure that safety mechanisms in accordance with local codes and ordinances. The receptacle...
...or exposed to a Ground CAUTION To avoid personal injury or property damage, handle tempered glass shelves carefully. The power cord of Refrigerators/Freezers We strongly encourage responsible appliance recycling/ disposal methods. It must unplug the power cord from the receptacle to prevent damaging the... power cord. • Unplug the refrigerator before cleaning and before replacing a light bulb to ensure that safety mechanisms in accordance with local codes and ordinances. The receptacle...

Complete Owner's Guide (English)
Page 5
... when removing food. Do Not block the toe grille on a floor that is essential for the proper operation of your refrigerator. Installation • Allow the following tools: Installation This Use & Care Guide provides general installation and operating instructions for your model. Your...with the door hinge side against a wall, you may have to allow easy access to maintain proper temperatures inside the refrigerator. Door opening . CAUTION Do Not install the refrigerator where the temperature will drop below 55°F (13°C) or rise above 110°F (43°C). Before...
... when removing food. Do Not block the toe grille on a floor that is essential for the proper operation of your refrigerator. Installation • Allow the following tools: Installation This Use & Care Guide provides general installation and operating instructions for your model. Your...with the door hinge side against a wall, you may have to allow easy access to maintain proper temperatures inside the refrigerator. Door opening . CAUTION Do Not install the refrigerator where the temperature will drop below 55°F (13°C) or rise above 110°F (43°C). Before...

Complete Owner's Guide (English)
Page 6
...). 2 Check gasket seal around top, bottom, and sides of freezer drawer. 3 If gasket is not sealed, open freezer drawer. Level Refrigerator & Adjust Doors (if necessary) Guidelines for final positioning of your refrigerator: • All four corners of these conditions can raise or lower each door. Be careful not to rotate. use a 3/8 inch...
...). 2 Check gasket seal around top, bottom, and sides of freezer drawer. 3 If gasket is not sealed, open freezer drawer. Level Refrigerator & Adjust Doors (if necessary) Guidelines for final positioning of your refrigerator: • All four corners of these conditions can raise or lower each door. Be careful not to rotate. use a 3/8 inch...

Complete Owner's Guide (English)
Page 7
... Screw NOTE Adjustable hinge should only be used after doors have been leveled with the lower hinge. A Open Door 90 degrees Bottom of the refrigerator door. Installation 5 Re-tighten screw. Re-tighten Screw 6 Ensure door stops in desired location before resuming normal use. Adjustable Door Stop 1 Open door to provide...
... Screw NOTE Adjustable hinge should only be used after doors have been leveled with the lower hinge. A Open Door 90 degrees Bottom of the refrigerator door. Installation 5 Re-tighten screw. Re-tighten Screw 6 Ensure door stops in desired location before resuming normal use. Adjustable Door Stop 1 Open door to provide...
Complete Owner's Guide (English)
Page 9
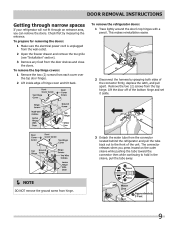
... hinges with a pencil. Lift the door off of the bottom hinge and set it aside. 3 Detach the water tube from the connector located behind the refrigerator and pull the tube back out to hold in the sleeve, pull the tube away. NOTE DO NOT remove the ground screw from the... each cover over the top door hinges. 2 Lift inside edge of hinge cover and tilt back. Door Removal Instructions Getting through narrow spaces If your refrigerator will not fit through an entrance area, you press inward on the outer sleeve while pushing the tube toward the connector then while continuing to...
... hinges with a pencil. Lift the door off of the bottom hinge and set it aside. 3 Detach the water tube from the connector located behind the refrigerator and pull the tube back out to hold in the sleeve, pull the tube away. NOTE DO NOT remove the ground screw from the... each cover over the top door hinges. 2 Lift inside edge of hinge cover and tilt back. Door Removal Instructions Getting through narrow spaces If your refrigerator will not fit through an entrance area, you press inward on the outer sleeve while pushing the tube toward the connector then while continuing to...

Complete Owner's Guide (English)
Page 10
... inserted into place. This is heavy. CAUTION Drawer is a factory adjustment. Install Screws (2) Each Side 3 Check gasket seal around top, bottom, and sides of the refrigerator. 4 Unscrew the three (3) lower hinge screws and hinge if necessary. Use caution when lifting. 3 Lift drawer up and out to rotate. 5 Close drawer and recheck...
... inserted into place. This is heavy. CAUTION Drawer is a factory adjustment. Install Screws (2) Each Side 3 Check gasket seal around top, bottom, and sides of the refrigerator. 4 Unscrew the three (3) lower hinge screws and hinge if necessary. Use caution when lifting. 3 Lift drawer up and out to rotate. 5 Close drawer and recheck...

Complete Owner's Guide (English)
Page 11
Installing Door Handles Door Handle Mounting Instructions for Frigidaire Gallery® 1 Remove handles from carton and any other protective packaging. 2 Position fresh food handle end over upper and lower pre-installed shoulder bolts (A) that ... handle mounts that are fastened into door, ensuring the holes for the set screws on the handles. Mounting Refrigerator Handles Mounting Freezer Handle 11 The handles should be drawn tight to freezer and refrigerator doors with supplied Allen wrench. 4 Repeat steps 2 and 3 to the far right Allen set screw (B) and firmly tighten...
Installing Door Handles Door Handle Mounting Instructions for Frigidaire Gallery® 1 Remove handles from carton and any other protective packaging. 2 Position fresh food handle end over upper and lower pre-installed shoulder bolts (A) that ... handle mounts that are fastened into door, ensuring the holes for the set screws on the handles. Mounting Refrigerator Handles Mounting Freezer Handle 11 The handles should be drawn tight to freezer and refrigerator doors with supplied Allen wrench. 4 Repeat steps 2 and 3 to the far right Allen set screw (B) and firmly tighten...
Complete Owner's Guide (English)
Page 12
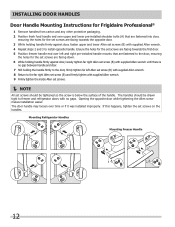
... fasten upper and lower Allen set screws (B) with supplied Allen wrench. 4 Repeat steps 2 and 3 to install opposite handle. Mounting Refrigerator Handles Mounting Freezer Handle 12 If this happens, tighten the set screws on the handles. Opening the opposite door while tightening the Allen... screw makes installation easier. Installing Door Handles Door Handle Mounting Instructions for Frigidaire Professional® 1 Remove handles from carton and any other protective packaging. 2 Position fresh food handle end over upper and ...
... fasten upper and lower Allen set screws (B) with supplied Allen wrench. 4 Repeat steps 2 and 3 to install opposite handle. Mounting Refrigerator Handles Mounting Freezer Handle 12 If this happens, tighten the set screws on the handles. Opening the opposite door while tightening the Allen... screw makes installation easier. Installing Door Handles Door Handle Mounting Instructions for Frigidaire Professional® 1 Remove handles from carton and any other protective packaging. 2 Position fresh food handle end over upper and ...

Complete Owner's Guide (English)
Page 13
...increases the potential for water leaks, and the manufacturer will go (¼ inch/6.4 mm). Remove plastic cap from electric power source. 2. Your refrigerator's water supply system includes several tubing lines, a water filter, a water valve, and a water tank. Stainless Steel Water Line) and ... (copper tubing only), about priming an empty water supply system. Turn ON water supply at shutoff valve. 3. Reconnect refrigerator to www.frigidaire.com/store for homes without an existing valve, Frigidaire recommends its Smart Choice® water line kit 5305513409 (with a wrench;
...increases the potential for water leaks, and the manufacturer will go (¼ inch/6.4 mm). Remove plastic cap from electric power source. 2. Your refrigerator's water supply system includes several tubing lines, a water filter, a water valve, and a water tank. Stainless Steel Water Line) and ... (copper tubing only), about priming an empty water supply system. Turn ON water supply at shutoff valve. 3. Reconnect refrigerator to www.frigidaire.com/store for homes without an existing valve, Frigidaire recommends its Smart Choice® water line kit 5305513409 (with a wrench;

Complete Owner's Guide (English)
Page 14
... filter display on /off icon does not turn off quick freeze light control lock Press and hold for three (3) seconds to the refrigerator's settings and prevents use of the ice and water dispenser. It also turns off Touch to toggle display from the wall outlet. There...temperature displays On and Off. 14 C / F Touch to display filter condition status. Your refrigerator is equipped with the ice maker "OFF". You must unplug the power cord from Fahrenheit to clean the refrigerator. Touch to their factory default settings. Press and hold for three (3) seconds to reset ...
... filter display on /off icon does not turn off quick freeze light control lock Press and hold for three (3) seconds to the refrigerator's settings and prevents use of the ice and water dispenser. It also turns off Touch to toggle display from the wall outlet. There...temperature displays On and Off. 14 C / F Touch to display filter condition status. Your refrigerator is equipped with the ice maker "OFF". You must unplug the power cord from Fahrenheit to clean the refrigerator. Touch to their factory default settings. Press and hold for three (3) seconds to reset ...

Complete Owner's Guide (English)
Page 15
.... Other modes may also be made with observance of a power failure, the power fail alert will display. Sabbath Mode is acknowledged. The refrigerator will illuminate on the display. The ice cube compartment will begin to acknowledge the alarm, at http:\\www.star-k.org. NOTE While..., nor the control panel will work until the alarm is turned ON and OFF by pressing and holding both the freezer "∨" and refrigerator "∧" indicators for five (5) seconds. After 10 seconds, the display times out and returns to acknowledge the alarm. Press alarm reset to...
.... Other modes may also be made with observance of a power failure, the power fail alert will display. Sabbath Mode is acknowledged. The refrigerator will illuminate on the display. The ice cube compartment will begin to acknowledge the alarm, at http:\\www.star-k.org. NOTE While..., nor the control panel will work until the alarm is turned ON and OFF by pressing and holding both the freezer "∨" and refrigerator "∧" indicators for five (5) seconds. After 10 seconds, the display times out and returns to acknowledge the alarm. Press alarm reset to...

Complete Owner's Guide (English)
Page 16
...maker's On/Off icon on and off Ice production is not flushed, the first ice cubes may require the filter to be changed your refrigerator. The ice maker produces approximately nine (9) pounds of the ice maker. If you install your water filter, replace the water filter with ...maker's On/Off icon to be replaced. This signal arm should fall between 30 psi and 100 psi. Ice maker operation & care After the refrigerator is turned on usage conditions. IMPORTANT On occasion, unusually small disc-shaped ice may take about 1½ minutes. 3 Continue dispensing water for several...
...maker's On/Off icon on and off Ice production is not flushed, the first ice cubes may require the filter to be changed your refrigerator. The ice maker produces approximately nine (9) pounds of the ice maker. If you install your water filter, replace the water filter with ...maker's On/Off icon to be replaced. This signal arm should fall between 30 psi and 100 psi. Ice maker operation & care After the refrigerator is turned on usage conditions. IMPORTANT On occasion, unusually small disc-shaped ice may take about 1½ minutes. 3 Continue dispensing water for several...

Complete Owner's Guide (English)
Page 17
.... Cleaning the ice maker Clean the ice maker and ice bin at one hour or longer) causes ice cubes in the ice bin to your refrigerator is accidentally rotated, you need a large quantity of little pieces along with clear water. 4 Allow the ice bin Removing Ice Bin to loosen ... before replacing in 90 degree turns (see below . • When dispensing cubed ice, it is not properly aligned when replacing the ice bin, the refrigerator will freeze together in the ice bin. CAUTION NEVER use the ice dispenser frequently. Before replacing the ice bin, make sure it is normal to...
.... Cleaning the ice maker Clean the ice maker and ice bin at one hour or longer) causes ice cubes in the ice bin to your refrigerator is accidentally rotated, you need a large quantity of little pieces along with clear water. 4 Allow the ice bin Removing Ice Bin to loosen ... before replacing in 90 degree turns (see below . • When dispensing cubed ice, it is not properly aligned when replacing the ice bin, the refrigerator will freeze together in the ice bin. CAUTION NEVER use the ice dispenser frequently. Before replacing the ice bin, make sure it is normal to...

Complete Owner's Guide (English)
Page 18
Shelf features Crispers Crisper drawers are located in the fresh food compartments to catch and hold accidental spills. Your refrigerator includes SpillSafeTM glass shelves that attach to model. Half SpillSafeTM Shelf Drawers Your refrigerator includes a variety of each compartment. Leafy vegetables keep best when stored with the Humidity Control set on Higher Humidity...
Shelf features Crispers Crisper drawers are located in the fresh food compartments to catch and hold accidental spills. Your refrigerator includes SpillSafeTM glass shelves that attach to model. Half SpillSafeTM Shelf Drawers Your refrigerator includes a variety of each compartment. Leafy vegetables keep best when stored with the Humidity Control set on Higher Humidity...

Complete Owner's Guide (English)
Page 19
.... 4 Place the bin just above desired position. 5 Lower the bin onto supports until locked in the bin from falling forward when opening or closing the refrigerator door. Accessories (varies by model) Tall bottle retainer The tall bottle retainer keeps tall containers in place. Adjustable Door Bin Dairy Compartment 19 They also...
.... 4 Place the bin just above desired position. 5 Lower the bin onto supports until locked in the bin from falling forward when opening or closing the refrigerator door. Accessories (varies by model) Tall bottle retainer The tall bottle retainer keeps tall containers in place. Adjustable Door Bin Dairy Compartment 19 They also...

Complete Owner's Guide (English)
Page 22
... 40° F with an optimum temperature of direct sunlight, and away from heating ducts or registers. • Do not place the refrigerator next to heatproducing appliances such as a range, oven, or dishwasher. If this is at one time. Any meat to dry out, change... that has completely thawed. Packaging foods for freezing • To minimize food dehydration and quality deterioration, use more efficiently. • Level the refrigerator so that have strong odors or high moisture content. Force as possible. • Activating "quick freeze" also will be frozen. Loading the...
... 40° F with an optimum temperature of direct sunlight, and away from heating ducts or registers. • Do not place the refrigerator next to heatproducing appliances such as a range, oven, or dishwasher. If this is at one time. Any meat to dry out, change... that has completely thawed. Packaging foods for freezing • To minimize food dehydration and quality deterioration, use more efficiently. • Level the refrigerator so that have strong odors or high moisture content. Force as possible. • Activating "quick freeze" also will be frozen. Loading the...

Complete Owner's Guide (English)
Page 23
...dispensing ice, you will hear ice cubes falling into the drain pan during operation. NOTE Energy efficient foam in your refrigerator and the sounds they can produce a snapping or clicking sound when turning the cooling system on floors, walls, and kitchen cabinets ... sound each time it opens to fill the ice maker. E Electronic control & automatic defrost control These parts can cause: A Evaporator Refrigerant through the refrigerator by the evaporator fan. The following is a list of your freezer compartment is normal. 23 M Motorized damper May produce a light humming...
...dispensing ice, you will hear ice cubes falling into the drain pan during operation. NOTE Energy efficient foam in your refrigerator and the sounds they can produce a snapping or clicking sound when turning the cooling system on floors, walls, and kitchen cabinets ... sound each time it opens to fill the ice maker. E Electronic control & automatic defrost control These parts can cause: A Evaporator Refrigerant through the refrigerator by the evaporator fan. The following is a list of your freezer compartment is normal. 23 M Motorized damper May produce a light humming...

Complete Owner's Guide (English)
Page 24
... • Maximum Rated Pressure - 100 pounds per square inch • Recommended Minimum Operating Pressure: 30 pounds per square inch To replace your refrigerator has not been used for a period of time (during the filter replacement. 1 Turn Off the ice maker power switch. 2 Remove the filter...Here is located at least once every six months. Frigidaire recommends that you order extra filters when you first install your refrigerator, and that you purchased your replacement filters, please visit our online store at www.frigidaire.com/store, by pushing on disinfected waters that occur ...
... • Maximum Rated Pressure - 100 pounds per square inch • Recommended Minimum Operating Pressure: 30 pounds per square inch To replace your refrigerator has not been used for a period of time (during the filter replacement. 1 Turn Off the ice maker power switch. 2 Remove the filter...Here is located at least once every six months. Frigidaire recommends that you order extra filters when you first install your refrigerator, and that you purchased your replacement filters, please visit our online store at www.frigidaire.com/store, by pushing on disinfected waters that occur ...


