
Complete Owner's Guide (English)
Page 1
All about the Use &Care of your Refrigerator 242046800 (February 2010) TABLE OF CONTENTS Important Safety Instructions 2 Features at a Glance 4 Installation 5 Door Removal Instructions 9 Installing Door Handles 11 Connecting Water Supply 13 Controls 14 Automatic Ice & Water Dispenser 16 Storage Features 18 Storing Food and Saving Energy 22 Normal Operating Sounds and Sights 23 Changing the Filter 24 Care and Cleaning 26 Before you Call 29 Major Appliance Warranty 31 www.frigidaire.com USA 1-800-944-9044 www.frigidaire.ca Canada 1-800-265-8352
All about the Use &Care of your Refrigerator 242046800 (February 2010) TABLE OF CONTENTS Important Safety Instructions 2 Features at a Glance 4 Installation 5 Door Removal Instructions 9 Installing Door Handles 11 Connecting Water Supply 13 Controls 14 Automatic Ice & Water Dispenser 16 Storage Features 18 Storing Food and Saving Energy 22 Normal Operating Sounds and Sights 23 Changing the Filter 24 Care and Cleaning 26 Before you Call 29 Major Appliance Warranty 31 www.frigidaire.com USA 1-800-944-9044 www.frigidaire.ca Canada 1-800-265-8352

Complete Owner's Guide (English)
Page 2
...if they come in Ice Maker House water supply connected to refrigerator No water leaks present at all staples from the carton. Obey all safety messages that follow this refrigerator. WARNING WARNING indicates a potentially hazardous situation which , if not avoided, ... an imminently hazardous situation which is setting solid on all corners Electrical Power House power turned on Refrigerator plugged in contact with any other appliance. Important Safety Instructions WARNING Please read all instructions before using this symbol to avoid...
...if they come in Ice Maker House water supply connected to refrigerator No water leaks present at all staples from the carton. Obey all safety messages that follow this refrigerator. WARNING WARNING indicates a potentially hazardous situation which , if not avoided, ... an imminently hazardous situation which is setting solid on all corners Electrical Power House power turned on Refrigerator plugged in contact with any other appliance. Important Safety Instructions WARNING Please read all instructions before using this symbol to avoid...

Complete Owner's Guide (English)
Page 3
... qualified service technician. The receptacle must be plugged into a properly grounded three prong receptacle. If you throw away your old refrigerator or freezer, please follow the instructions below to play. Before you are getting rid of the temperature control panel will sit ...appliance is unpacked. Fault Interrupter (GFI) circuit. Cartons covered with your utility company or visit www.recyclemyoldfridge.com for your Refrigerator or Freezer Risk of child entrapment Child entrapment and suffocation are still dangerous - Check with rugs, bedspreads, plastic sheets or...
... qualified service technician. The receptacle must be plugged into a properly grounded three prong receptacle. If you throw away your old refrigerator or freezer, please follow the instructions below to play. Before you are getting rid of the temperature control panel will sit ...appliance is unpacked. Fault Interrupter (GFI) circuit. Cartons covered with your utility company or visit www.recyclemyoldfridge.com for your Refrigerator or Freezer Risk of child entrapment Child entrapment and suffocation are still dangerous - Check with rugs, bedspreads, plastic sheets or...

Complete Owner's Guide (English)
Page 5
...°F (13°C) or rise above 110°F (43°C). We recommend using a service or kitchen contracting professional to install your refrigerator. Installation • Allow the following tools: Installation This Use & Care Guide provides general installation and operating instructions for your model. Do Not... with the door hinge side against a wall, you may have to a counter when removing food. CAUTION Do Not install the refrigerator where the temperature will not be positioned to allow easy access to allow additional space so the door can be opened . 5 Sufficient...
...°F (13°C) or rise above 110°F (43°C). We recommend using a service or kitchen contracting professional to install your refrigerator. Installation • Allow the following tools: Installation This Use & Care Guide provides general installation and operating instructions for your model. Do Not... with the door hinge side against a wall, you may have to a counter when removing food. CAUTION Do Not install the refrigerator where the temperature will not be positioned to allow easy access to allow additional space so the door can be opened . 5 Sufficient...

Complete Owner's Guide (English)
Page 6
...-free with each door. Open the drawer grabbing by fitting into place. 6 Door Door Anti-tip Leg Raise Lower Level Refrigerator & Adjust Doors (if necessary) Guidelines for final positioning of your refrigerator: • All four corners of the cabinet must rest firmly on each side) to allow drawer to rotate the drawer...
...-free with each door. Open the drawer grabbing by fitting into place. 6 Door Door Anti-tip Leg Raise Lower Level Refrigerator & Adjust Doors (if necessary) Guidelines for final positioning of your refrigerator: • All four corners of the cabinet must rest firmly on each side) to allow drawer to rotate the drawer...

Complete Owner's Guide (English)
Page 7
... Screw NOTE Adjustable hinge should only be used after doors have been leveled with the lower hinge. A Open Door 90 degrees Bottom of the refrigerator door. To level the doors using the adjustable lower hinge (select models): 1 Remove all food items from door bins on door being adjusted. 2 Open doors...
... Screw NOTE Adjustable hinge should only be used after doors have been leveled with the lower hinge. A Open Door 90 degrees Bottom of the refrigerator door. To level the doors using the adjustable lower hinge (select models): 1 Remove all food items from door bins on door being adjusted. 2 Open doors...
Complete Owner's Guide (English)
Page 9
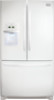
...Disconnect the harness by measuring the entrance. Remove the two (2) screws from the connector located behind the refrigerator and pull the tube back out to hold in the sleeve, pull the tube away. NOTE...aside. 3 Detach the water tube from the top hinge. To remove the refrigerator doors: 1 Trace lightly around the door's top hinges with a pencil. Door Removal Instructions Getting through narrow ...spaces If your refrigerator will not fit through an entrance area, you press inward on the outer sleeve while...
...Disconnect the harness by measuring the entrance. Remove the two (2) screws from the connector located behind the refrigerator and pull the tube back out to hold in the sleeve, pull the tube away. NOTE...aside. 3 Detach the water tube from the top hinge. To remove the refrigerator doors: 1 Trace lightly around the door's top hinges with a pencil. Door Removal Instructions Getting through narrow ...spaces If your refrigerator will not fit through an entrance area, you press inward on the outer sleeve while...

Complete Owner's Guide (English)
Page 10
... they cannot fall and cause personal injury, or damage to rotate the drawer. NOTE DO NOT remove center screw from the back of the refrigerator. 4 Unscrew the three (3) lower hinge screws and hinge if necessary. CAUTION Be sure doors are set aside in the center (B). Be careful not to the...
... they cannot fall and cause personal injury, or damage to rotate the drawer. NOTE DO NOT remove center screw from the back of the refrigerator. 4 Unscrew the three (3) lower hinge screws and hinge if necessary. CAUTION Be sure doors are set aside in the center (B). Be careful not to the...

Complete Owner's Guide (English)
Page 11
Installing Door Handles Door Handle Mounting Instructions for Frigidaire Gallery® 1 Remove handles from carton and any other protective packaging. 2 Position fresh food handle end over upper and lower pre-installed shoulder bolts (A) that are fastened to freezer and refrigerator doors with supplied Allen wrench. NOTE All set screws on the handles... the set screws should be tightened so the screw is no gaps. Opening the opposite door while tightening the Allen screw makes installation easier. Mounting Refrigerator Handles Mounting Freezer Handle 11
Installing Door Handles Door Handle Mounting Instructions for Frigidaire Gallery® 1 Remove handles from carton and any other protective packaging. 2 Position fresh food handle end over upper and lower pre-installed shoulder bolts (A) that are fastened to freezer and refrigerator doors with supplied Allen wrench. NOTE All set screws on the handles... the set screws should be tightened so the screw is no gaps. Opening the opposite door while tightening the Allen screw makes installation easier. Mounting Refrigerator Handles Mounting Freezer Handle 11
Complete Owner's Guide (English)
Page 12
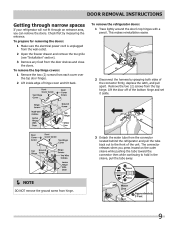
Installing Door Handles Door Handle Mounting Instructions for Frigidaire Professional® 1 Remove handles from carton and any other protective packaging. 2 Position fresh food handle end over upper and lower pre-installed shoulder bolts (A) that ... set screw (B) and firmly tighten with supplied Allen wrench. 9 Firmly tighten the inside Allen set screws. NOTE All set screws on the handles. Mounting Refrigerator Handles Mounting Freezer Handle 12 The door handle may loosen over left Allen set screw (B) with supplied Allen wrench. 8 Return to install opposite handle. If...
Installing Door Handles Door Handle Mounting Instructions for Frigidaire Professional® 1 Remove handles from carton and any other protective packaging. 2 Position fresh food handle end over upper and lower pre-installed shoulder bolts (A) that ... set screw (B) and firmly tighten with supplied Allen wrench. 9 Firmly tighten the inside Allen set screws. NOTE All set screws on the handles. Mounting Refrigerator Handles Mounting Freezer Handle 12 The door handle may loosen over left Allen set screw (B) with supplied Allen wrench. 8 Return to install opposite handle. If...

Complete Owner's Guide (English)
Page 13
...to installing your local/state building codes, Frigidaire recommends for homes with existing valves its Smart Choice water® line kit 5305510264 (with water pressure between 30 and 100 psi. • A water supply line made of the refrigerator to Ice Maker Fill Tube Steel Clamp Brass...Water Supply WARNING To avoid electric shock, which can cause death or severe personal injury, disconnect the refrigerator from electrical power before connecting a water supply line to www.frigidaire.com/store for more information. Water supply tubing made of water supply line into valve inlet and ...
...to installing your local/state building codes, Frigidaire recommends for homes with existing valves its Smart Choice water® line kit 5305510264 (with water pressure between 30 and 100 psi. • A water supply line made of the refrigerator to Ice Maker Fill Tube Steel Clamp Brass...Water Supply WARNING To avoid electric shock, which can cause death or severe personal injury, disconnect the refrigerator from electrical power before connecting a water supply line to www.frigidaire.com/store for more information. Water supply tubing made of water supply line into valve inlet and ...

Complete Owner's Guide (English)
Page 14
... light will read OFF. Neither "CUBE" nor "CRUSH" will operate with a touch control panel. It also turns off the ice maker, all refrigerator settings such as temp, and temp display to prevent it from the wall outlet. water filter air filter display on /off icon does not turn... the ice maker "ON" or "OFF". Your refrigerator is only necessary to display filter status. This restricts undesired changes to display filter condition status. Touch to gently touch the control panel. You...
... light will read OFF. Neither "CUBE" nor "CRUSH" will operate with a touch control panel. It also turns off the ice maker, all refrigerator settings such as temp, and temp display to prevent it from the wall outlet. water filter air filter display on /off icon does not turn... the ice maker "ON" or "OFF". Your refrigerator is only necessary to display filter status. This restricts undesired changes to display filter condition status. Touch to gently touch the control panel. You...

Complete Owner's Guide (English)
Page 15
...be illuminated. Press alarm reset to a door left open for proper usage and a complete list of models with observance of the refrigerator and its own and a red high temperature icon will resume normal operation. The alarm will then silence on its controls in ...For further assistance, guidelines for an extended period of a high temperature condition, the temperature display will beep to acknowledge the alarm. Refrigerator stays in Sabbath mode. After five (5) seconds of the Sabbath/Holidays. The temperature display will begin to reset any violation of ...
...be illuminated. Press alarm reset to a door left open for proper usage and a complete list of models with observance of the refrigerator and its own and a red high temperature icon will resume normal operation. The alarm will then silence on its controls in ...For further assistance, guidelines for an extended period of a high temperature condition, the temperature display will beep to acknowledge the alarm. Refrigerator stays in Sabbath mode. After five (5) seconds of the Sabbath/Holidays. The temperature display will begin to reset any violation of ...

Complete Owner's Guide (English)
Page 16
It may take about 1½ minutes. 3 Continue dispensing water for the first time, be sure to be changed your refrigerator. IMPORTANT Turning off the ice maker will result in existing ice melting in new plumbing lines can produce ice within 24 hours. This signal ...may be an indication of continuous use. Poor quality household water may be discolored or have an odd flavor. Ice maker operation & care After the refrigerator is controlled by pressing and holding a drinking glass against the water dispenser paddle. 2 Keep the glass in normal operation of ice every 24 hours ...
It may take about 1½ minutes. 3 Continue dispensing water for the first time, be sure to be changed your refrigerator. IMPORTANT Turning off the ice maker will result in existing ice melting in new plumbing lines can produce ice within 24 hours. This signal ...may be an indication of continuous use. Poor quality household water may be discolored or have an odd flavor. Ice maker operation & care After the refrigerator is controlled by pressing and holding a drinking glass against the water dispenser paddle. 2 Keep the glass in normal operation of ice every 24 hours ...

Complete Owner's Guide (English)
Page 17
... the auger in the freezer. 5 Replace the ice bin. If the auger is not properly aligned when replacing the ice bin, the refrigerator will freeze together in 90 degree turns (see below) until the ice bin fits into place with mild detergent. Chemicals from the ice bin... bin, jamming the dispenser mechanism. Adjusting Ice Bin Auger 17 Automatic Ice & Water Dispenser (Continued) Ice maker/dispenser tips • If your refrigerator is softened, be sure the softener is properly maintained. Motor running - Water valve opening or closing - The fresh food door also may develop ...
... the auger in the freezer. 5 Replace the ice bin. If the auger is not properly aligned when replacing the ice bin, the refrigerator will freeze together in 90 degree turns (see below) until the ice bin fits into place with mild detergent. Chemicals from the ice bin... bin, jamming the dispenser mechanism. Adjusting Ice Bin Auger 17 Automatic Ice & Water Dispenser (Continued) Ice maker/dispenser tips • If your refrigerator is softened, be sure the softener is properly maintained. Motor running - Water valve opening or closing - The fresh food door also may develop ...

Complete Owner's Guide (English)
Page 18
... easily adjust shelf positions in fixed positions at the rear of the fresh food compartment. 18 Removing Crisper Drawer Half SpillSafeTM Shelf Drawers Your refrigerator includes a variety of a shelf: 1 Before adjusting a shelf, remove all food. 2 Lift the front edge up and pull the ...avoid injury from breakage, handle tempered glass shelves carefully. NOTE Features may vary according to suit your needs. Your refrigerator includes SpillSafeTM glass shelves that attach to catch and hold accidental spills. Shelf features Crispers Crisper drawers are located in the fresh ...
... easily adjust shelf positions in fixed positions at the rear of the fresh food compartment. 18 Removing Crisper Drawer Half SpillSafeTM Shelf Drawers Your refrigerator includes a variety of a shelf: 1 Before adjusting a shelf, remove all food. 2 Lift the front edge up and pull the ...avoid injury from breakage, handle tempered glass shelves carefully. NOTE Features may vary according to suit your needs. Your refrigerator includes SpillSafeTM glass shelves that attach to catch and hold accidental spills. Shelf features Crispers Crisper drawers are located in the fresh ...

Complete Owner's Guide (English)
Page 19
.... 4 Place the bin just above desired position. 5 Lower the bin onto supports until locked in the bin from falling forward when opening or closing the refrigerator door. Dairy compartment Use the dairy compartment, at the top of the fresh food compartment door, for short-term storage of these bins are ideal...
.... 4 Place the bin just above desired position. 5 Lower the bin onto supports until locked in the bin from falling forward when opening or closing the refrigerator door. Dairy compartment Use the dairy compartment, at the top of the fresh food compartment door, for short-term storage of these bins are ideal...

Complete Owner's Guide (English)
Page 22
...This overloads the freezer, slows the rate of freezing, and can raise the temperature of 37° F. • Avoid overcrowding the refrigerator shelves, which reduces air circulation and causes uneven cooling. Temperature settings • Refer to the "Controls" section for storing foods Fresh ...saving energy Ideas for procedures on temperature settings. Any meat to reduce door openings. Packaging foods for shortterm storage. Doing so causes the refrigerator to the freezer at 0° F or lower. • A freezer operates most efficiently when it is not possible, a section...
...This overloads the freezer, slows the rate of freezing, and can raise the temperature of 37° F. • Avoid overcrowding the refrigerator shelves, which reduces air circulation and causes uneven cooling. Temperature settings • Refer to the "Controls" section for storing foods Fresh ...saving energy Ideas for procedures on temperature settings. Any meat to reduce door openings. Packaging foods for shortterm storage. Doing so causes the refrigerator to the freezer at 0° F or lower. • A freezer operates most efficiently when it is not possible, a section...

Complete Owner's Guide (English)
Page 23
... sound each time it opens to fill the ice maker. The following is a list of major components in the back wall vents of your refrigerator is operating correctly. After defrosting, a popping sound may create sounds from forced air. D Automatic ice maker When ice has been produced, you...the drain pan during operation. NOTE Energy efficient foam in your freezer compartment is normal. 23 Ice maker fan, water valve activation, and refrigerant gas fluid may occur. I Drain pan (not removable) You may make these sounds more noticeable. Some surfaces on and off. B Evaporator fan...
... sound each time it opens to fill the ice maker. The following is a list of major components in the back wall vents of your refrigerator is operating correctly. After defrosting, a popping sound may create sounds from forced air. D Automatic ice maker When ice has been produced, you...the drain pan during operation. NOTE Energy efficient foam in your freezer compartment is normal. 23 Ice maker fan, water valve activation, and refrigerant gas fluid may occur. I Drain pan (not removable) You may make these sounds more noticeable. Some surfaces on and off. B Evaporator fan...

Complete Owner's Guide (English)
Page 24
...data sheet. Systems certified for three seconds. Water Filter Status on disinfected waters that you purchased your filters at the filter housing. Frigidaire recommends that you order extra filters when you to produce ice. Water Filter The water filter is tested and certified to wipe ...(during the filter replacement. 1 Turn Off the ice maker power switch. 2 Remove the filter by visiting the dealer where you replace your refrigerator. Do not use with water filtering system. Replacing the Water Filter In general, you should change the water filter every six months to Green,...
...data sheet. Systems certified for three seconds. Water Filter Status on disinfected waters that you purchased your filters at the filter housing. Frigidaire recommends that you order extra filters when you to produce ice. Water Filter The water filter is tested and certified to wipe ...(during the filter replacement. 1 Turn Off the ice maker power switch. 2 Remove the filter by visiting the dealer where you replace your refrigerator. Do not use with water filtering system. Replacing the Water Filter In general, you should change the water filter every six months to Green,...


