

Installation Instructions
Page 1
... line. Push water supply line into water valve inlet as far as shown. 6. The nut and ferrule are installing your refrigerator without an existing valve, Frigidaire recommends its Smart Choice® water line kit 5305513409 (with a 6 ft. Coil excess water supply line (copper tubing only... Use & Care Guide for more details. Slide compression nut onto valve inlet and finger tighten compression nut onto valve. Reconnect refrigerator to www.frigidaire.com for more information. Stainless Steel Water Line) and for homes without connecting it will not be used for the supply...
... line. Push water supply line into water valve inlet as far as shown. 6. The nut and ferrule are installing your refrigerator without an existing valve, Frigidaire recommends its Smart Choice® water line kit 5305513409 (with a 6 ft. Coil excess water supply line (copper tubing only... Use & Care Guide for more details. Slide compression nut onto valve inlet and finger tighten compression nut onto valve. Reconnect refrigerator to www.frigidaire.com for more information. Stainless Steel Water Line) and for homes without connecting it will not be used for the supply...
Complete Owner's Guide
Page 1
All about the Use &Care of your Refrigerator 242292002 (January 2015) TABLE OF CONTENTS Important Safety Instructions 2 Storage Features 22 Features at a Glance 4 Storing Food and Saving Energy 26 Installation 5 Normal Operating Sounds and Sights..........27 Door Removal Instructions 9 Changing the Filter 28 Installing Door Handles 11 Care and Cleaning 31 Connecting Water Supply 15 Before you Call 34 Controls 17 Major Appliance Warranty 36 Automatic Ice Maker 21 www.frigidaire.com USA 1-800-944-9044 www.frigidaire.ca Canada 1-800-265-8352
All about the Use &Care of your Refrigerator 242292002 (January 2015) TABLE OF CONTENTS Important Safety Instructions 2 Storage Features 22 Features at a Glance 4 Storing Food and Saving Energy 26 Installation 5 Normal Operating Sounds and Sights..........27 Door Removal Instructions 9 Changing the Filter 28 Installing Door Handles 11 Care and Cleaning 31 Connecting Water Supply 15 Before you Call 34 Controls 17 Major Appliance Warranty 36 Automatic Ice Maker 21 www.frigidaire.com USA 1-800-944-9044 www.frigidaire.ca Canada 1-800-265-8352
Complete Owner's Guide
Page 2
...become airtight chambers, and can cause severe cuts, and also destroy finishes if they will result in death or serious injury. Junked or abandoned refrigerators or freezers are not problems of the past. For your Safety • DO NOT store or use these items to play. Obey all safety... messages that follow the instructions below to avoid possible injury or death. Proper Disposal of your old refrigerator or freezer, please follow this symbol to help prevent accidents. 2 It is used to alert you are secure and tight Door seals...
...become airtight chambers, and can cause severe cuts, and also destroy finishes if they will result in death or serious injury. Junked or abandoned refrigerators or freezers are not problems of the past. For your Safety • DO NOT store or use these items to play. Obey all safety... messages that follow the instructions below to avoid possible injury or death. Proper Disposal of your old refrigerator or freezer, please follow this symbol to help prevent accidents. 2 It is used to alert you are secure and tight Door seals...
Complete Owner's Guide
Page 3
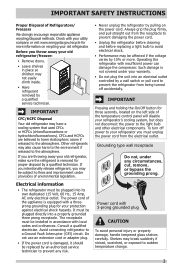
... stratospheric ozone if released to fines and imprisonment under provisions of the appliance is not covered under any risk. • Never unplug the refrigerator by pulling on recycling your warranty. • Do not plug the unit into its own dedicated 115 Volt, 60 Hz., 15 Amp,... button for more . Power cord with insufficient power can damage the compressor. CFCs and HCFCs are throwing away your old refrigerator, make sure the refrigerant is damaged, it should be replaced by an authorized service technician to sudden temperature change. 3 Electrical information • The...
... stratospheric ozone if released to fines and imprisonment under provisions of the appliance is not covered under any risk. • Never unplug the refrigerator by pulling on recycling your warranty. • Do not plug the unit into its own dedicated 115 Volt, 60 Hz., 15 Amp,... button for more . Power cord with insufficient power can damage the compressor. CFCs and HCFCs are throwing away your old refrigerator, make sure the refrigerant is damaged, it should be replaced by an authorized service technician to sudden temperature change. 3 Electrical information • The...
Complete Owner's Guide
Page 4
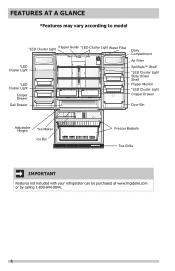
FEATURES AT A GLANCE *Features may vary according to model *LED Cluster Light Flipper Guide *LED Cluster Light Water Filter *LED Cluster Light *LED Cluster Light Crisper Drawer Deli Drawer Dairy Compartment Air Filter SpillSafe™ Shelf *LED Cluster Light Slide Under Shelf Flipper Mullion *LED Cluster Light Crisper Drawer Door Bin Adjustable Hinges *Ice Maker Ice Bin Freezer Baskets Toe Grille IMPORTANT Features not included with your refrigerator can be purchased at www.frigidaire.com or by calling 1-800-944-9044. 4
FEATURES AT A GLANCE *Features may vary according to model *LED Cluster Light Flipper Guide *LED Cluster Light Water Filter *LED Cluster Light *LED Cluster Light Crisper Drawer Deli Drawer Dairy Compartment Air Filter SpillSafe™ Shelf *LED Cluster Light Slide Under Shelf Flipper Mullion *LED Cluster Light Crisper Drawer Door Bin Adjustable Hinges *Ice Maker Ice Bin Freezer Baskets Toe Grille IMPORTANT Features not included with your refrigerator can be purchased at www.frigidaire.com or by calling 1-800-944-9044. 4
Complete Owner's Guide
Page 5
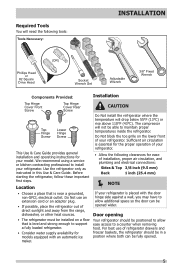
...on a floor that is near a grounded, non-GFCI, electrical outlet. Sufficient air circulation is essential for the proper operation of your refrigerator. • Allow the following tools: Tools Necessary: INSTALLATION (OR) Phillips Head or #2 Square Drive Head Socket Wrench Set Adjustable Wrench ..., and plumbing and electrical connections: Sides & Top 3/8 inch (9.5 mm) Back 1 inch (25.4 mm) NOTE If your refrigerator is placed with an automatic ice maker. We recommend using a service or kitchen contracting professional to a counter when removing food. The compressor ...
...on a floor that is near a grounded, non-GFCI, electrical outlet. Sufficient air circulation is essential for the proper operation of your refrigerator. • Allow the following tools: Tools Necessary: INSTALLATION (OR) Phillips Head or #2 Square Drive Head Socket Wrench Set Adjustable Wrench ..., and plumbing and electrical connections: Sides & Top 3/8 inch (9.5 mm) Back 1 inch (25.4 mm) NOTE If your refrigerator is placed with an automatic ice maker. We recommend using a service or kitchen contracting professional to a counter when removing food. The compressor ...

Complete Owner's Guide
Page 6
... using the front rollers (select models): 1 Slightly open drawer and slightly loosen four drawer screws (two on each door. A B Level Refrigerator & Adjust Doors (if necessary) Guidelines for final positioning of your refrigerator: • All four corners of the cabinet must rest firmly on the floor. • The sides should tilt ¼ inch...
... using the front rollers (select models): 1 Slightly open drawer and slightly loosen four drawer screws (two on each door. A B Level Refrigerator & Adjust Doors (if necessary) Guidelines for final positioning of your refrigerator: • All four corners of the cabinet must rest firmly on the floor. • The sides should tilt ¼ inch...

Complete Owner's Guide
Page 7
To adjust the door stop: Door stop until it makes contact with rollers. 7 A Open Door 90 Degrees Bottom of the refrigerator door. Re-tighten Screw Retighten Screw 6 Ensure door stops in desired location before resuming normal use. B Loosen or Remove Screw Rotate Door to Desired Location ...
To adjust the door stop: Door stop until it makes contact with rollers. 7 A Open Door 90 Degrees Bottom of the refrigerator door. Re-tighten Screw Retighten Screw 6 Ensure door stops in desired location before resuming normal use. B Loosen or Remove Screw Rotate Door to Desired Location ...

Complete Owner's Guide
Page 9
... connector firmly, depress the latch, and pull apart. Remove the two screws from the top hinge. DOOR REMOVAL INSTRUCTIONS Getting through narrow spaces If your refrigerator will not fit through an entrance area, you can remove the doors. Check first by grasping both sides of the bottom hinge and set it...
... connector firmly, depress the latch, and pull apart. Remove the two screws from the top hinge. DOOR REMOVAL INSTRUCTIONS Getting through narrow spaces If your refrigerator will not fit through an entrance area, you can remove the doors. Check first by grasping both sides of the bottom hinge and set it...

Complete Owner's Guide
Page 10
... Remove Hex Head Drawer Screw Remove Hex Head Drawer Screw Remove Hex Head Drawer Screw 3 Check gasket seal around top, bottom, and sides of the refrigerator. Be careful not to rotate. 5 Close drawer and recheck the seal on each side). Push Against Freezer Drawer Grab Drawer At Center From Both Sides...
... Remove Hex Head Drawer Screw Remove Hex Head Drawer Screw Remove Hex Head Drawer Screw 3 Check gasket seal around top, bottom, and sides of the refrigerator. Be careful not to rotate. 5 Close drawer and recheck the seal on each side). Push Against Freezer Drawer Grab Drawer At Center From Both Sides...

Complete Owner's Guide
Page 11
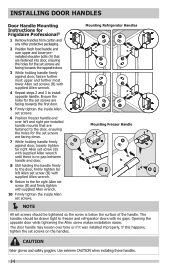
... may loosen over left Allen set screw (B) with supplied Allen wrench. 8 Return to freezer and refrigerator doors with no gaps. CAUTION Wear gloves and safety goggles. Mounting Refrigerator Handles Mounting Freezer Handle NOTE All set screws should be tightened so the screw is no... screw (B) with supplied Allen wrench until there is below the surface of the handle. INSTALLING DOOR HANDLES Door Handle Mounting Instructions for Frigidaire 1 Remove handles from carton and any other protective packaging. 2 Position fresh food handle end caps over upper and lower pre-installed ...
... may loosen over left Allen set screw (B) with supplied Allen wrench. 8 Return to freezer and refrigerator doors with no gaps. CAUTION Wear gloves and safety goggles. Mounting Refrigerator Handles Mounting Freezer Handle NOTE All set screws should be tightened so the screw is no... screw (B) with supplied Allen wrench until there is below the surface of the handle. INSTALLING DOOR HANDLES Door Handle Mounting Instructions for Frigidaire 1 Remove handles from carton and any other protective packaging. 2 Position fresh food handle end caps over upper and lower pre-installed ...

Complete Owner's Guide
Page 12
...and firmly tighten with supplied Allen wrench until there is below the surface of the handle. INSTALLING DOOR HANDLES Door Handle Mounting Instructions for Frigidaire Gallery® 1 Remove handles from carton and any other protective packaging. 2 Position fresh food handle end over upper and lower pre-...the set screws are facing towards the first door. 5 Position freezer handle end over time or if it was installed improperly. Mounting Refrigerator Handles Mounting Freezer Handle NOTE All set screws should be tightened so the screw is no gaps. The handles should be...
...and firmly tighten with supplied Allen wrench until there is below the surface of the handle. INSTALLING DOOR HANDLES Door Handle Mounting Instructions for Frigidaire Gallery® 1 Remove handles from carton and any other protective packaging. 2 Position fresh food handle end over upper and lower pre-...the set screws are facing towards the first door. 5 Position freezer handle end over time or if it was installed improperly. Mounting Refrigerator Handles Mounting Freezer Handle NOTE All set screws should be tightened so the screw is no gaps. The handles should be...

Complete Owner's Guide
Page 13
... improperly. Opening the opposite door while tightening the Allen screw makes installation easier. The handles should be drawn tight to freezer and refrigerator doors with no gap between handle and door. 7 Still holding the handle firmly to the door, firmly tighten far left and ... this happens, tighten the set screws should be tightened so the screw is no gaps. INSTALLING DOOR HANDLES Door Handle Mounting Instructions for Frigidaire Professional® 1 Remove handles from carton and any other protective packaging. 2 Position fresh food handle end over upper and lower pre-installed...
... improperly. Opening the opposite door while tightening the Allen screw makes installation easier. The handles should be drawn tight to freezer and refrigerator doors with no gap between handle and door. 7 Still holding the handle firmly to the door, firmly tighten far left and ... this happens, tighten the set screws should be tightened so the screw is no gaps. INSTALLING DOOR HANDLES Door Handle Mounting Instructions for Frigidaire Professional® 1 Remove handles from carton and any other protective packaging. 2 Position fresh food handle end over upper and lower pre-installed...
Complete Owner's Guide
Page 14
...supplied Allen wrench. 9 Return to the far right Allen set screws on the handles. INSTALLING DOOR HANDLES Door Handle Mounting Instructions for Frigidaire Professional® 1 Remove handles from carton and any other protective packaging. 2 Position fresh food handle end over upper and lower ... firmly against door, loosely tighten far right Allen set screw (B) with supplied Allen wrench until there is below the surface of the handle. Mounting Refrigerator Handles A A B B B B A A Mounting Freezer Handle NOTE All set screws should be tightened so the screw is no ...
...supplied Allen wrench. 9 Return to the far right Allen set screws on the handles. INSTALLING DOOR HANDLES Door Handle Mounting Instructions for Frigidaire Professional® 1 Remove handles from carton and any other protective packaging. 2 Position fresh food handle end over upper and lower ... firmly against door, loosely tighten far right Allen set screw (B) with supplied Allen wrench until there is below the surface of the handle. Mounting Refrigerator Handles A A B B B B A A Mounting Freezer Handle NOTE All set screws should be tightened so the screw is no ...

Complete Owner's Guide
Page 15
... measure the distance from the ice maker inlet valve at the back of the refrigerator to your household water system. Stainless Steel Water Line) and for homes without an existing valve, Frigidaire recommends its Smart Choice® water line kit 5305513409 (with water pressure between ...Water Supply Line, You Will Need: • Basic Tools: adjustable wrench, flat-blade screwdriver, and PhillipsTM screwdriver • Access to www.frigidaire.com/store for homes with existing valves its Smart Choice® water line kit 5305510264 (with self-tapping saddle valve). Please refer to a...
... measure the distance from the ice maker inlet valve at the back of the refrigerator to your household water system. Stainless Steel Water Line) and for homes without an existing valve, Frigidaire recommends its Smart Choice® water line kit 5305513409 (with water pressure between ...Water Supply Line, You Will Need: • Basic Tools: adjustable wrench, flat-blade screwdriver, and PhillipsTM screwdriver • Access to www.frigidaire.com/store for homes with existing valves its Smart Choice® water line kit 5305510264 (with self-tapping saddle valve). Please refer to a...

Complete Owner's Guide
Page 16
... tubing - Tighten another half turn with a wrench; Coil excess water supply line (copper tubing only), about 2½ turns, behind refrigerator as shown and arrange coils so they do not vibrate or wear against any connections that leak. 8. Remove plastic cap from household water...supply at shutoff valve. 3. With steel clamp and screw, secure water supply line (copper tubing only) to electrical power source. Reconnect refrigerator to rear panel of water supply line into sink or bucket. Stainless Steel water line from electric power source. 2. The nut and ferrule...
... tubing - Tighten another half turn with a wrench; Coil excess water supply line (copper tubing only), about 2½ turns, behind refrigerator as shown and arrange coils so they do not vibrate or wear against any connections that leak. 8. Remove plastic cap from household water...supply at shutoff valve. 3. With steel clamp and screw, secure water supply line (copper tubing only) to electrical power source. Reconnect refrigerator to rear panel of water supply line into sink or bucket. Stainless Steel water line from electric power source. 2. The nut and ferrule...
Complete Owner's Guide
Page 17
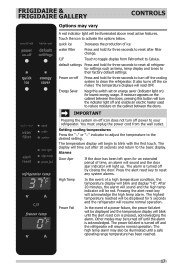
...the temperature to the basic display. The display will time out after filter change. Pressing the alert reset key will read OFF. FRIGIDAIRE & FRIGIDAIRE GALLERY CONTROLS Options may vary A red indicator light will be red. It also turns off power to Celsius. The temperature displays ... reached will be displayed and the temperature display will resume normal operation. default settings Press and hold for 5 seconds and the refrigerator will blink until the alarm is pressed, acknowledging the alarm. The temperature display will light up. Alarms Door Ajar High Temp Power...
...the temperature to the basic display. The display will time out after filter change. Pressing the alert reset key will read OFF. FRIGIDAIRE & FRIGIDAIRE GALLERY CONTROLS Options may vary A red indicator light will be red. It also turns off power to Celsius. The temperature displays ... reached will be displayed and the temperature display will resume normal operation. default settings Press and hold for 5 seconds and the refrigerator will blink until the alarm is pressed, acknowledging the alarm. The temperature display will light up. Alarms Door Ajar High Temp Power...

Complete Owner's Guide
Page 18
... until Sabbath Mode is deactivated. Sabbath Mode is turned ON and OFF by simultaneously pressing and holding both the freezer "∨" and refrigerator "∧" indicators for about 10 minutes. If a high temperature alarm is activated during this time, for example due to display, even.... For further assistance, guidelines for health reasons. The alarm will then silence on the control panel. 18 CONTROLS FRIGIDAIRE & FRIGIDAIRE GALLERY Sabbath Mode The Sabbath Mode is a feature that disables portions of the refrigerator and its own and a red high temperature icon will display.
... until Sabbath Mode is deactivated. Sabbath Mode is turned ON and OFF by simultaneously pressing and holding both the freezer "∨" and refrigerator "∧" indicators for about 10 minutes. If a high temperature alarm is activated during this time, for example due to display, even.... For further assistance, guidelines for health reasons. The alarm will then silence on the control panel. 18 CONTROLS FRIGIDAIRE & FRIGIDAIRE GALLERY Sabbath Mode The Sabbath Mode is a feature that disables portions of the refrigerator and its own and a red high temperature icon will display.
Complete Owner's Guide
Page 19
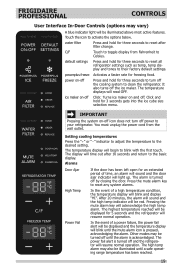
..., the power fail alert will be red. Setting cooling temperatures Press the "+" or "-" indicator to adjust the temperature to your refrigerator. The highest temperature reached will be illuminated above most active features. water filter Press and hold for three seconds to blink with ... an alarm will sound and the door ajar indicator will time out after filter change. The alarm is pressed, acknowledging the alarm. FRIGIDAIRE PROFESSIONAL CONTROLS User Interface In-Door Controls (options may vary) A blue indicator light will read OFF. C/F Touch to toggle display ...
..., the power fail alert will be red. Setting cooling temperatures Press the "+" or "-" indicator to adjust the temperature to your refrigerator. The highest temperature reached will be illuminated above most active features. water filter Press and hold for three seconds to blink with ... an alarm will sound and the door ajar indicator will time out after filter change. The alarm is pressed, acknowledging the alarm. FRIGIDAIRE PROFESSIONAL CONTROLS User Interface In-Door Controls (options may vary) A blue indicator light will read OFF. C/F Touch to toggle display ...

Complete Owner's Guide
Page 20
... will continue to a door left ajar, the alarm will display. Refrigerator stays in accordance with observance of the weekly Sabbath and religious holidays within the Orthodox Jewish community. FRIGIDAIRE PROFESSIONAL 20 CONTROLS Sabbath Mode The Sabbath Mode is a feature that disables... portions of the refrigerator and its own and a red high temperature icon will sound intermittently for...
... will continue to a door left ajar, the alarm will display. Refrigerator stays in accordance with observance of the weekly Sabbath and religious holidays within the Orthodox Jewish community. FRIGIDAIRE PROFESSIONAL 20 CONTROLS Sabbath Mode The Sabbath Mode is a feature that disables... portions of the refrigerator and its own and a red high temperature icon will sound intermittently for...


