
Complete Owner's Guide
Page 2
... your purchase of our product and are representative. NOTE Please attach sales receipt here for future reference. The graphics on your model and serial numbers below for future reference. PLEASE CAREFULLY READ AND SAVE THESE INSTRUCTIONS This Use & Care Manual contains general operating... instructions for your appliance may not look exactly like those shown. Model Number: Serial Number: Purchase Date: © 2013 Electrolux Canada Corp. Serial Plate Location Congratulations on your appliance and feature information ...
... your purchase of our product and are representative. NOTE Please attach sales receipt here for future reference. The graphics on your model and serial numbers below for future reference. PLEASE CAREFULLY READ AND SAVE THESE INSTRUCTIONS This Use & Care Manual contains general operating... instructions for your appliance may not look exactly like those shown. Model Number: Serial Number: Purchase Date: © 2013 Electrolux Canada Corp. Serial Plate Location Congratulations on your appliance and feature information ...

Complete Owner's Guide
Page 4
..., and local code requirements. Children should never be allowed to sit or stand on the oven door to play around the appliance. Do not remove model/serial number plate. • Proper Installation. Do not repair or replace any part of the appliance. CAUTION Electronic controllers can result in the manuals. Destroy...
..., and local code requirements. Children should never be allowed to sit or stand on the oven door to play around the appliance. Do not remove model/serial number plate. • Proper Installation. Do not repair or replace any part of the appliance. CAUTION Electronic controllers can result in the manuals. Destroy...

Complete Owner's Guide
Page 7
... user to have the appropriate outlet with limits for any wall oven. Move birds to the fumes given off and on different branch circuits. For models factory-equipped with a power cord: For maximum safety, the power cord must be determined by one or more of the following: • Reorient the receiving...
... user to have the appropriate outlet with limits for any wall oven. Move birds to the fumes given off and on different branch circuits. For models factory-equipped with a power cord: For maximum safety, the power cord must be determined by one or more of the following: • Reorient the receiving...

Complete Owner's Guide
Page 11
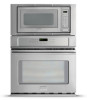
Self-clean convection oven. 12. Bottom trim 11 14 1 5 4 6 7 8 9 10 12 13 15 NOTE The features shown for your appliance may vary according to model type & color. 11 Microwave control. 2. Safety door latches. 3. Microwave turntable. 5. Electronic oven control with see-through window. 4. Door handle. 14. Oven vent. 9. Microwave oven light. 6. ...
Self-clean convection oven. 12. Bottom trim 11 14 1 5 4 6 7 8 9 10 12 13 15 NOTE The features shown for your appliance may vary according to model type & color. 11 Microwave control. 2. Safety door latches. 3. Microwave turntable. 5. Electronic oven control with see-through window. 4. Door handle. 14. Oven vent. 9. Microwave oven light. 6. ...

Complete Owner's Guide
Page 12
... audible signal will rotate clockwise or counterclockwise. Only remove for your appliance may assist you. 4 6 12 1 3 2 14 11 3 8 7 1 One touch door open button Push to model type & color. When HELP is lighted in the center of the Microwave Oven floor. 8 Removable turntable Place the turntable on the turntable support securely...
... audible signal will rotate clockwise or counterclockwise. Only remove for your appliance may assist you. 4 6 12 1 3 2 14 11 3 8 7 1 One touch door open button Push to model type & color. When HELP is lighted in the center of the Microwave Oven floor. 8 Removable turntable Place the turntable on the turntable support securely...

Complete Owner's Guide
Page 23
... OVEN RACKS ALWAYS ARRANGE OVEN RACKS WHEN THE OVEN IS COOL (PRIOR TO OPERATING THE OVEN). For best air circulation and baking results allow 2'' to model type & color. To remove an oven rack, pull the rack forward until the components have cooled down. CAUTION Some... models are equipped with a blower which runs in center of oven. Single Oven Rack RECOMMENDED RACK POSITION Food Rack Position Broiling meats, chicken or fish 3 ...
... OVEN RACKS ALWAYS ARRANGE OVEN RACKS WHEN THE OVEN IS COOL (PRIOR TO OPERATING THE OVEN). For best air circulation and baking results allow 2'' to model type & color. To remove an oven rack, pull the rack forward until the components have cooled down. CAUTION Some... models are equipped with a blower which runs in center of oven. Single Oven Rack RECOMMENDED RACK POSITION Food Rack Position Broiling meats, chicken or fish 3 ...

Complete Owner's Guide
Page 24
... Figure 2 Flat Half Oven Rack - The Flat Oven Handle Rack has an handle to maximize cooking space (See Figure 4). The Flat Oven Half Rack (some models). • Offset Oven Rack (Figure 4). Wait until the oven has completely cooled if possible. Flat Half Oven Rack - BEFORE SETTING OVEN CONTROLS TYPES OF OVEN... may be equipped with three types of the oven rack, as shown; • Flat Handle Oven Rack (Figure 1). • Flat Oven Half Rack (Figure 2 & 3) (some models) has a removable insert that extends beyond the edge of insert (See figure 6) and lay insert down.
... Figure 2 Flat Half Oven Rack - The Flat Oven Handle Rack has an handle to maximize cooking space (See Figure 4). The Flat Oven Half Rack (some models). • Offset Oven Rack (Figure 4). Wait until the oven has completely cooled if possible. Flat Half Oven Rack - BEFORE SETTING OVEN CONTROLS TYPES OF OVEN... may be equipped with three types of the oven rack, as shown; • Flat Handle Oven Rack (Figure 1). • Flat Oven Half Rack (Figure 2 & 3) (some models) has a removable insert that extends beyond the edge of insert (See figure 6) and lay insert down.

Complete Owner's Guide
Page 25
... select between the Convection Bake, Convection Roast and Convection Broil cooking features. 15. CONVECT PAD-Use to select the broil cooking feature MODEL B 14. IMPORTANT THINGS TO KNOW BEFORE SETTING ANY OVEN COOKING FEATURE This appliance has been factory pre-set at any oven feature... will sound to remind you to start 18 4 5 6 off 7890 time. 4. Detailed instructions for a cooking feature. STEAM CLEAN-Use to enter MODEL A the length of the functions listed above, unless specified in the oven. BAKE TIME PAD-Use to start or stop cooking. 7. START...
... select between the Convection Bake, Convection Roast and Convection Broil cooking features. 15. CONVECT PAD-Use to select the broil cooking feature MODEL B 14. IMPORTANT THINGS TO KNOW BEFORE SETTING ANY OVEN COOKING FEATURE This appliance has been factory pre-set at any oven feature... will sound to remind you to start 18 4 5 6 off 7890 time. 4. Detailed instructions for a cooking feature. STEAM CLEAN-Use to enter MODEL A the length of the functions listed above, unless specified in the oven. BAKE TIME PAD-Use to start or stop cooking. 7. START...

Complete Owner's Guide
Page 30
... cooking temperature has already been converted for some foods 4 but the overall result is no sides or very low sides to allow heated air to model type & color. 30 Some food may slightly increase cook time for convection baking there is time saved. Convection Baking Tips: • Always preheat your oven...
... cooking temperature has already been converted for some foods 4 but the overall result is no sides or very low sides to allow heated air to model type & color. 30 Some food may slightly increase cook time for convection baking there is time saved. Convection Baking Tips: • Always preheat your oven...

Complete Owner's Guide
Page 35
... feature, when set correctly, will not work properly until Continu appears then press START to the probe receptacle when setting this option. NOTE On some models the probe receptacle can be connected to accept. 35 Be sure to continue cooking after reaching the target temperature must be done when the oven...
... feature, when set correctly, will not work properly until Continu appears then press START to the probe receptacle when setting this option. NOTE On some models the probe receptacle can be connected to accept. 35 Be sure to continue cooking after reaching the target temperature must be done when the oven...

Complete Owner's Guide
Page 36
... the error message continues, the probe may be defective and need to be sure that cooking it to only 140°F/60°C means some models the receptacle is located on the top of the probe all the way into the receptacle. When Prob ERR displays, the oven control will revert...
... the error message continues, the probe may be defective and need to be sure that cooking it to only 140°F/60°C means some models the receptacle is located on the top of the probe all the way into the receptacle. When Prob ERR displays, the oven control will revert...

Complete Owner's Guide
Page 39
... hold both the BAKE TIME and DELAY START pads for at any further changes and the oven is properly set with the correct time of models with the Sabbath feature, please visit the web at least 3 seconds. This will turn OFF the Sabbath feature press and hold both the BAKE TIME...
... hold both the BAKE TIME and DELAY START pads for at any further changes and the oven is properly set with the correct time of models with the Sabbath feature, please visit the web at least 3 seconds. This will turn OFF the Sabbath feature press and hold both the BAKE TIME...

Complete Owner's Guide
Page 43
... use a mild cleanser and non abrasive scouring sponge. Avoid the use of any sort of water and vinegar. EASY CARE™ STAINLESS STEEL (some models). Rinse with clean water and dry with a soft cloth. Wipe interior with a soft clean cloth. for stainless steel use as they occur. The ... cord before cleaning or leave the door open the microwave oven door before cleaning. Clean the stainless with Easy Care™ Stainless Steel (some models) Your microwave oven finish may overheat and cause smoke or possibly catch fire. If the control panel becomes soiled, open to ...
... use a mild cleanser and non abrasive scouring sponge. Avoid the use of any sort of water and vinegar. EASY CARE™ STAINLESS STEEL (some models). Rinse with clean water and dry with a soft cloth. Wipe interior with a soft clean cloth. for stainless steel use as they occur. The ... cord before cleaning or leave the door open the microwave oven door before cleaning. Clean the stainless with Easy Care™ Stainless Steel (some models) Your microwave oven finish may overheat and cause smoke or possibly catch fire. If the control panel becomes soiled, open to ...

Complete Owner's Guide
Page 44
dry and polish with stainless steel (some models). Do not use other types of cleaners containing any harsh abrasive cleaning materials on the outside glass of the door. To remove control knobs, turn ... not use any store bought cleaners like stainless steel cleaners or any other liquid cleaners, abrasive cleaners, scouring pads, or paper towels- On self-clean models, the oven door gasket is essential for 30 to use spray oven cleaners on the control panel- CARE & CLEANING (OVEN CLEANING CHART) CLEANING VARIOUS PARTS...
dry and polish with stainless steel (some models). Do not use other types of cleaners containing any harsh abrasive cleaning materials on the outside glass of the door. To remove control knobs, turn ... not use any store bought cleaners like stainless steel cleaners or any other liquid cleaners, abrasive cleaners, scouring pads, or paper towels- On self-clean models, the oven door gasket is essential for 30 to use spray oven cleaners on the control panel- CARE & CLEANING (OVEN CLEANING CHART) CLEANING VARIOUS PARTS...

Wiring Diagram
Page 2
...RED POWER TRANSFORMER HIGH VOLTAGE CAPACITOR xx µF HIGH VOLTAGE RECTIFIER WHT WHT WHT WHT WHT "TO SOURCE" "TO LOAD" GRY COM. ONLY CERTAIN MODELS USE THE ABSOLUTE HUMIDITY SENSOR. 4. to the terminal with "N" mark on the power supply cord. WHT WHT WHT WHT "TO SOURCE" "TO LOAD...: The neutral (WHT/GRY) wire must always be connected to Oven cavity POWER SUPPLY CORD 120V 60Hz WHT BLK GRY RED N.O. ONLY CERTAIN MODELS USE THE ABSOLUTE HUMIDITY SENSOR. 4. RED RED COM. GRY ORG HIGH VOLTAGE COMPONENTS OVEN LAMP AND SOCKET SECONDARY INTERLOCK RELAY RED ORG COM. ...
...RED POWER TRANSFORMER HIGH VOLTAGE CAPACITOR xx µF HIGH VOLTAGE RECTIFIER WHT WHT WHT WHT WHT "TO SOURCE" "TO LOAD" GRY COM. ONLY CERTAIN MODELS USE THE ABSOLUTE HUMIDITY SENSOR. 4. to the terminal with "N" mark on the power supply cord. WHT WHT WHT WHT "TO SOURCE" "TO LOAD...: The neutral (WHT/GRY) wire must always be connected to Oven cavity POWER SUPPLY CORD 120V 60Hz WHT BLK GRY RED N.O. ONLY CERTAIN MODELS USE THE ABSOLUTE HUMIDITY SENSOR. 4. RED RED COM. GRY ORG HIGH VOLTAGE COMPONENTS OVEN LAMP AND SOCKET SECONDARY INTERLOCK RELAY RED ORG COM. ...

Wiring Diagram
Page 4
... PNK B1 F3 HUMIDITY SENSOR F2 F1 ORG ORG BRN ORG OL OVEN LAMP MONITOR TTM TURN TABLE MOTOR FM SWITCH FAN MOTOR N.C. ONLY CERTAIN MODELS USE THE ABSOLUTE HUMIDITY SENSOR. 4. RY2 RED WHT FAN MOTOR N.C. BLK H WHT CN-F 1 BLK 2 RED 3 WHT AH SENSOR SCHEMATIC NOTE:...WHT BLK GRY RED N.O. Door Closed 2. NOTES: GRY WHT WHT PRIMARY WHT INTERLOCK SWITCH 1.CIRCUITS SUBJECT TO CHANGE WITHOUT NOTICE. 2. ONLY CERTAIN MODELS USE THE ABSOLUTE HUMIDITY SENSOR. 4. POWER TRANSFORMER TOP (FINISH LEAD) TERMINAL MUST BE CONNECTED TO THE NEUTRAL (WHT) WIRE. BRN ORG GRN ...
... PNK B1 F3 HUMIDITY SENSOR F2 F1 ORG ORG BRN ORG OL OVEN LAMP MONITOR TTM TURN TABLE MOTOR FM SWITCH FAN MOTOR N.C. ONLY CERTAIN MODELS USE THE ABSOLUTE HUMIDITY SENSOR. 4. RY2 RED WHT FAN MOTOR N.C. BLK H WHT CN-F 1 BLK 2 RED 3 WHT AH SENSOR SCHEMATIC NOTE:...WHT BLK GRY RED N.O. Door Closed 2. NOTES: GRY WHT WHT PRIMARY WHT INTERLOCK SWITCH 1.CIRCUITS SUBJECT TO CHANGE WITHOUT NOTICE. 2. ONLY CERTAIN MODELS USE THE ABSOLUTE HUMIDITY SENSOR. 4. POWER TRANSFORMER TOP (FINISH LEAD) TERMINAL MUST BE CONNECTED TO THE NEUTRAL (WHT) WIRE. BRN ORG GRN ...

Installation Instructions
Page 1
...has been designed to fit a limited variety of cutout sizes to make the job of your installation should be to measure your model. The first step of installing easier. The oven must be centered to the cutout dimensions chart below for your current cutout ... (7.6 cm) Max. 1¼" (3.2 cm) Electrical Min. pages 1-6 Español - Do not remove spacers (if equipped) on the side walls and/or on model) Door Open (see note 2) * Suggested distance from floor is open. These spacers center the oven in USA P/N 807611001 (1304) Rev. Max. Max. 27"...
...has been designed to fit a limited variety of cutout sizes to make the job of your installation should be to measure your model. The first step of installing easier. The oven must be centered to the cutout dimensions chart below for your current cutout ... (7.6 cm) Max. 1¼" (3.2 cm) Electrical Min. pages 1-6 Español - Do not remove spacers (if equipped) on the side walls and/or on model) Door Open (see note 2) * Suggested distance from floor is open. These spacers center the oven in USA P/N 807611001 (1304) Rev. Max. Max. 27"...

Installation Instructions
Page 2
...flexible armored cable extending from the oven compartments before installing the combination oven. 2. IMPORTANT SAFETY INSTRUCTIONS • Be sure your model, see the insert sheet included in accordance with the American National Electrical Code ANSI/NFPA No. 70-latest edition, or with the ...wall oven. 3. Remove all instructions contained in ovens are being made. Do not discard oven removal tools found in electric oven models. Approved cooktops and built-in these instructions with the consumer. 5. Read all packing material from the appliance should not be used...
...flexible armored cable extending from the oven compartments before installing the combination oven. 2. IMPORTANT SAFETY INSTRUCTIONS • Be sure your model, see the insert sheet included in accordance with the American National Electrical Code ANSI/NFPA No. 70-latest edition, or with the ...wall oven. 3. Remove all instructions contained in ovens are being made. Do not discard oven removal tools found in electric oven models. Approved cooktops and built-in these instructions with the consumer. 5. Read all packing material from the appliance should not be used...

Installation Instructions
Page 4
...appliance inward. 5. Insert the oven into the cabinet opening. Slide oven inward leaving 1½" (3.8 cm) clearance between unit Figure 5 4 Model and Serial Number Location The serial plate is opened. Cabinet Installation IMPORTANT NOTE Do not lift the oven by the door handle. Remove the ... 1. Unpack the wall oven. Pull the armored cable through the neutral (white) wire, the appliance frame MUST NOT be sure to include the model and serial numbers and a lot number or letter from appliance Figure 4 U.L.-Listed Conduit Connector (or CSA listed) 4-WIRE GROUNDED JUNCTION BOX 4. ...
...appliance inward. 5. Insert the oven into the cabinet opening. Slide oven inward leaving 1½" (3.8 cm) clearance between unit Figure 5 4 Model and Serial Number Location The serial plate is opened. Cabinet Installation IMPORTANT NOTE Do not lift the oven by the door handle. Remove the ... 1. Unpack the wall oven. Pull the armored cable through the neutral (white) wire, the appliance frame MUST NOT be sure to include the model and serial numbers and a lot number or letter from appliance Figure 4 U.L.-Listed Conduit Connector (or CSA listed) 4-WIRE GROUNDED JUNCTION BOX 4. ...

Installation Instructions
Page 6
... a compromise for Service Checklist and operating instructions in the oven should feel heat coming from the inside the upper rear part above the oven (some models) provides cooling of the electronic oven controls once more. Each of the electronic oven controls: Bake - Broil - Refer to the Use and Care Guide for...
... a compromise for Service Checklist and operating instructions in the oven should feel heat coming from the inside the upper rear part above the oven (some models) provides cooling of the electronic oven controls once more. Each of the electronic oven controls: Bake - Broil - Refer to the Use and Care Guide for...


