

Complete Owner's Guide (English)
Page 1
All about the Use &Care of your Refrigerator 242063800 (November 2009) TABLE OF CONTENTS Important Safety Instructions 2 Installation 4 Door Removal Instructions 5 Handle Installation 6 Connecting Water Supply 8 Ice Service 9 Controls 9 Normal Operating Sounds and Sights 10 Care and Cleaning 11 Before you Call 12 Major Appliance Warranty 13 www.frigidaire.com USA 1-800-944-9044 www.frigidaire.ca Canada 1-800-265-8352
All about the Use &Care of your Refrigerator 242063800 (November 2009) TABLE OF CONTENTS Important Safety Instructions 2 Installation 4 Door Removal Instructions 5 Handle Installation 6 Connecting Water Supply 8 Ice Service 9 Controls 9 Normal Operating Sounds and Sights 10 Care and Cleaning 11 Before you Call 12 Major Appliance Warranty 13 www.frigidaire.com USA 1-800-944-9044 www.frigidaire.ca Canada 1-800-265-8352
Complete Owner's Guide (English)
Page 2
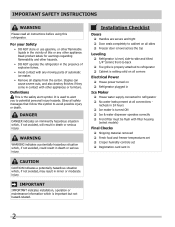
...in the presence of automatic ice maker. • Remove all staples from the carton. Obey all safety messages that follow this refrigerator. IMPORTANT IMPORTANT indicates installation, operation or maintenance information which , if not avoided, could result in minor or moderate injury. Read... CAUTION indicates a potentially hazardous situation which , if not avoided, will result in Ice Maker House water supply connected to refrigerator No water leaks present at all connections - Definitions This is important but not hazard-related. DANGER DANGER indicates an imminently ...
...in the presence of automatic ice maker. • Remove all staples from the carton. Obey all safety messages that follow this refrigerator. IMPORTANT IMPORTANT indicates installation, operation or maintenance information which , if not avoided, could result in minor or moderate injury. Read... CAUTION indicates a potentially hazardous situation which , if not avoided, will result in Ice Maker House water supply connected to refrigerator No water leaks present at all connections - Definitions This is important but not hazard-related. DANGER DANGER indicates an imminently ...

Complete Owner's Guide (English)
Page 3
... If you must unplug the power cord from being turned off power to sudden temperature change. 3 Before you throw away your old refrigerator/ freezer: • Remove doors. • Leave shelves in place so children may be replaced by an authorized service technician to...electrician. Cartons covered with a three-prong grounding plug for "just a few days". The receptacle must be installed in this refrigerator will sit for your old refrigerator or freezer, please follow the instructions below to a Ground Fault Interruptor (GFI) circuit. The power cord of your protection ...
... If you must unplug the power cord from being turned off power to sudden temperature change. 3 Before you throw away your old refrigerator/ freezer: • Remove doors. • Leave shelves in place so children may be replaced by an authorized service technician to...electrician. Cartons covered with a three-prong grounding plug for "just a few days". The receptacle must be installed in this refrigerator will sit for your old refrigerator or freezer, please follow the instructions below to a Ground Fault Interruptor (GFI) circuit. The power cord of your protection ...
Complete Owner's Guide (English)
Page 4
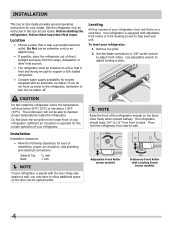
...plumbing and electrical connections: Sides & Top Back 3/8 inch 1 inch NOTE If your refrigerator is level and strong enough to support a fully loaded refrigerator. • Consider water supply availability for your refrigerator must be able to back. Do Not block the toe grille on a solid floor. To .... The compressor will drop below 55°F (13°C) or rise above 110°F (43°C). Use the refrigerator only as instructed in this Use & Care Guide. Installation Installation clearances • Allow the following clearances for the proper operation of your...
...plumbing and electrical connections: Sides & Top Back 3/8 inch 1 inch NOTE If your refrigerator is level and strong enough to support a fully loaded refrigerator. • Consider water supply availability for your refrigerator must be able to back. Do Not block the toe grille on a solid floor. To .... The compressor will drop below 55°F (13°C) or rise above 110°F (43°C). Use the refrigerator only as instructed in this Use & Care Guide. Installation Installation clearances • Allow the following clearances for the proper operation of your...

Complete Owner's Guide (English)
Page 5
...door off of door. Set door aside. 3 Unscrew center hinge pin using adjustable wrench. Ensure plastic washer stays on hinge pin. 4 Lift refrigerator door off center hinge pin. Trace around the hinge with adjustable wrench. 14 Remove cabinet and hinge hole plugs and move to "0" and ... Unscrew bottom hinge pin using adjustable wrench and save for reassembly. Before starting screws, use an awl to puncture the foam. 12 Position refrigerator door onto bottom hinge pin and screw center hinge pin through center hinge into top of bottom hinge and set aside. 5 Remove center hinge...
...door off of door. Set door aside. 3 Unscrew center hinge pin using adjustable wrench. Ensure plastic washer stays on hinge pin. 4 Lift refrigerator door off center hinge pin. Trace around the hinge with adjustable wrench. 14 Remove cabinet and hinge hole plugs and move to "0" and ... Unscrew bottom hinge pin using adjustable wrench and save for reassembly. Before starting screws, use an awl to puncture the foam. 12 Position refrigerator door onto bottom hinge pin and screw center hinge pin through center hinge into top of bottom hinge and set aside. 5 Remove center hinge...
Complete Owner's Guide (English)
Page 6
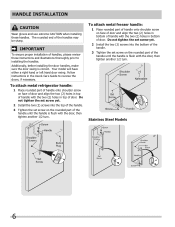
... screw on face of door and align the two (2) holes in the Use & Care Guide to installing the handles. Stainless Steel Models 6 To attach metal refrigerator handle: 1 Place rounded part of handle onto shoulder screw on the rounded part of the handle until the handle is correct. Follow instructions in bottom...
... screw on face of door and align the two (2) holes in the Use & Care Guide to installing the handles. Stainless Steel Models 6 To attach metal refrigerator handle: 1 Place rounded part of handle onto shoulder screw on the rounded part of the handle until the handle is correct. Follow instructions in bottom...
Complete Owner's Guide (English)
Page 7
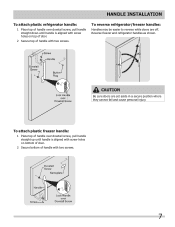
Handle installation To attach plastic refrigerator handle: 1 Place top of handle over dovetail screw, pull handle straight up until handle is aligned with screw holes on top of door. 2 Secure top ... screw, pull handle straight down until handle is aligned with screw holes on bottom of door. 2 Secure bottom of handle with two screws. 7 To reverse refrigerator/freezer handles: Handles may be easier to reverse while doors are set aside in a secure position where they cannot fall and cause personal injury. Reverse...
Handle installation To attach plastic refrigerator handle: 1 Place top of handle over dovetail screw, pull handle straight up until handle is aligned with screw holes on top of door. 2 Secure top ... screw, pull handle straight down until handle is aligned with screw holes on bottom of door. 2 Secure bottom of handle with two screws. 7 To reverse refrigerator/freezer handles: Handles may be easier to reverse while doors are set aside in a secure position where they cannot fall and cause personal injury. Reverse...
Complete Owner's Guide (English)
Page 8
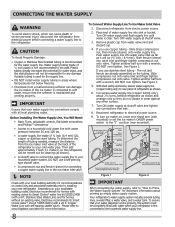
... the ice maker's On/Off power switch to rear panel of the refrigerator to your new refrigerator. Slide compression nut onto valve inlet and finger tighten compression nut onto valve. Reconnect refrigerator to www.frigidaire.com/store for more information. 8 To Connect Water Supply Line To ...power source. 2. DO NOT over tighten. Turn ON water supply at shutoff valve. 3. Then add approximately 7 feet (2.1 meters), so the refrigerator can be moved out for cleaning (as shown. 6. Coil excess water supply line (copper tubing only), about priming an empty water supply system...
... the ice maker's On/Off power switch to rear panel of the refrigerator to your new refrigerator. Slide compression nut onto valve inlet and finger tighten compression nut onto valve. Reconnect refrigerator to www.frigidaire.com/store for more information. 8 To Connect Water Supply Line To ...power source. 2. DO NOT over tighten. Turn ON water supply at shutoff valve. 3. Then add approximately 7 feet (2.1 meters), so the refrigerator can be moved out for cleaning (as shown. 6. Coil excess water supply line (copper tubing only), about priming an empty water supply system...
Complete Owner's Guide (English)
Page 9
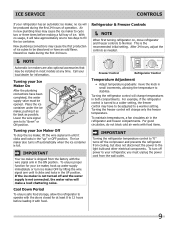
... lines may cause the ice maker to operate with the doors closed for information. Cool Down Period To ensure safe food storage, allow the refrigerator to cycle two or three times before loading it as far back as needed. NOTE Automatic ice makers are also optional accessories that... may have an odd flavor. Turning the refrigerator control will change only the freezer temperature. With no ice will be installed in most models at least 8 to its "down" or ON position...
... lines may cause the ice maker to operate with the doors closed for information. Cool Down Period To ensure safe food storage, allow the refrigerator to cycle two or three times before loading it as far back as needed. NOTE Automatic ice makers are also optional accessories that... may have an odd flavor. Turning the refrigerator control will change only the freezer temperature. With no ice will be installed in most models at least 8 to its "down" or ON position...

Complete Owner's Guide (English)
Page 10
... time it opens to 3 pounds of major components in the past. After defrosting, a popping sound may hear air being forced through the refrigerator by the evaporator fan. I Drain pan (not removable) You may create a boiling or gurgling sound. B Evaporator fan You may introduce ...unfamiliar sounds. J Condenser May create minimal sounds from forced air. 10 These sounds normally indicate your refrigerator and the sounds they can produce a snapping or clicking sound when turning the cooling system on the back wall of your freezer...
... time it opens to 3 pounds of major components in the past. After defrosting, a popping sound may hear air being forced through the refrigerator by the evaporator fan. I Drain pan (not removable) You may create a boiling or gurgling sound. B Evaporator fan You may introduce ...unfamiliar sounds. J Condenser May create minimal sounds from forced air. 10 These sounds normally indicate your refrigerator and the sounds they can produce a snapping or clicking sound when turning the cooling system on the back wall of your freezer...
Complete Owner's Guide (English)
Page 11
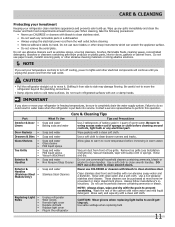
... of sponge or cloth before cleaning. • Remove adhesive labels by hand. Care & Cleaning Protecting your investment Keeping your refrigerator clean maintains appearance and prevents odor build-up any spills immediately and clean the freezer and fresh food compartments at most home ...improvement or major department stores. Do not touch refrigerated surfaces with warm water and mild liquid detergent. Remove toe grille (see Installation Instructions). Vacuum backside, wipe with a clean ...
... of sponge or cloth before cleaning. • Remove adhesive labels by hand. Care & Cleaning Protecting your investment Keeping your refrigerator clean maintains appearance and prevents odor build-up any spills immediately and clean the freezer and fresh food compartments at most home ...improvement or major department stores. Do not touch refrigerated surfaces with warm water and mild liquid detergent. Remove toe grille (see Installation Instructions). Vacuum backside, wipe with a clean ...
Complete Owner's Guide (English)
Page 12
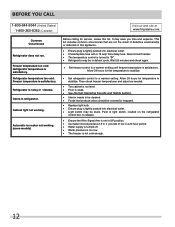
... turned off. • Water pressure is too low. • The freezer is satisfactory. Refrigerator temperature is noisy or vibrates. Before You Call 1-800-944-9044 (United States) 1-800-265-8352 (Canada) Visit our web site at www.frigidaire.com. Odors in this list. This list includes common occurrences that produce odors should...
... turned off. • Water pressure is too low. • The freezer is satisfactory. Refrigerator temperature is noisy or vibrates. Before You Call 1-800-944-9044 (United States) 1-800-265-8352 (Canada) Visit our web site at www.frigidaire.com. Odors in this list. This list includes common occurrences that produce odors should...
Complete Owner's Guide (English)
Page 13
...; Electrolux authorizes no person to , any after hour, weekend, or holiday service calls, tolls, ferry trip charges, or mileage expense for repairing or replacing any refrigerator or freezer failures. 6. Food loss due to repair or replace appliance light bulbs, air filters, water filters, other consumables, or knobs, handles, or other than...
...; Electrolux authorizes no person to , any after hour, weekend, or holiday service calls, tolls, ferry trip charges, or mileage expense for repairing or replacing any refrigerator or freezer failures. 6. Food loss due to repair or replace appliance light bulbs, air filters, water filters, other consumables, or knobs, handles, or other than...
Wiring Diagram (All Languages)
Page 2
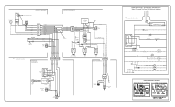
...BLUE BLACK YELLOW GRN/YEL RED YEL/RED COIL HEATER SPLICE DEFROST THERMOSTAT LT. BLUE FREEZER LIGHT SWITCH NOTE DENOTES NOT ON ALL MODELS. BLUE REFRIGERATOR LIGHT LT. BLUE LT. BLUE LT. BLUE BLACK GRN/YEL BROWN RED LT. BLUE BLACK RED YELLOW SEE COMPRESSOR WIRING GRN/YEL SPLICE RED .../BLACK MIDLEVEL LIGHT LT. BLUE BLACK BLACK GRN/YEL BLUE MACHINE COMPARTMENT LT. DIODE DIODE YELLOW CONDENSER FAN TAN TAN LT. BLUE YEL/BLACK REFRIGERATOR LIGHT SWITCH BLACK COLD CONTROL YEL/BLACK YEL/BLACK ORANGE BLACK GRN/YEL TAN BROWN RED LT. BLUE BLACK BLACK YELLOW GRN/YEL GRN/YEL...
...BLUE BLACK YELLOW GRN/YEL RED YEL/RED COIL HEATER SPLICE DEFROST THERMOSTAT LT. BLUE FREEZER LIGHT SWITCH NOTE DENOTES NOT ON ALL MODELS. BLUE REFRIGERATOR LIGHT LT. BLUE LT. BLUE LT. BLUE BLACK GRN/YEL BROWN RED LT. BLUE BLACK RED YELLOW SEE COMPRESSOR WIRING GRN/YEL SPLICE RED .../BLACK MIDLEVEL LIGHT LT. BLUE BLACK BLACK GRN/YEL BLUE MACHINE COMPARTMENT LT. DIODE DIODE YELLOW CONDENSER FAN TAN TAN LT. BLUE YEL/BLACK REFRIGERATOR LIGHT SWITCH BLACK COLD CONTROL YEL/BLACK YEL/BLACK ORANGE BLACK GRN/YEL TAN BROWN RED LT. BLUE BLACK BLACK YELLOW GRN/YEL GRN/YEL...

Installation Instructions (All Languages)
Page 1
...is not connected immediately. Use flat-blade screwdriver or 3/8" socket wrench to back. Connecting to adjust leveling screws. P/N: 240568304 Your refrigerator is equipped with LED display, 3 to 5 is normal operating range.) 7 ICEMAKER Ensure icemaker is setting solid on all corners ...Electrical Power House power turned on a solid floor. SHIPPING MATERIAL 3 Remove Shipping material. (Features may hear once your refrigerator is not recommended. IF YOU ARE DISSATISFIED WITH THE INSTALLATION, PLEASE CALL THE STORE YOU PURCHASED IT FROM. Use adjustable ...
...is not connected immediately. Use flat-blade screwdriver or 3/8" socket wrench to back. Connecting to adjust leveling screws. P/N: 240568304 Your refrigerator is equipped with LED display, 3 to 5 is normal operating range.) 7 ICEMAKER Ensure icemaker is setting solid on all corners ...Electrical Power House power turned on a solid floor. SHIPPING MATERIAL 3 Remove Shipping material. (Features may hear once your refrigerator is not recommended. IF YOU ARE DISSATISFIED WITH THE INSTALLATION, PLEASE CALL THE STORE YOU PURCHASED IT FROM. Use adjustable ...

Product Specifications Sheet (English)
Page 1
... what's inside. Bright Lighting Our bright lighting makes it 's easy to clean. 21 Cu. Ft. frigidaire.com SpillSafe® Shelves Designed to keep food organized and easy to find when you need it. Top Mount Refrigerators FPUI2188L F / R1 Signature Features SpaceWise™ Organization System Our SpaceWise™ Organization system makes it easy...
... what's inside. Bright Lighting Our bright lighting makes it 's easy to clean. 21 Cu. Ft. frigidaire.com SpillSafe® Shelves Designed to keep food organized and easy to find when you need it. Top Mount Refrigerators FPUI2188L F / R1 Signature Features SpaceWise™ Organization System Our SpaceWise™ Organization system makes it easy...

Product Specifications Sheet (English)
Page 2
...Hinges and Rollers) B - Width C - Printed in the U.S.A. Ft.) 20.6 Refrigerator Capacity (Cu. Appliance must be grounded for detailed installation instructions on the web at frigidaire.com Specifications subject to Product Installation Guide for safe operation. Features Door Design Door Handle... ENERGY STAR® Yes Specifications Total Capacity (Cu. Frigidaire Professional Top Mount Refrigerators FPUI2188L F / R 21 Cu. NOTE: For planning purposes only. Accessories information available on the web at frigidaire.com. Ft.) 15.35 Freezer Capacity (Cu. Always...
...Hinges and Rollers) B - Width C - Printed in the U.S.A. Ft.) 20.6 Refrigerator Capacity (Cu. Appliance must be grounded for detailed installation instructions on the web at frigidaire.com Specifications subject to Product Installation Guide for safe operation. Features Door Design Door Handle... ENERGY STAR® Yes Specifications Total Capacity (Cu. Frigidaire Professional Top Mount Refrigerators FPUI2188L F / R 21 Cu. NOTE: For planning purposes only. Accessories information available on the web at frigidaire.com. Ft.) 15.35 Freezer Capacity (Cu. Always...


