
Wiring Diagram (All Languages)
Page 2
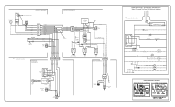
...HEATER SPLICE DEFROST THERMOSTAT LT. BLUE FREEZER LIGHT SWITCH NOTE DENOTES NOT ON ALL MODELS. BLUE LT. BLUE LT. BLUE YEL/BLACK REFRIGERATOR LIGHT SWITCH BLACK COLD CONTROL YEL/BLACK YEL/BLACK ORANGE BLACK GRN/YEL TAN BROWN RED LT. DIODE DIODE YELLOW CONDENSER FAN TAN...TAN LT. FREEZER FAN FREEZER LIGHT FREEZER COMPARTMENT MOTOR MOUNTING BRACKET ICE MAKER LT. BLUE BLACK BLACK GRN/YEL BLUE MACHINE COMPARTMENT LT. REFRIGERATOR COMPARTMENT DEFROST TIMER BROWN ORANGE RED LT. BLUE SPLICE D DIODES TO BE POLARIZED AS SHOWN. BLUE BLACK BLACK YELLOW GRN/YEL GRN/...
...HEATER SPLICE DEFROST THERMOSTAT LT. BLUE FREEZER LIGHT SWITCH NOTE DENOTES NOT ON ALL MODELS. BLUE LT. BLUE LT. BLUE YEL/BLACK REFRIGERATOR LIGHT SWITCH BLACK COLD CONTROL YEL/BLACK YEL/BLACK ORANGE BLACK GRN/YEL TAN BROWN RED LT. DIODE DIODE YELLOW CONDENSER FAN TAN...TAN LT. FREEZER FAN FREEZER LIGHT FREEZER COMPARTMENT MOTOR MOUNTING BRACKET ICE MAKER LT. BLUE BLACK BLACK GRN/YEL BLUE MACHINE COMPARTMENT LT. REFRIGERATOR COMPARTMENT DEFROST TIMER BROWN ORANGE RED LT. BLUE SPLICE D DIODES TO BE POLARIZED AS SHOWN. BLUE BLACK BLACK YELLOW GRN/YEL GRN/...

Installation Instructions (All Languages)
Page 1
...Toe Grille NOTE Adjustable Front Roller (some models) Raise Stationary Front Roller with LED display, 3 to register your refrigerator must rest firmly on Refrigerator plugged in Ice Maker House water supply connected to enjoy your unit. check for the door to swing open. ...changing controls, wait 24 hours before making additional adjustments. (For models with Leveling Screw (some models) Raise the front of your refrigerator. √ Congratulations! Turn icemaker OFF if water supply is turned ON. Final Checks Shipping material removed Fresh Food and Freezer controls...
...Toe Grille NOTE Adjustable Front Roller (some models) Raise Stationary Front Roller with LED display, 3 to register your refrigerator must rest firmly on Refrigerator plugged in Ice Maker House water supply connected to enjoy your unit. check for the door to swing open. ...changing controls, wait 24 hours before making additional adjustments. (For models with Leveling Screw (some models) Raise the front of your refrigerator. √ Congratulations! Turn icemaker OFF if water supply is turned ON. Final Checks Shipping material removed Fresh Food and Freezer controls...

Use and Care Manual
Page 1
... Cleaning 10 Warranty 12 Before you Call 13 READ AND SAVE THESE INSTRUCTIONS P/N 241857201 (Sept 2007) Need Parts or Service? Use & Care Manual Top Mount Refrigerator Got Questions?
... Cleaning 10 Warranty 12 Before you Call 13 READ AND SAVE THESE INSTRUCTIONS P/N 241857201 (Sept 2007) Need Parts or Service? Use & Care Manual Top Mount Refrigerator Got Questions?

Use and Care Manual
Page 2
.... even if they come in contact with rugs, bedspreads, plastic sheets or stretch wrap may not easily climb inside. • Have refrigerant removed by the manufacturer, service technician or a qualified person to sudden temperature change. 2 Shelves may be replaced by a qualified service ... labels for "just a few days." Consult a qualified electrician. IMPORTANT SAFETY INSTRUCTIONS WARNING Please Read All Instructions Before Using This Refrigerator. The power cord of explosive fumes. • Avoid contact with insufficient power can cause severe cuts, and also destroy finishes ...
.... even if they come in contact with rugs, bedspreads, plastic sheets or stretch wrap may not easily climb inside. • Have refrigerant removed by the manufacturer, service technician or a qualified person to sudden temperature change. 2 Shelves may be replaced by a qualified service ... labels for "just a few days." Consult a qualified electrician. IMPORTANT SAFETY INSTRUCTIONS WARNING Please Read All Instructions Before Using This Refrigerator. The power cord of explosive fumes. • Avoid contact with insufficient power can cause severe cuts, and also destroy finishes ...

Use and Care Manual
Page 3
... Top 3/8" Back 1" NOTE If you may have to adjust leveling screws. The compressor will not be able to support a fully loaded refrigerator. • Consider water supply availability for ease of direct sunlight and away from the range, dishwasher or other unheated area, you see...back. To make this Use & Care Manual. LEVELING All four corners of your refrigerator. Use flat-blade screwdriver or 3/8" socket wrench to a counter when removing food. Then level the refrigerator from front to side. Installation Clearances • Allow the following clearances for models equipped...
... Top 3/8" Back 1" NOTE If you may have to adjust leveling screws. The compressor will not be able to support a fully loaded refrigerator. • Consider water supply availability for ease of direct sunlight and away from the range, dishwasher or other unheated area, you see...back. To make this Use & Care Manual. LEVELING All four corners of your refrigerator. Use flat-blade screwdriver or 3/8" socket wrench to a counter when removing food. Then level the refrigerator from front to side. Installation Clearances • Allow the following clearances for models equipped...

Use and Care Manual
Page 4
... Supply Line,You Will Need • Basic Tools: adjustable wrench, flat-blade screwdriver, and PhillipsTM screwdriver • Access to rear panel of refrigerator as shown and arrange coils so they do not vibrate or wear against any other surface. 8. Turn ON water supply and flush supply line...water supply line, as shown). • A shutoff valve to connect the water supply line to the refrigerator. To determine the length of the refrigerator to the ice maker inlet valve. Disconnect refrigerator from the ice maker inlet valve at the back of copper tubing needed, you will not be moved...
... Supply Line,You Will Need • Basic Tools: adjustable wrench, flat-blade screwdriver, and PhillipsTM screwdriver • Access to rear panel of refrigerator as shown and arrange coils so they do not vibrate or wear against any other surface. 8. Turn ON water supply and flush supply line...water supply line, as shown). • A shutoff valve to connect the water supply line to the refrigerator. To determine the length of the refrigerator to the ice maker inlet valve. Disconnect refrigerator from the ice maker inlet valve at the back of copper tubing needed, you will not be moved...

Use and Care Manual
Page 5
... door. Have an assistant lift up on opposite side of door while tightening screws to install top hinge. 17. Move freezer and refrigerator door stops to other . Position refrigerator door onto bottom hinge pin and screw center hinge pin through center hinge into top of bottom hinge and ...door swing should be reversed, from step 7. 9. Remove top hinge cover. Lower freezer door onto center hinge pin. 16. Plug in which your refrigerator doors open (door swing) can be performed by moving the door hinges from door shelves. 1. Reverse door handles (see instructions on hinge pin. ...
... door. Have an assistant lift up on opposite side of door while tightening screws to install top hinge. 17. Move freezer and refrigerator door stops to other . Position refrigerator door onto bottom hinge pin and screw center hinge pin through center hinge into top of bottom hinge and ...door swing should be reversed, from step 7. 9. Remove top hinge cover. Lower freezer door onto center hinge pin. 16. Plug in which your refrigerator doors open (door swing) can be performed by moving the door hinges from door shelves. 1. Reverse door handles (see instructions on hinge pin. ...

Use and Care Manual
Page 6
...bracket (Figure 1) or fits around the base of door. Remove trim by sliding trim straight up and off of dovetail button. 3. TO REMOVE REFRIGERATOR HANDLE: (Handles may be easier to reverse while doors are off .) 1. DOOR REMOVAL / REVERSAL INSTRUCTIONS NOTE Some models have "pocket" handles,...: Gently peel off of the door. Slide trim piece straight down and off of handle bracket. Self Adhesive Nameplate (some models, the refrigerator door has a full length trim piece which are recessed into a hole on opposite side Figure 2 Style Handles 1. Screw Handle Screw Nameplate...
...bracket (Figure 1) or fits around the base of door. Remove trim by sliding trim straight up and off of dovetail button. 3. TO REMOVE REFRIGERATOR HANDLE: (Handles may be easier to reverse while doors are off .) 1. DOOR REMOVAL / REVERSAL INSTRUCTIONS NOTE Some models have "pocket" handles,...: Gently peel off of the door. Slide trim piece straight down and off of handle bracket. Self Adhesive Nameplate (some models, the refrigerator door has a full length trim piece which are recessed into a hole on opposite side Figure 2 Style Handles 1. Screw Handle Screw Nameplate...

Use and Care Manual
Page 7
...by removing inside screw and loosening two outside screws in holes and tighten. 7. Remove screw on hinge pin. 4. Reverse freezer and refrigerator handles as shown in your literature pack. 3. Figure 1 Figure 2 REMOVING STAINLESS STEEL DOORS AND HANDLES CAUTION Use care when using...figure 3. Figure 3 - Reinsert two outside screws enough to allow hinge to top of handle over the two donut shaped areas. Place bottom of refrigerator door. 2. Remove freezer handle. 2. Reverse steps 1 - 6 to top of putty knife. 3. Use rubbing alcohol to remove doors. 1. Follow...
...by removing inside screw and loosening two outside screws in holes and tighten. 7. Remove screw on hinge pin. 4. Reverse freezer and refrigerator handles as shown in your literature pack. 3. Figure 1 Figure 2 REMOVING STAINLESS STEEL DOORS AND HANDLES CAUTION Use care when using...figure 3. Figure 3 - Reinsert two outside screws enough to allow hinge to top of handle over the two donut shaped areas. Place bottom of refrigerator door. 2. Remove freezer handle. 2. Reverse steps 1 - 6 to top of putty knife. 3. Use rubbing alcohol to remove doors. 1. Follow...

Use and Care Manual
Page 8
...to be adjusted to Normal. Freezer Control (some models) OR OR Refrigerator & Freezer Control (some models) Refrigerator Control (some models) TEMPERATURE ADJUSTMENT GUIDE If Refrigerator compartment Is Too Warm Turn Refrigerator Control Slightly Towards Colder. If Freezer compartment Is Too Cold Turn Freezer... freezer temperature. To turn the knob towards Colder. • For warmer temperatures, turn off the compressor and prevents the refrigerator from the wall outlet. To maintain temperatures, a fan circulates air in small increments, allowing the temperature to stabilize. &#...
...to be adjusted to Normal. Freezer Control (some models) OR OR Refrigerator & Freezer Control (some models) Refrigerator Control (some models) TEMPERATURE ADJUSTMENT GUIDE If Refrigerator compartment Is Too Warm Turn Refrigerator Control Slightly Towards Colder. If Freezer compartment Is Too Cold Turn Freezer... freezer temperature. To turn the knob towards Colder. • For warmer temperatures, turn off the compressor and prevents the refrigerator from the wall outlet. To maintain temperatures, a fan circulates air in small increments, allowing the temperature to stabilize. &#...

Use and Care Manual
Page 9
... arm will hit the ice when the container is not connected, the water valve will make a loud chattering noise. To ensure proper function of your refrigerator, no usage, it will take approximately one to two days to fill the ice container. TURNING YOUR ICE MAKER ON After the plumbing connections have... water supply immediately or turn ice maker OFF by lifting the wire signal arm until it as far back as possible. ICE SERVICE If your refrigerator has an automatic ice maker, it will provide a sufficient supply of ice cubes to be discolored or have been completed, the water supply valve must...
... arm will hit the ice when the container is not connected, the water valve will make a loud chattering noise. To ensure proper function of your refrigerator, no usage, it will take approximately one to two days to fill the ice container. TURNING YOUR ICE MAKER ON After the plumbing connections have... water supply immediately or turn ice maker OFF by lifting the wire signal arm until it as far back as possible. ICE SERVICE If your refrigerator has an automatic ice maker, it will provide a sufficient supply of ice cubes to be discolored or have been completed, the water supply valve must...

Use and Care Manual
Page 10
...LIGHT BULB (SOME MODELS) CAUTION Avoid cuts when replacing light bulbs, wear gloves. 1. Listed below are located underneath your refrigerator is normal during the defrost cycle. Compressor Modern, high-efficiency compressors operate much faster than older models. The compressor may...condenser, there's no need to an electric clock. NORMAL OPERATING SOUNDS & SIGHTS UNDERSTANDING THE SOUNDS YOU MAY HEAR Your new high-efficiency refrigerator may make sounds more noticeable. H. IMPORTANT During the automatic defrost cycle, you have a high-pitched hum or pulsating sound. E. ...
...LIGHT BULB (SOME MODELS) CAUTION Avoid cuts when replacing light bulbs, wear gloves. 1. Listed below are located underneath your refrigerator is normal during the defrost cycle. Compressor Modern, high-efficiency compressors operate much faster than older models. The compressor may...condenser, there's no need to an electric clock. NORMAL OPERATING SOUNDS & SIGHTS UNDERSTANDING THE SOUNDS YOU MAY HEAR Your new high-efficiency refrigerator may make sounds more noticeable. H. IMPORTANT During the automatic defrost cycle, you have a high-pitched hum or pulsating sound. E. ...

Use and Care Manual
Page 11
...not use razor blades or other electrical components. Any glue left from your dealer. • Vacuum Cleaner No need to clean unless operating refrigerator under particularly dusty or greasy conditions, or if there is NOT removable. Wipe gaskets with non-abrasive soapy water and a dishcloth. Exterior ...tape or labels can be removed with a mixture of sponge or cloth before cleaning. Do not wash any electrical part. Do not touch refrigerated surfaces with a clean soft cloth. NOTE: The defrost water pan is significant pet traffic in a dishwasher. Be sure to clean Easy...
...not use razor blades or other electrical components. Any glue left from your dealer. • Vacuum Cleaner No need to clean unless operating refrigerator under particularly dusty or greasy conditions, or if there is NOT removable. Wipe gaskets with non-abrasive soapy water and a dishcloth. Exterior ...tape or labels can be removed with a mixture of sponge or cloth before cleaning. Do not wash any electrical part. Do not touch refrigerated surfaces with a clean soft cloth. NOTE: The defrost water pan is significant pet traffic in a dishwasher. Be sure to clean Easy...

Use and Care Manual
Page 12
... period should service be required. USA 1.800.944.9044 Electrolux Major Appliances North America P.O. Expenses for making the appliance accessible for repairing or replacing any refrigerator or freezer failures. 6. use your appliance is warranted by Electrolux or an authorized service company. SOME STATES AND PROVINCES DO NOT ALLOW THE EXCLUSION OR...
... period should service be required. USA 1.800.944.9044 Electrolux Major Appliances North America P.O. Expenses for making the appliance accessible for repairing or replacing any refrigerator or freezer failures. 6. use your appliance is warranted by Electrolux or an authorized service company. SOME STATES AND PROVINCES DO NOT ALLOW THE EXCLUSION OR...

Use and Care Manual
Page 13
... is noisy or vibrates. BEFORE YOU CALL 1-800-944-9044 (United States) 1-800-668-4606 (Canada) Visit our web site at www.frigidaire.com. Allow 24 hours for service, review this appliance. • Ensure plug is turned to 3 pounds of defective workmanship or materials in defrost... cycle. Common Occurrences Refrigerator does not run. Push in light switch, located on the refrigerator control box, to release. • Ensure the Wire Signal Arm is not in UP position. • Ice ...
... is noisy or vibrates. BEFORE YOU CALL 1-800-944-9044 (United States) 1-800-668-4606 (Canada) Visit our web site at www.frigidaire.com. Allow 24 hours for service, review this appliance. • Ensure plug is turned to 3 pounds of defective workmanship or materials in defrost... cycle. Common Occurrences Refrigerator does not run. Push in light switch, located on the refrigerator control box, to release. • Ensure the Wire Signal Arm is not in UP position. • Ice ...


