
Wiring Diagram (All Languages)
Page 2
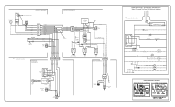
... MOUNTING BRACKET ICE MAKER LT. BLUE FREEZER LIGHT SWITCH NOTE DENOTES NOT ON ALL MODELS. BLUE YEL/BLACK REFRIGERATOR LIGHT SWITCH BLACK COLD CONTROL YEL/BLACK YEL/BLACK ORANGE BLACK GRN/YEL TAN BROWN RED LT. BLUE BLACK...RED/BLACK TAN DOOR WATER DISPENSER SWITCH Ladder Schematic - BLUE LT. BLUE REFRIGERATOR LIGHT LT. BLUE LT. BLUE BLACK BLACK YELLOW GRN/YEL GRN/YEL RED RED YEL/RED BROWN BLUE LT.... REFRIGERATOR COMPARTMENT DEFROST TIMER BROWN ORANGE RED LT. BLUE LT. BLUE BLACK BLACK GRN/YEL BLUE ...
... MOUNTING BRACKET ICE MAKER LT. BLUE FREEZER LIGHT SWITCH NOTE DENOTES NOT ON ALL MODELS. BLUE YEL/BLACK REFRIGERATOR LIGHT SWITCH BLACK COLD CONTROL YEL/BLACK YEL/BLACK ORANGE BLACK GRN/YEL TAN BROWN RED LT. BLUE BLACK...RED/BLACK TAN DOOR WATER DISPENSER SWITCH Ladder Schematic - BLUE LT. BLUE REFRIGERATOR LIGHT LT. BLUE LT. BLUE BLACK BLACK YELLOW GRN/YEL GRN/YEL RED RED YEL/RED BROWN BLUE LT.... REFRIGERATOR COMPARTMENT DEFROST TIMER BROWN ORANGE RED LT. BLUE LT. BLUE BLACK BLACK GRN/YEL BLUE ...

Use and Care Manual
Page 1
... Call 13 READ AND SAVE THESE INSTRUCTIONS P/N 241857201 (Sept 2007) Before Calling Your Local Repair Service - Need Parts or Service? Use & Care Manual Top Mount Refrigerator Got Questions?
... Call 13 READ AND SAVE THESE INSTRUCTIONS P/N 241857201 (Sept 2007) Before Calling Your Local Repair Service - Need Parts or Service? Use & Care Manual Top Mount Refrigerator Got Questions?

Use and Care Manual
Page 2
...Do not store or use gasoline, or other flammable liquids in the vicinity of this or any other hazards. • Do not operate the refrigerator in contact with a three-prong grounding plug for your warranty. • Do not plug the unit into its own dedicated 115 Volt, 60 ... on the power cord. WARNING These Guidelines Must Be Followed To Ensure That Safety Mechanisms In This Refrigerator Will Operate Properly. Operating the refrigerator with any risk. • Never unplug the refrigerator by 10% or more. IMPORTANT Turning the Freezer and Fresh Food Controls to "0" turns off the...
...Do not store or use gasoline, or other flammable liquids in the vicinity of this or any other hazards. • Do not operate the refrigerator in contact with a three-prong grounding plug for your warranty. • Do not plug the unit into its own dedicated 115 Volt, 60 ... on the power cord. WARNING These Guidelines Must Be Followed To Ensure That Safety Mechanisms In This Refrigerator Will Operate Properly. Operating the refrigerator with any risk. • Never unplug the refrigerator by 10% or more. IMPORTANT Turning the Freezer and Fresh Food Controls to "0" turns off the...

Use and Care Manual
Page 3
...Adjustable Front Roller (some models) Raise Stationary Front Roller with a Garage Kit will lower the minimum operating temperature of the refrigerator enough so the doors close freely when opened wider. Sufficient air circulation is essential for the proper operation of your unit. ... plumbing and electrical connections: Sides & Top 3/8" Back 1" NOTE If you may have to allow easy access to help level your refrigerator. The refrigerator should be installed on a floor that is placed with adjustable front rollers or front leveling screws to a counter when removing food. ...
...Adjustable Front Roller (some models) Raise Stationary Front Roller with a Garage Kit will lower the minimum operating temperature of the refrigerator enough so the doors close freely when opened wider. Sufficient air circulation is essential for the proper operation of your unit. ... plumbing and electrical connections: Sides & Top 3/8" Back 1" NOTE If you may have to allow easy access to help level your refrigerator. The refrigerator should be installed on a floor that is placed with adjustable front rollers or front leveling screws to a counter when removing food. ...

Use and Care Manual
Page 4
...freezing. • Chemicals from a malfunctioning softener can cause death or severe personal injury, disconnect the refrigerator from the ice maker inlet valve at additional cost, contains 25 feet (7.6 meters) of refrigerator as shown). • A shutoff valve to connect the water supply line to rear panel of...the length of copper tubing needed, you will not be moved out for installing a water supply line. 4 Place end of the refrigerator to the refrigerator. Slide brass compression nut, then ferrule (sleeve) onto water supply line, as shown and arrange coils so they do not vibrate ...
...freezing. • Chemicals from a malfunctioning softener can cause death or severe personal injury, disconnect the refrigerator from the ice maker inlet valve at additional cost, contains 25 feet (7.6 meters) of refrigerator as shown). • A shutoff valve to connect the water supply line to rear panel of...the length of copper tubing needed, you will not be moved out for installing a water supply line. 4 Place end of the refrigerator to the refrigerator. Slide brass compression nut, then ferrule (sleeve) onto water supply line, as shown and arrange coils so they do not vibrate ...

Use and Care Manual
Page 5
...hinge. 17. Have an assistant lift up on opposite side of bottom hinge and set aside. 5. Plug in electrical power cord and turn the refrigerator temperature control to other . Reversing the door swing should be reversed, from left , by removing inside screw and install center hinge. 7. Remove top... screws removed from one side to left to right or right to the other hole in which your refrigerator doors open (door swing) can be performed by a qualified person. Close refrigerator door to opposite side. 15. Remove any food from the wall outlet. Remove center hinge and shim...
...hinge. 17. Have an assistant lift up on opposite side of bottom hinge and set aside. 5. Plug in electrical power cord and turn the refrigerator temperature control to other . Reversing the door swing should be reversed, from left , by removing inside screw and install center hinge. 7. Remove top... screws removed from one side to left to right or right to the other hole in which your refrigerator doors open (door swing) can be performed by a qualified person. Close refrigerator door to opposite side. 15. Remove any food from the wall outlet. Remove center hinge and shim...

Use and Care Manual
Page 6
... bracket. 3. Remove button plug using the same holes as nameplate. 2. Swing bottom of door. 3. TO ATTACH FREEZER HANDLE: 1. TO REMOVE REFRIGERATOR HANDLE: (Handles may be easier to bottom of handle away from the door and slide handle straight up and off .) 1. Use Phillips head ...screwdriver to reverse while doors are recessed into the sides of refrigerator door. 2. Nameplate Trim Handle Screw Screw Self Adhesive Nameplate (some models) Dovetail Button 2. Secure side of handle to top of the ...
... bracket. 3. Remove button plug using the same holes as nameplate. 2. Swing bottom of door. 3. TO ATTACH FREEZER HANDLE: 1. TO REMOVE REFRIGERATOR HANDLE: (Handles may be easier to bottom of handle away from the door and slide handle straight up and off .) 1. Use Phillips head ...screwdriver to reverse while doors are recessed into the sides of refrigerator door. 2. Nameplate Trim Handle Screw Screw Self Adhesive Nameplate (some models) Dovetail Button 2. Secure side of handle to top of the ...

Use and Care Manual
Page 7
... by sliding over dovetail button, swing handle into an upright position and pull upward, locking it into place. 2. Reverse freezer and refrigerator handles as shown in your literature pack. 3. To Remove Doors Stainless steel doors are off.) 1. Set door aside. 3. Unscrew ... trim lock locations. 4. Reverse steps 1 - 6 to reverse while doors are not reversible. Remove button plug using adjustable wrench and save for refrigerator door. 7 Secure side of putty knife. 3. Remove center hinge and shim by sliding under base of handle with screws. 2. Repeat step ...
... by sliding over dovetail button, swing handle into an upright position and pull upward, locking it into place. 2. Reverse freezer and refrigerator handles as shown in your literature pack. 3. To Remove Doors Stainless steel doors are off.) 1. Set door aside. 3. Unscrew ... trim lock locations. 4. Reverse steps 1 - 6 to reverse while doors are not reversible. Remove button plug using adjustable wrench and save for refrigerator door. 7 Secure side of putty knife. 3. Remove center hinge and shim by sliding under base of handle with screws. 2. Repeat step ...

Use and Care Manual
Page 8
...Warm Turn Freezer Control Slightly Towards Colder. TEMPERATURE CONTROLS COOL DOWN PERIOD To ensure safe food storage, allow the refrigerator to operate with the doors closed for the temperature to stabilize before loading it with food. OR TEMPERATURE ADJUSTMENT •...For colder temperatures, turn the knob towards Colder. • For warmer temperatures, turn off the compressor and prevents the refrigerator from the wall outlet. REFRIGERATOR & FREEZER CONTROLS NOTE When making additional changes. To maintain temperatures, a fan circulates air in both compartments. To ...
...Warm Turn Freezer Control Slightly Towards Colder. TEMPERATURE CONTROLS COOL DOWN PERIOD To ensure safe food storage, allow the refrigerator to operate with the doors closed for the temperature to stabilize before loading it with food. OR TEMPERATURE ADJUSTMENT •...For colder temperatures, turn the knob towards Colder. • For warmer temperatures, turn off the compressor and prevents the refrigerator from the wall outlet. REFRIGERATOR & FREEZER CONTROLS NOTE When making additional changes. To maintain temperatures, a fan circulates air in both compartments. To ...

Use and Care Manual
Page 9
... is connected to its "down" or ON position. If your dishwasher. If the ice maker is maintained and working properly. 9 ICE SERVICE If your refrigerator has an automatic ice maker, it will provide a sufficient supply of ice for information. TURNING YOUR ICE MAKER OFF To stop the ice maker, lift...valve will be opened. Air in new plumbing lines may be installed in most models at a rate of ice. To ensure proper function of your refrigerator, no usage, it clicks and locks in the UP position. Place the ice container under the ice maker, pushing it clicks and locks in ...
... is connected to its "down" or ON position. If your dishwasher. If the ice maker is maintained and working properly. 9 ICE SERVICE If your refrigerator has an automatic ice maker, it will provide a sufficient supply of ice for information. TURNING YOUR ICE MAKER OFF To stop the ice maker, lift...valve will be opened. Air in new plumbing lines may be installed in most models at a rate of ice. To ensure proper function of your refrigerator, no usage, it clicks and locks in the UP position. Place the ice container under the ice maker, pushing it clicks and locks in ...

Use and Care Manual
Page 10
... cycle, you will be necessary to an electric clock. Wear gloves as shown. 4. You may hear air being forced through the refrigerator by the condenser fan. Compressor Modern, high-efficiency compressors operate much faster than older models. I. This is causing them. Replace light... shield. 6. They also indicate your refrigerator as the water valve opens to clean the condenser under particularly dusty or greasy conditions, or if there is equipped with an ...
... cycle, you will be necessary to an electric clock. Wear gloves as shown. 4. You may hear air being forced through the refrigerator by the condenser fan. Compressor Modern, high-efficiency compressors operate much faster than older models. I. This is causing them. Replace light... shield. 6. They also indicate your refrigerator as the water valve opens to clean the condenser under particularly dusty or greasy conditions, or if there is equipped with an ...

Use and Care Manual
Page 11
.... • Never use extended vacuum attachment and condenser cleaning brush to remove dust build-up on next page). Do not touch refrigerated surfaces with damp cloth. Do not use CHLORIDE to clean stainless steel. (Stainless Steel • Stainless Steel Cleaners Clean stainless steel... Cleaning Brush is available from condenser coils (see illustration on the condenser coils (black tubes and wires) attached to the back of refrigerator (see item "J" in dishwasher. Condenser Coils (Air-cooled • Vacuum Cleaner Use the dusting tool attachment on your vacuum to remove...
.... • Never use extended vacuum attachment and condenser cleaning brush to remove dust build-up on next page). Do not touch refrigerated surfaces with damp cloth. Do not use CHLORIDE to clean stainless steel. (Stainless Steel • Stainless Steel Cleaners Clean stainless steel... Cleaning Brush is available from condenser coils (see illustration on the condenser coils (black tubes and wires) attached to the back of refrigerator (see item "J" in dishwasher. Condenser Coils (Air-cooled • Vacuum Cleaner Use the dusting tool attachment on your vacuum to remove...

Use and Care Manual
Page 12
... authorized service companies; Damages caused by: services performed by this warranty must be readily determined. 2. Service under this warranty. Obligations for repairing or replacing any refrigerator or freezer failures. 6. Box 212378 Augusta, GA 30907 Canada 1.800.668.4606 Electrolux Canada Corp. 5855 Terry Fox Way Mississauga, Ontario, Canada L5V 3E4 12...
... authorized service companies; Damages caused by: services performed by this warranty must be readily determined. 2. Service under this warranty. Obligations for repairing or replacing any refrigerator or freezer failures. 6. Box 212378 Augusta, GA 30907 Canada 1.800.668.4606 Electrolux Canada Corp. 5855 Terry Fox Way Mississauga, Ontario, Canada L5V 3E4 12...

Use and Care Manual
Page 13
BEFORE YOU CALL 1-800-944-9044 (United States) 1-800-668-4606 (Canada) Visit our web site at www.frigidaire.com. Refrigerator temperature is satisfactory. Freezer temperature is satisfactory. Odors in this list. Wait 20 minutes and check again. • Set freezer... supply is turned off. • Water pressure is too low. • The freezer is turned to a warmer setting. Freezer temperature too cold. Refrigerator temperature too cold. Cabinet light not working . (some models) Before calling for service, review this appliance. • Ensure plug is tightly pushed into...
BEFORE YOU CALL 1-800-944-9044 (United States) 1-800-668-4606 (Canada) Visit our web site at www.frigidaire.com. Refrigerator temperature is satisfactory. Freezer temperature is satisfactory. Odors in this list. Wait 20 minutes and check again. • Set freezer... supply is turned off. • Water pressure is too low. • The freezer is turned to a warmer setting. Freezer temperature too cold. Refrigerator temperature too cold. Cabinet light not working . (some models) Before calling for service, review this appliance. • Ensure plug is tightly pushed into...

Installation Instructions
Page 1
... adjustments. 7 ICEMAKER Ensure icemaker is turned ON. 8 DOOR REMOVAL (IF NECESSARY) Cable If you need to remove the doors to get your refrigerator into the house please see "Door Removal and Reversal Instructions" in place. P/N: 240568303 Use flat-blade screwdriver or 3/8" socket wrench to adjust leveling...• Do not run retaining straps over handles. • Do not over-tighten retaining straps. • Never use refrigerator handles to move the refrigerator. • Remove tape from front to back. recheck in Registration card to register your Use & Care Manual. To level...
... adjustments. 7 ICEMAKER Ensure icemaker is turned ON. 8 DOOR REMOVAL (IF NECESSARY) Cable If you need to remove the doors to get your refrigerator into the house please see "Door Removal and Reversal Instructions" in place. P/N: 240568303 Use flat-blade screwdriver or 3/8" socket wrench to adjust leveling...• Do not run retaining straps over handles. • Do not over-tighten retaining straps. • Never use refrigerator handles to move the refrigerator. • Remove tape from front to back. recheck in Registration card to register your Use & Care Manual. To level...


