
T2010 User's Guide
Page 9
Chapter 4 PC Cards 83 Installing PC Cards 84 Removing PC Cards 84 Smart Card Reader 85 Memory Upgrade Module 86 Installing Memory Upgrade Modules 86 Removing a Memory Upgrade Module 88 Checking the Memory Capacity 88 ... 89 Universal Serial Bus Ports 90 IEEE 1394 Port 91 Headphone Jack 92 Microphone Jack 92 External Video Port 92 Troubleshooting Your LifeBook Troubleshooting 94 Identifying the Problem 94 Specific Problems 96 Power On Self Test Messages 108 Restoring Your Pre-installed Software 113 Re-installing Individual Drivers and Applications 113 Restoring...
Chapter 4 PC Cards 83 Installing PC Cards 84 Removing PC Cards 84 Smart Card Reader 85 Memory Upgrade Module 86 Installing Memory Upgrade Modules 86 Removing a Memory Upgrade Module 88 Checking the Memory Capacity 88 ... 89 Universal Serial Bus Ports 90 IEEE 1394 Port 91 Headphone Jack 92 Microphone Jack 92 External Video Port 92 Troubleshooting Your LifeBook Troubleshooting 94 Identifying the Problem 94 Specific Problems 96 Power On Self Test Messages 108 Restoring Your Pre-installed Software 113 Re-installing Individual Drivers and Applications 113 Restoring...
T2010 User's Guide
Page 10
Chapter 5 Chapter 6 Care and Maintenance Caring for your LifeBook Notebook 121 Cleaning your LifeBook notebook 123 Storing your LifeBook notebook 123 Traveling with your LifeBook notebook 123 Batteries 124 Media Care 125 PC Cards 127 System Specifications Specifications 128 Configuration Label 128 Microprocessor 129 Chipset 129 Memory 129 Video 129 Audio 130 Mass Storage Device Options 130 Features...
Chapter 5 Chapter 6 Care and Maintenance Caring for your LifeBook Notebook 121 Cleaning your LifeBook notebook 123 Storing your LifeBook notebook 123 Traveling with your LifeBook notebook 123 Batteries 124 Media Care 125 PC Cards 127 System Specifications Specifications 128 Configuration Label 128 Microprocessor 129 Chipset 129 Memory 129 Video 129 Audio 130 Mass Storage Device Options 130 Features...

T2010 User's Guide
Page 11
... the WLAN Using Windows Vista 167 Configuring the WLAN Using Windows XP 168 Connection to the network 168 Troubleshooting the WLAN 169 Troubleshooting 169 WLAN Specifications 171 Specifications 171 Using the Bluetooth Device 173 What is Bluetooth 173 Where to Find Information About Bluetooth 173 11
... the WLAN Using Windows Vista 167 Configuring the WLAN Using Windows XP 168 Connection to the network 168 Troubleshooting the WLAN 169 Troubleshooting 169 WLAN Specifications 171 Specifications 171 Using the Bluetooth Device 173 What is Bluetooth 173 Where to Find Information About Bluetooth 173 11
T2010 User's Guide
Page 13
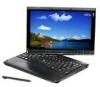
... with additional information about a specific topic are linked to the referenced items, so by a fast, Intel® Core™ 2 Duo Ultra Low Voltage processor, has a builtin color display with Windows® XP Tablet PC Edition 2005 or Windows Vista™ Business pre-installed. Example: "Click Fujitsu Menu, and select your LifeBook T2010 notebook's hardware and pre...
... with additional information about a specific topic are linked to the referenced items, so by a fast, Intel® Core™ 2 Duo Ultra Low Voltage processor, has a builtin color display with Windows® XP Tablet PC Edition 2005 or Windows Vista™ Business pre-installed. Example: "Click Fujitsu Menu, and select your LifeBook T2010 notebook's hardware and pre...
T2010 User's Guide
Page 17
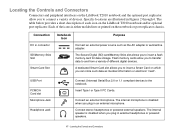
... Universal Serial Bus 2.0 or 1.1 compliant devices to insert a flash memory card for data storage. Insert Type I or Type II PC Cards. The internal speaker is disabled when you plug in connector SD/Memory Stick Slot Smart Card Slot Notebook Icon Purpose Connect an... disabled when you to connect a variety of different digital devices. Each of each icon on the LifeBook T2010 notebook and the optional port replicator allow you to the notebook. Specific locations are illustrated in external headphones or powered speakers. 17 - Connect stereo headphones or powered external ...
... Universal Serial Bus 2.0 or 1.1 compliant devices to insert a flash memory card for data storage. Insert Type I or Type II PC Cards. The internal speaker is disabled when you plug in connector SD/Memory Stick Slot Smart Card Slot Notebook Icon Purpose Connect an... disabled when you to connect a variety of different digital devices. Each of each icon on the LifeBook T2010 notebook and the optional port replicator allow you to the notebook. Specific locations are illustrated in external headphones or powered speakers. 17 - Connect stereo headphones or powered external ...
T2010 User's Guide
Page 20
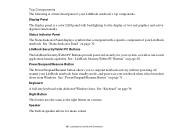
... The Status Indicator Panel displays symbols that correspond with a specific component of your LifeBook notebook's top components. Keyboard A full-size keyboard with dedicated Windows keys. Speaker The built-in speaker allows for the display of your LifeBook notebook. Display Panel The display panel is a brief description... shut down from standby mode, and power on a mouse. See "Status Indicator Panel" on page 48. See "LifeBook Security/Tablet PC Buttons" on page 30. LifeBook Security/Tablet PC Buttons The LifeBook Security/Tablet PC Buttons provide password security for your...
... The Status Indicator Panel displays symbols that correspond with a specific component of your LifeBook notebook's top components. Keyboard A full-size keyboard with dedicated Windows keys. Speaker The built-in speaker allows for the display of your LifeBook notebook. Display Panel The display panel is a brief description... shut down from standby mode, and power on a mouse. See "Status Indicator Panel" on page 48. See "LifeBook Security/Tablet PC Buttons" on page 30. LifeBook Security/Tablet PC Buttons The LifeBook Security/Tablet PC Buttons provide password security for your...
T2010 User's Guide
Page 30
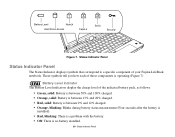
Battery Level NumLk Hard Drive Access CapsLk ScrLk Security Figure 7. Status Indicator Panel Status Indicator Panel The Status Indicator displays symbols that correspond to a specific component of the indicated battery pack, as follows: • Green, solid: Battery is between 50% and 100% charged. • Orange...battery. • Off: There is operating.(Figure 7) Battery Level Indicator The Battery Level indicators display the charge level of your Fujitsu LifeBook notebook. Status Indicator Panel These symbols tell you how each of those components is no battery installed. 30 -
Battery Level NumLk Hard Drive Access CapsLk ScrLk Security Figure 7. Status Indicator Panel Status Indicator Panel The Status Indicator displays symbols that correspond to a specific component of the indicated battery pack, as follows: • Green, solid: Battery is between 50% and 100% charged. • Orange...battery. • Off: There is operating.(Figure 7) Battery Level Indicator The Battery Level indicators display the charge level of your Fujitsu LifeBook notebook. Status Indicator Panel These symbols tell you how each of those components is no battery installed. 30 -
T2010 User's Guide
Page 48
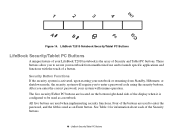
.... After you to be used to launch specific applications and functions with the touch of the display when it is configured to secure your LifeBook T2010 notebook is used when implementing security functions. All five buttons are used as an Enter button. LifeBook T2010 Notebook Security/Tablet PC Buttons LifeBook Security/Tablet PC Buttons A unique feature of the Security buttons...
.... After you to be used to launch specific applications and functions with the touch of the display when it is configured to secure your LifeBook T2010 notebook is used when implementing security functions. All five buttons are used as an Enter button. LifeBook T2010 Notebook Security/Tablet PC Buttons LifeBook Security/Tablet PC Buttons A unique feature of the Security buttons...
T2010 User's Guide
Page 52
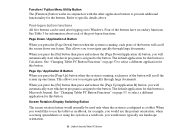
...use landscape orientation. 52 - The default application for this button. See "Changing Tablet PC Button Functions" on to the button. See Table 3 for this button is assigned to use the tablet as a notebook, you will scroll the screen down one frame. This allows ...like to the button. Refer to provide additional functionality for this button. LifeBook Security/Tablet PC Buttons Function / Fujitsu Menu Utility Button The [Function] button works in conjunction with the other application buttons to specific details above. Page Up / Application B Button When you will scroll ...
...use landscape orientation. 52 - The default application for this button. See "Changing Tablet PC Button Functions" on to the button. See Table 3 for this button is assigned to use the tablet as a notebook, you will scroll the screen down one frame. This allows ...like to the button. Refer to provide additional functionality for this button. LifeBook Security/Tablet PC Buttons Function / Fujitsu Menu Utility Button The [Function] button works in conjunction with the other application buttons to specific details above. Page Up / Application B Button When you will scroll ...
T2010 User's Guide
Page 53
...only, dual display. By default, the Application A button launches the Calculator, and the Application B button launches MS Journal. LifeBook Security/Tablet PC Buttons When the system is changed to launch a program or perform an action you to modify certain system settings. THE SCREEN... ON THE FUJITSU TABLET CONTROLS ICON AND SELECTING THE DESIRED SETTINGS IN THE DISPLAY PROPERTIES. When you press the [Screen Rotation /Display Switching] button, the system screen orientation changes from portrait (vertical) to landscape (horizontal) or from landscape to specific details above....
...only, dual display. By default, the Application A button launches the Calculator, and the Application B button launches MS Journal. LifeBook Security/Tablet PC Buttons When the system is changed to launch a program or perform an action you to modify certain system settings. THE SCREEN... ON THE FUJITSU TABLET CONTROLS ICON AND SELECTING THE DESIRED SETTINGS IN THE DISPLAY PROPERTIES. When you press the [Screen Rotation /Display Switching] button, the system screen orientation changes from portrait (vertical) to landscape (horizontal) or from landscape to specific details above....

T2010 User's Guide
Page 82
...INSERT A CARD INTO A SLOT IF THERE IS WATER OR ANY OTHER SUBSTANCE ON THE CARD AS YOU MAY PERMANENTLY DAMAGE THE CARD, YOUR LIFEBOOK NOTEBOOK, OR BOTH. 1 See your specific card manual for removal. 82 - Removing A Memory Stick/SD Card To remove a Memory Stick or SD Card, follow these easy steps:... SEE YOUR CARD MANUAL FOR SPECIFIC INSTRUCTIONS ON THE REMOVAL OF YOUR CARD. It will then eject from the System Tray. To install a Memory Stick or SD Card, follow these steps...
...INSERT A CARD INTO A SLOT IF THERE IS WATER OR ANY OTHER SUBSTANCE ON THE CARD AS YOU MAY PERMANENTLY DAMAGE THE CARD, YOUR LIFEBOOK NOTEBOOK, OR BOTH. 1 See your specific card manual for removal. 82 - Removing A Memory Stick/SD Card To remove a Memory Stick or SD Card, follow these easy steps:... SEE YOUR CARD MANUAL FOR SPECIFIC INSTRUCTIONS ON THE REMOVAL OF YOUR CARD. It will then eject from the System Tray. To install a Memory Stick or SD Card, follow these steps...
T2010 User's Guide
Page 84
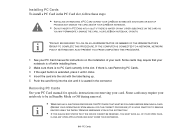
... PREVENT YOU FROM COMPLETING THIS PROCEDURE. 1 See your PC Card manual for specific instructions on the installation of your notebook is off while installing them. 2 Make sure there is seated in the PC Card slot, follow these steps: • INSTALLING OR REMOVING A PC CARD DURING YOUR LIFEBOOK NOTEBOOK'S SHUTDOWN OR BOOTUP PROCESS MAY DAMAGE THE...
... PREVENT YOU FROM COMPLETING THIS PROCEDURE. 1 See your PC Card manual for specific instructions on the installation of your notebook is off while installing them. 2 Make sure there is seated in the PC Card slot, follow these steps: • INSTALLING OR REMOVING A PC CARD DURING YOUR LIFEBOOK NOTEBOOK'S SHUTDOWN OR BOOTUP PROCESS MAY DAMAGE THE...
T2010 User's Guide
Page 86
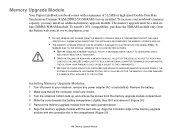
Memory Upgrade Module Your Fujitsu LifeBook notebook comes with a minimum of 512 MB of the memory upgrade module with the part side up , and remove the screws from the memory upgrade ... lift it and remove it (Figure 20). 5 Remove the memory upgrade module from the Fujitsu web store at www.shopfujitsu.com. • DO NOT REMOVE ANY SCREWS FROM THE MEMORY UPGRADE MODULE COMPARTMENT EXCEPT THE ONES SPECIFICALLY SHOWN IN THE DIRECTIONS FOR INSTALLING AND REMOVING THE MEMORY UPGRADE MODULE. • THE MEMORY...
Memory Upgrade Module Your Fujitsu LifeBook notebook comes with a minimum of 512 MB of the memory upgrade module with the part side up , and remove the screws from the memory upgrade ... lift it and remove it (Figure 20). 5 Remove the memory upgrade module from the Fujitsu web store at www.shopfujitsu.com. • DO NOT REMOVE ANY SCREWS FROM THE MEMORY UPGRADE MODULE COMPARTMENT EXCEPT THE ONES SPECIFICALLY SHOWN IN THE DIRECTIONS FOR INSTALLING AND REMOVING THE MEMORY UPGRADE MODULE. • THE MEMORY...
T2010 User's Guide
Page 96
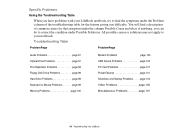
...LifeBook Troubleshooting Table ProblemPage ProblemPage Audio Problems page 97 Optical Drive Problems page 97 Port Replicator Problems page 98 Floppy Disk Drive Problems page 99 Hard Drive Problems page 99 Keyboard or Mouse Problems page 99 Memory Problems page 100 Modem Problems page 100 USB Device Problems page 100 PC... Specific Problems Using the Troubleshooting Table When you have problems with your notebook. You will find a description of the troubleshooting table for that symptom under the column Possible Cause and what, if anything, you can do to your LifeBook ...
...LifeBook Troubleshooting Table ProblemPage ProblemPage Audio Problems page 97 Optical Drive Problems page 97 Port Replicator Problems page 98 Floppy Disk Drive Problems page 99 Hard Drive Problems page 99 Keyboard or Mouse Problems page 99 Memory Problems page 100 Modem Problems page 100 USB Device Problems page 100 PC... Specific Problems Using the Troubleshooting Table When you have problems with your notebook. You will find a description of the troubleshooting table for that symptom under the column Possible Cause and what, if anything, you can do to your LifeBook ...

T2010 User's Guide
Page 107
.... See "External Video Port" on page 65. Your external monitor is not compatible with the correct software driver for more information. See "Specifications" on . Toggle the video destination by pressing [Fn]+ [F10] together, or check your BIOS setup and enable your external monitor. (... monitor documentation and the External Monitor Support portions of the BIOS. Troubleshooting Your LifeBook Press [Fn] + [F7] to increase brightness or double-click on low brightness to enable your LifeBook notebook. Application software often has its own set on the battery gauge and adjust...
.... See "External Video Port" on page 65. Your external monitor is not compatible with the correct software driver for more information. See "Specifications" on . Toggle the video destination by pressing [Fn]+ [F10] together, or check your BIOS setup and enable your external monitor. (... monitor documentation and the External Monitor Support portions of the BIOS. Troubleshooting Your LifeBook Press [Fn] + [F7] to increase brightness or double-click on low brightness to enable your LifeBook notebook. Application software often has its own set on the battery gauge and adjust...

T2010 User's Guide
Page 113
IF YOU HAVE ACCESS TO THE INTERNET, VISIT THE FUJITSU SUPPORT WEBSITE AT HTTP://WWW.COMPUTERS.US.FUJITSU.COM/SUPPORT TO CHECK FOR THE MOST CURRENT INFORMATION, DRIVERS AND HINTS ON HOW TO PERFORM RECOVERY AND SYSTEM UPDATES. THE LATEST ...THE DAR DVD, YOU WILL NEED TO USE A DVD DRIVE ATTACHED EXTERNALLY. A Fujitsu Installer screen is inserted. 2 After reading the License Agreement, click [I agree]. 3 A window will appear containing a list of device drivers and Fujitsu utilities (in specific directories) that are unique to selectively re-install drivers and/or applications that you...
IF YOU HAVE ACCESS TO THE INTERNET, VISIT THE FUJITSU SUPPORT WEBSITE AT HTTP://WWW.COMPUTERS.US.FUJITSU.COM/SUPPORT TO CHECK FOR THE MOST CURRENT INFORMATION, DRIVERS AND HINTS ON HOW TO PERFORM RECOVERY AND SYSTEM UPDATES. THE LATEST ...THE DAR DVD, YOU WILL NEED TO USE A DVD DRIVE ATTACHED EXTERNALLY. A Fujitsu Installer screen is inserted. 2 After reading the License Agreement, click [I agree]. 3 A window will appear containing a list of device drivers and Fujitsu utilities (in specific directories) that are unique to selectively re-install drivers and/or applications that you...
T2010 User's Guide
Page 127
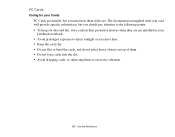
... PC Cards Caring for your Cards PC Cards are not installed in their protective sleeves when they are durable, but you must treat them to the following points: • To keep out dust and dirt, store cards in your card will provide specific ...information, but you should pay attention to excessive vibration. 127 - The documentation supplied with your LifeBook...
... PC Cards Caring for your Cards PC Cards are not installed in their protective sleeves when they are durable, but you must treat them to the following points: • To keep out dust and dirt, store cards in your card will provide specific ...information, but you should pay attention to excessive vibration. 127 - The documentation supplied with your LifeBook...
T2010 User's Guide
Page 128
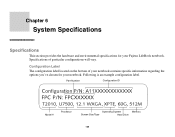
... hardware and environmental specifications for your Fujitsu LifeBook notebook. Following is an example configuration label. Configuration Label The configuration label located on the bottom of particular configurations will vary. Specifications of your notebook contains specific information regarding the options you've chosen for your notebook. Part Number Configuration ID Configuration P/N: A11XXXXXXXXXXXX FPC P/N: FPCXXXXXX T2010, U7500, 12...
... hardware and environmental specifications for your Fujitsu LifeBook notebook. Following is an example configuration label. Configuration Label The configuration label located on the bottom of particular configurations will vary. Specifications of your notebook contains specific information regarding the options you've chosen for your notebook. Part Number Configuration ID Configuration P/N: A11XXXXXXXXXXXX FPC P/N: FPCXXXXXX T2010, U7500, 12...
T2010 User's Guide
Page 129
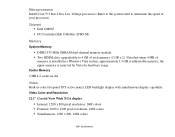
... speed of your processor). Microprocessor Intel® Core™ 2 Duo Ultra Low Voltage processors (Refer to the system label to 4 GB of total memory (2 GB x 2). Specifications
... speed of your processor). Microprocessor Intel® Core™ 2 Duo Ultra Low Voltage processors (Refer to the system label to 4 GB of total memory (2 GB x 2). Specifications
T2010 User's Guide
Page 130
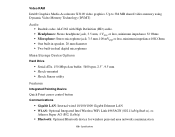
... Wireless WiFi Link 4965AGN (802.11a/b/g/draft n), or, Atheros Super AG (802.11a/b/g) • Bluetooth: Optional Bluetooth device for wireless personal area network communication 130 - Specifications
... Wireless WiFi Link 4965AGN (802.11a/b/g/draft n), or, Atheros Super AG (802.11a/b/g) • Bluetooth: Optional Bluetooth device for wireless personal area network communication 130 - Specifications