
T2010 User's Guide
Page 2
... or registered trademarks of Symantec Corporation in the United States and other countries. Microsoft, Windows, Windows Vista, and OneNote are registered trademarks of the Personal Computer Memory Card International Association. EverNote is a trademark of Softex, Inc. Fujitsu, the Fujitsu logo, and LifeBook are either a registered trademarks or trademarks of Adobe Systems Incorporated in the United...
... or registered trademarks of Symantec Corporation in the United States and other countries. Microsoft, Windows, Windows Vista, and OneNote are registered trademarks of the Personal Computer Memory Card International Association. EverNote is a trademark of Softex, Inc. Fujitsu, the Fujitsu logo, and LifeBook are either a registered trademarks or trademarks of Adobe Systems Incorporated in the United...

T2010 User's Guide
Page 8
... Sequence 64 Hard Disk Drive Passwords 64 BIOS Setup Utility 65 Booting the System 66 Starting Windows Vista the first time 67 Starting Windows XP the First Time 68 Registering Your LifeBook notebook with Fujitsu 69 Installing ClickMe 69 Fujitsu Driver Update Utility 70 Power Management 71 Power/Suspend/Resume Button 71 Standby (Sleep) Mode...
... Sequence 64 Hard Disk Drive Passwords 64 BIOS Setup Utility 65 Booting the System 66 Starting Windows Vista the first time 67 Starting Windows XP the First Time 68 Registering Your LifeBook notebook with Fujitsu 69 Installing ClickMe 69 Fujitsu Driver Update Utility 70 Power Management 71 Power/Suspend/Resume Button 71 Standby (Sleep) Mode...

T2010 User's Guide
Page 9
Chapter 4 PC Cards 83 Installing PC Cards 84 Removing PC Cards 84 Smart Card Reader 85 Memory Upgrade Module 86 Installing Memory Upgrade Modules 86 Removing a Memory Upgrade Module 88 Checking the Memory Capacity 88 ... Port Replicator Connector 89 Universal Serial Bus Ports 90 IEEE 1394 Port 91 Headphone Jack 92 Microphone Jack 92 External Video Port 92 Troubleshooting Your LifeBook Troubleshooting 94 Identifying the Problem 94 Specific Problems 96 Power On Self Test Messages 108 Restoring Your Pre-installed Software 113 Re-installing Individual Drivers...
Chapter 4 PC Cards 83 Installing PC Cards 84 Removing PC Cards 84 Smart Card Reader 85 Memory Upgrade Module 86 Installing Memory Upgrade Modules 86 Removing a Memory Upgrade Module 88 Checking the Memory Capacity 88 ... Port Replicator Connector 89 Universal Serial Bus Ports 90 IEEE 1394 Port 91 Headphone Jack 92 Microphone Jack 92 External Video Port 92 Troubleshooting Your LifeBook Troubleshooting 94 Identifying the Problem 94 Specific Problems 96 Power On Self Test Messages 108 Restoring Your Pre-installed Software 113 Re-installing Individual Drivers...

T2010 User's Guide
Page 11
... Disconnection Using the Icon in the Taskbar 166 Activating the WLAN Device 166 Configuring the Wireless LAN 167 Configuring the WLAN Using Windows Vista 167 Configuring the WLAN Using Windows XP 168 Connection to the network 168 Troubleshooting the WLAN 169 Troubleshooting 169 WLAN Specifications 171 Specifications 171 Using the Bluetooth Device...
... Disconnection Using the Icon in the Taskbar 166 Activating the WLAN Device 166 Configuring the Wireless LAN 167 Configuring the WLAN Using Windows Vista 167 Configuring the WLAN Using Windows XP 168 Connection to the network 168 Troubleshooting the WLAN 169 Troubleshooting 169 WLAN Specifications 171 Specifications 171 Using the Bluetooth Device...
T2010 User's Guide
Page 13
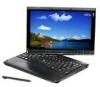
... cross-referenced within the text. On-screen menu items appear in tablet configuration using pen input. Example: "Click Fujitsu Menu, and select your LifeBook T2010 notebook's hardware and pre-installed system software. It is a powerful convertible computer. Pages with Windows® XP Tablet PC Edition 2005 or Windows Vista™ Business pre-installed. Example: [Fn], [F1], [ESC], [ENTER...
... cross-referenced within the text. On-screen menu items appear in tablet configuration using pen input. Example: "Click Fujitsu Menu, and select your LifeBook T2010 notebook's hardware and pre-installed system software. It is a powerful convertible computer. Pages with Windows® XP Tablet PC Edition 2005 or Windows Vista™ Business pre-installed. Example: [Fn], [F1], [ESC], [ENTER...
T2010 User's Guide
Page 18
..., or satellite Internet. *1000 Mbps, commonly referred to your computer. Locating the Controls and Connectors Refer to a Local Area Network (LAN) in your notebook from Windows. Wireless LAN On-Off Switch The wireless LAN switch allows you to connect a flatpanel LCD monitor or television that is used to connect the internal...
..., or satellite Internet. *1000 Mbps, commonly referred to your computer. Locating the Controls and Connectors Refer to a Local Area Network (LAN) in your notebook from Windows. Wireless LAN On-Off Switch The wireless LAN switch allows you to connect a flatpanel LCD monitor or television that is used to connect the internal...
T2010 User's Guide
Page 20
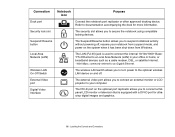
.../Resume button allows you to suspend notebook activity without powering off, resume your LifeBook notebook from Windows. Speaker The built-in speaker allows for the display of text and graphics and active digitizer functionality. LifeBook Security/Tablet PC Buttons The LifeBook Security/Tablet PC Buttons provide password security for your notebook when it has been shut down from...
.../Resume button allows you to suspend notebook activity without powering off, resume your LifeBook notebook from Windows. Speaker The built-in speaker allows for the display of text and graphics and active digitizer functionality. LifeBook Security/Tablet PC Buttons The LifeBook Security/Tablet PC Buttons provide password security for your notebook when it has been shut down from...
T2010 User's Guide
Page 35
... in the left panel. Set the screen brightness slider for On battery and Plugged in and Powered by batteries scenarios. The Tablet and Pen Settings window will open. Select the Display tab and set the screen brightness slider for On battery and Plugged in the lower right corner... Adjust Brightness Windows XP: To adjust brightness using the Fujitsu menu, click on the Fujitsu Menu icon in the system tray in the left panel. Double-click the Tablet and Pen Settings icon, then select the Display tab. THE HIGHER THE BRIGHTNESS LEVEL, THE MORE POWER THE TABLET PC WILL CONSUME ...
... in the left panel. Set the screen brightness slider for On battery and Plugged in and Powered by batteries scenarios. The Tablet and Pen Settings window will open. Select the Display tab and set the screen brightness slider for On battery and Plugged in the lower right corner... Adjust Brightness Windows XP: To adjust brightness using the Fujitsu menu, click on the Fujitsu Menu icon in the system tray in the left panel. Double-click the Tablet and Pen Settings icon, then select the Display tab. THE HIGHER THE BRIGHTNESS LEVEL, THE MORE POWER THE TABLET PC WILL CONSUME ...
T2010 User's Guide
Page 36
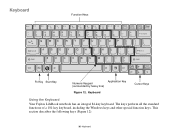
Keyboard Using the Keyboard Your Fujitsu LifeBook notebook has an integral 84-key keyboard. The keys perform all the standard functions of a 101-key keyboard, including the Windows keys and other special function keys. Keyboard This section describes the following keys (Figure 12): 36 - Keyboard Function Keys Home End Fn Key Start Key Numeric Keypad Application Key (surrounded by heavy line) Cursor Keys Figure 12.
Keyboard Using the Keyboard Your Fujitsu LifeBook notebook has an integral 84-key keyboard. The keys perform all the standard functions of a 101-key keyboard, including the Windows keys and other special function keys. Keyboard This section describes the following keys (Figure 12): 36 - Keyboard Function Keys Home End Fn Key Start Key Numeric Keypad Application Key (surrounded by heavy line) Cursor Keys Figure 12.

T2010 User's Guide
Page 37
... onscreen Start menu button, or the right button on the front edge of a Start key and an Application key. Windows Keys Your LifeBook notebook has two Windows keys, consisting of the key to your Windows documentation for the selected item. (Please refer to indicate their secondary functions. The Application key functions the same as...
... onscreen Start menu button, or the right button on the front edge of a Start key and an Application key. Windows Keys Your LifeBook notebook has two Windows keys, consisting of the key to your Windows documentation for the selected item. (Please refer to indicate their secondary functions. The Application key functions the same as...
T2010 User's Guide
Page 40
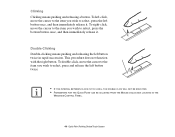
... LONG, THE DOUBLE-CLICK WILL NOT BE EXECUTED. • PARAMETERS FOR THE QUICK POINT CAN BE ADJUSTED FROM THE MOUSE DIALOG BOX LOCATED IN THE WINDOWS CONTROL PANEL. 40 - Clicking Clicking means pushing and releasing a button. This procedure does not function with the right button. Double-Clicking Double-clicking means pushing...
... LONG, THE DOUBLE-CLICK WILL NOT BE EXECUTED. • PARAMETERS FOR THE QUICK POINT CAN BE ADJUSTED FROM THE MOUSE DIALOG BOX LOCATED IN THE WINDOWS CONTROL PANEL. 40 - Clicking Clicking means pushing and releasing a button. This procedure does not function with the right button. Double-Clicking Double-clicking means pushing...

T2010 User's Guide
Page 41
To scroll, press and hold the left button, while moving the item to its new location and then release it. This is particularly useful when you to move. Scrolling Using the Scrolling button allows you are navigating through a document quickly without using the window's scroll bars. Quick Point Pointing Device/Touch Screen To drag, move the cursor to the item you wish to navigate through on-line pages. Press and hold the center button while scrolling with the cursor control button. 41 - Dragging Dragging means pressing and holding the left button while moving the cursor.
To scroll, press and hold the left button, while moving the item to its new location and then release it. This is particularly useful when you to move. Scrolling Using the Scrolling button allows you are navigating through a document quickly without using the window's scroll bars. Quick Point Pointing Device/Touch Screen To drag, move the cursor to the item you wish to navigate through on-line pages. Press and hold the center button while scrolling with the cursor control button. 41 - Dragging Dragging means pressing and holding the left button while moving the cursor.

T2010 User's Guide
Page 42
... dialog box. EXCESSIVE FORCE COULD RESULT IN DAMAGE TO THE LED AND/OR TOUCH SCREEN. • TO PURCHASE ADDITIONAL OR REPLACEMENT STYLUSES, VISIT FUJITSU'S ACCESSORIES WEBSITE AT: WWW.SHOPFUJITSU.COM. 42 - There are three aspects of the cursor. Touch Screen The integrated Touch Screen allows you set... up a relation between the speed of your application for the cursor arrow. Quick Point Control Adjustment The Windows Control Panel allows you to enable a Pointer Trail for details. • DO NOT USE EXCESSIVE FORCE WHEN TAPPING OR WRITING ON THE...
... dialog box. EXCESSIVE FORCE COULD RESULT IN DAMAGE TO THE LED AND/OR TOUCH SCREEN. • TO PURCHASE ADDITIONAL OR REPLACEMENT STYLUSES, VISIT FUJITSU'S ACCESSORIES WEBSITE AT: WWW.SHOPFUJITSU.COM. 42 - There are three aspects of the cursor. Touch Screen The integrated Touch Screen allows you set... up a relation between the speed of your application for the cursor arrow. Quick Point Control Adjustment The Windows Control Panel allows you to enable a Pointer Trail for details. • DO NOT USE EXCESSIVE FORCE WHEN TAPPING OR WRITING ON THE...
T2010 User's Guide
Page 43
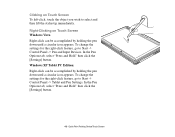
... to select and then lift the stylus tip immediately. In the Pen Options tab, select "Press and Hold" then click the [Settings] button. Windows XP Tablet PC Edition: Right-click can be accomplished by holding the pen down until a circular icon appears. Quick Point Pointing Device/Touch Screen Right-Clicking on Touch...Control Panel -> Pen and Input Devices. In the Pen Options tab, select "Press and Hold" then click the [Settings] button. 43 - Clicking on Touch Screen Windows Vista Right-click can be accomplished by holding the pen down until a circular icon appears.
... to select and then lift the stylus tip immediately. In the Pen Options tab, select "Press and Hold" then click the [Settings] button. Windows XP Tablet PC Edition: Right-click can be accomplished by holding the pen down until a circular icon appears. Quick Point Pointing Device/Touch Screen Right-Clicking on Touch...Control Panel -> Pen and Input Devices. In the Pen Options tab, select "Press and Hold" then click the [Settings] button. 43 - Clicking on Touch Screen Windows Vista Right-click can be accomplished by holding the pen down until a circular icon appears.
T2010 User's Guide
Page 45
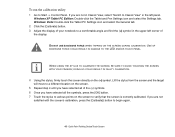
Windows Vista: Double-click the Tablet PC Settings icon and select the General tab 2 Click the [Calibrate] button. 3 Adjust the display of the display. DOING SO COULD RESULT IN FAULTY CALIBRATION. 4 Using ... the screen directly on the screen to Classic View" in Classic View, select "Switch to verify that the screen is correctly calibrated. Windows XP Tablet PC Edition: Double-click the Tablet and Pen Settings icon and select the Settings tab. If you are not in the left corner of your notebook to begin again...
Windows Vista: Double-click the Tablet PC Settings icon and select the General tab 2 Click the [Calibrate] button. 3 Adjust the display of the display. DOING SO COULD RESULT IN FAULTY CALIBRATION. 4 Using ... the screen directly on the screen to Classic View" in Classic View, select "Switch to verify that the screen is correctly calibrated. Windows XP Tablet PC Edition: Double-click the Tablet and Pen Settings icon and select the Settings tab. If you are not in the left corner of your notebook to begin again...

T2010 User's Guide
Page 49
... Down] button when the system is pre-logon, each press of the buttons have secondary functions. LifeBook Security/Tablet PC Buttons Pre-logon button functions All five buttons can be used before logging on to Windows (i.e., the Windows logon screen is pre-boot or resuming from suspend Security Panel Function Security Button 1 Security Button 2 Security...
... Down] button when the system is pre-logon, each press of the buttons have secondary functions. LifeBook Security/Tablet PC Buttons Pre-logon button functions All five buttons can be used before logging on to Windows (i.e., the Windows logon screen is pre-boot or resuming from suspend Security Panel Function Security Button 1 Security Button 2 Security...
T2010 User's Guide
Page 50
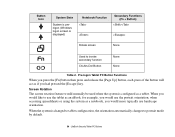
... Rotation The screen rotation feature would use landscape orientation. LifeBook Security/Tablet PC Buttons when accessing spreadsheets or using the system as if you would more typically use the portrait orientation; Button Icon System State System is prelogon (Windows logon screen is changed to tablet configuration, the orientation automatically changes to portrait mode by default...
... Rotation The screen rotation feature would use landscape orientation. LifeBook Security/Tablet PC Buttons when accessing spreadsheets or using the system as if you would more typically use the portrait orientation; Button Icon System State System is prelogon (Windows logon screen is changed to tablet configuration, the orientation automatically changes to portrait mode by default...

T2010 User's Guide
Page 51
... System is postlogon (Windows desktop is in pre-boot, the system screen orientation changes from portrait (vertical) to landscape (horizontal) or from landscape to portrait. Dual Display Fujitsu Menu Utility None Table 3. AFTER CHANGING THE SETTINGS, SAVE THEM IN FUJITSU TABLET CONTROLS. THE SCREEN... GOING TO THE CONTROL PANEL AND DOUBLE-CLICKING ON THE FUJITSU TABLET CONTROLS ICON AND SELECTING THE DESIRED SETTINGS IN THE DISPLAY PROPERTIES. LED only 2. Post-logon Tablet PC Button Functions 51 - LifeBook Security/Tablet PC Buttons When you press the [Screen Rotation] button when the...
... System is postlogon (Windows desktop is in pre-boot, the system screen orientation changes from portrait (vertical) to landscape (horizontal) or from landscape to portrait. Dual Display Fujitsu Menu Utility None Table 3. AFTER CHANGING THE SETTINGS, SAVE THEM IN FUJITSU TABLET CONTROLS. THE SCREEN... GOING TO THE CONTROL PANEL AND DOUBLE-CLICKING ON THE FUJITSU TABLET CONTROLS ICON AND SELECTING THE DESIRED SETTINGS IN THE DISPLAY PROPERTIES. LED only 2. Post-logon Tablet PC Button Functions 51 - LifeBook Security/Tablet PC Buttons When you press the [Screen Rotation] button when the...
T2010 User's Guide
Page 52
... is Calculator. LifeBook Security/Tablet PC Buttons Page Down / Application A Button When you will scroll the screen up one frame. See "Changing Tablet PC Button Functions" on page 53. Post-logon button functions All five buttons can be used after logging on to Windows. When you .... The default application for this button. Function / Fujitsu Menu Utility Button The [Function] button works in conjunction with the other application buttons to provide additional functionality for this button. See "Changing Tablet PC Button Functions" on page 53 to specific details above...
... is Calculator. LifeBook Security/Tablet PC Buttons Page Down / Application A Button When you will scroll the screen up one frame. See "Changing Tablet PC Button Functions" on page 53. Post-logon button functions All five buttons can be used after logging on to Windows. When you .... The default application for this button. Function / Fujitsu Menu Utility Button The [Function] button works in conjunction with the other application buttons to provide additional functionality for this button. See "Changing Tablet PC Button Functions" on page 53 to specific details above...
T2010 User's Guide
Page 53
...for the buttons. LifeBook Security/Tablet PC Buttons By default, the Application A button launches the Calculator, and the Application B button launches MS Journal. THE SCREEN ORIENTATION DEFAULT CAN BE CHANGED BY GOING TO THE CONTROL PANEL AND DOUBLE-CLICKING ON THE FUJITSU TABLET CONTROLS ICON AND ... additional functionality for up to 750 milliseconds launches the Logon screen or the Windows Task Manager. When the system is changed to portrait. AFTER CHANGING THE SETTINGS, SAVE THEM IN FUJITSU TABLET CONTROLS. Refer to portrait mode by default. To launch different applications or ...
...for the buttons. LifeBook Security/Tablet PC Buttons By default, the Application A button launches the Calculator, and the Application B button launches MS Journal. THE SCREEN ORIENTATION DEFAULT CAN BE CHANGED BY GOING TO THE CONTROL PANEL AND DOUBLE-CLICKING ON THE FUJITSU TABLET CONTROLS ICON AND ... additional functionality for up to 750 milliseconds launches the Logon screen or the Windows Task Manager. When the system is changed to portrait. AFTER CHANGING THE SETTINGS, SAVE THEM IN FUJITSU TABLET CONTROLS. Refer to portrait mode by default. To launch different applications or ...


