
Owners Manual
Page 3
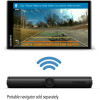
... for Europe 2 Installing AA Batteries 3 Installing the Camera in the Mount 3 Pairing the Camera with a Garmin Navigation Device 3 Pairing Additional Cameras with a Garmin Navigation Device 4 Viewing the Backup Camera 4 Switching Cameras 4 Adjusting the Camera Angle 4 Removing the Camera from the Mount 4 Backup Camera Settings 4 Aligning the Guidance Lines 5 Changing the Camera Order 5 Renaming a Camera 5 Removing a Paired Camera 5 Device Information 5 Software Updates 5 Specifications 6 Troubleshooting...
... for Europe 2 Installing AA Batteries 3 Installing the Camera in the Mount 3 Pairing the Camera with a Garmin Navigation Device 3 Pairing Additional Cameras with a Garmin Navigation Device 4 Viewing the Backup Camera 4 Switching Cameras 4 Adjusting the Camera Angle 4 Removing the Camera from the Mount 4 Backup Camera Settings 4 Aligning the Guidance Lines 5 Changing the Camera Order 5 Renaming a Camera 5 Removing a Paired Camera 5 Device Information 5 Software Updates 5 Specifications 6 Troubleshooting...

Owners Manual
Page 5
... avoid covering any portion of the license plate. It is your responsibility to follow license plate mounting regulations. 2 Rotate the camera clip 180 degrees, so the Garmin logo is facing right-side-up or down to be right-side up when the mount is intended to align one set ...of your vehicle. NOTE: The camera mount is installed on your license plate, you can configure the mount for proper camera angle adjustment, the Garmin® logo on the license plate. Vehicle Mount Installation for North America Installing the Mount ...
... avoid covering any portion of the license plate. It is your responsibility to follow license plate mounting regulations. 2 Rotate the camera clip 180 degrees, so the Garmin logo is facing right-side-up or down to be right-side up when the mount is intended to align one set ...of your vehicle. NOTE: The camera mount is installed on your license plate, you can configure the mount for proper camera angle adjustment, the Garmin® logo on the license plate. Vehicle Mount Installation for North America Installing the Mount ...

Owners Manual
Page 6
...-side-up . Installing Your License Plate into the slots in either orientation. Out of the box, the mount is assembled for installing the camera at the bottom your vehicle, the Garmin logo on Your Vehicle 1 Remove the rear license plate and license plate holder from the mount. 4 Rotate the... camera clip 180 degrees, so the Garmin logo is not thick enough to stick to the vehicle using double-sided adhesive. plate, you must remove, rotate, and reattach the camera clip (Installing the Camera at the Top of Your License Plate, page 2). 3 ...
...-side-up . Installing Your License Plate into the slots in either orientation. Out of the box, the mount is assembled for installing the camera at the bottom your vehicle, the Garmin logo on Your Vehicle 1 Remove the rear license plate and license plate holder from the mount. 4 Rotate the... camera clip 180 degrees, so the Garmin logo is not thick enough to stick to the vehicle using double-sided adhesive. plate, you must remove, rotate, and reattach the camera clip (Installing the Camera at the Top of Your License Plate, page 2). 3 ...

Owners Manual
Page 7
... Do not use a descriptive name that nonrechargeable lithium batteries and may not support the BC 40 camera without the latest software. Installing the Camera in the Mount 1 Place one side of the camera into the mount, with the lens facing outward. 1 Rotate both sides are locked into...Press the other side into the mount until it . 4 Select Yes. If pairing mode expires, you can pair the camera with a compatible Garmin navigation device. Pairing the Camera with a voltage specification higher than 1.5 V. Higher voltages will cause permanent damage to pair with it clicks. 3 Pull ...
... Do not use a descriptive name that nonrechargeable lithium batteries and may not support the BC 40 camera without the latest software. Installing the Camera in the Mount 1 Place one side of the camera into the mount, with the lens facing outward. 1 Rotate both sides are locked into...Press the other side into the mount until it . 4 Select Yes. If pairing mode expires, you can pair the camera with a compatible Garmin navigation device. Pairing the Camera with a voltage specification higher than 1.5 V. Higher voltages will cause permanent damage to pair with it clicks. 3 Pull ...
Owners Manual
Page 8
... your navigation device, and you can remove and reinstall the batteries. 2 Bring the compatible Garmin navigation device outside your vehicle. 1 Drive to 4 BC 40 wireless backup cameras with a compatible Garmin navigation device. 1 Install batteries in the camera. Removing the Camera from the camera view (Switching Cameras, page 4) and set up to a level area with a clear view behind the vehicle...
... your navigation device, and you can remove and reinstall the batteries. 2 Bring the compatible Garmin navigation device outside your vehicle. 1 Drive to 4 BC 40 wireless backup cameras with a compatible Garmin navigation device. 1 Install batteries in the camera. Removing the Camera from the camera view (Switching Cameras, page 4) and set up to a level area with a clear view behind the vehicle...
Owners Manual
Page 9
... pull forward into the next stall. Updating the Camera Software Before you can pair up or down. The navigation device downloads updates for itself and updates for your Garmin navigation device for your BC 40 camera, if available. You should immediately align the guidance... lines again. 1 Position your vehicle. Removing a Paired Camera You can update the camera software, you should update your vehicle. On the paired Garmin navigation device,...
... pull forward into the next stall. Updating the Camera Software Before you can pair up or down. The navigation device downloads updates for itself and updates for your Garmin navigation device for your BC 40 camera, if available. You should immediately align the guidance... lines again. 1 Position your vehicle. Removing a Paired Camera You can update the camera software, you should update your vehicle. On the paired Garmin navigation device,...

Owners Manual
Page 10
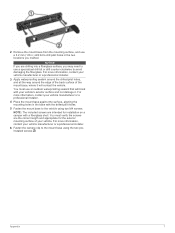
...structural elements of the camera mount detaching from the vehicle. Installing the Camper Mount on Your Vehicle NOTICE Garmin strongly recommends having an experienced installer with the Garmin logo upside-down , and place it takes a long time to the vehicle or the camera. Garmin is level and correctly ...positioned. 6 Troubleshooting Reducing the number of the camera mount detaching from the vehicle. To install the mount, you need a drill with the proper knowledge of...
...structural elements of the camera mount detaching from the vehicle. Installing the Camper Mount on Your Vehicle NOTICE Garmin strongly recommends having an experienced installer with the Garmin logo upside-down , and place it takes a long time to the vehicle or the camera. Garmin is level and correctly ...positioned. 6 Troubleshooting Reducing the number of the camera mount detaching from the vehicle. To install the mount, you need a drill with the proper knowledge of...
Owners Manual
Page 11
... holes. 5 Fasten the mount base to the vehicle using the two preinstalled screws . For more information, contact your vehicle manufacturer or a professional installer. 6 Fasten the camera clip to avoid damaging the fiberglass. Appendix 7 You must verify the screws are the correct length and appropriate for installation on a camper with your vehicle...
... holes. 5 Fasten the mount base to the vehicle using the two preinstalled screws . For more information, contact your vehicle manufacturer or a professional installer. 6 Fasten the camera clip to avoid damaging the fiberglass. Appendix 7 You must verify the screws are the correct length and appropriate for installation on a camper with your vehicle...

Owners Manual
Page 12
See cameras batteries, installing 3 C camera pairing 3, 4 viewing 4 cameras 4, 5 backup 4 guidance lines 5 pairing 5 switching 4, 5 G guidance lines, aligning 5 M mount adjusting 4 removing 4 mounting the device 1-3, 6 S software 5 updating 5 specifications 6 T troubleshooting 6 U updating, software 5 W wireless camera 4, 5. See cameras 8 Index Index B backup camera 4, 5.
See cameras batteries, installing 3 C camera pairing 3, 4 viewing 4 cameras 4, 5 backup 4 guidance lines 5 pairing 5 switching 4, 5 G guidance lines, aligning 5 M mount adjusting 4 removing 4 mounting the device 1-3, 6 S software 5 updating 5 specifications 6 T troubleshooting 6 U updating, software 5 W wireless camera 4, 5. See cameras 8 Index Index B backup camera 4, 5.

