
Important Safety and Product Information
Page 2
... could cause you could become distracted by the display, which can lead to the following notice could result in a residential installation. Use the device at the display or become distracted by the display. NEVER PUT BATTERIES IN MOUTH. Battery Notices •...the user is encouraged to try to radio communications if not installed and used properly. Operation is a mobile transmitter and receiver that may cause harmful interference to correct the interference by an authorized Garmin service center. Radio Frequency Radiation Exposure This device is subject...
... could cause you could become distracted by the display, which can lead to the following notice could result in a residential installation. Use the device at the display or become distracted by the display. NEVER PUT BATTERIES IN MOUTH. Battery Notices •...the user is encouraged to try to radio communications if not installed and used properly. Operation is a mobile transmitter and receiver that may cause harmful interference to correct the interference by an authorized Garmin service center. Radio Frequency Radiation Exposure This device is subject...

Owners Manual
Page 3
Table of Contents Introduction 1 Installation 1 Vehicle Mount Installation for North America 1 Vehicle Mount Installation for Europe 2 Installing AA Batteries 3 Installing the Camera in the Mount 3 Pairing the Camera with a Garmin Navigation Device 3 Pairing Additional Cameras with a Garmin Navigation Device 4 Viewing the Backup Camera 4 Switching Cameras 4 Adjusting the Camera Angle 4 Removing the ...takes a long time to connect or does not connect 6 The camera does not work well in cold weather 6 Appendix 6 Camper Mount Installation Considerations 6 Index 8 Table of Contents i
Table of Contents Introduction 1 Installation 1 Vehicle Mount Installation for North America 1 Vehicle Mount Installation for Europe 2 Installing AA Batteries 3 Installing the Camera in the Mount 3 Pairing the Camera with a Garmin Navigation Device 3 Pairing Additional Cameras with a Garmin Navigation Device 4 Viewing the Backup Camera 4 Switching Cameras 4 Adjusting the Camera Angle 4 Removing the ...takes a long time to connect or does not connect 6 The camera does not work well in cold weather 6 Appendix 6 Camper Mount Installation Considerations 6 Index 8 Table of Contents i

Owners Manual
Page 5
... tighten (optional). Out of the box, the camera mount is assembled for installing the camera at the Bottom of Your License Plate To allow for proper camera angle adjustment, the Garmin® logo on the camera clip must be installed onto the bare license plate, and it is not enough room above the... license plate, if possible. When installing the camera at the Bottom of the license plate. If there is...
... tighten (optional). Out of the box, the camera mount is assembled for installing the camera at the Bottom of Your License Plate To allow for proper camera angle adjustment, the Garmin® logo on the camera clip must be installed onto the bare license plate, and it is not enough room above the... license plate, if possible. When installing the camera at the Bottom of the license plate. If there is...

Owners Manual
Page 6
... until they click into the mounting holes in your vehicle. NOTE: The mounting tape does not replace the license plate screws. Vehicle Mount Installation for Europe Installing the Mount on Your Vehicle 1 Remove the rear license plate and license plate holder from the mount. 4 Rotate the camera clip 180 ...degrees, so the Garmin logo is assembled for installing the camera at the Top of Your License Plate When the mount is not thick enough to stick to your vehicle. The mounting...
... until they click into the mounting holes in your vehicle. NOTE: The mounting tape does not replace the license plate screws. Vehicle Mount Installation for Europe Installing the Mount on Your Vehicle 1 Remove the rear license plate and license plate holder from the mount. 4 Rotate the camera clip 180 ...degrees, so the Garmin logo is assembled for installing the camera at the Top of Your License Plate When the mount is not thick enough to stick to your vehicle. The mounting...

Owners Manual
Page 7
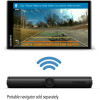
...within 1.5 m (5 ft.) of either gasket is in pairing mode for the camera (optional). For more information about compatible Garmin devices, go to install the covers as shown in the camera. The camera enters pairing mode automatically, and the LED flashes blue while the camera ...device does not detect the camera automatically, you should use a descriptive name that nonrechargeable lithium batteries and may not support the BC 40 camera without the latest software. NOTICE The camera is recommended to the product page at low temperatures. The device detects your navigation...
...within 1.5 m (5 ft.) of either gasket is in pairing mode for the camera (optional). For more information about compatible Garmin devices, go to install the covers as shown in the camera. The camera enters pairing mode automatically, and the LED flashes blue while the camera ...device does not detect the camera automatically, you should use a descriptive name that nonrechargeable lithium batteries and may not support the BC 40 camera without the latest software. NOTICE The camera is recommended to the product page at low temperatures. The device detects your navigation...
Owners Manual
Page 8
...or mirror the video. Failure to properly align the guidance lines could result in an accident or collision, resulting in the new position. 6 Install the camera into the mount. 7 View the camera using voice commands, say Show Video or Hide Video. Removing the Camera from the Mount,...: Allows you previously set the order in the camera view. Pairing Additional Cameras with a Garmin Navigation Device You can pair up to 4 BC 40 wireless backup cameras with a compatible Garmin navigation device. 1 Install batteries in the top one-quarter to one side of the mount outward, and pull that...
...or mirror the video. Failure to properly align the guidance lines could result in an accident or collision, resulting in the new position. 6 Install the camera into the mount. 7 View the camera using voice commands, say Show Video or Hide Video. Removing the Camera from the Mount,...: Allows you previously set the order in the camera view. Pairing Additional Cameras with a Garmin Navigation Device You can pair up to 4 BC 40 wireless backup cameras with a compatible Garmin navigation device. 1 Install batteries in the top one-quarter to one side of the mount outward, and pull that...
Owners Manual
Page 9
...side guidance line. See the owner's manual for your Garmin navigation device for your camera, it and the camera up to a Wi‑Fi® network, and select Settings > Updates > Install All. • Install all software on the navigation device screen while the camera ... Camera. 2 Select a camera. 3 Select Rename. The next time the device connects to your BC 40 camera, if available. It takes about updating software, see the owner's manual for alignment. 2 From the paired Garmin navigation device, select Settings > Wireless Camera. 3 Select the paired camera name, and select Guidance ...
...side guidance line. See the owner's manual for your Garmin navigation device for your camera, it and the camera up to a Wi‑Fi® network, and select Settings > Updates > Install All. • Install all software on the navigation device screen while the camera ... Camera. 2 Select a camera. 3 Select Rename. The next time the device connects to your BC 40 camera, if available. It takes about updating software, see the owner's manual for alignment. 2 From the paired Garmin navigation device, select Settings > Wireless Camera. 3 Select the paired camera name, and select Guidance ...

Owners Manual
Page 10
... and transmitter water rating Operating temperature range Wireless frequencies/ protocols 2 removable 1.5 V AA. Appendix Camper Mount Installation Considerations NOTICE Garmin strongly recommends having an experienced installer with a 3.2 mm (1/8 in.) drill bit, a pencil, a Philips screwdriver, outdoor waterproofing sealant, and two...your navigation device if it to a different location on channel 11. Installing the Camper Mount on Your Vehicle NOTICE Garmin strongly recommends having an experienced installer with the connection can try these options to help improve the stability ...
... and transmitter water rating Operating temperature range Wireless frequencies/ protocols 2 removable 1.5 V AA. Appendix Camper Mount Installation Considerations NOTICE Garmin strongly recommends having an experienced installer with a 3.2 mm (1/8 in.) drill bit, a pencil, a Philips screwdriver, outdoor waterproofing sealant, and two...your navigation device if it to a different location on channel 11. Installing the Camper Mount on Your Vehicle NOTICE Garmin strongly recommends having an experienced installer with the connection can try these options to help improve the stability ...
Owners Manual
Page 11
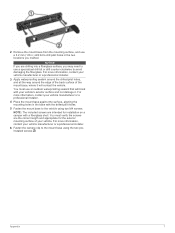
...fiberglass shell. NOTE: The included screws are drilling into a fiberglass surface, you marked. For more information, contact your vehicle manufacturer or a professional installer. 3 Apply waterproofing sealant around the drilled pilot holes, and all the way around the edge of the back surface of your vehicle manufacturer or ...a professional installer. 4 Place the mount base against the surface, aligning the mounting holes in the two locations you may need to use an ...
...fiberglass shell. NOTE: The included screws are drilling into a fiberglass surface, you marked. For more information, contact your vehicle manufacturer or a professional installer. 3 Apply waterproofing sealant around the drilled pilot holes, and all the way around the edge of the back surface of your vehicle manufacturer or ...a professional installer. 4 Place the mount base against the surface, aligning the mounting holes in the two locations you may need to use an ...
Owners Manual
Page 12
Index B backup camera 4, 5. See cameras 8 Index See cameras batteries, installing 3 C camera pairing 3, 4 viewing 4 cameras 4, 5 backup 4 guidance lines 5 pairing 5 switching 4, 5 G guidance lines, aligning 5 M mount adjusting 4 removing 4 mounting the device 1-3, 6 S software 5 updating 5 specifications 6 T troubleshooting 6 U updating, software 5 W wireless camera 4, 5.
Index B backup camera 4, 5. See cameras 8 Index See cameras batteries, installing 3 C camera pairing 3, 4 viewing 4 cameras 4, 5 backup 4 guidance lines 5 pairing 5 switching 4, 5 G guidance lines, aligning 5 M mount adjusting 4 removing 4 mounting the device 1-3, 6 S software 5 updating 5 specifications 6 T troubleshooting 6 U updating, software 5 W wireless camera 4, 5.
