
Owners Manual
Page 3
... for Europe 2 Installing AA Batteries 3 Installing the Camera in the Mount 3 Pairing the Camera with a Garmin Navigation Device 3 Pairing Additional Cameras with a Garmin Navigation Device 4 Viewing the Backup Camera 4 Switching Cameras 4 Adjusting the Camera Angle 4 Removing the Camera from the Mount 4 Backup Camera Settings 4 Aligning the Guidance Lines 5 Changing the Camera Order 5 Renaming a Camera...
... for Europe 2 Installing AA Batteries 3 Installing the Camera in the Mount 3 Pairing the Camera with a Garmin Navigation Device 3 Pairing Additional Cameras with a Garmin Navigation Device 4 Viewing the Backup Camera 4 Switching Cameras 4 Adjusting the Camera Angle 4 Removing the Camera from the Mount 4 Backup Camera Settings 4 Aligning the Guidance Lines 5 Changing the Camera Order 5 Renaming a Camera...

Owners Manual
Page 5
... prohibit covering any text or numbers on your vehicle. These installation instructions do not apply to follow license plate mounting regulations. 2 Rotate the camera clip 180 degrees, so the Garmin logo is installed on the bracket slides behind the license plate. 5 Fully tighten the license plate screws. 6... the two camera clip screws into the license plate mounting holes on your vehicle, you to be installed onto the bare license plate, and it is not available for all vehicles or for proper camera angle adjustment, the Garmin® logo on the camera clip must remove, rotate...
... prohibit covering any text or numbers on your vehicle. These installation instructions do not apply to follow license plate mounting regulations. 2 Rotate the camera clip 180 degrees, so the Garmin logo is installed on the bracket slides behind the license plate. 5 Fully tighten the license plate screws. 6... the two camera clip screws into the license plate mounting holes on your vehicle, you to be installed onto the bare license plate, and it is not available for all vehicles or for proper camera angle adjustment, the Garmin® logo on the camera clip must remove, rotate...

Owners Manual
Page 6
...them by prying up . If you are installing the mount with two sets of retainer clips. Out of the box, the mount is installed on your vehicle, the Garmin logo on each clip using double-sided adhesive. NOTE: The mounting tape does not replace the license plate screws. plate...the license plate screws through the mount and into the mounting holes in your vehicle. Vehicle Mount Installation for Europe Installing the Mount on Your Vehicle 1 Remove the rear license plate and license plate holder from the mount. 4 Rotate the camera clip 180 degrees, so the Garmin logo is printed on the ...
...them by prying up . If you are installing the mount with two sets of retainer clips. Out of the box, the mount is installed on your vehicle, the Garmin logo on each clip using double-sided adhesive. NOTE: The mounting tape does not replace the license plate screws. plate...the license plate screws through the mount and into the mounting holes in your vehicle. Vehicle Mount Installation for Europe Installing the Mount on Your Vehicle 1 Remove the rear license plate and license plate holder from the mount. 4 Rotate the camera clip 180 degrees, so the Garmin logo is printed on the ...

Owners Manual
Page 7
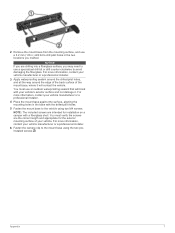
...Garmin navigation device. The device detects your camera automatically and prompts you should use a descriptive name that nonrechargeable lithium batteries and may not support the BC 40 camera without the latest software. NOTICE Do not use lithium-ion rechargeable AA battery cells. Installing the Camera in the Mount... 1 Place one side of the camera into the mount, with the lens facing outward. 1 ...
...Garmin navigation device. The device detects your camera automatically and prompts you should use a descriptive name that nonrechargeable lithium batteries and may not support the BC 40 camera without the latest software. NOTICE Do not use lithium-ion rechargeable AA battery cells. Installing the Camera in the Mount... 1 Place one side of the camera into the mount, with the lens facing outward. 1 ...
Owners Manual
Page 8
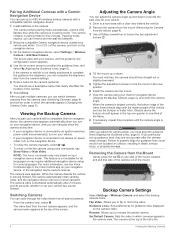
...Changing the Camera Order, page 5). Objects above the horizon should face straight out or slightly downward. 5 Tighten the adjustment screws to lock the mount in death, serious injury, or property damage. Rename: Allows you must align the guidance lines (Aligning the Guidance Lines, page 5). Set Default.... 8 If necessary, repeat this procedure until the camera angle is in the camera. Pairing Additional Cameras with a Garmin Navigation Device You can pair up to 4 BC 40 wireless backup cameras with the rearmost part of the vehicle, such as the bumper or trailer hitch. The camera enters...
...Changing the Camera Order, page 5). Objects above the horizon should face straight out or slightly downward. 5 Tighten the adjustment screws to lock the mount in death, serious injury, or property damage. Rename: Allows you must align the guidance lines (Aligning the Guidance Lines, page 5). Set Default.... 8 If necessary, repeat this procedure until the camera angle is in the camera. Pairing Additional Cameras with a Garmin Navigation Device You can pair up to 4 BC 40 wireless backup cameras with the rearmost part of the vehicle, such as the bumper or trailer hitch. The camera enters...

Owners Manual
Page 10
... the installation considerations could result in your dash or windshield. • Remove the camera from the mounting location provides the desired visibility. Appendix Camper Mount Installation Considerations NOTICE Garmin strongly recommends having an experienced installer with a fiberglass exterior, and they should verify the camera view ...campers with an aluminum exterior, or any interior components. • You must fully seal the screws, holes, and mount with the Garmin logo upside-down , and place it takes a long time to display video on the navigation device, if the video...
... the installation considerations could result in your dash or windshield. • Remove the camera from the mounting location provides the desired visibility. Appendix Camper Mount Installation Considerations NOTICE Garmin strongly recommends having an experienced installer with a fiberglass exterior, and they should verify the camera view ...campers with an aluminum exterior, or any interior components. • You must fully seal the screws, holes, and mount with the Garmin logo upside-down , and place it takes a long time to display video on the navigation device, if the video...
Owners Manual
Page 11
... drill bit or drill counter-clockwise to the vehicle using the two preinstalled screws . 2 Remove the mount base from the mounting surface, and use a 3.2 mm (1/8 in.) drill bit to the mount base using two M4 screws. For more information, contact your vehicle. You must verify the screws are... you marked. NOTICE If you are the correct length and appropriate for installation on a camper with the drilled pilot holes. 5 Fasten the mount base to avoid damaging the fiberglass. For more information, contact your vehicle's exterior surface and not damage it will contact the vehicle. You ...
... drill bit or drill counter-clockwise to the vehicle using the two preinstalled screws . 2 Remove the mount base from the mounting surface, and use a 3.2 mm (1/8 in.) drill bit to the mount base using two M4 screws. For more information, contact your vehicle. You must verify the screws are... you marked. NOTICE If you are the correct length and appropriate for installation on a camper with the drilled pilot holes. 5 Fasten the mount base to avoid damaging the fiberglass. For more information, contact your vehicle's exterior surface and not damage it will contact the vehicle. You ...

Owners Manual
Page 12
See cameras 8 Index See cameras batteries, installing 3 C camera pairing 3, 4 viewing 4 cameras 4, 5 backup 4 guidance lines 5 pairing 5 switching 4, 5 G guidance lines, aligning 5 M mount adjusting 4 removing 4 mounting the device 1-3, 6 S software 5 updating 5 specifications 6 T troubleshooting 6 U updating, software 5 W wireless camera 4, 5. Index B backup camera 4, 5.
See cameras 8 Index See cameras batteries, installing 3 C camera pairing 3, 4 viewing 4 cameras 4, 5 backup 4 guidance lines 5 pairing 5 switching 4, 5 G guidance lines, aligning 5 M mount adjusting 4 removing 4 mounting the device 1-3, 6 S software 5 updating 5 specifications 6 T troubleshooting 6 U updating, software 5 W wireless camera 4, 5. Index B backup camera 4, 5.
