
Owner's Manual
Page 4
... Introduction i About This Manual i Product Registration iii Contact Garmin iii Caring for the Fishfinder 160C iii Caring for the Screen iii Warnings iv Important Information iv Getting Started 1 Understanding the Fishfinder and Sonar 1 Understanding Sonar 1 Understanding the Fishfinder Screen 1 Using Dual Beam 2 Whiteline 3 Thermoclines 3 Installing the Fishfinder 160C 4 Packing List 4 Unit Installation 5 Transducer Installation 6 Selecting a Transom Mount Location 7 Mounting the...
... Introduction i About This Manual i Product Registration iii Contact Garmin iii Caring for the Fishfinder 160C iii Caring for the Screen iii Warnings iv Important Information iv Getting Started 1 Understanding the Fishfinder and Sonar 1 Understanding Sonar 1 Understanding the Fishfinder Screen 1 Using Dual Beam 2 Whiteline 3 Thermoclines 3 Installing the Fishfinder 160C 4 Packing List 4 Unit Installation 5 Transducer Installation 6 Selecting a Transom Mount Location 7 Mounting the...

Owner's Manual
Page 7
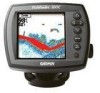
... settings that you choose determine how the information appears on the Fishfinder 160C screen. We recommend that you take your Fishfinder 160C to a transducer. The type of settings. Getting Started Understanding the Fishfinder and Sonar The Fishfinder 160C is a fully automatic, color sonar unit that allows you to go out on the water and find the fish. If you have...
... settings that you choose determine how the information appears on the Fishfinder 160C screen. We recommend that you take your Fishfinder 160C to a transducer. The type of settings. Getting Started Understanding the Fishfinder and Sonar The Fishfinder 160C is a fully automatic, color sonar unit that allows you to go out on the water and find the fish. If you have...

Owner's Manual
Page 8
... targets. it gives you may see suspended targets indicated by fish shapes instead of fish. The water area covered by the transducer beam width and the water depth. The Fishfinder 160C includes the latest technology in shallow water, because it can transmit a narrow or a wide beam. By default, the targets... including areas beyond the sides of about a 7-foot circle). You can turn down the Gain setting to the speed, fish orientation, or other sonar interference at a depth of 30 feet, the narrow beam covers the area of your boat. You can turn on the Fish Symbols setting if ...
... targets. it gives you may see suspended targets indicated by fish shapes instead of fish. The water area covered by the transducer beam width and the water depth. The Fishfinder 160C includes the latest technology in shallow water, because it can transmit a narrow or a wide beam. By default, the targets... including areas beyond the sides of about a 7-foot circle). You can turn down the Gain setting to the speed, fish orientation, or other sonar interference at a depth of 30 feet, the narrow beam covers the area of your boat. You can turn on the Fish Symbols setting if ...

Owner's Manual
Page 10
... professional assistance. Packing List A-Fishfinder 160C Sonar Unit (1) K-10-32 Lock Nut (1) B-Swivel Mount Bracket (1) L-5 x 30 mm Screws (2) C-Swivel Base (1) M-10-32 x 1.75 Screw (1) D-Mounting Knobs- If you are missing any items, contact your Garmin dealer. Be sure the wiring harness reaches the unit and transducer location before beginning installation. The Garmin Fishfinder 160C hardware allows for installation...
... professional assistance. Packing List A-Fishfinder 160C Sonar Unit (1) K-10-32 Lock Nut (1) B-Swivel Mount Bracket (1) L-5 x 30 mm Screws (2) C-Swivel Base (1) M-10-32 x 1.75 Screw (1) D-Mounting Knobs- If you are missing any items, contact your Garmin dealer. Be sure the wiring harness reaches the unit and transducer location before beginning installation. The Garmin Fishfinder 160C hardware allows for installation...

Owner's Manual
Page 13
... in the path of the prop on plane at high speed. Fishfinder 160C Owner's Manual Installing the Fishfinder 160C > Transducer Installation Do not mount the transducer behind strakes, rivet lines, struts, fittings, water intake, discharge ports, eroding paint, or anything that may degrade the sonar's operation. Apply marine sealant to all screw threads to become turbulent. DO...
... in the path of the prop on plane at high speed. Fishfinder 160C Owner's Manual Installing the Fishfinder 160C > Transducer Installation Do not mount the transducer behind strakes, rivet lines, struts, fittings, water intake, discharge ports, eroding paint, or anything that may degrade the sonar's operation. Apply marine sealant to all screw threads to become turbulent. DO...

Owner's Manual
Page 16
...the screw holes that connects the unit to power and the transducer with one easy-to the Data Input of the boat. Installing the Fishfinder 160C > Wiring Harness Installation Testing the Transom Mount Installation Perform this will void your Garmin Dealer. To test the transom mount installation: 1. If the...the signal improves. 3. Begin testing the installation at which the signal was lost or the bottom return is necessary to carry the sonar signal, the Fishfinder does not function properly with the unit. If your boat in the fuse holder (fuse block only). 4. Insert the cable ...
...the screw holes that connects the unit to power and the transducer with one easy-to the Data Input of the boat. Installing the Fishfinder 160C > Wiring Harness Installation Testing the Transom Mount Installation Perform this will void your Garmin Dealer. To test the transom mount installation: 1. If the...the signal improves. 3. Begin testing the installation at which the signal was lost or the bottom return is necessary to carry the sonar signal, the Fishfinder does not function properly with the unit. If your boat in the fuse holder (fuse block only). 4. Insert the cable ...
Owner's Manual
Page 31
... unit 5 the wiring harness 10 K keel offset 18 L language 20 light 21 M MENU key 12 mounting the bracket assembly 5 the transducer 8, 9 N narrow beam 2, 17 NMEA 10 output 21 numbers 18 O operating instructions 12 Index P packing list 4 physical specifications 22 power/backlight key 12 R...S scroll 14 setup menu 15 shallow alarm 16 simulator mode 12, 20 size (numbers) 18 Software License Agreement 24 sonar 1, 22 sound waves 1 specifications 22 speed 13, 18, 20 storage iii strongest sonar returns 1 surface clutter 2 suspended targets 2, 13 system 20 Index A adjustment bar, the 14 alarms 15 arches ...
... unit 5 the wiring harness 10 K keel offset 18 L language 20 light 21 M MENU key 12 mounting the bracket assembly 5 the transducer 8, 9 N narrow beam 2, 17 NMEA 10 output 21 numbers 18 O operating instructions 12 Index P packing list 4 physical specifications 22 power/backlight key 12 R...S scroll 14 setup menu 15 shallow alarm 16 simulator mode 12, 20 size (numbers) 18 Software License Agreement 24 sonar 1, 22 sound waves 1 specifications 22 speed 13, 18, 20 storage iii strongest sonar returns 1 surface clutter 2 suspended targets 2, 13 system 20 Index A adjustment bar, the 14 alarms 15 arches ...
Owner's Manual
Page 32
Index T temperature 20 testing the transom mount installation 10 thermoclines 3 and structure 13 tool list 5 transducer 1 assembling 6 installing 6, 9 mounting on a transom 8 mounting on a trolling motor 9 transom mount installation 10 selecting a mount location 7 trolling motor mounting the transducer 9 U understanding sonar 1 units 20 unit installation 5 V view 15 W water depth 13 temperature 3, 13, 18 weakest returns 1 whiteline 3, 17 wide beam 2, 17 wiring diagram 11 harness installation 10 to a fuse block 11 Z zoom 15
Index T temperature 20 testing the transom mount installation 10 thermoclines 3 and structure 13 tool list 5 transducer 1 assembling 6 installing 6, 9 mounting on a transom 8 mounting on a trolling motor 9 transom mount installation 10 selecting a mount location 7 trolling motor mounting the transducer 9 U understanding sonar 1 units 20 unit installation 5 V view 15 W water depth 13 temperature 3, 13, 18 weakest returns 1 whiteline 3, 17 wide beam 2, 17 wiring diagram 11 harness installation 10 to a fuse block 11 Z zoom 15


