
Owners Manual
Page 1
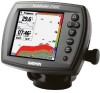
Fishfinder 250/250C high-resolution sonar owner's manual (Fishfinder 250C shown)
Fishfinder 250/250C high-resolution sonar owner's manual (Fishfinder 250C shown)
Owners Manual
Page 2
...886/2.2642.9199 Fax 886/2.2642.9099 All rights reserved. © Copyright 2005 Garmin Ltd. May 2005 Part Number 190-00328-00 Rev. Except as expressly provided herein, no part of this manual or any storage medium, for current updates and supplemental information concerning the use and... operation of such changes or improvements. Visit the Garmin Web site (www.garmin.com) for any person or organization of this document is...
...886/2.2642.9199 Fax 886/2.2642.9099 All rights reserved. © Copyright 2005 Garmin Ltd. May 2005 Part Number 190-00328-00 Rev. Except as expressly provided herein, no part of this manual or any storage medium, for current updates and supplemental information concerning the use and... operation of such changes or improvements. Visit the Garmin Web site (www.garmin.com) for any person or organization of this document is...

Owners Manual
Page 3
.... iii To ensure that you for the Product Registration link on interpreting sonar graphs. Use this Owner's Manual and learn how to operate your Fishfinder 250/250C is lost, stolen, or in a safe place or attach a photocopy to these instructions. Basic Operation ... overview of service. Connect to our Web site (www.garmin.com) and look for choosing Garmin! Getting Started covers the installation and testing for links to Product Support and Product FAQs. Fishfinder 250/250C Owner's Manual INTRODUCTION Enjoy your purchase ensures you by our product registration...
.... iii To ensure that you for the Product Registration link on interpreting sonar graphs. Use this Owner's Manual and learn how to operate your Fishfinder 250/250C is lost, stolen, or in a safe place or attach a photocopy to these instructions. Basic Operation ... overview of service. Connect to our Web site (www.garmin.com) and look for choosing Garmin! Getting Started covers the installation and testing for links to Product Support and Product FAQs. Fishfinder 250/250C Owner's Manual INTRODUCTION Enjoy your purchase ensures you by our product registration...
Owners Manual
Page 4
... Product Registration iii Getting Started 1 Packing List 1 Transducers 2 Optional Transducers 2 Installation 3 Selecting a Proper Location 3 Installing the Swivel Mount 3 Flush Mounting the Fishfinder 250/250C Unit 6 Connecting the Power/Data Cable 7 Interfacing 8 Installing the Transducer 10 Transom Mount Installation 10 Shoot-Thru-Hull Installation 11 Testing the Installation 12 Basic... 36 Sonar 36 Cleaning and Storage 36 Messages and Alarms 37 Software License Agreement 38 Limited Warranty 38 Index 40 iv Fishfinder 250/250C Owner's Manual
... Product Registration iii Getting Started 1 Packing List 1 Transducers 2 Optional Transducers 2 Installation 3 Selecting a Proper Location 3 Installing the Swivel Mount 3 Flush Mounting the Fishfinder 250/250C Unit 6 Connecting the Power/Data Cable 7 Interfacing 8 Installing the Transducer 10 Transom Mount Installation 10 Shoot-Thru-Hull Installation 11 Testing the Installation 12 Basic... 36 Sonar 36 Cleaning and Storage 36 Messages and Alarms 37 Software License Agreement 38 Limited Warranty 38 Index 40 iv Fishfinder 250/250C Owner's Manual

Owners Manual
Page 5
...your Fishfinder 250/250C, check to see that your Garmin dealer immediately. If any parts are missing, contact your package includes the following items. The package part number can be found on the outside of available accessories for your unit, current user manuals, and software updates, ...visit our Web site at www.garmin.com. 1 Fishfinder 250 Standard Package (010-00343-00 w/o transducer): • Fishfinder 250 Unit...
...your Fishfinder 250/250C, check to see that your Garmin dealer immediately. If any parts are missing, contact your package includes the following items. The package part number can be found on the outside of available accessories for your unit, current user manuals, and software updates, ...visit our Web site at www.garmin.com. 1 Fishfinder 250 Standard Package (010-00343-00 w/o transducer): • Fishfinder 250 Unit...

Owners Manual
Page 6
... operation of your sonar, transmitting sound waves toward the bottom in the Optional Packages (page 1) are available from your local dealer or direct from Garmin. • 200/50kHz, 12/45°, plastic, transom mount, depth, temp • 200/50kHz, 12/45°, plastic, transom mount...this can result in -hull mount, depth • 200kHz, 14°, plastic, trolling motor mount, depth, temp Fishfinder 250/250C Owner's Manual A wide cone angle transducer works best in shallower water, providing a large coverage or viewing area, but with improved bottom resolution and a smaller...
... operation of your sonar, transmitting sound waves toward the bottom in the Optional Packages (page 1) are available from your local dealer or direct from Garmin. • 200/50kHz, 12/45°, plastic, transom mount, depth, temp • 200/50kHz, 12/45°, plastic, transom mount...this can result in -hull mount, depth • 200kHz, 14°, plastic, trolling motor mount, depth, temp Fishfinder 250/250C Owner's Manual A wide cone angle transducer works best in shallower water, providing a large coverage or viewing area, but with improved bottom resolution and a smaller...

Owners Manual
Page 7
If you need the appropriate fasteners and tools. Fishfinder 250/250C Owner's Manual GETTING STARTED > INSTALLATION When choosing a location for mounting in an ... related consequences are NOT covered by the manufacturer's limited warranty. 3 Installation The Fishfinder 250/250C must be properly installed according to the following conditions: • There should be sturdy enough to support..., you experience difficulty installing the unit, contact Garmin Product Support or seek the assistance of the unit and protecting it from excessive vibration and shock.
If you need the appropriate fasteners and tools. Fishfinder 250/250C Owner's Manual GETTING STARTED > INSTALLATION When choosing a location for mounting in an ... related consequences are NOT covered by the manufacturer's limited warranty. 3 Installation The Fishfinder 250/250C must be properly installed according to the following conditions: • There should be sturdy enough to support..., you experience difficulty installing the unit, contact Garmin Product Support or seek the assistance of the unit and protecting it from excessive vibration and shock.
Owners Manual
Page 8
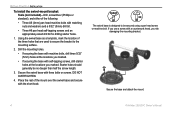
..., drill three 5/32" (5mm) holes at the locations you risk damaging the mounting bracket. Secure the base and attach the mount. 4 Fishfinder 250/250C Owner's Manual GETTING STARTED > INSTALLATION To install the swivel-mount bracket: Tools (not included)-Drill, screwdriver (Phillips or standard), and either of the following: • Three...
..., drill three 5/32" (5mm) holes at the locations you risk damaging the mounting bracket. Secure the base and attach the mount. 4 Fishfinder 250/250C Owner's Manual GETTING STARTED > INSTALLATION To install the swivel-mount bracket: Tools (not included)-Drill, screwdriver (Phillips or standard), and either of the following: • Three...

Owners Manual
Page 9
.... (Turn counter-clockwise to widen the bracket arms, clockwise to tighten.) 2. GETTING STARTED > INSTALLATION Slide the unit onto the bracket. Fishfinder 250/250C Owner's Manual Adjust for optimal viewing. 5 Tighten all knobs once the desired viewing angle is obtained. Adjust the unit angle and tighten the long mounting knob until...
.... (Turn counter-clockwise to widen the bracket arms, clockwise to tighten.) 2. GETTING STARTED > INSTALLATION Slide the unit onto the bracket. Fishfinder 250/250C Owner's Manual Adjust for optimal viewing. 5 Tighten all knobs once the desired viewing angle is obtained. Adjust the unit angle and tighten the long mounting knob until...
Owners Manual
Page 10
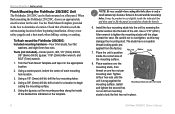
... the unit is only a small amount of clearance between the unit and the mounting holes. To flush mount the Fishfinder 250/250C: Included mounting hardware-Four 3mm studs, four flat panel. Trim the Flush Mount Template and tape it in place. 6 Fishfinder 250.../250C Owner's Manual GETTING STARTED > INSTALLATION Flush Mounting the Fishfinder 250/250C Unit The Fishfinder 250/250C can be prudent to cut the mounting surface along the inside of the dashed line indicated on...
... the unit is only a small amount of clearance between the unit and the mounting holes. To flush mount the Fishfinder 250/250C: Included mounting hardware-Four 3mm studs, four flat panel. Trim the Flush Mount Template and tape it in place. 6 Fishfinder 250.../250C Owner's Manual GETTING STARTED > INSTALLATION Flush Mounting the Fishfinder 250/250C Unit The Fishfinder 250/250C can be prudent to cut the mounting surface along the inside of the dashed line indicated on...
Owners Manual
Page 11
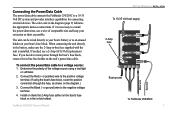
... or in the in the diagram (page 9) indicates the appropriate harness connections. Connect the Black (- Boat ground To Fishfinder 250/250C 7 When connecting the unit directly to the battery, make sure the 2-Amp in-line fuse supplied with the unit is necessary to the positive...The unit can be wired directly to a 10-35 Volt DC system and provides interface capabilities for connecting external devices. Fishfinder 250/250C Owner's Manual 2A Black wire Red wire GETTING STARTED > INSTALLATION To 10-35 Volt boat supply + 2-Amp fuse - Connecting the Power/Data Cable The...
... or in the in the diagram (page 9) indicates the appropriate harness connections. Connect the Black (- Boat ground To Fishfinder 250/250C 7 When connecting the unit directly to the battery, make sure the 2-Amp in-line fuse supplied with the unit is necessary to the positive...The unit can be wired directly to a 10-35 Volt DC system and provides interface capabilities for connecting external devices. Fishfinder 250/250C Owner's Manual 2A Black wire Red wire GETTING STARTED > INSTALLATION To 10-35 Volt boat supply + 2-Amp fuse - Connecting the Power/Data Cable The...
Owners Manual
Page 12
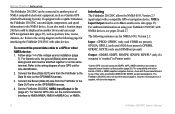
...data ground and must be connected to another device and can accept GPS navigational data (page 23), such as a Garmin GPS (Global Positioning System). Set the Fishfinder 250/250C NMEA Input/Output to a GPS or other NMEA device: 1. The following page for NMEA 0183, Version 2.3 ... present) Output-SDDBT, SDDPT, SDMTW, SDVHW, SDWPL* (only if a waypoint is "marked" in Pointer mode) *Garmin GPS units will store the waypoint. 8 Fishfinder 250/250C Owner's Manual Refer to see pages 20 and 27. Refer to the wiring diagram on using your Fishfinder 250...
...data ground and must be connected to another device and can accept GPS navigational data (page 23), such as a Garmin GPS (Global Positioning System). Set the Fishfinder 250/250C NMEA Input/Output to a GPS or other NMEA device: 1. The following page for NMEA 0183, Version 2.3 ... present) Output-SDDBT, SDDPT, SDMTW, SDVHW, SDWPL* (only if a waypoint is "marked" in Pointer mode) *Garmin GPS units will store the waypoint. 8 Fishfinder 250/250C Owner's Manual Refer to see pages 20 and 27. Refer to the wiring diagram on using your Fishfinder 250...
Owners Manual
Page 13
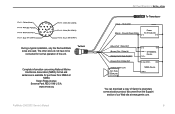
... is available for normal operation of our Web site at : NMEA Seven Riggs Avenue Severna Park, MD 21146 U.S.A. www.nmea.org Fishfinder 250/250C Owner's Manual GETTING STARTED > INSTALLATION To Transducer (Red) + 10-35 VDC (Black) - Ground (Power/Data) Power 10-35 Volts DC (Blue) Port 1 Data OUT (Brown) Port... other wires do not have to be connected for purchase from the Support section of the unit. NMEA Device RXD + You can download a copy of Garmin's proprietary communication protocol document from NMEA at www...
... is available for normal operation of our Web site at : NMEA Seven Riggs Avenue Severna Park, MD 21146 U.S.A. www.nmea.org Fishfinder 250/250C Owner's Manual GETTING STARTED > INSTALLATION To Transducer (Red) + 10-35 VDC (Black) - Ground (Power/Data) Power 10-35 Volts DC (Blue) Port 1 Data OUT (Brown) Port... other wires do not have to be connected for purchase from the Support section of the unit. NMEA Device RXD + You can download a copy of Garmin's proprietary communication protocol document from NMEA at www...
Owners Manual
Page 14
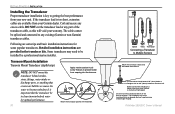
... that creates air bubbles or causes the water to Multiple Sensors Fishfinder 250/250C Owner's Manual DO NOT cut the transducer lead or any excess cable. Some transducers may need to any existing (Garmin or non-Garmin) transducer cables. Detailed installation instructions are available from your new unit. The cable cannot be... Temp Transducer Connecting a Transducer to become turbulent. GETTING STARTED > INSTALLATION Installing the Transducer Proper transducer installation is key to getting the best performance from your Garmin dealer.
... that creates air bubbles or causes the water to Multiple Sensors Fishfinder 250/250C Owner's Manual DO NOT cut the transducer lead or any excess cable. Some transducers may need to any existing (Garmin or non-Garmin) transducer cables. Detailed installation instructions are available from your new unit. The cable cannot be... Temp Transducer Connecting a Transducer to become turbulent. GETTING STARTED > INSTALLATION Installing the Transducer Proper transducer installation is key to getting the best performance from your Garmin dealer.

Owners Manual
Page 15
..., the temperature displayed reflects the hull temperature. If the sonar performance is equipped with water or light mineral oil. 3. Fishfinder 250/250C Owner's Manual GETTING STARTED > INSTALLATION NOTE: Many modern hulls have a prelocated pocket for optimum performance. If you to use a higher gain setting. Shoot-Thru-Hull Installation...
..., the temperature displayed reflects the hull temperature. If the sonar performance is equipped with water or light mineral oil. 3. Fishfinder 250/250C Owner's Manual GETTING STARTED > INSTALLATION NOTE: Many modern hulls have a prelocated pocket for optimum performance. If you to use a higher gain setting. Shoot-Thru-Hull Installation...

Owners Manual
Page 16
...is severely degraded, note the speed at which this occurs. Press the POWER/BACKLIGHT key (page 13) and the Fishfinder 250/250C should be in the water to select the transducer type. If the unit is connected to the correct polarity, and the 2-Amp fuse is...appears to cure for leaks. Weight the transducer in the epoxy, turning the transducer to properly test the sonar installation. Fishfinder 250/250C Owner's Manual Placing the transducer too deep can adversely affect the boat's performance and put the transducer at a slow speed. It may be working properly...
...is severely degraded, note the speed at which this occurs. Press the POWER/BACKLIGHT key (page 13) and the Fishfinder 250/250C should be in the water to select the transducer type. If the unit is connected to the correct polarity, and the 2-Amp fuse is...appears to cure for leaks. Weight the transducer in the epoxy, turning the transducer to properly test the sonar installation. Fishfinder 250/250C Owner's Manual Placing the transducer too deep can adversely affect the boat's performance and put the transducer at a slow speed. It may be working properly...
Owners Manual
Page 17
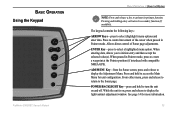
.../BACKLIGHT Key-press and hold to access the Main Menu for more information. 13 BASIC OPERATION Using the Keypad ADJ MENU Fishfinder 250/250C Owner's Manual BASIC OPERATION > USING THE KEYPAD NOTE: Press and release a key to activate its secondary function (if available). Pressing and holding a key activates its primary...
.../BACKLIGHT Key-press and hold to access the Main Menu for more information. 13 BASIC OPERATION Using the Keypad ADJ MENU Fishfinder 250/250C Owner's Manual BASIC OPERATION > USING THE KEYPAD NOTE: Press and release a key to activate its secondary function (if available). Pressing and holding a key activates its primary...
Owners Manual
Page 18
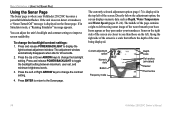
... -left . Current adjustment option Numeric data Bottom Frequency mode Depth scale Fish arches (simulated) Flasher Thermocline 14 Fishfinder 250/250C Owner's Manual The adjustment window automatically disappears when idle for 20 seconds. 2. The currently selected adjustment option (page 17) is displayed in Simulator...transducer. Directly below the adjustment option, the screen displays numeric data such as they pass under your Fishfinder 250/250C becomes a powerful fishfinder/flasher. Along the right side of the screen is displayed on the left...
... -left . Current adjustment option Numeric data Bottom Frequency mode Depth scale Fish arches (simulated) Flasher Thermocline 14 Fishfinder 250/250C Owner's Manual The adjustment window automatically disappears when idle for 20 seconds. 2. The currently selected adjustment option (page 17) is displayed in Simulator...transducer. Directly below the adjustment option, the screen displays numeric data such as they pass under your Fishfinder 250/250C becomes a powerful fishfinder/flasher. Along the right side of the screen is displayed on the left...

Owners Manual
Page 19
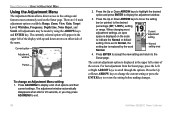
...of a zoomed portion of the sonar, bottom lock (display scaled from the wider beam (50kHz) will change. Fishfinder 250/250C Owner's Manual BASIC OPERATION > USING THE SONAR PAGE Split screen view Fish symbol Wide beam returns Fish symbols Narrow beam returns Frequency mode 15 stronger returns...). Simulated fish icons are displayed in three different sizes based on the size of both. For more information on the Fishfinder 250C. The Fishfinder 250 displays sonar returns as red (strongest), orange (strong), yellow (medium), green (weaker), and blue (weakest)....
...of a zoomed portion of the sonar, bottom lock (display scaled from the wider beam (50kHz) will change. Fishfinder 250/250C Owner's Manual BASIC OPERATION > USING THE SONAR PAGE Split screen view Fish symbol Wide beam returns Fish symbols Narrow beam returns Frequency mode 15 stronger returns...). Simulated fish icons are displayed in three different sizes based on the size of both. For more information on the Fishfinder 250C. The Fishfinder 250 displays sonar returns as red (strongest), orange (strong), yellow (medium), green (weaker), and blue (weakest)....
Owners Manual
Page 20
... scroll through the options. Press ENTER to accept the new setting and return to review the setting before making changes. 16 Fishfinder 250/250C Owner's Manual BASIC OPERATION > USING THE ADJUSTMENT MENU Using the Adjustment Menu The Adjustment Menu allows direct access to the settings and features most adjustment settings...
... scroll through the options. Press ENTER to accept the new setting and return to review the setting before making changes. 16 Fishfinder 250/250C Owner's Manual BASIC OPERATION > USING THE ADJUSTMENT MENU Using the Adjustment Menu The Adjustment Menu allows direct access to the settings and features most adjustment settings...