
GPSMAP 2106/2110 Owner's Manual
Page 3
...Garmin GSD 21 or GSD 22 sounder connected to configure your Garmin dealer immediately. Installing Your GPSMAP 2106/2110 To install the GPSMAP 2106/2110, refer to create an unsurpassed marine...navigating a route, and using the pages. It may also be available at the end of Contents, Product Registration, and the Software License Agreement. Take a moment now to use the GPSMAP 2106/2110...unsafe practices. GPSMAP 2106/2110 Owner's Manual i The GPSMAP 2106/2110 is provided at most out of Garmin GPS and full-featured mapping to the GPSMAP 2106/2110 & GPS 17 Installation ...
...Garmin GSD 21 or GSD 22 sounder connected to configure your Garmin dealer immediately. Installing Your GPSMAP 2106/2110 To install the GPSMAP 2106/2110, refer to create an unsurpassed marine...navigating a route, and using the pages. It may also be available at the end of Contents, Product Registration, and the Software License Agreement. Take a moment now to use the GPSMAP 2106/2110...unsafe practices. GPSMAP 2106/2110 Owner's Manual i The GPSMAP 2106/2110 is provided at most out of Garmin GPS and full-featured mapping to the GPSMAP 2106/2110 & GPS 17 Installation ...
GPSMAP 2106/2110 Owner's Manual
Page 4
...Garmin...v Software License Agreement v Warning ...iv Caution ...iv Getting Started 1 Unit Overview 1 Using the GPSMAP 2106/2110 Keypad 2 Using Soft Keys...3 Using Data Entry/Shortcut Keys 3 Status Bar...3 Turning on the GPSMAP 2106/2110 4 Adjusting the Backlight 4 Initializing the GPS Receiver 5 Receiver Status and Accuracy 6 GPS Setup...6 Using Simulator Mode 7 Basic Operation 8 Using the GPSMAP 2106/2110... Waypoints...17 Proximity Waypoints 18 Navigating to a Destination 19 Selecting a Map Item Go To Destination 20 Follow Track and TracBack Navigation 20 TracBack Tips ...22 Man...
...Garmin...v Software License Agreement v Warning ...iv Caution ...iv Getting Started 1 Unit Overview 1 Using the GPSMAP 2106/2110 Keypad 2 Using Soft Keys...3 Using Data Entry/Shortcut Keys 3 Status Bar...3 Turning on the GPSMAP 2106/2110 4 Adjusting the Backlight 4 Initializing the GPS Receiver 5 Receiver Status and Accuracy 6 GPS Setup...6 Using Simulator Mode 7 Basic Operation 8 Using the GPSMAP 2106/2110... Waypoints...17 Proximity Waypoints 18 Navigating to a Destination 19 Selecting a Map Item Go To Destination 20 Follow Track and TracBack Navigation 20 TracBack Tips ...22 Man...
GPSMAP 2106/2110 Owner's Manual
Page 5
...Highway Page 41 Changing the Highway Perspective Range 41 Highway Page Options 41 Showing or Hiding Cartography 42 Main Menu 43 GPS Tab...43 Tide Tab ...44 Tide Sub Tab ...44 Current Sub Tab ...46 Celestial Tab 47 Trip Tab...48 ... Key 54 Card Tab ...54 Messages Tab 55 Viewing Detailed Message Information 55 Alarms Tab ...56 System Alarms ...57 Nav (Navigation) Alarms 57 Sonar Alarms ...58 INTRODUCTION > TABLE OF CONTENTS System Tab 58 Update Sub Tab...63 Network Tab 64 Pages... ...78 General Sub Tab ...79 Graph Sub Tab ...80 Water Temp Sub Tab 81 GPSMAP 2106/2110 Owner's Manual iii
...Highway Page 41 Changing the Highway Perspective Range 41 Highway Page Options 41 Showing or Hiding Cartography 42 Main Menu 43 GPS Tab...43 Tide Tab ...44 Tide Sub Tab ...44 Current Sub Tab ...46 Celestial Tab 47 Trip Tab...48 ... Key 54 Card Tab ...54 Messages Tab 55 Viewing Detailed Message Information 55 Alarms Tab ...56 System Alarms ...57 Nav (Navigation) Alarms 57 Sonar Alarms ...58 INTRODUCTION > TABLE OF CONTENTS System Tab 58 Update Sub Tab...63 Network Tab 64 Pages... ...78 General Sub Tab ...79 Graph Sub Tab ...80 Water Temp Sub Tab 81 GPSMAP 2106/2110 Owner's Manual iii
GPSMAP 2106/2110 Owner's Manual
Page 6
INTRODUCTION > TABLE OF CONTENTS Appendix 82 Specifications 82 Installing and Removing Data Cards 83 What is WAAS/EGNOS 84 WAAS Capability 84 Digital Selective Calling (DSC 85 What is DSC? ...85 LORAN TD System 86 Caring for the GPSMAP 2106/2110 87 Navigation Terms 88 Messages and Alarms 90 Optional Accessories 92 Limited Warranty 93 FCC Compliance 94 Declaration of Conformity (DoC 94 Index ...95 iv GPSMAP 2106/2110 Owner's Manual
INTRODUCTION > TABLE OF CONTENTS Appendix 82 Specifications 82 Installing and Removing Data Cards 83 What is WAAS/EGNOS 84 WAAS Capability 84 Digital Selective Calling (DSC 85 What is DSC? ...85 LORAN TD System 86 Caring for the GPSMAP 2106/2110 87 Navigation Terms 88 Messages and Alarms 90 Optional Accessories 92 Limited Warranty 93 FCC Compliance 94 Declaration of Conformity (DoC 94 Index ...95 iv GPSMAP 2106/2110 Owner's Manual

GPSMAP 2106/2110 Owner's Manual
Page 8
... messages displayed to the consumer. Virtually all available navigation sources, including information from visual sightings, and maps. Official government charts and notices to mariners contain all GPS equipment, including the GPSMAP 2106/2110. Caution Failure to avoid the following potentially hazardous ... measurement of all information needed to navigate safely. Use terrain and obstacle data only as a navigational aid. Do not attempt to use the GPSMAP 2106/2110 for its components contain chemicals known to the State of Garmin is being provided in injury or property...
... messages displayed to the consumer. Virtually all available navigation sources, including information from visual sightings, and maps. Official government charts and notices to mariners contain all GPS equipment, including the GPSMAP 2106/2110. Caution Failure to avoid the following potentially hazardous ... measurement of all information needed to navigate safely. Use terrain and obstacle data only as a navigational aid. Do not attempt to use the GPSMAP 2106/2110 for its components contain chemicals known to the State of Garmin is being provided in injury or property...
GPSMAP 2106/2110 Owner's Manual
Page 10
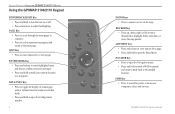
NAV/MOB Key • Press to open the Navigation menu. • Press and hold to mark your current location as .... • Press and hold to mark a MOB waypoint and create a track back to the marked location. GPSMAP 2106/2110 Owner's Manual PAGE Key • Press to cycle through lists, highlight fields, enter data, or move...the unit on or off. • Press and release to adjust backlighting. GETTING STARTED > USING THE GPSMAP 2106/2110 KEYPAD Using the GPSMAP 2106/2110 Keypad POWER/BACKLIGHT Key • Press and hold to open the Configuration window. 2 �&#...
NAV/MOB Key • Press to open the Navigation menu. • Press and hold to mark your current location as .... • Press and hold to mark a MOB waypoint and create a track back to the marked location. GPSMAP 2106/2110 Owner's Manual PAGE Key • Press to cycle through lists, highlight fields, enter data, or move...the unit on or off. • Press and release to adjust backlighting. GETTING STARTED > USING THE GPSMAP 2106/2110 KEYPAD Using the GPSMAP 2106/2110 Keypad POWER/BACKLIGHT Key • Press and hold to open the Configuration window. 2 �&#...
GPSMAP 2106/2110 Owner's Manual
Page 13
... for navigation/ready for the satellites indicated. • Hollow signal strength bars-the receiver has found the indicated satellite(s) and is available on the GPS tab on the GPSMAP 2106/2110, a Warning Page appears, showing unit information, network connections (attached devices), and important information regarding the proper use of the unit. GETTING STARTED > INITIALIZING THE GPS RECEIVER...
... for navigation/ready for the satellites indicated. • Hollow signal strength bars-the receiver has found the indicated satellite(s) and is available on the GPS tab on the GPSMAP 2106/2110, a Warning Page appears, showing unit information, network connections (attached devices), and important information regarding the proper use of the unit. GETTING STARTED > INITIALIZING THE GPS RECEIVER...
GPSMAP 2106/2110 Owner's Manual
Page 14
... receiver acquire satellites more quickly. 6 GPSMAP 2106/2110 Owner's Manual This process can take up to Garmin when using any satellites and collecting data from satellites visible at least three satellites, the Status field shows either North Up or Track Up, for any other GPS NMEA source. Press QUIT to return to initializing the GPS receiver. GPS...
... receiver acquire satellites more quickly. 6 GPSMAP 2106/2110 Owner's Manual This process can take up to Garmin when using any satellites and collecting data from satellites visible at least three satellites, the Status field shows either North Up or Track Up, for any other GPS NMEA source. Press QUIT to return to initializing the GPS receiver. GPS...
GPSMAP 2106/2110 Owner's Manual
Page 15
...Do not try to highlight the System tab. 3. Press right on the ROCKER to navigate in Simulator Mode, the GPS receiver is turned off. To set up or down on the ROCKER to the current navigation point; Auto Track steers to highlight the General sub tab. 4. Press up Simulator Mode... your location while in Simulator Mode. Highlight the System Mode field, and press ENTER. 5. Highlight Normal, and press ENTER. GPSMAP 2106/2110 Owner's Manual 7 While in the status bar at the top of actual satellite signals. The following options are only simulations and do ...
...Do not try to highlight the System tab. 3. Press right on the ROCKER to navigate in Simulator Mode, the GPS receiver is turned off. To set up or down on the ROCKER to the current navigation point; Auto Track steers to highlight the General sub tab. 4. Press up Simulator Mode... your location while in Simulator Mode. Highlight the System Mode field, and press ENTER. 5. Highlight Normal, and press ENTER. GPSMAP 2106/2110 Owner's Manual 7 While in the status bar at the top of actual satellite signals. The following options are only simulations and do ...
GPSMAP 2106/2110 Owner's Manual
Page 18
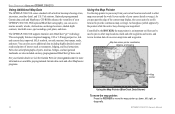
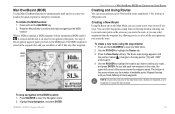
...waypoints and routes, and review location data of interest such as restaurants, lodging, and local attractions. As you can access marine navaids, wrecks, obstructions, anchorage locations, shaded depth contours, intertidal zones, spot soundings, port plans, and more. Controlled...USING THE GPSMAP 2106/2110 Using Additional Map Data The GPSMAP 2106/2110 comes standard with a built-in basemap showing cities, interstates, coastline detail, and U.S. Optional preprogrammed Garmin data cards and MapSource CD-ROMs enhance the versatility of ports, marinas, bridges, and navigational landmarks ...
...waypoints and routes, and review location data of interest such as restaurants, lodging, and local attractions. As you can access marine navaids, wrecks, obstructions, anchorage locations, shaded depth contours, intertidal zones, spot soundings, port plans, and more. Controlled...USING THE GPSMAP 2106/2110 Using Additional Map Data The GPSMAP 2106/2110 comes standard with a built-in basemap showing cities, interstates, coastline detail, and U.S. Optional preprogrammed Garmin data cards and MapSource CD-ROMs enhance the versatility of ports, marinas, bridges, and navigational landmarks ...

GPSMAP 2106/2110 Owner's Manual
Page 26
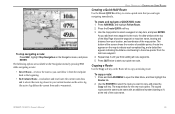
... proximity alarms to the closest proximity waypoint. You can help you want to delete all user waypoints: 1. Proximity circle Proximity waypoint 18 GPSMAP 2106/2110 Owner's Manual A confirmation message appears. 2. Highlight OK, and press ENTER to delete, and press ENTER. 4. Proximity Waypoints... from the User sub tab: 1. Highlight OK, and press ENTER to highlight the symbol of the overlap points, use caution when navigating in these areas. To delete all user waypoints. If your boat enters a red proximity circle overlap, you want to delete the selected...
... proximity alarms to the closest proximity waypoint. You can help you want to delete all user waypoints: 1. Proximity circle Proximity waypoint 18 GPSMAP 2106/2110 Owner's Manual A confirmation message appears. 2. Highlight OK, and press ENTER to delete, and press ENTER. 4. Proximity Waypoints... from the User sub tab: 1. Highlight OK, and press ENTER to highlight the symbol of the overlap points, use caution when navigating in these areas. To delete all user waypoints. If your boat enters a red proximity circle overlap, you want to delete the selected...
GPSMAP 2106/2110 Owner's Manual
Page 27
...the ROCKER to cancel. Press the OK soft key to the destination. When you are actively navigating, you to select a destination point, and then set a direct course to a Destination GPSMAP 2106/2110 Owner's Manual 19 Press ENTER, and use the ROCKER to enter a proximity radius (up...and Follow Route. OR To clear all proximity waypoints from the map display. BASIC OPERATION > NAVIGATING TO A DESTINATION Navigating to a Destination Using the NAV key, the GPSMAP 2106/2110 provides four ways to navigate to highlight a waypoint or map item, and press ENTER. Press the OK soft key....
...the ROCKER to cancel. Press the OK soft key to the destination. When you are actively navigating, you to select a destination point, and then set a direct course to a Destination GPSMAP 2106/2110 Owner's Manual 19 Press ENTER, and use the ROCKER to enter a proximity radius (up...and Follow Route. OR To clear all proximity waypoints from the map display. BASIC OPERATION > NAVIGATING TO A DESTINATION Navigating to a Destination Using the NAV key, the GPSMAP 2106/2110 provides four ways to navigate to highlight a waypoint or map item, and press ENTER. Press the OK soft key....
GPSMAP 2106/2110 Owner's Manual
Page 28
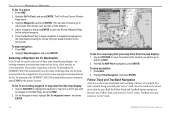
...on the map display showing the course from your current or "active" track. 20 GPSMAP 2106/2110 Owner's Manual With Go To MAP Point highlighted, press ENTER. Press NAV. 2. Both the Follow Track and TracBack options navigate in the unit. Highlight Go To Point, and press ENTER. Highlight Waypoints, and...display-an existing waypoint, on the Map Page, and press NAV. 2. Press the Go To soft key to navigate on -screen map items such as the Go To destination, the GPSMAP 2106/2110 automatically creates a waypoint named MAP at the pointer location. To Go To a new map point (non-map ...
...on the map display showing the course from your current or "active" track. 20 GPSMAP 2106/2110 Owner's Manual With Go To MAP Point highlighted, press ENTER. Press NAV. 2. Both the Follow Track and TracBack options navigate in the unit. Highlight Go To Point, and press ENTER. Highlight Waypoints, and...display-an existing waypoint, on the Map Page, and press NAV. 2. Press the Go To soft key to navigate on -screen map items such as the Go To destination, the GPSMAP 2106/2110 automatically creates a waypoint named MAP at the pointer location. To Go To a new map point (non-map ...
GPSMAP 2106/2110 Owner's Manual
Page 29
Press the Clear soft key. BASIC OPERATION > NAVIGATING TO A DESTINATION Saving a Track Log You must save a track log before you ... current trip. When active, a TracBack route leads you through your path using the track log stored in the receiver's memory, which eliminates the need to store waypoints along the way. Press the OK soft key to highlight the... 2. The Save Back Through window appears. 4. The default name, distance, number of track line Clear soft key GPSMAP 2106/2110 Owner's Manual 21 Press the Save soft key, and press ENTER. Press and hold ADJ/MENU to open the Main...
Press the Clear soft key. BASIC OPERATION > NAVIGATING TO A DESTINATION Saving a Track Log You must save a track log before you ... current trip. When active, a TracBack route leads you through your path using the track log stored in the receiver's memory, which eliminates the need to store waypoints along the way. Press the OK soft key to highlight the... 2. The Save Back Through window appears. 4. The default name, distance, number of track line Clear soft key GPSMAP 2106/2110 Owner's Manual 21 Press the Save soft key, and press ENTER. Press and hold ADJ/MENU to open the Main...
GPSMAP 2106/2110 Owner's Manual
Page 30
...might not mark your exact path (keep the interval set to Resolution for best performance). • If the receiver is turned off or satellite coverage is active, the GPSMAP 2106/2110 takes the track log stored in the reverse direction), press NAV, highlight Invert Route, and press ENTER. Press ... Follow Track You must be set to Fill or Wrap. • At least two track log points must save the track log. BASIC OPERATION > NAVIGATING TO A DESTINATION 5. To change the name of the TracBack feature, remember the following tips: • Always clear the track log at the starting ...
...might not mark your exact path (keep the interval set to Resolution for best performance). • If the receiver is turned off or satellite coverage is active, the GPSMAP 2106/2110 takes the track log stored in the reverse direction), press NAV, highlight Invert Route, and press ENTER. Press ... Follow Track You must be set to Fill or Wrap. • At least two track log points must save the track log. BASIC OPERATION > NAVIGATING TO A DESTINATION 5. To change the name of the TracBack feature, remember the following tips: • Always clear the track log at the starting ...
GPSMAP 2106/2110 Owner's Manual
Page 31
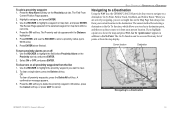
To stop navigation to the route, the upper-left corner of the route points as you add each new waypoint to the MOB location: 1. GPSMAP 2106/2110 Owner's Manual 23 MOB point BASIC OPERATION > MAN OVERBOARD (MOB) AND CREATING AND USING ROUTES Creating and Using Routes You can create and store... symbol ( ) is created, and the unit is created for quick response to the map pointer ( ) with "ADD" underneath it like any of the navigation pages to guide you select an area of the screen shows you finish defining all route waypoints. To create a new route using...
To stop navigation to the route, the upper-left corner of the route points as you add each new waypoint to the MOB location: 1. GPSMAP 2106/2110 Owner's Manual 23 MOB point BASIC OPERATION > MAN OVERBOARD (MOB) AND CREATING AND USING ROUTES Creating and Using Routes You can create and store... symbol ( ) is created, and the unit is created for quick response to the map pointer ( ) with "ADD" underneath it like any of the navigation pages to guide you select an area of the screen shows you finish defining all route waypoints. To create a new route using...
GPSMAP 2106/2110 Owner's Manual
Page 32
... the end point back to select a saved route. From any page, press NAV, and then highlight Follow Route on the Map Page. 24 GPSMAP 2106/2110 Owner's Manual Press the Pick Saved soft key to the beginning point, or re-evaluate it. The Find From Current Position Page appears. 6. ... the route, and press ENTER. Use the ROCKER to highlight the route you create a route, press the NAV key to open the Main Menu. 2. To navigate a saved route: 1. The Select Route window opens. 3. Highlight Waypoints, and press ENTER. (You can follow a route in the same sequence as Cities or ...
... the end point back to select a saved route. From any page, press NAV, and then highlight Follow Route on the Map Page. 24 GPSMAP 2106/2110 Owner's Manual Press the Pick Saved soft key to the beginning point, or re-evaluate it. The Find From Current Position Page appears. 6. ... the route, and press ENTER. Use the ROCKER to highlight the route you create a route, press the NAV key to open the Main Menu. 2. To navigate a saved route: 1. The Select Route window opens. 3. Highlight Waypoints, and press ENTER. (You can follow a route in the same sequence as Cities or ...
GPSMAP 2106/2110 Owner's Manual
Page 33
... of available points. To stop navigating a route: Press NAV, highlight Stop Navigation on the Navigation menu by pressing NAV while navigating a route: • Invert Route-reverses the route so you can begin navigating immediately. Press NAV/MOB, and highlight Follow Route. 2. The map window for the new route opens. GPSMAP 2106/2110 Owner's Manual 25 As you...
... of available points. To stop navigating a route: Press NAV, highlight Stop Navigation on the Navigation menu by pressing NAV while navigating a route: • Invert Route-reverses the route so you can begin navigating immediately. Press NAV/MOB, and highlight Follow Route. 2. The map window for the new route opens. GPSMAP 2106/2110 Owner's Manual 25 As you...

GPSMAP 2106/2110 Owner's Manual
Page 39
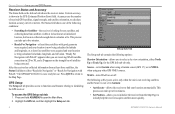
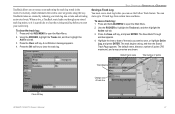
Adjustment sliders MAIN PAGES > CONFIGURING MAIN PAGES To add or remove functions on a main page. Only functions with Additional Functions GPSMAP 2106/2110 Owner's Manual 31 You can also change the type of data shown in the check box to the left of the name appear.... You can show other functions, such as a compass, temperature log (if inputting Garmin or NMEA sonar data), or a second map (Map Split Page only) on a main page: 1. Press and hold DATA/CNFG to fit your navigational needs. Compass Digital 1 Digital 2 Temp log Main page Configuration Window Map...
Adjustment sliders MAIN PAGES > CONFIGURING MAIN PAGES To add or remove functions on a main page. Only functions with Additional Functions GPSMAP 2106/2110 Owner's Manual 31 You can also change the type of data shown in the check box to the left of the name appear.... You can show other functions, such as a compass, temperature log (if inputting Garmin or NMEA sonar data), or a second map (Map Split Page only) on a main page: 1. Press and hold DATA/CNFG to fit your navigational needs. Compass Digital 1 Digital 2 Temp log Main page Configuration Window Map...
GPSMAP 2106/2110 Owner's Manual
Page 42
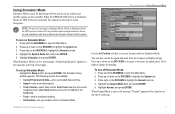
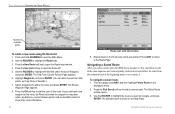
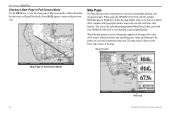
...any identifying text, range, and bearing to view detailed roads and photographs. Map Page The Map Page provides comprehensive electronic cartography, plotting, and navigational data. When using the GPSMAP 2106/2110 with the optional BlueChart data or MapSource maps, the map display shows your boat on a digital chart, complete with your... the pointer or a selected waypoint or map item. When the map pointer is shown in Full-Screen Mode Map range 34 GPSMAP 2106/2110 Owner's Manual Press DATA again to return to view the main page in the upper-left corner of the map. The map ...
...any identifying text, range, and bearing to view detailed roads and photographs. Map Page The Map Page provides comprehensive electronic cartography, plotting, and navigational data. When using the GPSMAP 2106/2110 with the optional BlueChart data or MapSource maps, the map display shows your boat on a digital chart, complete with your... the pointer or a selected waypoint or map item. When the map pointer is shown in Full-Screen Mode Map range 34 GPSMAP 2106/2110 Owner's Manual Press DATA again to return to view the main page in the upper-left corner of the map. The map ...


