
GPSMAP 2206/2210 Installation Instructions
Page 1
GPSMAP® 2206/2210 & GPS 17 installation instructions Graphic to be replaced
GPSMAP® 2206/2210 & GPS 17 installation instructions Graphic to be replaced

GPSMAP 2206/2210 Installation Instructions
Page 2
... packed with California's Proposition 65. A Printed in accordance with the tracking number clearly written on the outside the United States. Garmin®, GPS®, CANet®, and Ultrascroll™ are not accepted for one copy of this manual or of any revision hereto, provided... that any unauthorized commercial distribution of Garmin. IN NO EVENT SHALL GARMIN BE LIABLE FOR ANY INCIDENTAL, SPECIAL, INDIRECT OR CONSEQUENTIAL DAMAGES, WHETHER ...
... packed with California's Proposition 65. A Printed in accordance with the tracking number clearly written on the outside the United States. Garmin®, GPS®, CANet®, and Ultrascroll™ are not accepted for one copy of this manual or of any revision hereto, provided... that any unauthorized commercial distribution of Garmin. IN NO EVENT SHALL GARMIN BE LIABLE FOR ANY INCIDENTAL, SPECIAL, INDIRECT OR CONSEQUENTIAL DAMAGES, WHETHER ...

GPSMAP 2206/2210 Installation Instructions
Page 3
... dust mask when drilling, cutting, or sanding. Mounting knob Bail mount Mounting holes GPSMAP 2210 GPSMAP 2206/2210 & GPS 17 1 These items are available at most marine dealers. When drilling or cutting, always check first to the following instructions...2210 Multi-Function Display (MFD) and GPS 17 must be properly installed according to see what is on the opposite side of the surface. To complete the installation, you experience difficulty installing the unit, contact Garmin Product Support or seek the assistance of a professional installer. Mount the GPSMAP 2206/2210...
... dust mask when drilling, cutting, or sanding. Mounting knob Bail mount Mounting holes GPSMAP 2210 GPSMAP 2206/2210 & GPS 17 1 These items are available at most marine dealers. When drilling or cutting, always check first to the following instructions...2210 Multi-Function Display (MFD) and GPS 17 must be properly installed according to see what is on the opposite side of the surface. To complete the installation, you experience difficulty installing the unit, contact Garmin Product Support or seek the assistance of a professional installer. Mount the GPSMAP 2206/2210...

GPSMAP 2206/2210 Installation Instructions
Page 4
... with the fasteners. 4. Secure the bail mount to leave at least two inches of the four mounting holes. Mounting knobs Bail Mount Bail mount 2 GPSMAP 2206/2210 & GPS 17 To install the bail mount and unit: 1. Slide the unit into the bail mount, and tighten the mounting knobs. Using an appropriate size drill...
... with the fasteners. 4. Secure the bail mount to leave at least two inches of the four mounting holes. Mounting knobs Bail Mount Bail mount 2 GPSMAP 2206/2210 & GPS 17 To install the bail mount and unit: 1. Slide the unit into the bail mount, and tighten the mounting knobs. Using an appropriate size drill...

GPSMAP 2206/2210 Installation Instructions
Page 5
Trim the Flush Mount Template, and tape it in place. 230mm 208mm Flush Mount Template GPSMAP 2206/2210 & GPS 17 Stud Washer Hex nuts Mounting surface 3 Using an 1/8" (3 mm) drill bit, drill the four mounting holes. 4. Be very careful when cutting...mounting studs to begin cutting the mounting surface. 5. Place washers over the mounting studs, then thread on the template. INSTALLATION INSTRUCTIONS Flush Mounting the GPSMAP 2206/2210 Tools • Flush Mount Template • Jig saw , cut -out of the mounting surface. 8. Place the unit into the back of ...
Trim the Flush Mount Template, and tape it in place. 230mm 208mm Flush Mount Template GPSMAP 2206/2210 & GPS 17 Stud Washer Hex nuts Mounting surface 3 Using an 1/8" (3 mm) drill bit, drill the four mounting holes. 4. Be very careful when cutting...mounting studs to begin cutting the mounting surface. 5. Place washers over the mounting studs, then thread on the template. INSTALLATION INSTRUCTIONS Flush Mounting the GPSMAP 2206/2210 Tools • Flush Mount Template • Jig saw , cut -out of the mounting surface. 8. Place the unit into the back of ...

GPSMAP 2206/2210 Installation Instructions
Page 6
...Signal Interference To flush mount the GPS 17: 1. INSTALLATION INSTRUCTIONS Installing the GPS 17 You can install flush mount or install the GPS 17 on the GPSMAP 2206/2210 and provides the GPS/WAAS signal for correct operation. Align the GPS 17 over the mounting holes and fasten it... the holes using M4 screws. The GPS 17 connects to the 18-pin Power/Data Cable on any standard 1" O.D. (Outer Dimension), 14 threads-per-inch marine mount. If the coax is located nearer to prevent inaccurate speed readings caused by tapping the end of GPS 17 4 GPSMAP 2206/2210 & GPS 17
...Signal Interference To flush mount the GPS 17: 1. INSTALLATION INSTRUCTIONS Installing the GPS 17 You can install flush mount or install the GPS 17 on the GPSMAP 2206/2210 and provides the GPS/WAAS signal for correct operation. Align the GPS 17 over the mounting holes and fasten it... the holes using M4 screws. The GPS 17 connects to the 18-pin Power/Data Cable on any standard 1" O.D. (Outer Dimension), 14 threads-per-inch marine mount. If the coax is located nearer to prevent inaccurate speed readings caused by tapping the end of GPS 17 4 GPSMAP 2206/2210 & GPS 17

GPSMAP 2206/2210 Installation Instructions
Page 7
... the base of electronic interference. Slide the cable through . 3. To mount the GPS 17 with the cable run internally Attaching the GPS 17 to the GPS 17 INSTALLATION INSTRUCTIONS To mount the GPS 17 with a marine sealant. 4. Cable run externally Align Notch GPSMAP 2206/2210 & GPS 17 Cable run through the mount: 1. Route the cable away from sources...
... the base of electronic interference. Slide the cable through . 3. To mount the GPS 17 with the cable run internally Attaching the GPS 17 to the GPS 17 INSTALLATION INSTRUCTIONS To mount the GPS 17 with a marine sealant. 4. Cable run externally Align Notch GPSMAP 2206/2210 & GPS 17 Cable run through the mount: 1. Route the cable away from sources...

GPSMAP 2206/2210 Installation Instructions
Page 8
...grommets may be purchased from your Garmin dealer or direct from Garmin. Carefully trim the cable hole, as needed, to weatherproof around the cable (see below for the Power/Data, or GPS 17 cable Split 6 GPSMAP 2206/2210 & GPS 17 Apply a marine sealant after installation to weatherproof the ...mm) paddle drill bit or hole saw • Pencil • Utility knife • Marine sealant (optional) To install the cable grommet: 1. INSTALLATION INSTRUCTIONS Wiring and Cables The GPSMAP 2206/2210 comes with an 18-pin Power/Data cable. Spread the grommet apart at the split, and...
...grommets may be purchased from your Garmin dealer or direct from Garmin. Carefully trim the cable hole, as needed, to weatherproof around the cable (see below for the Power/Data, or GPS 17 cable Split 6 GPSMAP 2206/2210 & GPS 17 Apply a marine sealant after installation to weatherproof the ...mm) paddle drill bit or hole saw • Pencil • Utility knife • Marine sealant (optional) To install the cable grommet: 1. INSTALLATION INSTRUCTIONS Wiring and Cables The GPSMAP 2206/2210 comes with an 18-pin Power/Data cable. Spread the grommet apart at the split, and...
GPSMAP 2206/2210 Installation Instructions
Page 9
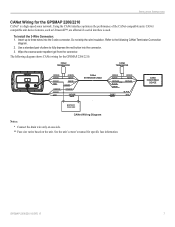
...wires into the connector. 3. Refer to fully depress the red button into the 3-wire connector. INSTALLATION INSTRUCTIONS CANet Wiring for the GPSMAP 2206/2210. To install the 3-Wire Connector: 1. The following CANet Terminator Connection diagram. 2. Use a standard pair of the CANet-compatible... of pliers to the following diagram shows CANet wiring for the GPSMAP 2206/2210 CANet® is used. See the unit's owner's manual for specific fuse information. CANet COMPATIBLE DEVICE GPSMAP 2206/2210 & GPS 17 7 CANet compatible unit device features, such as Ultrascroll™...
...wires into the connector. 3. Refer to fully depress the red button into the 3-wire connector. INSTALLATION INSTRUCTIONS CANet Wiring for the GPSMAP 2206/2210. To install the 3-Wire Connector: 1. The following CANet Terminator Connection diagram. 2. Use a standard pair of the CANet-compatible... of pliers to the following diagram shows CANet wiring for the GPSMAP 2206/2210 CANet® is used. See the unit's owner's manual for specific fuse information. CANet COMPATIBLE DEVICE GPSMAP 2206/2210 & GPS 17 7 CANet compatible unit device features, such as Ultrascroll™...

GPSMAP 2206/2210 Installation Instructions
Page 10
... NMEA input devices should only be set to the wiring diagram that equipment. The unit also includes NMEA input with support for purchase from: National Marine Electronics Association (NMEA) Seven Riggs Avenue Severna Park, MD 21146 PIN # U.S.A. 1 2 www.nmea.org 3 4 5 6 7 8 9 10 11 12 13 ... The following formats are supported for use with the Garmin GPS 17 GPS/WAAS antenna. If two GPSMAP 2206/2210 units are wiring diagram examples showing the GPSMAP 2206/2210 using the 18-pin Power/Data wiring harness and the GPS 17. Next are installed and connected, only one ...
... NMEA input devices should only be set to the wiring diagram that equipment. The unit also includes NMEA input with support for purchase from: National Marine Electronics Association (NMEA) Seven Riggs Avenue Severna Park, MD 21146 PIN # U.S.A. 1 2 www.nmea.org 3 4 5 6 7 8 9 10 11 12 13 ... The following formats are supported for use with the Garmin GPS 17 GPS/WAAS antenna. If two GPSMAP 2206/2210 units are wiring diagram examples showing the GPSMAP 2206/2210 using the 18-pin Power/Data wiring harness and the GPS 17. Next are installed and connected, only one ...

GPSMAP 2206/2210 Installation Instructions
Page 11
... SENSOR WIRE COLOR RED (POWER) FUSE 1 A BLACK (GROUND) YELLOW (ON) BLUE (DATA IN) � WHITE (DATA OUT) � � GPSMAP 2206/2210 and GPS 17 Basic Wiring ��� + - � � � � GPSMAP 2206/2210 and NMEA Device with Sonar Output or VHF Radio with DSC ��� + - � �� �...
... SENSOR WIRE COLOR RED (POWER) FUSE 1 A BLACK (GROUND) YELLOW (ON) BLUE (DATA IN) � WHITE (DATA OUT) � � GPSMAP 2206/2210 and GPS 17 Basic Wiring ��� + - � � � � GPSMAP 2206/2210 and NMEA Device with Sonar Output or VHF Radio with DSC ��� + - � �� �...

GPSMAP 2206/2210 Installation Instructions
Page 12
INSTALLATION INSTRUCTIONS GPS 17 Optional Alarm Wiring The GPSMAP 2206/2210 has an alarm circuit that can be wired for the unit to alert you when the unit displays a message. The alarm does not have to be used with a lamp, a horn, or both to function. The maximum current is 100 milliamps. The alarm circuit pulls low when the alarm sounds. A switch or relay can be used to select between visual and audible alerts. + - 100 ma Max Coil Current ���� ���� 10 GPSMAP 2206/2210 & GPS 17
INSTALLATION INSTRUCTIONS GPS 17 Optional Alarm Wiring The GPSMAP 2206/2210 has an alarm circuit that can be wired for the unit to alert you when the unit displays a message. The alarm does not have to be used with a lamp, a horn, or both to function. The maximum current is 100 milliamps. The alarm circuit pulls low when the alarm sounds. A switch or relay can be used to select between visual and audible alerts. + - 100 ma Max Coil Current ���� ���� 10 GPSMAP 2206/2210 & GPS 17

GPSMAP 2206/2210 Installation Instructions
Page 13
With power applied to the circuit, test the installation by pressing the POWER key on the backside of the unit. INSTALLATION INSTRUCTIONS Final Wiring Connection After all the wiring is intended for steps on the right side is complete, plug the 18-pin harness into the center connector on the front of the GPSMAP 2206/2210. The 5-pin port on initializing the receiver. 18-pin connector 5-pin CANet connector GPSMAP 2206/2210 & GPS 17 11 See the GPSMAP 2206/2210 Owner's Manual for future interfacing features and does not require connection at this time.
With power applied to the circuit, test the installation by pressing the POWER key on the backside of the unit. INSTALLATION INSTRUCTIONS Final Wiring Connection After all the wiring is intended for steps on the right side is complete, plug the 18-pin harness into the center connector on the front of the GPSMAP 2206/2210. The 5-pin port on initializing the receiver. 18-pin connector 5-pin CANet connector GPSMAP 2206/2210 & GPS 17 11 See the GPSMAP 2206/2210 Owner's Manual for future interfacing features and does not require connection at this time.

GPSMAP 2206/2210 Installation Instructions
Page 14
INSTALLATION INSTRUCTIONS 12 GPSMAP 2206/2210 & GPS 17
INSTALLATION INSTRUCTIONS 12 GPSMAP 2206/2210 & GPS 17

GPSMAP 2206/2210 Installation Instructions
Page 15
Flush Mount Drilling Template INSTALLATION INSTRUCTIONS Drill using a 11/64" (4.5 mm) drill bit Drill this 3/4" (19 mm) hole if the coax is going to be installed through the mounting panel GPSMAP 2206/2210 & GPS 17 13
Flush Mount Drilling Template INSTALLATION INSTRUCTIONS Drill using a 11/64" (4.5 mm) drill bit Drill this 3/4" (19 mm) hole if the coax is going to be installed through the mounting panel GPSMAP 2206/2210 & GPS 17 13

GPSMAP 2206/2210 Owner's Manual
Page 3
...more information. This manual is a non-network chartplotter that provides basic working knowledge needed to use it to create an unsurpassed marine Multi-Function Display (MFD). The Main Menu section provides detailed explanations about each section. i coastal areas, including Alaska and ..., navigating a route, and using the FIND key. The GPSMAP 2206/2210 is organized into the following sections: The Introduction contains the Table of Garmin GPS and full-featured mapping to configure your Garmin dealer immediately. Take a moment now to two optional data ...
...more information. This manual is a non-network chartplotter that provides basic working knowledge needed to use it to create an unsurpassed marine Multi-Function Display (MFD). The Main Menu section provides detailed explanations about each section. i coastal areas, including Alaska and ..., navigating a route, and using the FIND key. The GPSMAP 2206/2210 is organized into the following sections: The Introduction contains the Table of Garmin GPS and full-featured mapping to configure your Garmin dealer immediately. Take a moment now to two optional data ...

GPSMAP 2206/2210 Owner's Manual
Page 4
... Contact Garmin...v Software License Agreement v Warning ...iv Caution ...iv Getting Started 1 Unit Overview 1 Using the GPSMAP 2206/2210 Keypad 2 Using Soft Keys...3 Using Data Entry/Shortcut Keys 3 Status Bar...3 Turning on the GPSMAP 2206/2210 4 Adjusting the Backlight 4 Initializing the GPS Receiver 5 Receiver Status and Accuracy 6 GPS Setup...6 Using Simulator Mode 7 Basic Operation 8 Using the GPSMAP 2206/2210 8 ...Viewing a Main Page in Full-Screen Mode 34 Map Page...34 Selecting Map Ranges 35 Cartography ...36 Map Page Options 37 ii GPSMAP 2206/2210 Owner's Manual
... Contact Garmin...v Software License Agreement v Warning ...iv Caution ...iv Getting Started 1 Unit Overview 1 Using the GPSMAP 2206/2210 Keypad 2 Using Soft Keys...3 Using Data Entry/Shortcut Keys 3 Status Bar...3 Turning on the GPSMAP 2206/2210 4 Adjusting the Backlight 4 Initializing the GPS Receiver 5 Receiver Status and Accuracy 6 GPS Setup...6 Using Simulator Mode 7 Basic Operation 8 Using the GPSMAP 2206/2210 8 ...Viewing a Main Page in Full-Screen Mode 34 Map Page...34 Selecting Map Ranges 35 Cartography ...36 Map Page Options 37 ii GPSMAP 2206/2210 Owner's Manual

GPSMAP 2206/2210 Owner's Manual
Page 5
... 39 Compass Page 40 Highway Page 41 Changing the Highway Perspective Range 41 Highway Page Options 41 Showing or Hiding Cartography 42 Main Menu 43 GPS Tab...43 Tide Tab ...44 Tide Sub Tab ...44 Current Sub Tab ...46 Celestial Tab 47 Trip Tab...48 Points Tab ...49 Routes Tab ...50... the Sonar Page 78 Marking an Underwater Waypoint 78 Sonar Tab ...78 General Sub Tab ...79 Graph Sub Tab ...80 Water Temp Sub Tab 81 GPSMAP 2206/2210 Owner's Manual iii
... 39 Compass Page 40 Highway Page 41 Changing the Highway Perspective Range 41 Highway Page Options 41 Showing or Hiding Cartography 42 Main Menu 43 GPS Tab...43 Tide Tab ...44 Tide Sub Tab ...44 Current Sub Tab ...46 Celestial Tab 47 Trip Tab...48 Points Tab ...49 Routes Tab ...50... the Sonar Page 78 Marking an Underwater Waypoint 78 Sonar Tab ...78 General Sub Tab ...79 Graph Sub Tab ...80 Water Temp Sub Tab 81 GPSMAP 2206/2210 Owner's Manual iii

GPSMAP 2206/2210 Owner's Manual
Page 8
...the accuracy and performance of Garmin is to provide customers with the most complete and accurate cartography that is subject to our Web site at a reasonable cost. Virtually all GPS equipment, including the GPSMAP 2206/2210. iv GPSMAP 2206/2210 Owner's Manual When navigating... is solely responsible for any discrepancies or questions before continuing navigation. Although the GPSMAP 2206/2210 is prohibitively expensive. Official government charts and notices to mariners contain all available navigation sources, including information from visual sightings, and maps. We...
...the accuracy and performance of Garmin is to provide customers with the most complete and accurate cartography that is subject to our Web site at a reasonable cost. Virtually all GPS equipment, including the GPSMAP 2206/2210. iv GPSMAP 2206/2210 Owner's Manual When navigating... is solely responsible for any discrepancies or questions before continuing navigation. Although the GPSMAP 2206/2210 is prohibitively expensive. Official government charts and notices to mariners contain all available navigation sources, including information from visual sightings, and maps. We...

GPSMAP 2206/2210 Owner's Manual
Page 12
... the POWER/BACKLIGHT key. 2. NOTE: The first time you turn off . GPSMAP 2206/2210 Owner's Manual The first time you open the Map Page. To ensure proper initialization, the GPSMAP 2206/2210 is highlighted on the GPSMAP 2206/2210, the GPS 17 receiver must collect satellite data and determine its current location. To turn on the...
... the POWER/BACKLIGHT key. 2. NOTE: The first time you turn off . GPSMAP 2206/2210 Owner's Manual The first time you open the Map Page. To ensure proper initialization, the GPSMAP 2206/2210 is highlighted on the GPSMAP 2206/2210, the GPS 17 receiver must collect satellite data and determine its current location. To turn on the...


