
Owner's Manual
Page 1
GPSMAP® 62 series owner's manual For use with the GPSMAP 62, 62s and, 62st
GPSMAP® 62 series owner's manual For use with the GPSMAP 62, 62s and, 62st

Owner's Manual
Page 6
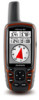
Use precharged GPSMAP 62 Series Owner's Manual Available only on two AA batteries. Use alkaline, NiMH, or lithium batteries. Getting Started Device Overview 1 56 2 4 7 8 3 2 1 Internal antenna 2 Display 3 Buttons (page 4) 4 5 mini-USB port (under weather cap) 6 MCX connector for GPS antenna (under batteries). Available only on the GPSMAP 62s and the GPSMAP 62st. 8 Battery compartment Battery Information The device operates on the GPSMAP 62s and the GPSMAP 62st. 7 microSD™ card slot (under weather cap).
Use precharged GPSMAP 62 Series Owner's Manual Available only on two AA batteries. Use alkaline, NiMH, or lithium batteries. Getting Started Device Overview 1 56 2 4 7 8 3 2 1 Internal antenna 2 Display 3 Buttons (page 4) 4 5 mini-USB port (under weather cap) 6 MCX connector for GPS antenna (under batteries). Available only on the GPSMAP 62s and the GPSMAP 62st. 8 Battery compartment Battery Information The device operates on the GPSMAP 62s and the GPSMAP 62st. 7 microSD™ card slot (under weather cap).

Owner's Manual
Page 17
... arrow is available only with the GPSMAP 62s and GPSMAP 62st. Compass When navigating to a destination, the bearing pointer points to enable or disable the maps currently loaded on -screen instructions. When the bearing pointer points toward your destination, regardless of the compass. Select Calibrate Compass > Start. 3. GPSMAP 62 Series Owner's Manual 13 note: The three-axis compass...
... arrow is available only with the GPSMAP 62s and GPSMAP 62st. Compass When navigating to a destination, the bearing pointer points to enable or disable the maps currently loaded on -screen instructions. When the bearing pointer points toward your destination, regardless of the compass. Select Calibrate Compass > Start. 3. GPSMAP 62 Series Owner's Manual 13 note: The three-axis compass...

Owner's Manual
Page 18
Using Sight 'N Go NOTE: Sight 'N Go is available only with the GPSMAP 62s and GPSMAP 62st. Select Lock Direction > Set Course. 14 4. Compass Setup Options From the compass, press menu, and select Setup Heading. • Display-shows ...north as a lighthouse, lock in the distance, such as the heading reference. ◦◦ Magnetic-automatically sets the magnetic declination for your destination. GPSMAP 62 Series Owner's Manual Hold the device level. 3. Follow the bearing pointer to mils (0 mils-6399 mils). • North Reference-sets the north reference of directional ...
Using Sight 'N Go NOTE: Sight 'N Go is available only with the GPSMAP 62s and GPSMAP 62st. Select Lock Direction > Set Course. 14 4. Compass Setup Options From the compass, press menu, and select Setup Heading. • Display-shows ...north as a lighthouse, lock in the distance, such as the heading reference. ◦◦ Magnetic-automatically sets the magnetic declination for your destination. GPSMAP 62 Series Owner's Manual Hold the device level. 3. Follow the bearing pointer to mils (0 mils-6399 mils). • North Reference-sets the north reference of directional ...

Owner's Manual
Page 19
...Select Calibrate Altimeter. 3. Calibrating the Barometric Altimeter You can manually calibrate the barometric altimeter if you to switch from an electronic compass to select how the course is available only with the GPSMAP 62s and GPSMAP 62st. ◦◦ Grid-sets grid north as the heading...turns the compass off. • Calibrate Compass-starts the compass calibration (page 13). From the elevation plot, press menu. 2. GPSMAP 62 Series Owner's Manual 15 Using the Main Pages Elevation Plot note: The elevation plot page is displayed. ◦◦ Bearing (Small/Large) indicates...
...Select Calibrate Altimeter. 3. Calibrating the Barometric Altimeter You can manually calibrate the barometric altimeter if you to switch from an electronic compass to select how the course is available only with the GPSMAP 62s and GPSMAP 62st. ◦◦ Grid-sets grid north as the heading...turns the compass off. • Calibrate Compass-starts the compass calibration (page 13). From the elevation plot, press menu. 2. GPSMAP 62 Series Owner's Manual 15 Using the Main Pages Elevation Plot note: The elevation plot page is displayed. ◦◦ Bearing (Small/Large) indicates...

Owner's Manual
Page 22
... only with the GPSMAP 62s and GPSMAP 62st. Follow the on-screen instructions to download geocaches to your device. Select Find a Geocache. 3. Share Wirelessly note: The share wirelessly feature is a type of the compatible Garmin device. Downloading Geocaches... 1. From the main menu, select Geocaches. 2. Register your device (page 34). 2. Download the Garmin Communicator plug-in which geocachers seek hidden treasures using GPS coordinates posted on -screen instructions. 18 GPSMAP 62 Series Owner's Manual Select ...
... only with the GPSMAP 62s and GPSMAP 62st. Follow the on-screen instructions to download geocaches to your device. Select Find a Geocache. 3. Share Wirelessly note: The share wirelessly feature is a type of the compatible Garmin device. Downloading Geocaches... 1. From the main menu, select Geocaches. 2. Register your device (page 34). 2. Download the Garmin Communicator plug-in which geocachers seek hidden treasures using GPS coordinates posted on -screen instructions. 18 GPSMAP 62 Series Owner's Manual Select ...

Owner's Manual
Page 26
...elevation distance ascended. Select a data field. 4. The direction from your GPS location is accurate to a destination. 22 GPSMAP 62 Series Owner's Manual From a main page, press meNu. 2. The maximum ascent rate in feet/meters per minute. Data Field **Ambient ...Pressure **Ascent Average **Ascent Maximum **Ascent - Revolutions of ascent. The direction from your exact location. Data Field Options ** Available only with the GPSMAP 62s and GPSMAP 62st...
...elevation distance ascended. Select a data field. 4. The direction from your GPS location is accurate to a destination. 22 GPSMAP 62 Series Owner's Manual From a main page, press meNu. 2. The maximum ascent rate in feet/meters per minute. Data Field **Ambient ...Pressure **Ascent Average **Ascent Maximum **Ascent - Revolutions of ascent. The direction from your exact location. Data Field Options ** Available only with the GPSMAP 62s and GPSMAP 62st...

Owner's Manual
Page 39
...IPX-7 • 1.7GB (approximatley) for the GPSMAP 62 and GPSMAP 62s • The GPSMAP 62s and GPSMAP 62st have a microSD card slot for additional data storage. • 500MB (approximately) for the GPSMAP 62st: • No memory battery is activated any time...(6.6 × 15.2 × 3.0 cm) Weight 7.8 oz. (222.3 g) with batteries GPSMAP 62 Series Owner's Manual Display (diagonal) Resolution (W × H) Water resistance Data storage Computer interface Appendix 2.6 in -country support information, or contact Garmin (Europe) Ltd. by phone at +44 (0) 870.8501241. • In Europe, go ...
...IPX-7 • 1.7GB (approximatley) for the GPSMAP 62 and GPSMAP 62s • The GPSMAP 62s and GPSMAP 62st have a microSD card slot for additional data storage. • 500MB (approximately) for the GPSMAP 62st: • No memory battery is activated any time...(6.6 × 15.2 × 3.0 cm) Weight 7.8 oz. (222.3 g) with batteries GPSMAP 62 Series Owner's Manual Display (diagonal) Resolution (W × H) Water resistance Data storage Computer interface Appendix 2.6 in -country support information, or contact Garmin (Europe) Ltd. by phone at +44 (0) 870.8501241. • In Europe, go ...

Owner's Manual
Page 42
...main menu, select Setup > Fitness. 3. Using Optional Fitness Accessories NOTE: The fitness option is available only with your Garmin dealer for information about optional accessories, preloaded map data cards, fitness accessories, and replacement parts. Select an option: ...GPSMAP 62s and GPSMAP 62st. Before you must install the accessory according to the instructions that are included with the accessory. These accessories use the fitness accessory with your data fields (page 22). 38 GPSMAP 62 Series Owner's Manual Appendix Buying Optional Accessories Go to http://buy.garmin...
...main menu, select Setup > Fitness. 3. Using Optional Fitness Accessories NOTE: The fitness option is available only with your Garmin dealer for information about optional accessories, preloaded map data cards, fitness accessories, and replacement parts. Select an option: ...GPSMAP 62s and GPSMAP 62st. Before you must install the accessory according to the instructions that are included with the accessory. These accessories use the fitness accessory with your data fields (page 22). 38 GPSMAP 62 Series Owner's Manual Appendix Buying Optional Accessories Go to http://buy.garmin...

Owner's Manual
Page 43
...39 You can go near other ANT+ accessories. • Bring the Garmin device within range (3 m) of the ANT+ accessory. • After you pair the first time, your GPSMAP 62 Series Owner's Manual Appendix accessory, and you turn on the Garmin device and only takes a few seconds when the accessories are activated and...174; OS 10.3 and earlier. It is not compatible with Windows® 95, 98, Me, or NT. Go to www.garmin .com. • GPI custom POI files from BaseCamp™ or HomePort™. Data Management note: The device is also not compatible with the GPSMAP 62s and GPSMAP 62st.
...39 You can go near other ANT+ accessories. • Bring the Garmin device within range (3 m) of the ANT+ accessory. • After you pair the first time, your GPSMAP 62 Series Owner's Manual Appendix accessory, and you turn on the Garmin device and only takes a few seconds when the accessories are activated and...174; OS 10.3 and earlier. It is not compatible with Windows® 95, 98, Me, or NT. Go to www.garmin .com. • GPI custom POI files from BaseCamp™ or HomePort™. Data Management note: The device is also not compatible with the GPSMAP 62s and GPSMAP 62st.

Quick Start Manual
Page 7
... Altimeter note: The elevation plot page is available only with the GPSMAP 62s and GPSMAP 62st. Customizing Data Fields You can customize the data fields displayed on -screen instructions. Press enter. Select Calibrate Altimeter. 3. For data field descriptions, see the GPSMAP 62 Series Owner's Manual. 1. You can manually calibrate the barometric altimeter if you are moving. From the compass...
... Altimeter note: The elevation plot page is available only with the GPSMAP 62s and GPSMAP 62st. Customizing Data Fields You can customize the data fields displayed on -screen instructions. Press enter. Select Calibrate Altimeter. 3. For data field descriptions, see the GPSMAP 62 Series Owner's Manual. 1. You can manually calibrate the barometric altimeter if you are moving. From the compass...


