

Quick Reference Guide
Page 1
...and bottom clearance. Use visual sightings and steer to avoid land, shallow water, and other obstacles. Select Navigation Chart or Fishing Chart. 3. Review the course indicated by the magenta line. 10.Follow the magenta line, steering to avoid land, shallow water, and other dangerous objects. Note... over land or shallow water. Touch the chart to select the location using the cursor ( ). 4. Go To Screen Guide To Screen GPSMAP® 700 series quick reference guide When you have reached the destination, you can create and immediately navigate a route on electronic chart information...
...and bottom clearance. Use visual sightings and steer to avoid land, shallow water, and other obstacles. Select Navigation Chart or Fishing Chart. 3. Review the course indicated by the magenta line. 10.Follow the magenta line, steering to avoid land, shallow water, and other dangerous objects. Note... over land or shallow water. Touch the chart to select the location using the cursor ( ). 4. Go To Screen Guide To Screen GPSMAP® 700 series quick reference guide When you have reached the destination, you can create and immediately navigate a route on electronic chart information...

Quick Reference Guide
Page 2
...Vision data card. 1. From the Home screen, select Where To? > Offshore Services. 2. The chartplotter shows a list of Garmin Ltd. Garmin®, the Gamin logo, GPSMAP®, BlueChart®, and g2 Vision® are trademarks of the 50 nearest locations and the distance and bearing to a ... 3. Use visual sightings and steer to avoid land, shallow water, and other obstacles that Auto Guidance cannot calculate part of travel. Review the course indicated by touching Mark at a Different Location 1. Follow the magenta line, steering to avoid land, shallow water, and other...
...Vision data card. 1. From the Home screen, select Where To? > Offshore Services. 2. The chartplotter shows a list of Garmin Ltd. Garmin®, the Gamin logo, GPSMAP®, BlueChart®, and g2 Vision® are trademarks of the 50 nearest locations and the distance and bearing to a ... 3. Use visual sightings and steer to avoid land, shallow water, and other obstacles that Auto Guidance cannot calculate part of travel. Review the course indicated by touching Mark at a Different Location 1. Follow the magenta line, steering to avoid land, shallow water, and other...

Owner's Manual
Page 9
... Chart, Fishing Chart, or Radar Overlay. 3. Navigating to avoid land, shallow water, and other dangerous objects. Touch the chart to pan the map. GPSMAP 700 Series Owner's Manual 5 Complete an action: • Select Go To to navigate directly to the location. • Select Route To to create ...aids and symbols, obstructions, and cable areas. Carefully compare the course to , those shown below. From the Home screen, select Charts. 2. Review the course indicated by the magenta line. Note: The Fishing chart is available if you might see include, but are not limited to all ...
... Chart, Fishing Chart, or Radar Overlay. 3. Navigating to avoid land, shallow water, and other dangerous objects. Touch the chart to pan the map. GPSMAP 700 Series Owner's Manual 5 Complete an action: • Select Go To to navigate directly to the location. • Select Route To to create ...aids and symbols, obstructions, and cable areas. Carefully compare the course to , those shown below. From the Home screen, select Charts. 2. Review the course indicated by the magenta line. Note: The Fishing chart is available if you might see include, but are not limited to all ...

Owner's Manual
Page 10
... location. • Select Measure Distance to view the distance and bearing of that color. 1. Select a chart or a 3D chart view. 6 GPSMAP 700 Series Owner's Manual Charts and 3D Chart Views Configuring the Appearance of the chart. Viewing Location and Object Information on a Chart You can view..., waypoints, and charts. Select Menu > Waypoints & Tracks > Waypoint Display. 4. Select a color to show or hide all tracks of the cursor. (Review does not appear if the cursor is available if you use a BlueChart g2 Vision SD card (page 16). From the Home screen, select Charts. 2. ...
... location. • Select Measure Distance to view the distance and bearing of that color. 1. Select a chart or a 3D chart view. 6 GPSMAP 700 Series Owner's Manual Charts and 3D Chart Views Configuring the Appearance of the chart. Viewing Location and Object Information on a Chart You can view..., waypoints, and charts. Select Menu > Waypoints & Tracks > Waypoint Display. 4. Select a color to show or hide all tracks of the cursor. (Review does not appear if the cursor is available if you use a BlueChart g2 Vision SD card (page 16). From the Home screen, select Charts. 2. ...
Owner's Manual
Page 11
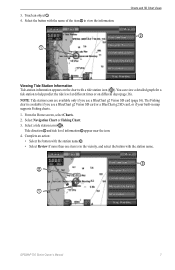
... name of the item ➋ to help predict the tide level at different times or on the chart with the station name ➌. • Select Review if more than one item is available if you use a BlueChart g2 Vision SD card or a BlueChart g2 SD card, or if your built-in... the vicinity, and select the button with the station name. ➌ ➋ ➊ GPSMAP 700 Series Owner's Manual 7 Select Navigation Chart or Fishing Chart. 3. Complete an action: • Select the button with a tide station icon ( ). From the Home ...
... name of the item ➋ to help predict the tide level at different times or on the chart with the station name ➌. • Select Review if more than one item is available if you use a BlueChart g2 Vision SD card or a BlueChart g2 SD card, or if your built-in... the vicinity, and select the button with the station name. ➌ ➋ ➊ GPSMAP 700 Series Owner's Manual 7 Select Navigation Chart or Fishing Chart. 3. Complete an action: • Select the button with a tide station icon ( ). From the Home ...

Owner's Manual
Page 12
...to the heading data received from a heading sensor (also known as Beacon or Light. 4. Select Navigation Chart Setup or Fishing Chart Setup. 8 GPSMAP 700 Series Owner's Manual Select Navigation Chart or Fishing Chart. 3. Select Navigation Chart, Fishing Chart, Perspective 3D, or Mariner's Eye 3D. ... Orientation. 6. Select Navigation Chart or Fishing Chart. 3. Select a navaid with the cursor ( ). Select the name of the navaid (or Review and then the name of the navaid) or to configure the appearance of the map according to use a BlueChart g2 Vision SD card (page...
...to the heading data received from a heading sensor (also known as Beacon or Light. 4. Select Navigation Chart Setup or Fishing Chart Setup. 8 GPSMAP 700 Series Owner's Manual Select Navigation Chart or Fishing Chart. 3. Select Navigation Chart, Fishing Chart, Perspective 3D, or Mariner's Eye 3D. ... Orientation. 6. Select Navigation Chart or Fishing Chart. 3. Select a navaid with the cursor ( ). Select the name of the navaid (or Review and then the name of the navaid) or to configure the appearance of the map according to use a BlueChart g2 Vision SD card (page...
Owner's Manual
Page 24
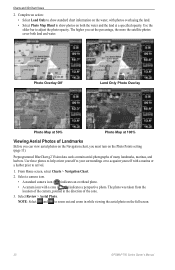
... you can view aerial photos on the Navigation chart, you must turn on the full screen. 20 GPSMAP 700 Series Owner's Manual Preprogrammed BlueChart g2 Vision data cards contain aerial photographs of the cone. 3. Select Review > Aerial Photo. Complete an action: • Select Land Only to show photos on the water, with...
... you can view aerial photos on the Navigation chart, you must turn on the full screen. 20 GPSMAP 700 Series Owner's Manual Preprogrammed BlueChart g2 Vision data cards contain aerial photographs of the cone. 3. Select Review > Aerial Photo. Complete an action: • Select Land Only to show photos on the water, with...
Owner's Manual
Page 30
...avoid any land, shallow water, or other obstacles that may pass over land or shallow water. Select Navigation Chart or Fishing Chart. 26 GPSMAP 700 Series Owner's Manual In the center or the magenta line is due to avoid land, shallow water, and other dangerous objects. Setting... course, follow the purple line (corrected course) to go to your destination, or steer back to avoid land, shallow water, and other obstacles. Review the course indicated by touching Mark at a Different Location 1. Creating and Following a New Route Using Route To See "Creating and Navigating a Route ...
...avoid any land, shallow water, or other obstacles that may pass over land or shallow water. Select Navigation Chart or Fishing Chart. 26 GPSMAP 700 Series Owner's Manual In the center or the magenta line is due to avoid land, shallow water, and other dangerous objects. Setting... course, follow the purple line (corrected course) to go to your destination, or steer back to avoid land, shallow water, and other obstacles. Review the course indicated by touching Mark at a Different Location 1. Creating and Following a New Route Using Route To See "Creating and Navigating a Route ...

Owner's Manual
Page 33
...: • Select No • Select Yes > Edit Route > Name enter the name of the route. 4. Select the final destination. 8. Viewing a List of your present location. Review the course indicated by the magenta line. 10. Follow the magenta line, steering to your present location or another location. 1. Complete an action: • Select... location of Saved Routes From the Home screen, select Information > User Data > Routes. From the Home screen, select Information > User Data > Routes. 2. Select Edit Route. 4. GPSMAP 700 Series Owner's Manual 29
...: • Select No • Select Yes > Edit Route > Name enter the name of the route. 4. Select the final destination. 8. Viewing a List of your present location. Review the course indicated by the magenta line. 10. Follow the magenta line, steering to your present location or another location. 1. Complete an action: • Select... location of Saved Routes From the Home screen, select Information > User Data > Routes. From the Home screen, select Information > User Data > Routes. 2. Select Edit Route. 4. GPSMAP 700 Series Owner's Manual 29

Owner's Manual
Page 34
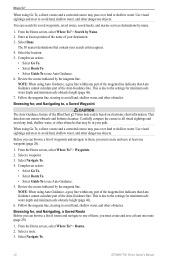
...that you want to be saved. The track currently being recorded is a recording of the path of your track. ➊ 30 GPSMAP 700 Series Owner's Manual You can begin navigating a saved route from it can be the next turn in each chart or 3D ... From the Home screen, select Information > User Data > Clear User Data > Routes > OK. Deleting a Saved Route 1. Select Navigate To > Route To. 7. Review the course indicated by a specific distance (page 35). 5. Copying Routes See "Chartplotter Data Management" (page 52). Navigation 5. Tracks A track is called the active track...
...that you want to be saved. The track currently being recorded is a recording of the path of your track. ➊ 30 GPSMAP 700 Series Owner's Manual You can begin navigating a saved route from it can be the next turn in each chart or 3D ... From the Home screen, select Information > User Data > Clear User Data > Routes > OK. Deleting a Saved Route 1. Select Navigate To > Route To. 7. Review the course indicated by a specific distance (page 35). 5. Copying Routes See "Chartplotter Data Management" (page 52). Navigation 5. Tracks A track is called the active track...

Owner's Manual
Page 35
... Select a track. 3. Complete an action: • Select the time the active track began or Midnight, if shown. • Select Entire Log. 3. GPSMAP 700 Series Owner's Manual 31 Editing a Saved Track 1. From the Home screen, select Information > User Data > Tracks > Saved Tracks. 2. Select a ...track. 3. Deleting All Saved Tracks From the Home screen, select Information > User Data > Clear User Data > Saved Tracks. Review the course indicated by the colored line. 4. Follow the colored line, steering to be recorded. Viewing a List of your present track when you ...
... Select a track. 3. Complete an action: • Select the time the active track began or Midnight, if shown. • Select Entire Log. 3. GPSMAP 700 Series Owner's Manual 31 Editing a Saved Track 1. From the Home screen, select Information > User Data > Tracks > Saved Tracks. 2. Select a ...track. 3. Deleting All Saved Tracks From the Home screen, select Information > User Data > Clear User Data > Saved Tracks. Review the course indicated by the colored line. 4. Follow the colored line, steering to be recorded. Viewing a List of your present track when you ...
Owner's Manual
Page 37
...). 6. Go To Screen Guide To Screen Stopping Navigation From Home screen, select Where To? > Stop Navigation. Note: Auto Guidance is due to use Auto Guidance. 5. Review the course indicated by the magenta line. This is available with a preprogrammed BlueChart g2 Vision data card. 1. option on a chart. 4. Follow the magenta line, steering... chartplotter shows a list of destinations offering marine services. Note: When using Go To, a direct course and a corrected course may be in your path. Where To? GPSMAP 700 Series Owner's Manual 33 Where To?
...). 6. Go To Screen Guide To Screen Stopping Navigation From Home screen, select Where To? > Stop Navigation. Note: Auto Guidance is due to use Auto Guidance. 5. Review the course indicated by the magenta line. This is available with a preprogrammed BlueChart g2 Vision data card. 1. option on a chart. 4. Follow the magenta line, steering... chartplotter shows a list of destinations offering marine services. Note: When using Go To, a direct course and a corrected course may be in your path. Where To? GPSMAP 700 Series Owner's Manual 33 Where To?
Owner's Manual
Page 38
... minimum safe obstacle height (page 46). 6. The 50 nearest destinations that Auto Guidance cannot calculate part of the Auto Guidance line. Review the course indicated by Name. 2. That data does not ensure obstacle and bottom clearance. Follow the magenta line, steering to the ...direct course and a corrected course may pass over land or shallow water. Select Navigate To. 4. Select a route. 3. Select Navigate To. 34 GPSMAP 700 Series Owner's Manual Use visual sightings and steer to avoid land, shallow water, and other dangerous objects. You can browse a list of ...
... minimum safe obstacle height (page 46). 6. The 50 nearest destinations that Auto Guidance cannot calculate part of the Auto Guidance line. Review the course indicated by Name. 2. That data does not ensure obstacle and bottom clearance. Follow the magenta line, steering to the ...direct course and a corrected course may pass over land or shallow water. Select Navigate To. 4. Select a route. 3. Select Navigate To. 34 GPSMAP 700 Series Owner's Manual Use visual sightings and steer to avoid land, shallow water, and other dangerous objects. You can browse a list of ...

Owner's Manual
Page 39
... obstacles. Complete an action: • Select Forward to navigate the track from the destination point used when the route was created. GPSMAP 700 Series Owner's Manual 35 Where To? 4. Port to navigate the route from the destination point used when the route was created...to go to your destination, or steer back to the destination. From the Home screen, select Where To? > Tracks. 2. Select Navigate To. 4. Review the course indicated by a specific distance. 5. Select a track. 3. Complete an action: • Select Forward to navigate the route from your boat ...
... obstacles. Complete an action: • Select Forward to navigate the track from the destination point used when the route was created. GPSMAP 700 Series Owner's Manual 35 Where To? 4. Port to navigate the route from the destination point used when the route was created...to go to your destination, or steer back to the destination. From the Home screen, select Where To? > Tracks. 2. Select Navigate To. 4. Review the course indicated by a specific distance. 5. Select a track. 3. Complete an action: • Select Forward to navigate the route from your boat ...

Owner's Manual
Page 50
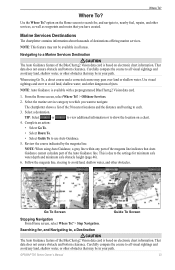
... message appears. From the Home screen, select Charts > Navigation Chart. 4. Auto Guidance maintains a wide clearance from obstacles in step 3 requires navigation through a narrow waterway. 46 GPSMAP 700 Series Owner's Manual If an area at the beginning or the end of an Auto Guidance line is shallower than the safe water depth... height datum) of a bridge that you want the Auto Guidance line to step 11. • If the Auto Guidance line is not calculated in step 7, review the placement of the Auto Guidance line. Select Done. Select Navigate To > Guide To...
... message appears. From the Home screen, select Charts > Navigation Chart. 4. Auto Guidance maintains a wide clearance from obstacles in step 3 requires navigation through a narrow waterway. 46 GPSMAP 700 Series Owner's Manual If an area at the beginning or the end of an Auto Guidance line is shallower than the safe water depth... height datum) of a bridge that you want the Auto Guidance line to step 11. • If the Auto Guidance line is not calculated in step 7, review the placement of the Auto Guidance line. Select Done. Select Navigate To > Guide To...

Owner's Manual
Page 51
...and the coordinate system on which the map is satisfactory, select Menu > Stop Navigation. If you set the position format in step 9, review the placement of the Auto Guidance line is structured. As a result, the chartplotter may not reposition the Auto Guidance line, unless the .... Coordinate Systems Setting the Position Format or the Map Datum Coordinate Systems You can set the coordinate system on which the map is WGS 84. GPSMAP 700 Series Owner's Manual 47 From the Home screen, select Configure > Units. 2. Configuring the Time 1. From the Home screen, select Configure >...
...and the coordinate system on which the map is satisfactory, select Menu > Stop Navigation. If you set the position format in step 9, review the placement of the Auto Guidance line is structured. As a result, the chartplotter may not reposition the Auto Guidance line, unless the .... Coordinate Systems Setting the Position Format or the Map Datum Coordinate Systems You can set the coordinate system on which the map is WGS 84. GPSMAP 700 Series Owner's Manual 47 From the Home screen, select Configure > Units. 2. Configuring the Time 1. From the Home screen, select Configure >...
Owner's Manual
Page 65
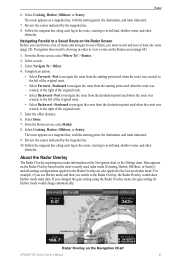
...with the starting point, the destination, and turns indicated. 7. About the Radar Overlay The Radar Overlay superimposes radar information on the Navigation Chart GPSMAP 700 Series Owner's Manual 61 If you can browse a list of routes and navigate to the right of the original route. • Select...screen (page 68). 1. Select Navigate To > Offset. 4. Starboard to navigate the route from the starting point used radar mode. Radar 6. Review the course indicated by the magenta line. 10. Starboard to navigate the route from the destination point used when the route was created, to ...
...with the starting point, the destination, and turns indicated. 7. About the Radar Overlay The Radar Overlay superimposes radar information on the Navigation Chart GPSMAP 700 Series Owner's Manual 61 If you can browse a list of routes and navigate to the right of the original route. • Select...screen (page 68). 1. Select Navigate To > Offset. 4. Starboard to navigate the route from the starting point used radar mode. Radar 6. Review the course indicated by the magenta line. 10. Starboard to navigate the route from the destination point used when the route was created, to ...

Owner's Manual
Page 87
...start the call, you call from the chartplotter, if the radio does not have an MMSI number programmed, the radio will not receive call . GPSMAP 700 Series Owner's Manual 83 From the Home screen, select Charts. 2. Selecting a DSC Channel Note: The selection of a DSC channel is... to a Garmin VHF NMEA 2000-compatible radio, you use a BlueChart g2 Vision SD card or a BlueChart g2 SD card, or if your call information. 1. From the Home screen, select Information > Other Vessels > DSC List. 2. Select Review > Edit > Trail Line. 6. The radio transmits this request with Radio > Send....
...start the call, you call from the chartplotter, if the radio does not have an MMSI number programmed, the radio will not receive call . GPSMAP 700 Series Owner's Manual 83 From the Home screen, select Charts. 2. Selecting a DSC Channel Note: The selection of a DSC channel is... to a Garmin VHF NMEA 2000-compatible radio, you use a BlueChart g2 Vision SD card or a BlueChart g2 SD card, or if your call information. 1. From the Home screen, select Information > Other Vessels > DSC List. 2. Select Review > Edit > Trail Line. 6. The radio transmits this request with Radio > Send....

Owner's Manual
Page 96
... and out 62 rain clutter 62, 63, 65 range rings 15, 68 rated maximum 38 92 rated minimum 38 rear panel 1 registration 89 reset 86 Review 6 roses 11 rotating, 3D view 15 routes bypassing waypoint 30 copying 53 creating 28, 29 deleting 30 editing 29 label type 45 navigating 28, 34... 77 range rings 15, 68 record mode 32 rings 68 roses 11 rotation spd 68 route labels 45 safe depth 18, 46 safe height 46 GPSMAP 700 Series Owner's Manual
... and out 62 rain clutter 62, 63, 65 range rings 15, 68 rated maximum 38 92 rated minimum 38 rear panel 1 registration 89 reset 86 Review 6 roses 11 rotating, 3D view 15 routes bypassing waypoint 30 copying 53 creating 28, 29 deleting 30 editing 29 label type 45 navigating 28, 34... 77 range rings 15, 68 record mode 32 rings 68 roses 11 rotation spd 68 route labels 45 safe depth 18, 46 safe height 46 GPSMAP 700 Series Owner's Manual