
Flush Mount Kit Instructions (multilingual)
Page 2
... Tension mount brackets Wing nuts Figure 2 NOTE: You must connect the wiring harness to the boat's power supply, GPS antenna, XM antenna (if applicable), and transducer (if applicable) per the installation instructions included with the four wing nuts. • Tighten the four wing nuts to secure the unit housing to the...
... Tension mount brackets Wing nuts Figure 2 NOTE: You must connect the wiring harness to the boat's power supply, GPS antenna, XM antenna (if applicable), and transducer (if applicable) per the installation instructions included with the four wing nuts. • Tighten the four wing nuts to secure the unit housing to the...

Installation Instructions
Page 1
... 6. Before installing your GPSMAP 400 or 500 series chartplotter, confirm that the package contains the items listed on model number. Install the transducer, if applicable (page 3). 4. C Printed in the product box for product warnings and other important information. WARNING: See the Important ...Product Information guide in Taiwan notice: When drilling or cutting, always check the opposite side of a professional installer, or contact Garmin Product Support. You need the appropriate fasteners, tools, and mounts listed in the GPSMAP 400/500 series have different functionality ...
... 6. Before installing your GPSMAP 400 or 500 series chartplotter, confirm that the package contains the items listed on model number. Install the transducer, if applicable (page 3). 4. C Printed in the product box for product warnings and other important information. WARNING: See the Important ...Product Information guide in Taiwan notice: When drilling or cutting, always check the opposite side of a professional installer, or contact Garmin Product Support. You need the appropriate fasteners, tools, and mounts listed in the GPSMAP 400/500 series have different functionality ...

Installation Instructions
Page 3
... cables are available from your sonar to getting the best performance from your warranty. screw (1) F - 1/4 in . cable clamps (2) G - rubber washer (1) I Notice: Do not cut the transducer lead or any existing (Garmin or non-Garmin) transducer cables. Cable tie, 5.6 in . The cable cannot be jarred when launching, hauling, or storing. • Do not mount the...
... cables are available from your sonar to getting the best performance from your warranty. screw (1) F - 1/4 in . cable clamps (2) G - rubber washer (1) I Notice: Do not cut the transducer lead or any existing (Garmin or non-Garmin) transducer cables. Cable tie, 5.6 in . The cable cannot be jarred when launching, hauling, or storing. • Do not mount the...

Installation Instructions
Page 4
...avoid drilling the holes too deep, wrap a piece of the bit. 3. Tighten the 10-32 locking nut until it .) 5. Do not mount the transducer directly in . (25 mm) from the point of tape around the motor body. Apply marine sealant to prevent water from the trolling motor propeller, ...mm) on the opposite end and pull it touches the mounting bracket, and then tighten 1/4 turn more . (Do not overtighten.) Cable tie Front of the transducer mount. 3. Attach the cable clamp using the other sources of the mount. notice: For cold water and heavy timber or debris areas, a metal 4-5 in...
...avoid drilling the holes too deep, wrap a piece of the bit. 3. Tighten the 10-32 locking nut until it .) 5. Do not mount the transducer directly in . (25 mm) from the point of tape around the motor body. Apply marine sealant to prevent water from the trolling motor propeller, ...mm) on the opposite end and pull it touches the mounting bracket, and then tighten 1/4 turn more . (Do not overtighten.) Cable tie Front of the transducer mount. 3. Attach the cable clamp using the other sources of the mount. notice: For cold water and heavy timber or debris areas, a metal 4-5 in...

Installation Instructions
Page 5
...two-part, slow-cure epoxy into the dam. 3. GPSMAP 400/500 Series Installation Instructions 5 This type of electrical interference. When installing a transducer, consider the following illustration. 2. Strip caulk or RTV sealer Fill a pipe or a can provide better noise reduction and allow it in ...from a section of PVC pipe or a can be no more than 5/8 in. (9.53 mm) thick when using a temperature-sensing transducer, the temperature displayed reflects the hull temperature. Professional installation might be over any strakes or behind any air bubbles. 4. Shoot-Thru-Hull...
...two-part, slow-cure epoxy into the dam. 3. GPSMAP 400/500 Series Installation Instructions 5 This type of electrical interference. When installing a transducer, consider the following illustration. 2. Strip caulk or RTV sealer Fill a pipe or a can provide better noise reduction and allow it in ...from a section of PVC pipe or a can be no more than 5/8 in. (9.53 mm) thick when using a temperature-sensing transducer, the temperature displayed reflects the hull temperature. Professional installation might be over any strakes or behind any air bubbles. 4. Shoot-Thru-Hull...

Installation Instructions
Page 6
...to an unused holder on connecting to a NMEA 2000 network with a wiring harness that connects the chartplotter to power and to a transducer. or Garmin CANet-compatible device, see page 8. or ground) wire to Power 1. Notice: The maximum input voltage is necessary to extend the ...warranty. Connecting the Wiring Harness to the negative voltage terminal. 4. For instructions on the fuse block. • Do not cut the transducer cable, because this can be connected for more information. 6 GPSMAP 400/500 Series Installation Instructions Use a test light or voltmeter to...
...to an unused holder on connecting to a NMEA 2000 network with a wiring harness that connects the chartplotter to power and to a transducer. or Garmin CANet-compatible device, see page 8. or ground) wire to Power 1. Notice: The maximum input voltage is necessary to extend the ...warranty. Connecting the Wiring Harness to the negative voltage terminal. 4. For instructions on the fuse block. • Do not cut the transducer cable, because this can be connected for more information. 6 GPSMAP 400/500 Series Installation Instructions Use a test light or voltmeter to...

Installation Instructions
Page 9
...until the chartplotter beeps and turns on your GPSMAP 400/500 series chartplotter. You cannot get a depth or distance reading when the transducer is listed for identification purposes. Connecting Cables to the Chartplotter Use the diagrams below the water line. Every possible chartplotter configuration is... 526, 536, 546, and 556 Testing the Installation To turn on . Testing the Optional Transducer Installation Because water is necessary to carry the sonar signal from the sounder, the transducer must be used for leaks around any screw holes that were added below to work properly....
...until the chartplotter beeps and turns on your GPSMAP 400/500 series chartplotter. You cannot get a depth or distance reading when the transducer is listed for identification purposes. Connecting Cables to the Chartplotter Use the diagrams below the water line. Every possible chartplotter configuration is... 526, 536, 546, and 556 Testing the Installation To turn on . Testing the Optional Transducer Installation Because water is necessary to carry the sonar signal from the sounder, the transducer must be used for leaks around any screw holes that were added below to work properly....

Installation Instructions
Page 10
... in . diagonal (10.6 cm), QVGA display with adjustable brightness, 640 × 480 pixels. If the signal strength improves while turning, adjust the transducer so that it was lost or the bottom return is at which the signal was turned off. GPSMAP 520/521/530/531/540/541/550/...(s): 4.0 in . diagonal (12.7 cm), QVGA display with a clear view of the sonar. Begin testing the installation at greater risk of the boat and put the transducer at a slow speed. GPSMAP 525/526/535/536/545/546/555/556 (s): 5.0 in . (95 cm) Performance Receiver: GPSMAP 420/430/440/450 (s) GPSMAP 520...
... in . diagonal (10.6 cm), QVGA display with adjustable brightness, 640 × 480 pixels. If the signal strength improves while turning, adjust the transducer so that it was lost or the bottom return is at which the signal was turned off. GPSMAP 520/521/530/531/540/541/550/...(s): 4.0 in . diagonal (12.7 cm), QVGA display with a clear view of the sonar. Begin testing the installation at greater risk of the boat and put the transducer at a slow speed. GPSMAP 525/526/535/536/545/546/555/556 (s): 5.0 in . (95 cm) Performance Receiver: GPSMAP 420/430/440/450 (s) GPSMAP 520...

Installation Instructions
Page 11
.../546s/555s/556s units only.) Dual Frequency, 500 W (RMS), 4,000 W (peak to peak); Sonar Power: 1 kW Transducer, 1,000 W (RMS), 8,000 W (peak to peak); (1 kW transducers are NMEA 2000 certified. 130314 Actual Pressure NMEA 0183, Version 3.01 Sentences: SDDBT, SDDPT, SDMTW, SDVHW, SDWPL You can ... Claim NMEA - Depth capacity is dependent on water salinity, bottom type, and other water conditions. Communication NMEA 2000 PGN Information (Only Applicable to peak) Frequency: 50/200 kHz (dual frequency and 1 kW), 80/200 kHz (dual beam) Depth: 2,500 ft. (762 m) (1 kW), 1,500 ft (457 m) (...
.../546s/555s/556s units only.) Dual Frequency, 500 W (RMS), 4,000 W (peak to peak); Sonar Power: 1 kW Transducer, 1,000 W (RMS), 8,000 W (peak to peak); (1 kW transducers are NMEA 2000 certified. 130314 Actual Pressure NMEA 0183, Version 3.01 Sentences: SDDBT, SDDPT, SDMTW, SDVHW, SDWPL You can ... Claim NMEA - Depth capacity is dependent on water salinity, bottom type, and other water conditions. Communication NMEA 2000 PGN Information (Only Applicable to peak) Frequency: 50/200 kHz (dual frequency and 1 kW), 80/200 kHz (dual beam) Depth: 2,500 ft. (762 m) (1 kW), 1,500 ft (457 m) (...

Owner's Manual
Page 12
... options, tides, currents, celestial data, user data, and information about other screens. Note: You must have an "s" series unit (such as a GPSMAP 526s) with a connected transducer to the most-current version by clicking Help > Check for Software Updates, or check the...
... options, tides, currents, celestial data, user data, and information about other screens. Note: You must have an "s" series unit (such as a GPSMAP 526s) with a connected transducer to the most-current version by clicking Help > Check for Software Updates, or check the...
Owner's Manual
Page 23
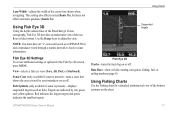
...width of the bottom contours on the chart. Note: You must have an "s" series unit (such as fish). Targets are indicated by your transducer on or off . Data Bars-show or hide cruising, navigation, fishing, fuel, or sailing numbers (page 8). Using Fishing Charts Use the Fishing... red, green, and yellow spheres. Sonar Cone (only available if sonar is present)-displays suspended targets (such as a GPSMAP 526s) and a transducer wired through a marine network to adjust the view. Using Fish Eye 3D Using the depth contour lines of the BlueChart g2 Vision cartography, Fish...
...width of the bottom contours on the chart. Note: You must have an "s" series unit (such as fish). Targets are indicated by your transducer on or off . Data Bars-show or hide cruising, navigation, fishing, fuel, or sailing numbers (page 8). Using Fishing Charts Use the Fishing... red, green, and yellow spheres. Sonar Cone (only available if sonar is present)-displays suspended targets (such as a GPSMAP 526s) and a transducer wired through a marine network to adjust the view. Using Fish Eye 3D Using the depth contour lines of the BlueChart g2 Vision cartography, Fish...
Owner's Manual
Page 28
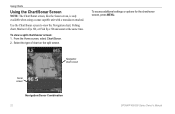
.... Using Charts Using the Chart/Sonar Screen Note: The Chart/Sonar screen, like the Sonar screen, is only available when using a sonar capable unit with a transducer attached. To access additional settings or options for the chart/sonar screen, press MENU. From the Home screen, select Chart/Sonar. 2. Use the Chart/Sonar...
.... Using Charts Using the Chart/Sonar Screen Note: The Chart/Sonar screen, like the Sonar screen, is only available when using a sonar capable unit with a transducer attached. To access additional settings or options for the chart/sonar screen, press MENU. From the Home screen, select Chart/Sonar. 2. Use the Chart/Sonar...

Owner's Manual
Page 60
...-set an alarm to sound when the depth is 2°F (1.1°C) above or below the specified temperature. Fish-set an alarm to sound when the transducer reports a temperature that is less than the specified value. From the Home screen, select Configure > Alarms > Fuel > Total Onboard > On (or Off). ...Alarms > Sonar. Setting the Total Fuel Onboard Alarm You can configure your unit must be connected to an external fuel sensor, such as the Garmin GFS 10. Setting Sonar Alarms To set the fuel alarm level: 1. Configuring the Chartplotter Battery-set an alarm to sound when the GPS ...
...-set an alarm to sound when the depth is 2°F (1.1°C) above or below the specified temperature. Fish-set an alarm to sound when the transducer reports a temperature that is less than the specified value. From the Home screen, select Configure > Alarms > Fuel > Total Onboard > On (or Off). ...Alarms > Sonar. Setting the Total Fuel Onboard Alarm You can configure your unit must be connected to an external fuel sensor, such as the Garmin GFS 10. Setting Sonar Alarms To set the fuel alarm level: 1. Configuring the Chartplotter Battery-set an alarm to sound when the GPS ...

Owner's Manual
Page 61
Keel Offset-offset the surface reading for the depth of from the transducer location. From the Home screen, select Configure > My Boat > Keel Offset. 2. This shows the depth at the surface. If you get the message, contact Garmin Product Support. Enter a positive number to measure depth from the bottom of the keel instead...
Keel Offset-offset the surface reading for the depth of from the transducer location. From the Home screen, select Configure > My Boat > Keel Offset. 2. This shows the depth at the surface. If you get the message, contact Garmin Product Support. Enter a positive number to measure depth from the bottom of the keel instead...
Owner's Manual
Page 63
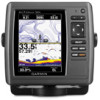
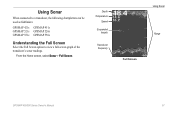
Using Sonar When connected to a transducer, the following chartplotters can be used as fishfinders: GPSMAP 421s GPSMAP 451s GPSMAP 521s GPSMAP 526s GPSMAP 551s GPSMAP 556s Understanding the Full Screen Select the Full Screen option to view a full-screen graph of the transducer's sonar readings. Depth Temperature Speed Suspended targets Transducer frequency Full Screen Using Sonar Range GPSMAP 400/500 Series Owner's Manual 57 From the Home screen, select Sonar > Full Screen.
Using Sonar When connected to a transducer, the following chartplotters can be used as fishfinders: GPSMAP 421s GPSMAP 451s GPSMAP 521s GPSMAP 526s GPSMAP 551s GPSMAP 556s Understanding the Full Screen Select the Full Screen option to view a full-screen graph of the transducer's sonar readings. Depth Temperature Speed Suspended targets Transducer frequency Full Screen Using Sonar Range GPSMAP 400/500 Series Owner's Manual 57 From the Home screen, select Sonar > Full Screen.

Owner's Manual
Page 64
... window Range Split Zoom GPSMAP 400/500 Series Owner's Manual Using Sonar Understanding the Split Frequency Screen Use the Split Frequency screen (dual-frequency transducer only) to view the full sonar data from the graph and a zoomed in portion on the same screen. From the Home screen, select... Sonar > Split Frequency. From the Home screen, select Sonar > Split Zoom. A 200 kHz frequency graph appears on the left. A 50 kHz frequency graph appears on the right. Depth, temperature, and speed Understanding The Split Zoom Screen Use the Split Zoom screen to view both the...
... window Range Split Zoom GPSMAP 400/500 Series Owner's Manual Using Sonar Understanding the Split Frequency Screen Use the Split Frequency screen (dual-frequency transducer only) to view the full sonar data from the graph and a zoomed in portion on the same screen. From the Home screen, select... Sonar > Split Frequency. From the Home screen, select Sonar > Split Zoom. A 200 kHz frequency graph appears on the left. A 50 kHz frequency graph appears on the right. Depth, temperature, and speed Understanding The Split Zoom Screen Use the Split Zoom screen to view both the...
Owner's Manual
Page 65
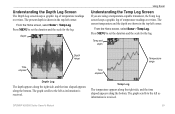
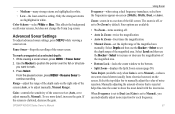
... to the left as information is shown in the top-left as information is received. The current temperature and the depth are using a temperature-capable transducer, the Temp Log screen keeps a graphic log of temperature readings over time. The present depth is received.
... to the left as information is shown in the top-left as information is received. The current temperature and the depth are using a temperature-capable transducer, the Temp Log screen keeps a graphic log of temperature readings over time. The present depth is received.

Owner's Manual
Page 66
... vertical flasher along the right side of fish symbols, whiteline, and the sonar color scheme. • Fish Symbols-set the depth of your transducer is capable), battery voltage, cruising, navigation, and the compass tape (page 9). Select Auto to help reduce clutter. Almost all sonar screens....Off (default)-turns off whiteline. ◦◦ High-the most-sensitive setting. Note: To display water temperature or water speed, the connected transducer must be capable of the water. Hide surface noise to left (Ultrascroll™, Fast, Medium, or Slow). From the Home screen, select ...
... vertical flasher along the right side of fish symbols, whiteline, and the sonar color scheme. • Fish Symbols-set the depth of your transducer is capable), battery voltage, cruising, navigation, and the compass tape (page 9). Select Auto to help reduce clutter. Almost all sonar screens....Off (default)-turns off whiteline. ◦◦ High-the most-sensitive setting. Note: To display water temperature or water speed, the connected transducer must be capable of the water. Hide surface noise to left (Ultrascroll™, Fast, Medium, or Slow). From the Home screen, select ...
Owner's Manual
Page 67
.... • Bottom Lock-locks the zoom window to adjust manually, Manual Range). GPSMAP 400/500 Series Owner's Manual Using Sonar Frequency-when using a dual frequency transducer, select how the frequencies appear on the right side of the magnified area manually. The zoom is set the depth range of the screen (Auto...
.... • Bottom Lock-locks the zoom window to adjust manually, Manual Range). GPSMAP 400/500 Series Owner's Manual Using Sonar Frequency-when using a dual frequency transducer, select how the frequencies appear on the right side of the magnified area manually. The zoom is set the depth range of the screen (Auto...

Owner's Manual
Page 74
Update Rate: once per second GPS Accuracy: Position: Appendix Acquisition Times: (Average acquisition times for a stationary receiver with a clear view of the sky) GPSMAP 421/421s GPSMAP 451/451s GPSMAP 521/521s GPSMAP 551/551s Warm*: Approximately 1 second Cold**: Approximately 38 seconds GPSMAP 526/526s GPSMAP 556/556s Warm*: Approximately 15 seconds Cold**: Approximately 45 seconds *Warm: your unit is at or near the last location where you recently acquired satellites. **Cold: your unit has moved by more than about 500 mi. (800 km) since it was turned off.
Update Rate: once per second GPS Accuracy: Position: Appendix Acquisition Times: (Average acquisition times for a stationary receiver with a clear view of the sky) GPSMAP 421/421s GPSMAP 451/451s GPSMAP 521/521s GPSMAP 551/551s Warm*: Approximately 1 second Cold**: Approximately 38 seconds GPSMAP 526/526s GPSMAP 556/556s Warm*: Approximately 15 seconds Cold**: Approximately 45 seconds *Warm: your unit is at or near the last location where you recently acquired satellites. **Cold: your unit has moved by more than about 500 mi. (800 km) since it was turned off.


