
Flush Mount Kit Instructions (multilingual)
Page 1
...when drilling, cutting, or sanding. Remove the protective liner and apply the template to the location you have limited space behind the mounting surface, this kit to flush mount a GPSMAP 500 series unit into the unit housing so they stick out of the unit housing. • Insert the four hex... bolts into a flat panel. • Select an appropriately sized location for the unit. • Use the Flush Mount Template provided to the unit. (This can be done in Taiwan B Hex nuts Printed in step 3, if necessary.) Unit Rubber seal Hex bolts Unit ...
...when drilling, cutting, or sanding. Remove the protective liner and apply the template to the location you have limited space behind the mounting surface, this kit to flush mount a GPSMAP 500 series unit into the unit housing so they stick out of the unit housing. • Insert the four hex... bolts into a flat panel. • Select an appropriately sized location for the unit. • Use the Flush Mount Template provided to the unit. (This can be done in Taiwan B Hex nuts Printed in step 3, if necessary.) Unit Rubber seal Hex bolts Unit ...

Flush Mount Kit Instructions (multilingual)
Page 2
EN 3. Be careful not to overtighten. • If you did not do so in step 2, connect the wiring harness to the mounting surface. Assembled unit and flush mount hardware Tension mount brackets Wing nuts Figure 2 NOTE: You must connect the wiring harness to the boat's power supply, GPS antenna, XM antenna (if ... nuts to secure the unit housing to the unit, then slide the unit into the unit housing until it snaps in the mounting surface. • Slide the tension mount brackets onto the hex bolts and secure them with the unit. Install the unit in the opening (see Figure 2): •...
EN 3. Be careful not to overtighten. • If you did not do so in step 2, connect the wiring harness to the mounting surface. Assembled unit and flush mount hardware Tension mount brackets Wing nuts Figure 2 NOTE: You must connect the wiring harness to the boat's power supply, GPS antenna, XM antenna (if ... nuts to secure the unit housing to the unit, then slide the unit into the unit housing until it snaps in the mounting surface. • Slide the tension mount brackets onto the hex bolts and secure them with the unit. Install the unit in the opening (see Figure 2): •...
Flush Mount Template
Page 1
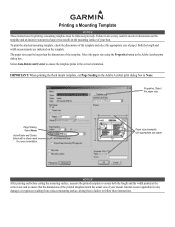
Important: When printing the flush mount template, set Page Scaling in the Adobe Acrobat print dialog box. Notice After printing and before cutting the mounting surface, measure the printed template to ensure both the length and the width printed at the correct size and to ...: Select with a check mark for any damages or expenses resulting from a miscut mounting surface arising from a failure to None. Select Auto-Rotate and Center to do so may result in the correct orientation. Garmin is not responsible for correct orientation Paper size (example): Use appropriate size paper....
Important: When printing the flush mount template, set Page Scaling in the Adobe Acrobat print dialog box. Notice After printing and before cutting the mounting surface, measure the printed template to ensure both the length and the width printed at the correct size and to ...: Select with a check mark for any damages or expenses resulting from a miscut mounting surface arising from a failure to None. Select Auto-Rotate and Center to do so may result in the correct orientation. Garmin is not responsible for correct orientation Paper size (example): Use appropriate size paper....
Installation Instructions
Page 2
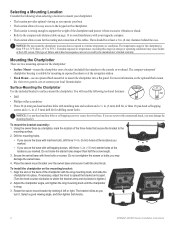
For more information on the optional flush mount kit, visit www.garmin.com or contact your chartplotter: • The location provides optimal viewing as you may damage the swivel base. 4. Secure the swivel base with the short ... screws with self-tapping screws, drill three 1/16 in. (1.5 mm) starter holes at the locations you may damage the mounting bracket. If you use an optional flush mount kit to mount the chartplotter into place. Do not overtighten the screws or bolts; Notice: Use pan-head machine bolts or self-tapping screws to surface...
For more information on the optional flush mount kit, visit www.garmin.com or contact your chartplotter: • The location provides optimal viewing as you may damage the swivel base. 4. Secure the swivel base with the short ... screws with self-tapping screws, drill three 1/16 in. (1.5 mm) starter holes at the locations you may damage the mounting bracket. If you use an optional flush mount kit to mount the chartplotter into place. Do not overtighten the screws or bolts; Notice: Use pan-head machine bolts or self-tapping screws to surface...


