
Quick Reference Guide
Page 2
... turn toward your destination. 4. If you select Use Chart, use the map pointer ( ) to the previous screen when indicated. Select the route to manually adjust the backlight. A trailing line on or off the unit, press and hold to switch between day mode and night mode: 1. To clear the... is complete. 5. When the unit acquires satellite signals, the signal strength bars at the bottom of the map. Home Screen Please visit www.garmin.com for product warnings and other areas on the Navigation Chart Use the Rocker to move through menus, highlight fields, and enter data. Press...
... turn toward your destination. 4. If you select Use Chart, use the map pointer ( ) to the previous screen when indicated. Select the route to manually adjust the backlight. A trailing line on or off the unit, press and hold to switch between day mode and night mode: 1. To clear the... is complete. 5. When the unit acquires satellite signals, the signal strength bars at the bottom of the map. Home Screen Please visit www.garmin.com for product warnings and other areas on the Navigation Chart Use the Rocker to move through menus, highlight fields, and enter data. Press...

Important Safety and Product Information
Page 2
...before continuing navigation. • Use the electronic chart in the unit only to facilitate, not to replace, the use a combination of Garmin is in compliance with Industry Canada Standard RSS-210. Avoid chemical cleaners and solvents that is moving could result in an accident or collision... precise measurement of the unit, take it to a professional service, such as a navigational aid. NOTE: Refer to your product's owner's manual to determine if your product contains or accepts maps, or to determine if your unit contains or accepts mapping products, follow these guidelines to ensure...
...before continuing navigation. • Use the electronic chart in the unit only to facilitate, not to replace, the use a combination of Garmin is in compliance with Industry Canada Standard RSS-210. Avoid chemical cleaners and solvents that is moving could result in an accident or collision... precise measurement of the unit, take it to a professional service, such as a navigational aid. NOTE: Refer to your product's owner's manual to determine if your product contains or accepts maps, or to determine if your unit contains or accepts mapping products, follow these guidelines to ensure...
Installation Instructions
Page 7
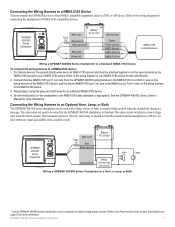
.... 2. Connect the blue (NMEA 0183 port 1 out) wire from the chartplotter to 100 mA. See the GPSMAP 400/500 Series Owner's Manual for connecting the chartplotter to NMEA 0183-compatible devices. GPSMAP 400/500 Series Installation Instructions 7 GPSMAP 400/500 Series Chartplotter + - To select ...harness to a NMEA 0183 device: 1. The alarm circuit switches to sound or flash an alert when the chartplotter displays a message. For Garmin devices, the ground (black) wires serve as the NMEA 0183 ground on the chartplotter to use NMEA 0183 data (standard or high speed)....
.... 2. Connect the blue (NMEA 0183 port 1 out) wire from the chartplotter to 100 mA. See the GPSMAP 400/500 Series Owner's Manual for connecting the chartplotter to NMEA 0183-compatible devices. GPSMAP 400/500 Series Installation Instructions 7 GPSMAP 400/500 Series Chartplotter + - To select ...harness to a NMEA 0183 device: 1. The alarm circuit switches to sound or flash an alert when the chartplotter displays a message. For Garmin devices, the ground (black) wires serve as the NMEA 0183 ground on the chartplotter to use NMEA 0183 data (standard or high speed)....

Installation Instructions
Page 12
...®, and AutoLocate® are trademarks of your Garmin products, visit the Garmin Web site at www.garmin.com. © 2009-2012 Garmin Ltd. or its products and to make changes in the content without obligation to change or improve its subsidiaries, registered in this manual may not be used without the express prior written...
...®, and AutoLocate® are trademarks of your Garmin products, visit the Garmin Web site at www.garmin.com. © 2009-2012 Garmin Ltd. or its products and to make changes in the content without obligation to change or improve its subsidiaries, registered in this manual may not be used without the express prior written...

Owner's Manual
Page 1
GPSMAP® 400/500 series owner's manual
GPSMAP® 400/500 series owner's manual

Owner's Manual
Page 2
...without notice. All rights reserved. Except as expressly provided herein, no part of this manual may not be viewed and to change without obligation to notify any person or organization of Garmin Ltd. or its subsidiaries, registered in any purpose without the express permission of Microsoft... updates and supplemental information concerning the use and operation of Garmin. Garmin reserves the right to print one copy of this manual or of any revision hereto, provided that such electronic or printed copy of this manual must contain the complete text of this copyright notice and ...
...without notice. All rights reserved. Except as expressly provided herein, no part of this manual may not be viewed and to change without obligation to notify any person or organization of Garmin Ltd. or its subsidiaries, registered in any purpose without the express permission of Microsoft... updates and supplemental information concerning the use and operation of Garmin. Garmin reserves the right to print one copy of this manual or of any revision hereto, provided that such electronic or printed copy of this manual must contain the complete text of this copyright notice and ...

Owner's Manual
Page 3
...you see "select Charts > Navigation Chart," you are instructed to select an item, small arrows (>) appear in the text. Introduction This manual includes information for the following products: GPSMAP® 421/421s GPSMAP 521/521s GPSMAP 551/551s GPSMAP 451/451s GPSMAP 526/526s GPSMAP ...the screen using the Rocker, and press the SELECT key after each item. They indicate that you should highlight Charts, and press SELECT. Manual Conventions In this manual, when you should highlight a series of the main screens to access advanced settings. • Press and release the Power key to ...
...you see "select Charts > Navigation Chart," you are instructed to select an item, small arrows (>) appear in the text. Introduction This manual includes information for the following products: GPSMAP® 421/421s GPSMAP 521/521s GPSMAP 551/551s GPSMAP 451/451s GPSMAP 526/526s GPSMAP ...the screen using the Rocker, and press the SELECT key after each item. They indicate that you should highlight Charts, and press SELECT. Manual Conventions In this manual, when you should highlight a series of the main screens to access advanced settings. • Press and release the Power key to ...

Owner's Manual
Page 4
Introduction Table of Contents Introduction i Tips and Shortcuts i Manual Conventions i Quick Links i Declaration of Conformity (DoC iv Product Registration iv Contact Garmin iv Getting Started 1 Unit Overview 1 Turning the Unit On or Off 2 Initializing Unit Settings 2 Adjusting the Backlight 3 Using...23 Creating and Using Waypoints 25 Creating and Using Routes 26 Using Tracks 28 Using BlueChart g2 Vision 30 Navigating with a Garmin Autopilot 30 Viewing Information 31 Viewing a Compass 31 Viewing Numbers 31 Viewing Trip Information 32 Viewing and Customizing Fuel Gauges ...
Introduction Table of Contents Introduction i Tips and Shortcuts i Manual Conventions i Quick Links i Declaration of Conformity (DoC iv Product Registration iv Contact Garmin iv Getting Started 1 Unit Overview 1 Turning the Unit On or Off 2 Initializing Unit Settings 2 Adjusting the Backlight 3 Using...23 Creating and Using Waypoints 25 Creating and Using Routes 26 Using Tracks 28 Using BlueChart g2 Vision 30 Navigating with a Garmin Autopilot 30 Viewing Information 31 Viewing a Compass 31 Viewing Numbers 31 Viewing Trip Information 32 Viewing and Customizing Fuel Gauges ...

Owner's Manual
Page 5
... Contact 63 Viewing the DSC List 63 Receiving Distress Calls 63 Man-Overboard Distress Calls Initiated from a VHF Radio 64 GPSMAP 400/500 Series Owner's Manual Introduction Man-Overboard Distress Calls Initiated from the Chartplotter 64 Position Tracking 64 Placing an Individual Routine Call 65 Calling an AIS Target 66 Appendix...
... Contact 63 Viewing the DSC List 63 Receiving Distress Calls 63 Man-Overboard Distress Calls Initiated from a VHF Radio 64 GPSMAP 400/500 Series Owner's Manual Introduction Man-Overboard Distress Calls Initiated from the Chartplotter 64 Position Tracking 64 Placing an Individual Routine Call 65 Calling an AIS Target 66 Appendix...

Owner's Manual
Page 6
For more information go to : www.garmin.com/aboutGarmin/environment/disposal.html. To view the full Declaration of Conformity, go to www.garmin.com/compliance. by completing our online registration today. iv GPSMAP 400/500 Series Owner's Manual Product Registration Help us better support you... have any questions while using your unit. In the UK, contact Garmin (Europe) Ltd. In Europe, go to www.garmin.com/support and click Contact Support for product warnings...
For more information go to : www.garmin.com/aboutGarmin/environment/disposal.html. To view the full Declaration of Conformity, go to www.garmin.com/compliance. by completing our online registration today. iv GPSMAP 400/500 Series Owner's Manual Product Registration Help us better support you... have any questions while using your unit. In the UK, contact Garmin (Europe) Ltd. In Europe, go to www.garmin.com/support and click Contact Support for product warnings...

Owner's Manual
Page 7
Unit Overview GPSMAP 526/556 Getting Started NMEA 2000® Power/Data External GPS antenna GPSMAP 421/451/ 521/551 Power/Data NMEA 2000 GPSMAP 400/500 Series Owner's Manual External GPS antenna Getting Started POWER/ BACKLIGHT RANGE (-/+) ROCKER MARK SELECT MENU HOME SD card slot GPSMAP 526 shown 1
Unit Overview GPSMAP 526/556 Getting Started NMEA 2000® Power/Data External GPS antenna GPSMAP 421/451/ 521/551 Power/Data NMEA 2000 GPSMAP 400/500 Series Owner's Manual External GPS antenna Getting Started POWER/ BACKLIGHT RANGE (-/+) ROCKER MARK SELECT MENU HOME SD card slot GPSMAP 526 shown 1

Owner's Manual
Page 8
... available if you want the time shown in a 12‑hour, 24‑hour, or UTC (Universal Time Coordinated) format. 2 GPSMAP 400/500 Series Owner's Manual Getting Started Turning the Unit On or Off To turn off the unit, press and hold the Power key. When the Warning screen appears, select...
... available if you want the time shown in a 12‑hour, 24‑hour, or UTC (Universal Time Coordinated) format. 2 GPSMAP 400/500 Series Owner's Manual Getting Started Turning the Unit On or Off To turn off the unit, press and hold the Power key. When the Warning screen appears, select...
Owner's Manual
Page 9
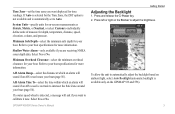
... the Safe Zone around your boat. Refer to your boat specifications for your boat (page 56). Select Yes or No. GPSMAP 400/500 Series Owner's Manual Getting Started Adjusting the Backlight 1. Press left or right on the Rocker to automatically adjust the backlight based on ambient light, select Auto Backlight (automatic...
... the Safe Zone around your boat. Refer to your boat specifications for your boat (page 56). Select Yes or No. GPSMAP 400/500 Series Owner's Manual Getting Started Adjusting the Backlight 1. Press left or right on the Rocker to automatically adjust the backlight based on ambient light, select Auto Backlight (automatic...

Owner's Manual
Page 10
... the unit on the Rocker to switch between Day and Night mode: 1. Press to zoom in or out on lists. GPSMAP 400/500 Series Owner's Manual RANGE (-/+)-Press to adjust the backlight and the day and night modes. Select Color Mode. 3. Press to page up , down on a chart. Press and release...
... the unit on the Rocker to switch between Day and Night mode: 1. Press to zoom in or out on lists. GPSMAP 400/500 Series Owner's Manual RANGE (-/+)-Press to adjust the backlight and the day and night modes. Select Color Mode. 3. Press to page up , down on a chart. Press and release...

Owner's Manual
Page 11
...signals. Insert optional BlueChart® g2 Vision® SD cards to set speed, track control, and position. Press to return to another compatible Garmin unit or a computer (page 40). Use SD cards to transfer data such as waypoints, routes, and tracks to the previous screen when indicated.... The SD card slot is turned off for use indoors or for practice. GPSMAP 400/500 Series Owner's Manual 5 Getting Started To turn on Simulator mode: 1. Any satellite signal-strength bars shown are green . Inserting and Removing SD Cards Your ...
...signals. Insert optional BlueChart® g2 Vision® SD cards to set speed, track control, and position. Press to return to another compatible Garmin unit or a computer (page 40). Use SD cards to transfer data such as waypoints, routes, and tracks to the previous screen when indicated.... The SD card slot is turned off for use indoors or for practice. GPSMAP 400/500 Series Owner's Manual 5 Getting Started To turn on Simulator mode: 1. Any satellite signal-strength bars shown are green . Inserting and Removing SD Cards Your ...

Owner's Manual
Page 12
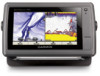
...the Home Screen Use the Home screen to the most-current version by clicking Help > Check for Software Updates, or check the Garmin Web site at www.garmin.com. Press HOME from MapSource® or HomePort™, update to access all other vessels (page 31). • Configure-access... unit and system settings (page 48). 6 GPSMAP 400/500 Series Owner's Manual Fishing charts are available only if you use a BlueChart g2 Vision SD ...
...the Home Screen Use the Home screen to the most-current version by clicking Help > Check for Software Updates, or check the Garmin Web site at www.garmin.com. Press HOME from MapSource® or HomePort™, update to access all other vessels (page 31). • Configure-access... unit and system settings (page 48). 6 GPSMAP 400/500 Series Owner's Manual Fishing charts are available only if you use a BlueChart g2 Vision SD ...

Owner's Manual
Page 13
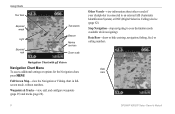
The BlueChart g2 Vision Mariner's Eye 3D is more detailed than the preloaded data. GPSMAP 400/500 Series Owner's Manual 7 This chart works well for either the USA shoreline or a specific country. • Navigation Chart-displays all relevant navigation data available on the chart. To ...
The BlueChart g2 Vision Mariner's Eye 3D is more detailed than the preloaded data. GPSMAP 400/500 Series Owner's Manual 7 This chart works well for either the USA shoreline or a specific country. • Navigation Chart-displays all relevant navigation data available on the chart. To ...
Owner's Manual
Page 14
..., fuel, or sailing numbers. Full Screen Map-view the Navigation or Fishing chart in fullscreen mode, without numbers. Data bars 8 GPSMAP 400/500 Series Owner's Manual
..., fuel, or sailing numbers. Full Screen Map-view the Navigation or Fishing chart in fullscreen mode, without numbers. Data bars 8 GPSMAP 400/500 Series Owner's Manual

Owner's Manual
Page 15
... displays Wind VMG when you turn the GPS Speed, GPS Heading, Depth, and GPS Position data bar on or off. GPSMAP 400/500 Series Owner's Manual 9 Select Data Bar Setup to choose different data to show on the cruising data bar. • Fishing-turn the Depth, Water Temperature, and Water Speed...
... displays Wind VMG when you turn the GPS Speed, GPS Heading, Depth, and GPS Position data bar on or off. GPSMAP 400/500 Series Owner's Manual 9 Select Data Bar Setup to choose different data to show on the cruising data bar. • Fishing-turn the Depth, Water Temperature, and Water Speed...

Owner's Manual
Page 16
... other areas on the Navigation chart. To pan the map, press up, down, right, or left on the map. 10 GPSMAP 400/500 Series Owner's Manual Select Navigate To. 6. The bar under the number represents that distance on the Rocker. Navigating to a Point on the chart to select the point on...
... other areas on the Navigation chart. To pan the map, press up, down, right, or left on the map. 10 GPSMAP 400/500 Series Owner's Manual Select Navigate To. 6. The bar under the number represents that distance on the Rocker. Navigating to a Point on the chart to select the point on...


