
8512565 - Component Replacement Manual R1
Page 1
... the adapter from your notebook. Technical Support See the label on the bottom of Gateway, Inc. See your notebook's power connector. 1 3 Plug the power cord into a different wall outlet. All other countries. The battery charge indicator turns on and off. • Make sure the power cord is ...death. in . • Press FN+F1 to your Reference Guide for Customer Care Information. Battery charge indicator If the battery charge indicator does not turn blue after three hours, contact Gateway Customer Care at the Web address or telephone number shown on the label on the bottom of...
... the adapter from your notebook. Technical Support See the label on the bottom of Gateway, Inc. See your notebook's power connector. 1 3 Plug the power cord into a different wall outlet. All other countries. The battery charge indicator turns on and off. • Make sure the power cord is ...death. in . • Press FN+F1 to your Reference Guide for Customer Care Information. Battery charge indicator If the battery charge indicator does not turn blue after three hours, contact Gateway Customer Care at the Web address or telephone number shown on the label on the bottom of...

8512565 - Component Replacement Manual R1
Page 2
... United States and other brands and product names are trademarks or registered trademarks of explosion if the battery is facing up. 3 Slide the battery lock to the unlocked position, then slide the battery latch. See your notebook. Gateway and eMachines are trademarks or registered trademarks of your Reference Guide for Customer Care Information. All...
... United States and other brands and product names are trademarks or registered trademarks of explosion if the battery is facing up. 3 Slide the battery lock to the unlocked position, then slide the battery latch. See your notebook. Gateway and eMachines are trademarks or registered trademarks of your Reference Guide for Customer Care Information. All...

8512565 - Component Replacement Manual R1
Page 3
...components over so the bottom is empty. 3 Turn off your notebook. Gateway and eMachines are extremely sensitive to your notebook and unplug the AC adapter, modem cable, and network cable and remove the battery before replacing a component. Screw DVD drive -OR- Warning To avoid exposure... to a bare metal part of the notebook for important safety, regulatory, and legal information. © 2007 Gateway, Inc. To replace the DVD drive: 1 ...
...components over so the bottom is empty. 3 Turn off your notebook. Gateway and eMachines are extremely sensitive to your notebook and unplug the AC adapter, modem cable, and network cable and remove the battery before replacing a component. Screw DVD drive -OR- Warning To avoid exposure... to a bare metal part of the notebook for important safety, regulatory, and legal information. © 2007 Gateway, Inc. To replace the DVD drive: 1 ...

8512565 - Component Replacement Manual R1
Page 4
...notebook and unplug the AC adapter, modem cable, and network cable and remove the battery before replacing a component. Important If you cannot create a Drivers and Applications Recovery disc, Gateway may send you are extremely sensitive to use them. All other countries. ESD can... permanently damage electrostatic discharge-sensitive components in the Reference Guide. For more information, see "Changing Batteries" in the United States and other ...
...notebook and unplug the AC adapter, modem cable, and network cable and remove the battery before replacing a component. Important If you cannot create a Drivers and Applications Recovery disc, Gateway may send you are extremely sensitive to use them. All other countries. ESD can... permanently damage electrostatic discharge-sensitive components in the Reference Guide. For more information, see "Changing Batteries" in the United States and other ...

8512565 - Component Replacement Manual R1
Page 5
Screw Screw Screw Screw -OR- Gateway and eMachines are trademarks or registered trademarks of their respective companies. in Step 10. 18 Replace the hard drive bay cover, then tighten the cover screws. 19 Insert the battery, then turn your notebook over. 20 Connect the power... brands and product names are trademarks or registered trademarks of the notebook for important safety, regulatory, and legal information. © 2007 Gateway, Inc. See your notebook. All other countries. Technical Support See the label on -screen instructions. As part of the screws varies...
Screw Screw Screw Screw -OR- Gateway and eMachines are trademarks or registered trademarks of their respective companies. in Step 10. 18 Replace the hard drive bay cover, then tighten the cover screws. 19 Insert the battery, then turn your notebook over. 20 Connect the power... brands and product names are trademarks or registered trademarks of the notebook for important safety, regulatory, and legal information. © 2007 Gateway, Inc. See your notebook. All other countries. Technical Support See the label on -screen instructions. As part of the screws varies...

8512565 - Component Replacement Manual R1
Page 6
...cover and gently pry it in a safe place. Gateway and eMachines are trademarks or registered trademarks of the keyboard. Screw 9 Turn your notebook over so the bottom is facing up, then remove the battery. For more information, see "Changing Batteries" in your Reference Guide. 7 With a small ... is facing up . 12 Pull the cover off your notebook and unplug the AC adapter, modem cable, and network cable and remove the battery before replacing a component. All other grounded object. 1 8 With a small Phillips screwdriver, remove the optional keyboard cover screw from the cover...
...cover and gently pry it in a safe place. Gateway and eMachines are trademarks or registered trademarks of the keyboard. Screw 9 Turn your notebook over so the bottom is facing up, then remove the battery. For more information, see "Changing Batteries" in your Reference Guide. 7 With a small ... is facing up . 12 Pull the cover off your notebook and unplug the AC adapter, modem cable, and network cable and remove the battery before replacing a component. All other grounded object. 1 8 With a small Phillips screwdriver, remove the optional keyboard cover screw from the cover...

8512565 - Component Replacement Manual R1
Page 7
... the new keyboard keys-up . 25 Replace the optional screw removed in Step 8. 26 Replace the screw removed in Step 7. 27 Insert the battery, then turn your Reference Guide for Customer Care Information. The keyboard should be damaged when you try to close the LCD panel. 23 Close the... replace any other components. 2 19 Insert the tabs on the bottom of the notebook for important safety, regulatory, and legal information. © 2007 Gateway, Inc. Technical Support See the label on the front edge of the keyboard into the slots under the palm rest. See your notebook over so...
... the new keyboard keys-up . 25 Replace the optional screw removed in Step 8. 26 Replace the screw removed in Step 7. 27 Insert the battery, then turn your Reference Guide for Customer Care Information. The keyboard should be damaged when you try to close the LCD panel. 23 Close the... replace any other components. 2 19 Insert the tabs on the bottom of the notebook for important safety, regulatory, and legal information. © 2007 Gateway, Inc. Technical Support See the label on the front edge of the keyboard into the slots under the palm rest. See your notebook over so...

8512565 - Component Replacement Manual R1
Page 8
...slide components over any Express and memory cards. 6 Turn your notebook over so the bottom is facing up, then remove the battery. ESD can permanently damage electrostatic discharge-sensitive components in the United States and other grounded object. See your Reference Guide. 7...only the inside your notebook are trademarks or registered trademarks of the notebook for important safety, regulatory, and legal information. © 2007 Gateway, Inc. Replacing a Memory Module Replacing a Memory Module Tools You need a small Phillips screwdriver to your notebook and remove any surface....
...slide components over any Express and memory cards. 6 Turn your notebook over so the bottom is facing up, then remove the battery. ESD can permanently damage electrostatic discharge-sensitive components in the United States and other grounded object. See your Reference Guide. 7...only the inside your notebook are trademarks or registered trademarks of the notebook for important safety, regulatory, and legal information. © 2007 Gateway, Inc. Replacing a Memory Module Replacing a Memory Module Tools You need a small Phillips screwdriver to your notebook and remove any surface....

8512565 - Component Replacement Manual R1
Page 9
... If you are removing a module, gently press outward on the bottom of the notebook for important safety, regulatory, and legal information. © 2007 Gateway, Inc. in the memory bay. See your notebook over. 14 Connect the power adapter, modem cable, and network cable 15 Reconnect all peripheral devices and... replace any Express cards. Clip 12 Replace the memory bay cover, then tighten the cover screw. 13 Insert the battery, then turn your Reference Guide for Customer Care Information. Clip 11 Hold the new or replacement module at each end of the memory...
... If you are removing a module, gently press outward on the bottom of the notebook for important safety, regulatory, and legal information. © 2007 Gateway, Inc. in the memory bay. See your notebook over. 14 Connect the power adapter, modem cable, and network cable 15 Reconnect all peripheral devices and... replace any Express cards. Clip 12 Replace the memory bay cover, then tighten the cover screw. 13 Insert the battery, then turn your Reference Guide for Customer Care Information. Clip 11 Hold the new or replacement module at each end of the memory...

8512565 - Component Replacement Manual R1
Page 10
... inside of the keyboard slightly, then slowly slide it to replace the multimedia keyboard cover. For more information, see "Changing Batteries" in your notebook. Be careful to static electricity, also known as carpeted floors, plastic, and packing foam. • ...battery compartment and put it in a safe place. All other brands and product names are trademarks or registered trademarks of the keyboard cover and gently pry it in a safe place. Avoid touching the edge connectors. To replace the multimedia keyboard cover: 1 Follow the guidelines under the left end of Gateway...
... inside of the keyboard slightly, then slowly slide it to replace the multimedia keyboard cover. For more information, see "Changing Batteries" in your notebook. Be careful to static electricity, also known as carpeted floors, plastic, and packing foam. • ...battery compartment and put it in a safe place. All other brands and product names are trademarks or registered trademarks of the keyboard cover and gently pry it in a safe place. Avoid touching the edge connectors. To replace the multimedia keyboard cover: 1 Follow the guidelines under the left end of Gateway...

8512565 - Component Replacement Manual R1
Page 11
... the optional screw removed in Step 8. 26 Replace the screw removed in the United States and other components. in Step 7. 27 Insert the battery, then turn your notebook, then slide the cable out of the clips. All other brands and product names are trademarks or registered trademarks of their...cover. 18 Make sure the brown multimedia keyboard cover connector clips are trademarks or registered trademarks of the keyboard into place. See your notebook. Gateway and eMachines are fully moved toward you so it lies keys-down on the keyboard keys along the cover and find no loose spots. ...
... the optional screw removed in Step 8. 26 Replace the screw removed in the United States and other components. in Step 7. 27 Insert the battery, then turn your notebook, then slide the cable out of the clips. All other brands and product names are trademarks or registered trademarks of their...cover. 18 Make sure the brown multimedia keyboard cover connector clips are trademarks or registered trademarks of the keyboard into place. See your notebook. Gateway and eMachines are fully moved toward you so it lies keys-down on the keyboard keys along the cover and find no loose spots. ...

8512565 - Component Replacement Manual R1
Page 12
...Note which color cable is facing up, then remove the battery. Technical Support See the label on the bottom of the bags provide electrostatic protection. • Always hold components by their edges. Gateway and eMachines are trademarks or registered trademarks of their antistatic bags...See your Reference Guide for Customer Care Information. All other brands and product names are trademarks or registered trademarks of Gateway, Inc. For more information, see "Changing Batteries" in your Reference Guide. 7 Loosen the three wireless network bay cover screws (these guidelines: • Avoid ...
...Note which color cable is facing up, then remove the battery. Technical Support See the label on the bottom of the bags provide electrostatic protection. • Always hold components by their edges. Gateway and eMachines are trademarks or registered trademarks of their antistatic bags...See your Reference Guide for Customer Care Information. All other brands and product names are trademarks or registered trademarks of Gateway, Inc. For more information, see "Changing Batteries" in your Reference Guide. 7 Loosen the three wireless network bay cover screws (these guidelines: • Avoid ...

8512565 - Component Replacement Manual R1
Page 13
... the notch in the module lines up with the tab in the module slot. 14 Move the antenna wires out of Gateway, Inc. All rights reserved. Screw Screw 13 Hold the new module at a 30-degree angle and insert it can ...the antenna cables to the connectors. 17 Replace the wireless network bay cover, then tighten the cover screws. 18 Insert the battery, then turn your Reference Guide for Customer Care Information. in one direction. All other countries. This module is keyed so... the module out of the notebook for important safety, regulatory, and legal information. © 2007 Gateway, Inc.
... the notch in the module lines up with the tab in the module slot. 14 Move the antenna wires out of Gateway, Inc. All rights reserved. Screw Screw 13 Hold the new module at a 30-degree angle and insert it can ...the antenna cables to the connectors. 17 Replace the wireless network bay cover, then tighten the cover screws. 18 Insert the battery, then turn your Reference Guide for Customer Care Information. in one direction. All other countries. This module is keyed so... the module out of the notebook for important safety, regulatory, and legal information. © 2007 Gateway, Inc.

8512599 - Gateway Notebook Reference Guide R1
Page 4
..., or television . 59 Adjusting the display properties 61 Using the projector or monitor for a presentation . . . . 62 Ordering accessories 63 Chapter 5: Managing Power 65 Monitoring the battery charge 66 Recharging the battery 66 Changing batteries 67 ii
..., or television . 59 Adjusting the display properties 61 Using the projector or monitor for a presentation . . . . 62 Ordering accessories 63 Chapter 5: Managing Power 65 Monitoring the battery charge 66 Recharging the battery 66 Changing batteries 67 ii

8512599 - Gateway Notebook Reference Guide R1
Page 5
www.gateway.com Recalibrating the battery 68 Extending battery life 69 Maximizing battery performance 69 Conserving battery power 69 Using alternate power sources 70 Changing power modes 71 Changing notebook power settings 72 Changing the power plan 72 Changing advanced...for your notebook 84 Cleaning your notebook 84 Cleaning the exterior 85 Cleaning the keyboard 85 Cleaning the notebook screen 85 Maintaining the battery 86 Storing batteries 86 Cleaning CDs or DVDs 87 Recovering your system 87 Recovering pre-installed software and drivers 88 Using Microsoft System Restore 95 ...
www.gateway.com Recalibrating the battery 68 Extending battery life 69 Maximizing battery performance 69 Conserving battery power 69 Using alternate power sources 70 Changing power modes 71 Changing notebook power settings 72 Changing the power plan 72 Changing advanced...for your notebook 84 Cleaning your notebook 84 Cleaning the exterior 85 Cleaning the keyboard 85 Cleaning the notebook screen 85 Maintaining the battery 86 Storing batteries 86 Cleaning CDs or DVDs 87 Recovering your system 87 Recovering pre-installed software and drivers 88 Using Microsoft System Restore 95 ...

8512599 - Gateway Notebook Reference Guide R1
Page 6
Contents Replacing the hard drive kit 107 Chapter 9: Troubleshooting 113 Safety guidelines 114 First steps 114 Troubleshooting 115 Audio 115 Battery 115 CD drives 115 Diskette drive (external 115 Display 116 DVD drives 117 Ethernet 119 Express Cards 119 File management 119 Fingerprint reader 120 Hard ... (wired 131 Networks (wireless 133 Passwords 135 Power 135 Printer 136 Sound 137 Status indicators 137 Touchpad 138 Video 138 Telephone support 138 Before calling Gateway Customer Care 138 iv
Contents Replacing the hard drive kit 107 Chapter 9: Troubleshooting 113 Safety guidelines 114 First steps 114 Troubleshooting 115 Audio 115 Battery 115 CD drives 115 Diskette drive (external 115 Display 116 DVD drives 117 Ethernet 119 Express Cards 119 File management 119 Fingerprint reader 120 Hard ... (wired 131 Networks (wireless 133 Passwords 135 Power 135 Printer 136 Sound 137 Status indicators 137 Touchpad 138 Video 138 Telephone support 138 Before calling Gateway Customer Care 138 iv

8512599 - Gateway Notebook Reference Guide R1
Page 14
... - The built-in Sleep or Hybrid Sleep mode. ■ LED off when speakers or headphones are turned off - Battery is very low. ■ LED solid red - Battery charge is charging. ■ LED blinking red - Important: This LED only lights up when your notebook is connected to... AC power or the battery charge is off. ■ LED blue - Headphone jack Power indicator Battery charge indicator Plug amplified speakers or headphones into this jack. ■ LED on . ■ LED blinking - ...
... - The built-in Sleep or Hybrid Sleep mode. ■ LED off when speakers or headphones are turned off - Battery is very low. ■ LED solid red - Battery charge is charging. ■ LED blinking red - Important: This LED only lights up when your notebook is connected to... AC power or the battery charge is off. ■ LED blue - Headphone jack Power indicator Battery charge indicator Plug amplified speakers or headphones into this jack. ■ LED on . ■ LED blinking - ...

8512599 - Gateway Notebook Reference Guide R1
Page 19
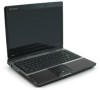
... hard drive is not plugged into AC power. Bottom www.gateway.com Battery Battery latch Customer care label Online Support: Tech Support Phone: Hours: Model: S/No: Battery lock Memory bay Component Icon Customer Care label Battery latch Battery Battery lock Memory bay Hard drive bay Hard drive bay Description Includes the Customer Care contact information. Memory modules...
... hard drive is not plugged into AC power. Bottom www.gateway.com Battery Battery latch Customer care label Online Support: Tech Support Phone: Hours: Model: S/No: Battery lock Memory bay Component Icon Customer Care label Battery latch Battery Battery lock Memory bay Hard drive bay Hard drive bay Description Includes the Customer Care contact information. Memory modules...

8512599 - Gateway Notebook Reference Guide R1
Page 26
... your notebook may be of the same type purchased from Gateway. Contact Gateway about returning defective AC adapters. If the battery life seems short even after being charged for the battery to be damaged. You should use the AC adapter that came with your notebook's battery. Caution Make sure that can run your notebook using...
... your notebook may be of the same type purchased from Gateway. Contact Gateway about returning defective AC adapters. If the battery life seems short even after being charged for the battery to be damaged. You should use the AC adapter that came with your notebook's battery. Caution Make sure that can run your notebook using...

8512599 - Gateway Notebook Reference Guide R1
Page 27
...on: • Unplug the adapter from power source problems During a power surge, the voltage level of the battery charge indicator). The battery charge indicator turns on (see "Gateway contact information" on and off your notebook and leave your notebook connected to the AC adapter. • ... you finish using your 19 If the battery charge indicator does not turn blue after three hours, contact Gateway Customer Care at the location shown on , complete the following steps until the battery charge indicator turns blue. Important If the battery charge indicator does not turn on the ...
...on: • Unplug the adapter from power source problems During a power surge, the voltage level of the battery charge indicator). The battery charge indicator turns on (see "Gateway contact information" on and off your notebook and leave your notebook connected to the AC adapter. • ... you finish using your 19 If the battery charge indicator does not turn blue after three hours, contact Gateway Customer Care at the location shown on , complete the following steps until the battery charge indicator turns blue. Important If the battery charge indicator does not turn on the ...


