
8511264 - User Guide Gateway Computer
Page 141
...keep the vents free of your notebook and other peripherals before cleaning any components. www.gateway.com Protecting your notebook from viruses Warning When you shut down . Cleaning the exterior ...notebook from the wall outlets. Cleaning the notebook screen Use a soft cloth and water to replace it again. Also, remove the battery(ies) before trying to protect your notebook turned ..., then let the keyboard dry before cleaning any water into the vents. Caution A notebook LCD screen is cooled by abrasive or ammonia-based glass cleaners. To avoid possible injury from electrical...
...keep the vents free of your notebook and other peripherals before cleaning any components. www.gateway.com Protecting your notebook from viruses Warning When you shut down . Cleaning the exterior ...notebook from the wall outlets. Cleaning the notebook screen Use a soft cloth and water to replace it again. Also, remove the battery(ies) before trying to protect your notebook turned ..., then let the keyboard dry before cleaning any water into the vents. Caution A notebook LCD screen is cooled by abrasive or ammonia-based glass cleaners. To avoid possible injury from electrical...

8511264 - User Guide Gateway Computer
Page 158
...or shelves. For instructions on changing the display settings, see "Adjusting the screen and desktop settings" on page 119. Gateway's inspection standards keep these pixels are using is IBM-compatible. Press FN + F4 several times to an external monitor ... The text on the display is dim or difficult to identify whether a repair or replacement is justified based on the diskette. CHAPTER 14: Troubleshooting www.gateway.com You see a "Disk is full" error message ■ Delete unnecessary files ...modes" on page 136. The screen is not in active-matrix LCD screens.
...or shelves. For instructions on changing the display settings, see "Adjusting the screen and desktop settings" on page 119. Gateway's inspection standards keep these pixels are using is IBM-compatible. Press FN + F4 several times to an external monitor ... The text on the display is dim or difficult to identify whether a repair or replacement is justified based on the diskette. CHAPTER 14: Troubleshooting www.gateway.com You see a "Disk is full" error message ■ Delete unnecessary files ...modes" on page 136. The screen is not in active-matrix LCD screens.
8511340 - Gateway Notebook Hardware Reference
Page 37
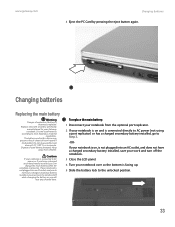
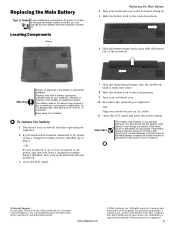
...connected to the unlocked position. 33 Discard used battery promptly. Dispose of explosion if battery is turned on. To replace the main battery: 1 Disconnect your notebook from children. If your Gateway notebook. Do not disassemble, heat above 212°F (100°C), or incinerate. If your notebook is on...into an AC outlet, and does not have a charged secondary battery installed, save your work and turn the notebook off the notebook. 3 Close the LCD panel. 4 Turn your notebook is on , is facing up. 5 Slide the battery lock to AC power, or if you have a charged secondary...
...connected to the unlocked position. 33 Discard used battery promptly. Dispose of explosion if battery is turned on. To replace the main battery: 1 Disconnect your notebook from children. If your Gateway notebook. Do not disassemble, heat above 212°F (100°C), or incinerate. If your notebook is on...into an AC outlet, and does not have a charged secondary battery installed, save your work and turn the notebook off the notebook. 3 Close the LCD panel. 4 Turn your notebook is on , is facing up. 5 Slide the battery lock to AC power, or if you have a charged secondary...
8511340 - Gateway Notebook Hardware Reference
Page 38
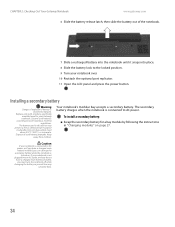
... regulations. Caution If your notebook is incorrectly replaced. Keep away from children. The battery used battery promptly. If your notebook is connected to the locked position. 9 Turn your Gateway notebook. The secondary battery charges when the ...Replace only with a battery specifically manufactured for a bay module by following the instructions in this device may present a fire or chemical burn hazard if mishandled. To install a secondary battery: ■ Swap the secondary battery for your notebook over. 10 Reattach the optional port replicator. 11 Open the LCD...
... regulations. Caution If your notebook is incorrectly replaced. Keep away from children. The battery used battery promptly. If your notebook is connected to the locked position. 9 Turn your Gateway notebook. The secondary battery charges when the ...Replace only with a battery specifically manufactured for a bay module by following the instructions in this device may present a fire or chemical burn hazard if mishandled. To install a secondary battery: ■ Swap the secondary battery for your notebook over. 10 Reattach the optional port replicator. 11 Open the LCD...

8511340 - Gateway Notebook Hardware Reference
Page 49
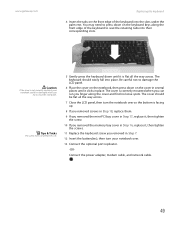
www.gateway.com 9 Remove the two keyboard cover screws. You will help prevent damage to the notebook... 11 Carefully open the LCD panel to the fully opened position. 12 Insert the small flat-blade screwdriver or non-marring tool under the bottom of the keyboard cover and ...gently pry it up . 13 Pull the old cover off the notebook. Replacing the keyboard Screw Screw 10 Insert the small flat-blade screwdriver or non-marring tool under the right end of the keyboard cover over each LCD panel hinge and gently pry it up . Tips & Tricks Inserting a piece of...
www.gateway.com 9 Remove the two keyboard cover screws. You will help prevent damage to the notebook... 11 Carefully open the LCD panel to the fully opened position. 12 Insert the small flat-blade screwdriver or non-marring tool under the bottom of the keyboard cover and ...gently pry it up . 13 Pull the old cover off the notebook. Replacing the keyboard Screw Screw 10 Insert the small flat-blade screwdriver or non-marring tool under the right end of the keyboard cover over each LCD panel hinge and gently pry it up . Tips & Tricks Inserting a piece of...

8511340 - Gateway Notebook Hardware Reference
Page 51
Replacing the keyboard Screw Screw 19 Turn your notebook. 47 Be careful not to release the keyboard retaining tabs. www.gateway.com Important Depending on top of your notebook over so the top is facing up, then open the LCD panel to the fully opened position. 20 With the back edge of the keyboard raised, carefully push it toward the LCD panel to damage the LCD panel. 21 Rotate the keyboard toward you so it lies keys-down on the keyboard features, one of both of these screws may be absent. 18 Remove the two optional keyboard screws.
Replacing the keyboard Screw Screw 19 Turn your notebook. 47 Be careful not to release the keyboard retaining tabs. www.gateway.com Important Depending on top of your notebook over so the top is facing up, then open the LCD panel to the fully opened position. 20 With the back edge of the keyboard raised, carefully push it toward the LCD panel to damage the LCD panel. 21 Rotate the keyboard toward you so it lies keys-down on the keyboard features, one of both of these screws may be absent. 18 Remove the two optional keyboard screws.
8511340 - Gateway Notebook Hardware Reference
Page 53
...the battery(ies), then turn your notebook could be flat all the way across . 7 Close the LCD panel, then turn the notebook over . 13 Connect the optional port replicator. -OR- www.gateway.com Replacing the keyboard 4 Insert the tabs on the front edge of the keyboard to press down until it ,... then tighten the screws. 11 Replace the keyboard screw you removed in place. You may need to seat the ...
...the battery(ies), then turn your notebook could be flat all the way across . 7 Close the LCD panel, then turn the notebook over . 13 Connect the optional port replicator. -OR- www.gateway.com Replacing the keyboard 4 Insert the tabs on the front edge of the keyboard to press down until it ,... then tighten the screws. 11 Replace the keyboard screw you removed in place. You may need to seat the ...
8511340 - Gateway Notebook Hardware Reference
Page 68
...7 files opening 22, 23 Firewire port 8 Fn key 18, 19 folders opening 22, 23 function keys 18 G Gateway model number 2, 10 serial number 2 Support 3 H hard drive bay 10 indicator 17 installing 27, 41 replacing 41 second hard drive 7, 27 headphone jack 6 hot-swapping 32 I i.Link port 8 IEEE 1394 port 8 indicators...connecting 18 features 18 locating 11 USB port 8 keys application 18 arrow 18 brightness 20 directional 18 Fn 18, 19 function 18 LCD brightness 20 LCD/CRT 19 navigation 18 numeric keypad 18 Standby 19 system 18 system key combinations 19 toggle display 19 Windows 18 L labels Microsoft ...
...7 files opening 22, 23 Firewire port 8 Fn key 18, 19 folders opening 22, 23 function keys 18 G Gateway model number 2, 10 serial number 2 Support 3 H hard drive bay 10 indicator 17 installing 27, 41 replacing 41 second hard drive 7, 27 headphone jack 6 hot-swapping 32 I i.Link port 8 IEEE 1394 port 8 indicators...connecting 18 features 18 locating 11 USB port 8 keys application 18 arrow 18 brightness 20 directional 18 Fn 18, 19 function 18 LCD brightness 20 LCD/CRT 19 navigation 18 numeric keypad 18 Standby 19 system 18 system key combinations 19 toggle display 19 Windows 18 L labels Microsoft ...
8511340 - Gateway Notebook Hardware Reference
Page 69
www.gateway.com Index status indicator 17 system key 18 numeric keypad status indicator 17 using 18 O opening files 22, 23 folders 22, 23 LCD panel 6 notebook 6 programs 22, 23 shortcut menu 22, 23 option bay See bays P PC Card adding 32 eject button 32 inserting ... USB port 8 programs closing unresponsive 16 opening 22, 23 projector port 9 using 19 R RAM See memory rebooting notebook 16 recalibrating battery 35 replacing See installing resetting notebook 16 restarting notebook 16 right-clicking 22 S safety general precautions 52 static electricity 38 scanner USB port 8 screen objects getting...
www.gateway.com Index status indicator 17 system key 18 numeric keypad status indicator 17 using 18 O opening files 22, 23 folders 22, 23 LCD panel 6 notebook 6 programs 22, 23 shortcut menu 22, 23 option bay See bays P PC Card adding 32 eject button 32 inserting ... USB port 8 programs closing unresponsive 16 opening 22, 23 projector port 9 using 19 R RAM See memory rebooting notebook 16 recalibrating battery 35 replacing See installing resetting notebook 16 restarting notebook 16 right-clicking 22 S safety general precautions 52 static electricity 38 scanner USB port 8 screen objects getting...
8511371 - Component Replacement Manual
Page 2
...use the AC adapter right away to you can change the main battery while the notebook is incorrectly replaced. See your notebook is on . Gateway and eMachines are trademarks or registered trademarks of Gateway, Inc. All other countries. The battery used in the United States and other brands and product ...to the unlock position. 6 Slide the battery release latch, then slide the battery out of your notebook into an AC outlet. 11 Open the LCD panel and press the power button. Keep away from the optional port replicator. 2 If your hardware guide for your notebook is connected to AC...
...use the AC adapter right away to you can change the main battery while the notebook is incorrectly replaced. See your notebook is on . Gateway and eMachines are trademarks or registered trademarks of Gateway, Inc. All other countries. The battery used in the United States and other brands and product ...to the unlock position. 6 Slide the battery release latch, then slide the battery out of your notebook into an AC outlet. 11 Open the LCD panel and press the power button. Keep away from the optional port replicator. 2 If your hardware guide for your notebook is connected to AC...
8511371 - Component Replacement Manual
Page 5
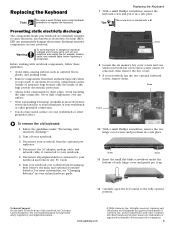
... bay covers. 9 If your hardware guide for Customer Care Information. Tips The screw hole is facing up . 12 Carefully open the LCD panel to replace the keyboard. www.gateway.com © 2006 Gateway, Inc. ESD can permanently damage electrostatic discharge-sensitive components in the United States and other grounded connection. • Touch a bare metal...
... bay covers. 9 If your hardware guide for Customer Care Information. Tips The screw hole is facing up . 12 Carefully open the LCD panel to replace the keyboard. www.gateway.com © 2006 Gateway, Inc. ESD can permanently damage electrostatic discharge-sensitive components in the United States and other grounded connection. • Touch a bare metal...

8511371 - Component Replacement Manual
Page 6
...the front edge of the keyboard into the connectors, then slide the black clips to release the keyboard retaining tabs located on the front of Gateway, Inc. Press down on the cover in several places until it is facing up . The cover is correctly mounted when you can run .... It may be flat all the way across . Be careful not to not damage the LCD panel. 6 Replace the keyboard cover. Important Inserting a piece of the keyboard to close the LCD panel. 7 Close the LCD panel, then replace the two hinge cover screws. 8 Turn your notebook over so the bottom is not twisted....
...the front edge of the keyboard into the connectors, then slide the black clips to release the keyboard retaining tabs located on the front of Gateway, Inc. Press down on the cover in several places until it is facing up . The cover is correctly mounted when you can run .... It may be flat all the way across . Be careful not to not damage the LCD panel. 6 Replace the keyboard cover. Important Inserting a piece of the keyboard to close the LCD panel. 7 Close the LCD panel, then replace the two hinge cover screws. 8 Turn your notebook over so the bottom is not twisted....


