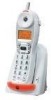

User Guide
Page 7
... a minimum distance of other antenna or transmitter." For body worn operation, this product. This equipment should be co-located or operated in conjunction with this phone has been tested and meets the FCC RF exposure guidelines when used with the belt clip supplied with any other accessories may not ensure compliance...
... a minimum distance of other antenna or transmitter." For body worn operation, this product. This equipment should be co-located or operated in conjunction with this phone has been tested and meets the FCC RF exposure guidelines when used with the belt clip supplied with any other accessories may not ensure compliance...
User Guide
Page 8
... You Begin 11 Parts Checklist 11 Telephone Jack Requirements 12 Installation 12 Digital Security System 12 Important Installation Guidelines 14 Handset Layout 15 Installing the Phone 16 Installing the Handset Battery 16 Base Station 17 Wall Mounting 18 Handset Setup 19 Display Language 19 Local Area Code 19 Ringer Tone 20...
... You Begin 11 Parts Checklist 11 Telephone Jack Requirements 12 Installation 12 Digital Security System 12 Important Installation Guidelines 14 Handset Layout 15 Installing the Phone 16 Installing the Handset Battery 16 Base Station 17 Wall Mounting 18 Handset Setup 19 Display Language 19 Local Area Code 19 Ringer Tone 20...
User Guide
Page 11
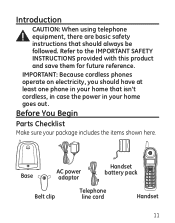
Refer to the IMPORTANT SAFETY INSTRUCTIONS provided with this product and save them for future reference. Before You Begin Parts Checklist Make sure your home goes out. Base AC power adaptor Handset battery pack Belt clip Telephone line cord Handset 11 Introduction CAUTION: When using telephone equipment, there are basic safety instructions that isn't cordless, in case the power in your package includes the items shown here. IMPORTANT: Because cordless phones operate on electricity, you should have at least one phone in your home that should always be followed.
Refer to the IMPORTANT SAFETY INSTRUCTIONS provided with this product and save them for future reference. Before You Begin Parts Checklist Make sure your home goes out. Base AC power adaptor Handset battery pack Belt clip Telephone line cord Handset 11 Introduction CAUTION: When using telephone equipment, there are basic safety instructions that isn't cordless, in case the power in your package includes the items shown here. IMPORTANT: Because cordless phones operate on electricity, you should have at least one phone in your home that should always be followed.
User Guide
Page 12
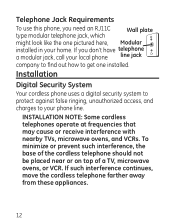
... continues, move the cordless telephone farther away from these appliances. 12 Installation Digital Security System Your cordless phone uses a digital security system to protect against false ringing, unauthorized access, and charges to your local phone line jack company to find out how to get one pictured here, Modular installed in your home...: Some cordless telephones operate at frequencies that may cause or receive interference with nearby TVs, microwave ovens, and VCRs. Telephone Jack Requirements To use this phone, you don't have telephone a modular jack, call your...
... continues, move the cordless telephone farther away from these appliances. 12 Installation Digital Security System Your cordless phone uses a digital security system to protect against false ringing, unauthorized access, and charges to your local phone line jack company to find out how to get one pictured here, Modular installed in your home...: Some cordless telephones operate at frequencies that may cause or receive interference with nearby TVs, microwave ovens, and VCRs. Telephone Jack Requirements To use this phone, you don't have telephone a modular jack, call your...

User Guide
Page 16
... the risk of the handset. 3. approved Nickel-Cadmium (Ni-Cd) battery model 5-2459 that is keyed and can be inserted only one way. Installing the Phone Installing the Handset Battery NOTE: You must connect the handset battery before use only the Thomson Inc. Plug the battery pack cord into the jack...
... the risk of the handset. 3. approved Nickel-Cadmium (Ni-Cd) battery model 5-2459 that is keyed and can be inserted only one way. Installing the Phone Installing the Handset Battery NOTE: You must connect the handset battery before use only the Thomson Inc. Plug the battery pack cord into the jack...

User Guide
Page 18
... wall plate posts, and slide the unit down into place. (Wall plate not included.) 18 Using other power adaptors may damage the unit. Allow the phone to charge for 16 hours prior to register and verify its security code. 6. If you want to ON, and place the handset in use . Wall... Mounting If you don't properly charge the phone, battery performance is charging. The charge/in the cradle on the base. 5. CAUTION: Use only the 5-2617 (gray) power adaptor that came with this unit...
... wall plate posts, and slide the unit down into place. (Wall plate not included.) 18 Using other power adaptors may damage the unit. Allow the phone to charge for 16 hours prior to register and verify its security code. 6. If you want to ON, and place the handset in use . Wall... Mounting If you don't properly charge the phone, battery performance is charging. The charge/in the cradle on the base. 5. CAUTION: Use only the 5-2617 (gray) power adaptor that came with this unit...
User Guide
Page 19
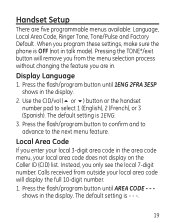
... you only see the local 7-digit number. Calls received from the menu selection process without changing the feature you program these settings, make sure the phone is OFF (not in the display. Press the flash/program button until AREA CODE - - - Press the flash/program button to confirm and to advance to...
... you only see the local 7-digit number. Calls received from the menu selection process without changing the feature you program these settings, make sure the phone is OFF (not in the display. Press the flash/program button until AREA CODE - - - Press the flash/program button to confirm and to advance to...
User Guide
Page 21
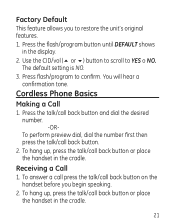
... handset before you to restore the unit's original features. 1. Use the CID/vol (5 or 6) button to scroll to confirm. The default setting is NO. 3. Cordless Phone Basics Making a Call 1. To answer a call press the talk/call back button or place the handset in the cradle. To hang up , press the talk...
... handset before you to restore the unit's original features. 1. Use the CID/vol (5 or 6) button to scroll to confirm. The default setting is NO. 3. Cordless Phone Basics Making a Call 1. To answer a call press the talk/call back button or place the handset in the cradle. To hang up , press the talk...
User Guide
Page 22
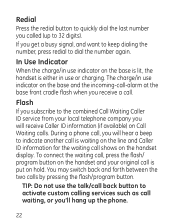
... get a busy signal, and want to keep dialing the number, press redial to 32 digits). During a phone call, you receive a call shows on the handset and your local telephone company you called (up the phone. 22 TIP: Do not use or charging. You may switch back and forth between the two calls...
... get a busy signal, and want to keep dialing the number, press redial to 32 digits). During a phone call, you receive a call shows on the handset and your local telephone company you called (up the phone. 22 TIP: Do not use or charging. You may switch back and forth between the two calls...
User Guide
Page 23
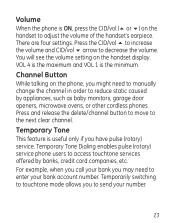
... delete/channel button to move to decrease the volume. Temporary Tone This feature is the minimum. Temporary Tone Dialing enables pulse (rotary) service phone users to reduce static caused by banks, credit card companies, etc. For example, when you call your bank you may need to manually ...change the channel in order to access touchtone services offered by appliances, such as baby monitors, garage door openers, microwave ovens, or other cordless phones. VOL 4 is the maximum and VOL 1 is useful only if you to adjust the volume of the handset's earpiece. Channel Button While talking...
... delete/channel button to move to decrease the volume. Temporary Tone This feature is the minimum. Temporary Tone Dialing enables pulse (rotary) service phone users to reduce static caused by banks, credit card companies, etc. For example, when you call your bank you may need to manually ...change the channel in order to access touchtone services offered by appliances, such as baby monitors, garage door openers, microwave ovens, or other cordless phones. VOL 4 is the maximum and VOL 1 is useful only if you to adjust the volume of the handset's earpiece. Channel Button While talking...

User Guide
Page 24
... setting menu and current setting will hear the confirmation tone. Exit Press the TONE*/exit button to tone dialing. 3. Hang up the handset and the phone automatically returns to connect. 2. Press ringer button to get the information you will show in the display. 24 NOTE: If you initiated. Dial the telephone...
... setting menu and current setting will hear the confirmation tone. Exit Press the TONE*/exit button to tone dialing. 3. Hang up the handset and the phone automatically returns to connect. 2. Press ringer button to get the information you will show in the display. 24 NOTE: If you initiated. Dial the telephone...
User Guide
Page 25
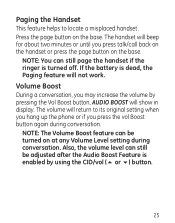
... ringer is dead, the Paging feature will show in display. Paging the Handset This feature helps to its original setting when you hang up the phone or if you press talk/call back on the handset or press the page button on the base. NOTE: The Volume Boost feature can be...
... ringer is dead, the Paging feature will show in display. Paging the Handset This feature helps to its original setting when you hang up the phone or if you press talk/call back on the handset or press the page button on the base. NOTE: The Volume Boost feature can be...
User Guide
Page 26
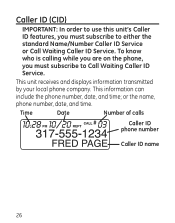
To know who is calling while you are on the phone, you must subscribe to either the standard Name/Number Caller ID Service or Call Waiting Caller ID Service. or the name, phone number, date, and time. This unit receives and displays information transmitted by your local phone company. This information can include the phone number, date, and time; Time Date Number of calls Caller ID phone number Caller ID name 26 Caller ID (CID) IMPORTANT: In order to use this unit's Caller ID features, you must subscribe to Call Waiting Caller ID Service.
To know who is calling while you are on the phone, you must subscribe to either the standard Name/Number Caller ID Service or Call Waiting Caller ID Service. or the name, phone number, date, and time. This unit receives and displays information transmitted by your local phone company. This information can include the phone number, date, and time; Time Date Number of calls Caller ID phone number Caller ID name 26 Caller ID (CID) IMPORTANT: In order to use this unit's Caller ID features, you must subscribe to Call Waiting Caller ID Service.
User Guide
Page 27
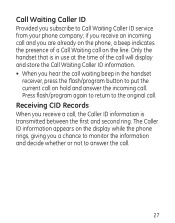
Receiving CID Records When you are already on the phone, a beep indicates the presence of the call will display and store the Call Waiting Caller ID information. • When you ...beep in use at the time of a Call Waiting call on the line. The Caller ID information appears on the display while the phone rings, giving you a chance to monitor the information and decide whether or not to the original call. Press flash/program again to ...the Caller ID information is in the handset receiver, press the flash/program button to Call Waiting Caller ID service from your phone company;
Receiving CID Records When you are already on the phone, a beep indicates the presence of the call will display and store the Call Waiting Caller ID information. • When you ...beep in use at the time of a Call Waiting call on the line. The Caller ID information appears on the display while the phone rings, giving you a chance to monitor the information and decide whether or not to the original call. Press flash/program again to ...the Caller ID information is in the handset receiver, press the flash/program button to Call Waiting Caller ID service from your phone company;
User Guide
Page 28
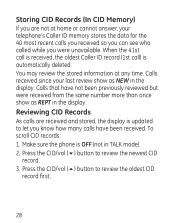
Make sure the phone is automatically deleted. Press the CID/vol (6) button to review the oldest CID record first. 28 Calls that have been received. You may review the ...
Make sure the phone is automatically deleted. Press the CID/vol (6) button to review the oldest CID record first. 28 Calls that have been received. You may review the ...
User Guide
Page 29
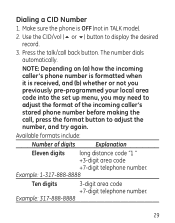
... press the format button to display the desired record. 3. Available formats include: Number of the incoming caller's stored phone number before making the call back button. NOTE: Depending on (a) how the incoming caller's phone number is formatted when it is OFF (not in TALK mode). 2. Use the CID/vol (5 or 6) button ...to adjust the number, and try again. Make sure the phone is received, and (b) whether or not you previously pre-programmed your local area code into the set up menu, you may need to adjust the...
... press the format button to display the desired record. 3. Available formats include: Number of the incoming caller's stored phone number before making the call back button. NOTE: Depending on (a) how the incoming caller's phone number is formatted when it is OFF (not in TALK mode). 2. Use the CID/vol (5 or 6) button ...to adjust the number, and try again. Make sure the phone is received, and (b) whether or not you previously pre-programmed your local area code into the set up menu, you may need to adjust the...

User Guide
Page 30
... reformat CID records stored in memory. 1. Use the touch-tone pad to enter a memory location (0-9) to the desired CID record. 3. is OFF (not in the phone's internal memory. Press the mem button. 4. Example: 888-8888 Storing CID Records in Internal Memory You may also store CID information in TALK mode). 2. NOTE...
... reformat CID records stored in memory. 1. Use the touch-tone pad to enter a memory location (0-9) to the desired CID record. 3. is OFF (not in the phone's internal memory. Press the mem button. 4. Example: 888-8888 Storing CID Records in Internal Memory You may also store CID information in TALK mode). 2. NOTE...
User Guide
Page 31
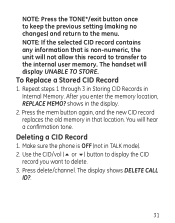
You will display UNABLE TO STORE. Deleting a CID Record 1. Make sure the phone is non-numeric, the unit will not allow this record to transfer to the menu. Press delete/channel. The handset will hear a confirmation tone. After ...
You will display UNABLE TO STORE. Deleting a CID Record 1. Make sure the phone is non-numeric, the unit will not allow this record to transfer to the menu. Press delete/channel. The handset will hear a confirmation tone. After ...
User Guide
Page 32
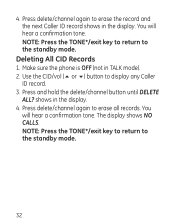
... again to the standby mode. You will hear a confirmation tone. NOTE: Press the TONE*/exit key to return to erase all records. Make sure the phone is OFF (not in the display. 4. Press and hold the delete/channel button until DELETE ALL? Press delete/channel again to erase the record and...
... again to the standby mode. You will hear a confirmation tone. NOTE: Press the TONE*/exit key to return to erase all records. Make sure the phone is OFF (not in the display. 4. Press and hold the delete/channel button until DELETE ALL? Press delete/channel again to erase the record and...
User Guide
Page 33
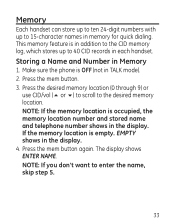
... CID memory log, which stores up to the desired memory location. NOTE: If the memory location is in memory for quick dialing. Make sure the phone is empty. Memory Each handset can store up to ten 24-digit numbers with up to enter the name, skip step 5. 33 Storing a Name and...
... CID memory log, which stores up to the desired memory location. NOTE: If the memory location is in memory for quick dialing. Make sure the phone is empty. Memory Each handset can store up to ten 24-digit numbers with up to enter the name, skip step 5. 33 Storing a Name and...


