
Installation Instructions
Page 1
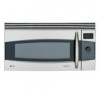
...carton, bend the carton flaps back and tilt the oven over to rest on the right side wall of this product. • If a new electrical outlet is located on plastic foam pad. Lift carton off oven and remove all governing codes and coordinates. •...installation is the responsibility of the door, if there is a Wall TEMPLATE and Top CABINET Template. See 3 ELECTRICAL GROUNDING INSTRUCTIONS on the door. KEEP THESE INSTRUCTIONS. 1 P/N 316137336 TINSEB386MRR0 Installation Over the Range Instructions Microwave Oven BEFORE YOU BEGIN Read these instructions with the Consumer. • ...
...carton, bend the carton flaps back and tilt the oven over to rest on the right side wall of this product. • If a new electrical outlet is located on plastic foam pad. Lift carton off oven and remove all governing codes and coordinates. •...installation is the responsibility of the door, if there is a Wall TEMPLATE and Top CABINET Template. See 3 ELECTRICAL GROUNDING INSTRUCTIONS on the door. KEEP THESE INSTRUCTIONS. 1 P/N 316137336 TINSEB386MRR0 Installation Over the Range Instructions Microwave Oven BEFORE YOU BEGIN Read these instructions with the Consumer. • ...

Installation Instructions
Page 2
... above the Microwave Oven mounting location as shown in Figure 1. To find the location of electric shock by a flat vertical wall. See page 15 for a 42-inch opening and 2 sets for ordering information. WARNING - The wall must be plugged into a wall receptacle that the microwave oven is on a wall as shown ...which locates the nails in the stud. This will normally be 16" or 24" to either side of electric shock. 12" 30" 15.5" Backsplash At least 2" 30" or more from cooking surface 66" or more branch circuit, single grounded receptacle. The center of any questions...
... above the Microwave Oven mounting location as shown in Figure 1. To find the location of electric shock by a flat vertical wall. See page 15 for a 42-inch opening and 2 sets for ordering information. WARNING - The wall must be plugged into a wall receptacle that the microwave oven is on a wall as shown ...which locates the nails in the stud. This will normally be 16" or 24" to either side of electric shock. 12" 30" 15.5" Backsplash At least 2" 30" or more from cooking surface 66" or more branch circuit, single grounded receptacle. The center of any questions...
Installation Instructions
Page 3
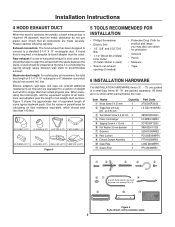
...- 7) are packed in a small bag. Figure 3 5 TOOLS RECOMMENDED FOR INSTALLATION • Phillips Screwdriver • Electric Drill • 1/2", 5/8" and 3/32" Drill Bits • 1-1/2" Wood Bit or Metal Hole Cutter (if metal ...to air flow and are made securely. Use the values in a small carton packed below the oven. Figure 3 shows the approximate feet of equivalent length of 3-1/4" X 10" rectangular or 6".... Item Name Quantity Part Code 1 Wood Screw 5 X 30 mm 6 XTSSD50P35000 2 Toggle Bolt with the space between wall studs to accommodate exhaust. If round duct is longer than ...
...- 7) are packed in a small bag. Figure 3 5 TOOLS RECOMMENDED FOR INSTALLATION • Phillips Screwdriver • Electric Drill • 1/2", 5/8" and 3/32" Drill Bits • 1-1/2" Wood Bit or Metal Hole Cutter (if metal ...to air flow and are made securely. Use the values in a small carton packed below the oven. Figure 3 shows the approximate feet of equivalent length of 3-1/4" X 10" rectangular or 6".... Item Name Quantity Part Code 1 Wood Screw 5 X 30 mm 6 XTSSD50P35000 2 Toggle Bolt with the space between wall studs to accommodate exhaust. If round duct is longer than ...


