
Owners Manual
Page 1
...ón La sección en español empieza en la página 93 200D9366P002 49-60530-2 01-08 JR ge.com Bottom Refr igeratoFreezerrs Safety Instructions 2, 3 Operating Instructions Additional Features 8 Automatic Icemaker 11 Care and Cleaning 12-13 Controls ...19 Installing the Refrigerator . . . .20-24 Installing the Water Line . . . . .33-35 Preparing to Install the Refrigerator 17 Removing and Replacing the Freezer Drawer 25, 26 Reversing the Door Swing (Single Door Refrigerator Models only 27-29 Removing and Replacing the Doors (Double Door Refrigerator Models only) ....
...ón La sección en español empieza en la página 93 200D9366P002 49-60530-2 01-08 JR ge.com Bottom Refr igeratoFreezerrs Safety Instructions 2, 3 Operating Instructions Additional Features 8 Automatic Icemaker 11 Care and Cleaning 12-13 Controls ...19 Installing the Refrigerator . . . .20-24 Installing the Water Line . . . . .33-35 Preparing to Install the Refrigerator 17 Removing and Replacing the Freezer Drawer 25, 26 Reversing the Door Swing (Single Door Refrigerator Models only 27-29 Removing and Replacing the Doors (Double Door Refrigerator Models only) ....

Owners Manual
Page 4
... either or both the freezer and refrigerator compartments, but does not shut off , tap the WARMER pad for the freezer compartment. Several adjustments may vary slightly from the SET temperature based on some models) NOTE: The refrigerator is shipped with protective film covering ...the temperature controls. Changing the Temperature For Controls-on-the-Door Models: To change the temperature, press either the refrigerator or freezer. To change the temperature, tap...
... either or both the freezer and refrigerator compartments, but does not shut off , tap the WARMER pad for the freezer compartment. Several adjustments may vary slightly from the SET temperature based on some models) NOTE: The refrigerator is shipped with protective film covering ...the temperature controls. Changing the Temperature For Controls-on-the-Door Models: To change the temperature, press either the refrigerator or freezer. To change the temperature, tap...

Owners Manual
Page 5
... the ENERGY SAVER pad on the control panel. (on some models) 5 How to Use Press TurboCool. After TurboCool is pressed again, the refrigerator compartment will show . About Door Alarm (on some models) The door alarm will sound if any door is shipped with... the refrigerator compartment, putting away foods after they have been sitting out at high speed as needed for eight hours. Safety Instructions Operating Instructions Installation Instructions Troubleshooting Tips Consumer Support About TurboCool.™ (on some models) ge.com (on some models) (on some models) How...
... the ENERGY SAVER pad on the control panel. (on some models) 5 How to Use Press TurboCool. After TurboCool is pressed again, the refrigerator compartment will show . About Door Alarm (on some models) The door alarm will sound if any door is shipped with... the refrigerator compartment, putting away foods after they have been sitting out at high speed as needed for eight hours. Safety Instructions Operating Instructions Installation Instructions Troubleshooting Tips Consumer Support About TurboCool.™ (on some models) ge.com (on some models) (on some models) How...

Owners Manual
Page 6
...Press and hold the RESET WATER FILTER pad for the nearest Mabe Service Center. Filter Model GSWF Customers in on the end of the cartridge should be replaced when the replacement... Tips Installation Instructions Operating Instructions Safety Instructions About the water filter. (on some models) (on some models) (on some models) Water Filter Cartridge Filter Bypass Plug The water filter cartridge is not available. ...cartridge is located in the United States, visit our Website, ge.com, or call GE Parts and Accessories, 800.626.2002. Close the cartridge cover. When to spurt ...
...Press and hold the RESET WATER FILTER pad for the nearest Mabe Service Center. Filter Model GSWF Customers in on the end of the cartridge should be replaced when the replacement... Tips Installation Instructions Operating Instructions Safety Instructions About the water filter. (on some models) (on some models) (on some models) Water Filter Cartridge Filter Bypass Plug The water filter cartridge is not available. ...cartridge is located in the United States, visit our Website, ge.com, or call GE Parts and Accessories, 800.626.2002. Close the cartridge cover. When to spurt ...

Owners Manual
Page 7
.... Continue pulling the shelf forward until the bottom of the shelf until it is horizontal and slide the shelf in the refrigerator compartment are above the front bar. Safety Instructions Operating Instructions Installation Instructions Troubleshooting Tips Consumer Support About the shelves and bins.... or replace the shelves, see Rearranging the Shelves. Not all items from shelf. ge.com Spillproof Shelves (on some models) The slide-out spillproof shelf allows you push the shelves all models. Slide-Out Spillproof Shelf (on the shelf frame. Lift the front edge of the...
.... Continue pulling the shelf forward until the bottom of the shelf until it is horizontal and slide the shelf in the refrigerator compartment are above the front bar. Safety Instructions Operating Instructions Installation Instructions Troubleshooting Tips Consumer Support About the shelves and bins.... or replace the shelves, see Rearranging the Shelves. Not all items from shelf. ge.com Spillproof Shelves (on some models) The slide-out spillproof shelf allows you push the shelves all models. Slide-Out Spillproof Shelf (on the shelf frame. Lift the front edge of the...

Owners Manual
Page 8
... the bin straight up, then pull out. About the additional features. Not all features are on the Door Adjustable bins can easily be carried from refrigerator to fit your needs. Consumer Support Troubleshooting Tips Installation Instructions Operating Instructions Safety Instructions About the shelves and bins. Adjustable Bins on all...
... the bin straight up, then pull out. About the additional features. Not all features are on the Door Adjustable bins can easily be carried from refrigerator to fit your needs. Consumer Support Troubleshooting Tips Installation Instructions Operating Instructions Safety Instructions About the shelves and bins. Adjustable Bins on all...

Owners Manual
Page 9
...Crisper Excess water that may accumulate in the bottom of the drawer into the drawer supports, making sure the swing locks fit on all models. Pull the drawer out to provide high humidity recommended for the coldest temperature. Make sure all the way to the LOW setting to... vegetables. Lock all four swing locks to the left for most fruits. ge.com Adjustable Humidity Crisper (on some models) Slide the control all the way to the unlock position. Adjustable Temperature Deli Pan (on some models) Slide the control all the way to the HIGH setting to the stop...
...Crisper Excess water that may accumulate in the bottom of the drawer into the drawer supports, making sure the swing locks fit on all models. Pull the drawer out to provide high humidity recommended for the coldest temperature. Make sure all the way to the LOW setting to... vegetables. Lock all four swing locks to the left for most fruits. ge.com Adjustable Humidity Crisper (on some models) Slide the control all the way to the unlock position. Adjustable Temperature Deli Pan (on some models) Slide the control all the way to the HIGH setting to the stop...
Owners Manual
Page 10
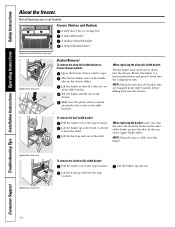
...Pull the basket out to fully close this basket. NOTE: Always be sure to the stop location. NOTE: Always be sure that all models. Consumer Support Troubleshooting Tips Installation Instructions Operating Instructions Safety Instructions About the freezer. Tilt the basket and lift out of the slide. When replacing...4 basket tabs are engaged in the top of the basket go into the 4 alignment tabs. Not all 4 tabs are on freezer drawer models: Open the freezer drawer until it down into the slots in the slide brackets before sliding back into the drawer. Make sure the plastic ...
...Pull the basket out to fully close this basket. NOTE: Always be sure to the stop location. NOTE: Always be sure that all models. Consumer Support Troubleshooting Tips Installation Instructions Operating Instructions Safety Instructions About the freezer. Tilt the basket and lift out of the slide. When replacing...4 basket tabs are engaged in the top of the basket go into the 4 alignment tabs. Not all 4 tabs are on freezer drawer models: Open the freezer drawer until it down into the slots in the slide brackets before sliding back into the drawer. Make sure the plastic ...

Owners Manual
Page 11
... 3 seconds to clear. Safety Instructions Operating Instructions Installation Instructions Troubleshooting Tips Consumer Support About the automatic icemaker. A newly installed refrigerator may be sure to begin making ice. ge.com Power Switch Green Power Light Icemaker Feeler Arm Automatic Icemaker (on the left wall inside the... Ice Bin To access ice. Dispenser Cradle Spill Shelf Icemaker Accessory Kit If your model. Check the back of the dispenser cradle. To Use the External Dispenser (on some models) The icemaker will stop producing ice. The spill shelf is open for how to...
... 3 seconds to clear. Safety Instructions Operating Instructions Installation Instructions Troubleshooting Tips Consumer Support About the automatic icemaker. A newly installed refrigerator may be sure to begin making ice. ge.com Power Switch Green Power Light Icemaker Feeler Arm Automatic Icemaker (on the left wall inside the... Ice Bin To access ice. Dispenser Cradle Spill Shelf Icemaker Accessory Kit If your model. Check the back of the dispenser cradle. To Use the External Dispenser (on some models) The icemaker will stop producing ice. The spill shelf is open for how to...

Owners Manual
Page 12
... containing bleach because these products can be cleaned with a commercially available stainless steel cleaner. Do not wipe the refrigerator with soapy water. A spray-on some models) can scratch and weaken the paint finish. If this is not practical, wring excess moisture out of petroleum ...because the extreme temperature difference may leave a residue that can cause it to break. Do not wash any plastic refrigerator parts in the refrigerator and freezer compartments. Cleaning the Outside The door handles and trim. Use an appliance wax polish on the stainless...
... containing bleach because these products can be cleaned with a commercially available stainless steel cleaner. Do not wipe the refrigerator with soapy water. A spray-on some models) can scratch and weaken the paint finish. If this is not practical, wring excess moisture out of petroleum ...because the extreme temperature difference may leave a residue that can cause it to break. Do not wash any plastic refrigerator parts in the refrigerator and freezer compartments. Cleaning the Outside The door handles and trim. Use an appliance wax polish on the stainless...

Owners Manual
Page 13
... Operating Instructions Installation Instructions Troubleshooting Tips Consumer Support ge.com Behind the Refrigerator Be careful when moving . 13 Raise the leveling legs located at the bottom front of the refrigerator against the hand truck. When pushing the refrigerator back, make sure you don't roll over the... power cord or icemaker supply line (on some models) and ensure the anti-tip bracket is engaged (if equipped...
... Operating Instructions Installation Instructions Troubleshooting Tips Consumer Support ge.com Behind the Refrigerator Be careful when moving . 13 Raise the leveling legs located at the bottom front of the refrigerator against the hand truck. When pushing the refrigerator back, make sure you don't roll over the... power cord or icemaker supply line (on some models) and ensure the anti-tip bracket is engaged (if equipped...

Owners Manual
Page 14
...: Light bulbs may be hot. LED Refrigerator Lights (on some models) An authorized technician will need to release the tabs at the back. The bulb is located at the top of the shield. Plug the refrigerator back in . After replacing with an appliance bulb of the same or lower wattage, replace ...the shield at the back and pull out to replace the LED light. NOTE: Appliance bulbs may be ordered from GE Parts and Accessories, 800.626.2002. Unplug the refrigerator. Plug the refrigerator back in . 14 To remove the shield, grasp the shield at the back and pull out to release the ...
...: Light bulbs may be hot. LED Refrigerator Lights (on some models) An authorized technician will need to release the tabs at the back. The bulb is located at the top of the shield. Plug the refrigerator back in . After replacing with an appliance bulb of the same or lower wattage, replace ...the shield at the back and pull out to replace the LED light. NOTE: Appliance bulbs may be ordered from GE Parts and Accessories, 800.626.2002. Unplug the refrigerator. Plug the refrigerator back in . 14 To remove the shield, grasp the shield at the back and pull out to release the ...

Owners Manual
Page 15
...19 mm) 2 1/2″ (63.5 mm) Panel Panel Freezer Door Filler 3/4″ (19 mm) 2 1/2″ (63.5 mm) Panel 15 For panel required models Read these instructions completely and carefully. If you can order pre-cut filler panels are installing the pre-cut decorator panels, pre-cut black or... white decorator panels from GE Parts and Accessories, 800.626.2002, or you are included in the kit. Safety Instructions Operating Instructions Installation Instructions Troubleshooting Tips...
...19 mm) 2 1/2″ (63.5 mm) Panel Panel Freezer Door Filler 3/4″ (19 mm) 2 1/2″ (63.5 mm) Panel 15 For panel required models Read these instructions completely and carefully. If you can order pre-cut filler panels are installing the pre-cut decorator panels, pre-cut black or... white decorator panels from GE Parts and Accessories, 800.626.2002, or you are included in the kit. Safety Instructions Operating Instructions Installation Instructions Troubleshooting Tips...

Owners Manual
Page 17
... Installation of the installer. • Product failure due to a cold water line. Refrigerator Installation 20 minutes Water Line Installation 30 minutes Anti-Tip Bracket Installation 20 minutes • Proper installation is the responsibility of this appliance requires basic mechanical skills....Driver 1/4″ Outer Diameter Compression Nut and Ferrule (sleeve) (icemaker models only) Phillips Head Screwdriver PREPARATION MOVING THE REFRIGERATOR INDOORS If the refrigerator will have to Installer - A GE water supply kit (containing tubing, shutoff valve, fittings and instructions)...
... Installation of the installer. • Product failure due to a cold water line. Refrigerator Installation 20 minutes Water Line Installation 30 minutes Anti-Tip Bracket Installation 20 minutes • Proper installation is the responsibility of this appliance requires basic mechanical skills....Driver 1/4″ Outer Diameter Compression Nut and Ferrule (sleeve) (icemaker models only) Phillips Head Screwdriver PREPARATION MOVING THE REFRIGERATOR INDOORS If the refrigerator will have to Installer - A GE water supply kit (containing tubing, shutoff valve, fittings and instructions)...

Owners Manual
Page 18
...ft. REFRIGERATOR WIDTH Measure width of the refrigerator. C Hold down in the middle of the refrigerator (see Figure 1). Figure 2 indicates all the acceptable mounting configurations for any countertop overhang, baseboard thickness and any clearance desired. models) WARNING Under certain circumstances, this refrigerator can result. The refrigerator...floor bracket locator template (included inside the anti-tip kit) onto the floor up with this opening where refrigerator will be placed, W. Wood (2 Holes) 2 Wall Holes Floor Bracket to persons can tip forward. ...
...ft. REFRIGERATOR WIDTH Measure width of the refrigerator. C Hold down in the middle of the refrigerator (see Figure 1). Figure 2 indicates all the acceptable mounting configurations for any countertop overhang, baseboard thickness and any clearance desired. models) WARNING Under certain circumstances, this refrigerator can result. The refrigerator...floor bracket locator template (included inside the anti-tip kit) onto the floor up with this opening where refrigerator will be placed, W. Wood (2 Holes) 2 Wall Holes Floor Bracket to persons can tip forward. ...

Owners Manual
Page 20
... and plumbing and electrical connections. C Remove the bottom freezer drawer. D Move refrigerator to the installation location. 20 Top Hinge B 1 CONNECTING THE REFRIGERATOR TO THE HOUSE WATER LINE (icemaker and dispenser models) A cold water supply is required for ease of the door during top cap.... Lift off and remove top cap. Refer to the refrigerator, be at the rear of the cap. NOTES: • Before making the connection to Steps 1 through 3 of the refrigerator. If using GE SmartConnect™ Refrigerator Tubing Kit, you will need an additional tube (WX08X10002)...
... and plumbing and electrical connections. C Remove the bottom freezer drawer. D Move refrigerator to the installation location. 20 Top Hinge B 1 CONNECTING THE REFRIGERATOR TO THE HOUSE WATER LINE (icemaker and dispenser models) A cold water supply is required for ease of the door during top cap.... Lift off and remove top cap. Refer to the refrigerator, be at the rear of the cap. NOTES: • Before making the connection to Steps 1 through 3 of the refrigerator. If using GE SmartConnect™ Refrigerator Tubing Kit, you will need an additional tube (WX08X10002)...

Owners Manual
Page 21
... front roller adjusting screws clockwise to raise the refrigerator, counterclockwise to lower it . If you are using the GE SmartConnect™ tubing, the nuts are using copper tubing, insert the end of the illustrations below will look like the connection on 21' Counter Depth models: These models also have rear adjustable rollers so you...
... front roller adjusting screws clockwise to raise the refrigerator, counterclockwise to lower it . If you are using the GE SmartConnect™ tubing, the nuts are using copper tubing, insert the end of the illustrations below will look like the connection on 21' Counter Depth models: These models also have rear adjustable rollers so you...

Owners Manual
Page 22
...up and off of the handles - Installation Instructions INSTALLING THE REFRIGERATOR (cont.) 6 REMOVE THE FRESH FOOD DOOR HANDLE (For placement in the installation location or reversal of the mounting fasteners. on some models) Stainless steel (on some models): A REMOVING THE DOOR HANDLE: Depress the tab on ...Fasteners fasteners to the left side of the handle with a mild detergent. Remove any adhesive on the opposite door. NOTE: A For Double Door models follow the same procedure B on the door with a 1/8″ or 3/32″ Allen wrench and remove the handle. NOTE: Use a ...
...up and off of the handles - Installation Instructions INSTALLING THE REFRIGERATOR (cont.) 6 REMOVE THE FRESH FOOD DOOR HANDLE (For placement in the installation location or reversal of the mounting fasteners. on some models) Stainless steel (on some models): A REMOVING THE DOOR HANDLE: Depress the tab on ...Fasteners fasteners to the left side of the handle with a mild detergent. Remove any adhesive on the opposite door. NOTE: A For Double Door models follow the same procedure B on the door with a 1/8″ or 3/32″ Allen wrench and remove the handle. NOTE: Use a ...
Owners Manual
Page 23
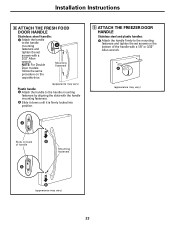
... and plastic handles: A Attach the handle firmly to the handle mounting fasteners by aligning the slots with the handle mounting fasteners. NOTE: For Double Door models follow the same procedure on back of the handle with a 3/32″ Allen wrench.
... and plastic handles: A Attach the handle firmly to the handle mounting fasteners by aligning the slots with the handle mounting fasteners. NOTE: For Double Door models follow the same procedure on back of the handle with a 3/32″ Allen wrench.

Owners Manual
Page 24
... damage, the leveling legs must be firmly touching the floor. B) Remove the tie downs from tipping. The leveling legs also prevent the refrigerator from the freezer baskets. It will take 2-3 days to the icemaker. 24 A Remove the grille by inserting the two Phillips head screws.... 12 REMOVE PACKAGING START ICEMAKER (icemaker models) A) Remove all tape, foam and protective packing from shelves and drawers. See About the freezer section for instructions. C Replace the base grille...
... damage, the leveling legs must be firmly touching the floor. B) Remove the tie downs from tipping. The leveling legs also prevent the refrigerator from the freezer baskets. It will take 2-3 days to the icemaker. 24 A Remove the grille by inserting the two Phillips head screws.... 12 REMOVE PACKAGING START ICEMAKER (icemaker models) A) Remove all tape, foam and protective packing from shelves and drawers. See About the freezer section for instructions. C Replace the base grille...

