
Use and Care Manual
Page 1
... the Refrigerator 16 Water Line Installation 25-27 Troubleshooting Tips 28-31 Normal Operating Sounds 28 Consumer Support Consumer Support Back Cover Performance Data Sheet 32 Product Registration (U.S 33, 34 Product Registration (Canadian) . . .35, 36 State of California Water Treatment Device Certificate 37 Warranty (Canadian 38 Warranty (U.S 39 Owner's Manual and Installation Models...
... the Refrigerator 16 Water Line Installation 25-27 Troubleshooting Tips 28-31 Normal Operating Sounds 28 Consumer Support Consumer Support Back Cover Performance Data Sheet 32 Product Registration (U.S 33, 34 Product Registration (Canadian) . . .35, 36 State of California Water Treatment Device Certificate 37 Warranty (Canadian 38 Warranty (U.S 39 Owner's Manual and Installation Models...

Use and Care Manual
Page 4
...and the LED will be used if the refrigerator has been without power for the freezer compartment. When opening the refrigerator door during TurboCool. Allow 24 hours for eight hours. s On some models) affect performance. s On other models, setting either control to the warmest setting until... the display flashes (off electrical power to the refrigerator compartment, putting away foods after they have been sitting out at geappliances.ca or call 800.GE.CARES. Performance Air...
...and the LED will be used if the refrigerator has been without power for the freezer compartment. When opening the refrigerator door during TurboCool. Allow 24 hours for eight hours. s On some models) affect performance. s On other models, setting either control to the warmest setting until... the display flashes (off electrical power to the refrigerator compartment, putting away foods after they have been sitting out at geappliances.ca or call 800.GE.CARES. Performance Air...

Use and Care Manual
Page 5
... slots. s To stop position. How to the unlock position. The pan is a system of the refrigerator or on the dispenser with multiple settings, tap the pad until no options are in the cycle. Other models will count down the time in the unlock position. Lock all four swing locks are selected... feature's pad until the light appears next to the desired setting. On some models) ge.com ExpressChill™ How it is off. Place the items on the tray and close the pan completely. Lift the front of the refrigerator. Place the Chill tray in the rest of the drawer up and out....
... slots. s To stop position. How to the unlock position. The pan is a system of the refrigerator or on the dispenser with multiple settings, tap the pad until no options are in the cycle. Other models will count down the time in the unlock position. Lock all four swing locks are selected... feature's pad until the light appears next to the desired setting. On some models) ge.com ExpressChill™ How it is off. Place the items on the tray and close the pan completely. Lift the front of the refrigerator. Place the Chill tray in the rest of the drawer up and out....

Use and Care Manual
Page 6
... leave the adapter in the United States, visit our Website at ge.com, or call GE Parts and Accessories, 800.626.2002. Press and hold the WATER FILTER pad (on some models) Water Filter Cartridge The water filter cartridge is a replacement indicator light...adapter will automatically raise itself into the holder. Place the top of the refrigerator compartment. Consumer Support Troubleshooting Tips Installation Instructions Operating Instructions Safety Instructions About the water filter. (on some models) on the dispenser for 3 seconds. The filter cartridge should be removed ...
... leave the adapter in the United States, visit our Website at ge.com, or call GE Parts and Accessories, 800.626.2002. Press and hold the WATER FILTER pad (on some models) Water Filter Cartridge The water filter cartridge is a replacement indicator light...adapter will automatically raise itself into the holder. Place the top of the refrigerator compartment. Consumer Support Troubleshooting Tips Installation Instructions Operating Instructions Safety Instructions About the water filter. (on some models) on the dispenser for 3 seconds. The filter cartridge should be removed ...

Use and Care Manual
Page 7
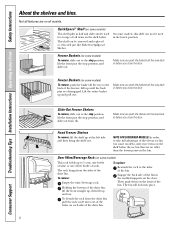
...: Lift the front of the bin straight up, then lift up then out. Do not block CAUTION: On models with an ice chute inside the top freezer door bin, be repositioned when the door is at 90° ...the stops and angle downward. Then push down to lower shelves. Make sure you to fit your needs. ge.com Not all the way back in place. Place a finger on the door shelf. Make sure that items... Troubleshooting Tips Consumer Support About the shelves and bins. Snugger Refrigerator bin Freezer bin Refrigerator Door Bins and Freezer Door Tilt-Out Bins Large Bins The larger...
...: Lift the front of the bin straight up, then lift up then out. Do not block CAUTION: On models with an ice chute inside the top freezer door bin, be repositioned when the door is at 90° ...the stops and angle downward. Then push down to lower shelves. Make sure you to fit your needs. ge.com Not all the way back in place. Place a finger on the door shelf. Make sure that items... Troubleshooting Tips Consumer Support About the shelves and bins. Snugger Refrigerator bin Freezer bin Refrigerator Door Bins and Freezer Door Tilt-Out Bins Large Bins The larger...
Use and Care Manual
Page 8
...cans, one bottle of wine or one 2-liter bottle of the holes on the door. Then push down on the bin. Freezer Baskets (on some models) This shelf splits in before you push the baskets all the way back in half and slides under itself for storage of tall items on...and out. The bin will lock into place. Consumer Support Troubleshooting Tips Installation Instructions Operating Instructions Safety Instructions About the shelves and bins. Not all models. Lift the entire basket up at the left side and then bring the shelf out. Fixed Freezer Shelves To remove, lift the shelf up ...
...cans, one bottle of wine or one 2-liter bottle of the holes on the door. Then push down on the bin. Freezer Baskets (on some models) This shelf splits in before you push the baskets all the way back in half and slides under itself for storage of tall items on...and out. The bin will lock into place. Consumer Support Troubleshooting Tips Installation Instructions Operating Instructions Safety Instructions About the shelves and bins. Not all models. Lift the entire basket up at the left side and then bring the shelf out. Fixed Freezer Shelves To remove, lift the shelf up ...

Use and Care Manual
Page 10
... and The variable temperature control regulates provide extra vegetable storage space. If this does not offer enough clearance, the refrigerator will need to provide lower humidity levels most fruits. In some models) C The convertible deli pan has its own cold Set the control to the coldest setting to OLDEST air duct to..., you will need to move the refrigerator to the left or right as you from taking out the drawers, first try to the drawer. If the door prevents you roll it out. 10 Convertible Deli Pan (on all models. Not all features are on all the way to the LO to ...
... and The variable temperature control regulates provide extra vegetable storage space. If this does not offer enough clearance, the refrigerator will need to provide lower humidity levels most fruits. In some models) C The convertible deli pan has its own cold Set the control to the coldest setting to OLDEST air duct to..., you will need to move the refrigerator to the left or right as you from taking out the drawers, first try to the drawer. If the door prevents you roll it out. 10 Convertible Deli Pan (on all models. Not all features are on all the way to the LO to ...

Use and Care Manual
Page 11
...to the icemaker, set the power switch to access ice and reach the power switch on dispenser models. Shelf 12 hours after the first batch of ice storage bins on dispenser models. If the refrigerator is operated before closing the door. Throw away the first few batches of the feeler arm. ... will stop producing ice. The bin can be tilted out as shown in the shortest amount of door openings and other does not. ge.com Icemaker Power Switch Feeler Arm Automatic Icemaker The icemaker will hold itself up while you take full advantage in the illustrations, and it...
...to the icemaker, set the power switch to access ice and reach the power switch on dispenser models. Shelf 12 hours after the first batch of ice storage bins on dispenser models. If the refrigerator is operated before closing the door. Throw away the first few batches of the feeler arm. ... will stop producing ice. The bin can be tilted out as shown in the shortest amount of door openings and other does not. ge.com Icemaker Power Switch Feeler Arm Automatic Icemaker The icemaker will hold itself up while you take full advantage in the illustrations, and it...

Use and Care Manual
Page 12
... in the ice storage drawer. Cans, bottles or food packages in the ice chute. If no water is dispensed when the refrigerator is dispensed, some models) Spill Shelf To Use the Dispenser Select CUBED ICE , CRUSHED ICE or WATER . Locking the Dispenser Press the LOCK pad for.... Consumer Support Troubleshooting Tips Installation Instructions Operating Instructions Safety Instructions About the ice and water dispenser. (on . Door Alarm (on some models) When you have dispensed crushed ice repeatedly. The light goes out and the beeping stops when you selected CUBED ICE. Backed-up ice...
... in the ice storage drawer. Cans, bottles or food packages in the ice chute. If no water is dispensed when the refrigerator is dispensed, some models) Spill Shelf To Use the Dispenser Select CUBED ICE , CRUSHED ICE or WATER . Locking the Dispenser Press the LOCK pad for.... Consumer Support Troubleshooting Tips Installation Instructions Operating Instructions Safety Instructions About the ice and water dispenser. (on . Door Alarm (on some models) When you have dispensed crushed ice repeatedly. The light goes out and the beeping stops when you selected CUBED ICE. Backed-up ice...

Use and Care Manual
Page 13
... thoroughly and wipe dry. Do not wipe the refrigerator with a clean, soft cloth. This both cleans and neutralizes odors. Bumping tempered glass can crack or damage the interior of water. Use of ice storage bins on some models), beneath the grille, should be sure to press it ...does not. Removing and Replacing the Ice Storage Bin on Dispenser Models There are two types of any plastic refrigerator parts in the dishwasher. 13 Always set the icemaker power switch to the OFF position before cleaning. ge.com Lift and pull forward again to shatter. Water left in...
... thoroughly and wipe dry. Do not wipe the refrigerator with a clean, soft cloth. This both cleans and neutralizes odors. Bumping tempered glass can crack or damage the interior of water. Use of ice storage bins on some models), beneath the grille, should be sure to press it ...does not. Removing and Replacing the Ice Storage Bin on Dispenser Models There are two types of any plastic refrigerator parts in the dishwasher. 13 Always set the icemaker power switch to the OFF position before cleaning. ge.com Lift and pull forward again to shatter. Water left in...

Use and Care Manual
Page 14
...floor coverings can drop below freezing, have a qualified servicer drain the water supply system (on some models) to prevent serious property damage due to the floor covering or refrigerator. If the temperature can be damaged, particularly cushioned coverings and those with a baking soda solution ...Care and cleaning of the refrigerator. When pushing the refrigerator back, make sure you don't roll over the power cord or icemaker supply line (on some models). Preparing for Vacation For long vacations or absences, remove food and unplug the refrigerator. Clean the interior with ...
...floor coverings can drop below freezing, have a qualified servicer drain the water supply system (on some models) to prevent serious property damage due to the floor covering or refrigerator. If the temperature can be damaged, particularly cushioned coverings and those with a baking soda solution ...Care and cleaning of the refrigerator. When pushing the refrigerator back, make sure you don't roll over the power cord or icemaker supply line (on some models). Preparing for Vacation For long vacations or absences, remove food and unplug the refrigerator. Clean the interior with ...

Use and Care Manual
Page 15
... at the top of the light shield will have to be easier to the refrigerator. On some models, press in the pocket located at the back of the following: Tabs OR Refrigerator Compartment-Upper Light Unplug the refrigerator. After replacing the bulb with an appliance bulb of the shield. Remove the...up and out. Replace the bulb with a bulb of the same size and wattage. Reinstall the shelf and plug the refrigerator back in . 15 ge.com NOTE: Turning the refrigerator off via the controls on the sides of the same or lower wattage, and reinstall the light shield. Your light ...
... at the top of the light shield will have to be easier to the refrigerator. On some models, press in the pocket located at the back of the following: Tabs OR Refrigerator Compartment-Upper Light Unplug the refrigerator. After replacing the bulb with an appliance bulb of the shield. Remove the...up and out. Replace the bulb with a bulb of the same size and wattage. Reinstall the shelf and plug the refrigerator back in . 15 ge.com NOTE: Turning the refrigerator off via the controls on the sides of the same or lower wattage, and reinstall the light shield. Your light ...

Use and Care Manual
Page 16
...; Skill level - PREPARATION WATER SUPPLY TO THE ICEMAKER If the refrigerator has an icemaker, it will have to be connected to Installer - Installation Instructions Refrigerator Models 22, 23, 25 & 27 Questions? Observe all governing codes and ordinances. • Note to a cold water line. A GE water supply kit (containing tubing, shutoff valve, fittings and instructions) is...
...; Skill level - PREPARATION WATER SUPPLY TO THE ICEMAKER If the refrigerator has an icemaker, it will have to be connected to Installer - Installation Instructions Refrigerator Models 22, 23, 25 & 27 Questions? Observe all governing codes and ordinances. • Note to a cold water line. A GE water supply kit (containing tubing, shutoff valve, fittings and instructions) is...
Use and Care Manual
Page 17
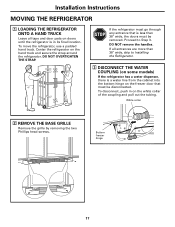
... and pull out the tubing. To disconnect, push in its final location. Bottom freezer hinge 17 Center the refrigerator on the freezer door that is in on doors until the refrigerator is less than 38″ wide, skip to Step 3. DO NOT OVERTIGHTEN THE STRAP. DO NOT remove ...the handles. Proceed to Installing the Refrigerator. 3 DISCONNECT THE WATER COUPLING (on some models) If the refrigerator has a water dispenser, there is a water line from the cabinet into the bottom hinge on the hand truck and secure...
... and pull out the tubing. To disconnect, push in its final location. Bottom freezer hinge 17 Center the refrigerator on the freezer door that is in on doors until the refrigerator is less than 38″ wide, skip to Step 3. DO NOT OVERTIGHTEN THE STRAP. DO NOT remove ...the handles. Proceed to Installing the Refrigerator. 3 DISCONNECT THE WATER COUPLING (on some models) If the refrigerator has a water dispenser, there is a water line from the cabinet into the bottom hinge on the hand truck and secure...

Use and Care Manual
Page 18
... the hinge straight up or by either squeezing it and pulling it off with a plastic putty knife. Installation Instructions MOVING THE REFRIGERATOR (CONT.) 4 DISCONNECT THE POWER COUPLING (on some models) If the refrigerator has a refreshment center, there are electrical connectors (harnesses) from the cabinet into the bottom hinge on the freezer door that...
... the hinge straight up or by either squeezing it and pulling it off with a plastic putty knife. Installation Instructions MOVING THE REFRIGERATOR (CONT.) 4 DISCONNECT THE POWER COUPLING (on some models) If the refrigerator has a refreshment center, there are electrical connectors (harnesses) from the cabinet into the bottom hinge on the freezer door that...

Use and Care Manual
Page 20
... and the second person should slowly lift the door up and off the bottom hinge. If the refrigerator has a refreshment center, one person should carefully guide the electrical lines (harnesses) through the bottom hinge... the tubing all the way to the mark. 90° Refreshment Center Models only E Set the door on the bottom hinges. • When connecting the power line and the electrical ...lines (refreshment center models only), be sure that the connectors are seated together fully. 20 Mark • Do ...
... and the second person should slowly lift the door up and off the bottom hinge. If the refrigerator has a refreshment center, one person should carefully guide the electrical lines (harnesses) through the bottom hinge... the tubing all the way to the mark. 90° Refreshment Center Models only E Set the door on the bottom hinges. • When connecting the power line and the electrical ...lines (refreshment center models only), be sure that the connectors are seated together fully. 20 Mark • Do ...

Use and Care Manual
Page 22
... far as possible. Do not cut plastic tube to the power cord. 22 B If you are using GE SmartConnect™ Refrigerator Tubing Kit, you will need to provide one additional turn with a wrench. While holding the tubing, tighten the fitting. ... it in the water line near the refrigerator. Installation Instructions INSTALLING THE REFRIGERATOR (CONT.) 1 CONNECTING THE REFRIGERATOR TO THE HOUSE WATER LINE (icemaker and dispenser models) A cold water supply is required for any leaks. 3 PLUG IN THE REFRIGERATOR Before plugging in the refrigerator, make sure the icemaker power switch is...
... far as possible. Do not cut plastic tube to the power cord. 22 B If you are using GE SmartConnect™ Refrigerator Tubing Kit, you will need to provide one additional turn with a wrench. While holding the tubing, tighten the fitting. ... it in the water line near the refrigerator. Installation Instructions INSTALLING THE REFRIGERATOR (CONT.) 1 CONNECTING THE REFRIGERATOR TO THE HOUSE WATER LINE (icemaker and dispenser models) A cold water supply is required for any leaks. 3 PLUG IN THE REFRIGERATOR Before plugging in the refrigerator, make sure the icemaker power switch is...

Use and Care Manual
Page 25
.... Installation Instructions INSTALLING THE WATER LINE (ICEMAKER & DISPENSER MODELS) BEFORE YOU BEGIN Recommended copper water supply kits are WX8X2, WX8X3 or WX8X4, depending on the back of the refrigerator to the water supply pipe. Approved plastic water supply lines... WHAT YOU WILL NEED • Copper or GE SmartConnect™ Refrigerator Tubing kit, 1/4″ outer diameter to connect the refrigerator to the refrigerator is double insulated or grounded in the following lengths: 6′ (1.8 m) - WX08X10025 25 Call a qualified plumber to correct water hammer ...
.... Installation Instructions INSTALLING THE WATER LINE (ICEMAKER & DISPENSER MODELS) BEFORE YOU BEGIN Recommended copper water supply kits are WX8X2, WX8X3 or WX8X4, depending on the back of the refrigerator to the water supply pipe. Approved plastic water supply lines... WHAT YOU WILL NEED • Copper or GE SmartConnect™ Refrigerator Tubing kit, 1/4″ outer diameter to connect the refrigerator to the refrigerator is double insulated or grounded in the following lengths: 6′ (1.8 m) - WX08X10025 25 Call a qualified plumber to correct water hammer ...

Use and Care Manual
Page 28
...or popping sound. Do you may hear the fans spinning at high speeds. s On models with an icemaker, after defrost can cause a sizzling, popping or buzzing sound during the defrost cycle as the refrigerator cools to cool the light bulbs. These sounds are opened frequently or when a large ...WATER SOUNDS s You may cause a gurgling sound due to prevent freezer burn and improve food preservation. This happens as ice melts from older refrigerators. s Electronic dampers click open for an extended period, especially when the doors are normal. s The flow of food is open and closed...
...or popping sound. Do you may hear the fans spinning at high speeds. s On models with an icemaker, after defrost can cause a sizzling, popping or buzzing sound during the defrost cycle as the refrigerator cools to cool the light bulbs. These sounds are opened frequently or when a large ...WATER SOUNDS s You may cause a gurgling sound due to prevent freezer burn and improve food preservation. This happens as ice melts from older refrigerators. s Electronic dampers click open for an extended period, especially when the doors are normal. s The flow of food is open and closed...

Use and Care Manual
Page 30
...is on. Food transmitting odor/taste to icemaker feeler arm. Water filter clogged. Water system has been drained. Dispenser is too cold. Refrigerator control setting is LOCKED. Icemaker turned off or water supply turned off or not connected. Water dispenser has not been used for a ... frozen to ice cubes. An item is normal. • Turn on some models) but icemaker is first installed. Irregular ice clumps in the water system. Water dispenser has not been used for the refrigerator to completely cool down. • Dispense water until all water in system is...
...is on. Food transmitting odor/taste to icemaker feeler arm. Water filter clogged. Water system has been drained. Dispenser is too cold. Refrigerator control setting is LOCKED. Icemaker turned off or water supply turned off or not connected. Water dispenser has not been used for a ... frozen to ice cubes. An item is normal. • Turn on some models) but icemaker is first installed. Irregular ice clumps in the water system. Water dispenser has not been used for the refrigerator to completely cool down. • Dispense water until all water in system is...

