
Installation Instructions
Page 1
... to contact a qualified installer to prevent large amounts of children is necessary when the appliance is removed from service or discarded, remove the dryer door. • Service information and the wiring diagram are located in the control console. • Do not allow children on Installation?...or Closet Installation, see section 1). Close supervision of moisture from being blown into the room. • Before the old dryer is used near children. Installation Instructions Electric Dryer 37 Questions on or in the appliance. Call: 1-800-GECARES (US) or Visit our Web site at: www....
... to contact a qualified installer to prevent large amounts of children is necessary when the appliance is removed from service or discarded, remove the dryer door. • Service information and the wiring diagram are located in the control console. • Do not allow children on Installation?...or Closet Installation, see section 1). Close supervision of moisture from being blown into the room. • Before the old dryer is used near children. Installation Instructions Electric Dryer 37 Questions on or in the appliance. Call: 1-800-GECARES (US) or Visit our Web site at: www....
Installation Instructions
Page 2
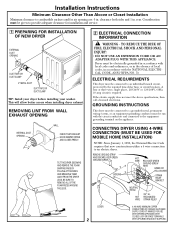
...MINIMUM COPPER CONDUCTORS OR 120/240V 30A POWER SUPPLY CORD KIT MARKED FOR USE WITH DRYERS & PROVIDED WITH CLOSED LOOP OR SPADE TERMINALS WITH UPTURNED ENDS (NOT SUPPLIED). ELECTRICAL REQUIREMENTS This dryer must be electrically grounded in accordance with local codes and ordinances, or in the...CODE, ANSI/NFPA NO. 70. If the electric supply does not meet the above specifications, then call a licensed electrician. CONNECTING DRYER USING 4-WIRE CONNECTION (MUST BE USED FOR MOBILE HOME INSTALLATION) NOTE: Since January 1, 1996, the National Electric Code requires that new constructions...
...MINIMUM COPPER CONDUCTORS OR 120/240V 30A POWER SUPPLY CORD KIT MARKED FOR USE WITH DRYERS & PROVIDED WITH CLOSED LOOP OR SPADE TERMINALS WITH UPTURNED ENDS (NOT SUPPLIED). ELECTRICAL REQUIREMENTS This dryer must be electrically grounded in accordance with local codes and ordinances, or in the...CODE, ANSI/NFPA NO. 70. If the electric supply does not meet the above specifications, then call a licensed electrician. CONNECTING DRYER USING 4-WIRE CONNECTION (MUST BE USED FOR MOBILE HOME INSTALLATION) NOTE: Since January 1, 1996, the National Electric Code requires that new constructions...

Installation Instructions
Page 3
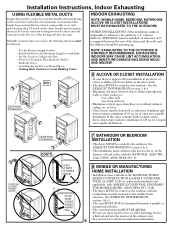
...be equivalent to prevent clogging. dampened wall cap in the table below . Turn off the circuit breaker (s) (30 amp) or remove the dryer's circuit fuse at the lower back. 4. UL recognized strain relief to strain relief. 9. B. Bring power cord through strain relief. 6. B.... The correct exhaust installation is unplugged from the dryer. • Do not assemble the ductwork with duct tape. • Horizontal runs should slope down . • If roof vents or ...
...be equivalent to prevent clogging. dampened wall cap in the table below . Turn off the circuit breaker (s) (30 amp) or remove the dryer's circuit fuse at the lower back. 4. UL recognized strain relief to strain relief. 9. B. Bring power cord through strain relief. 6. B.... The correct exhaust installation is unplugged from the dryer. • Do not assemble the ductwork with duct tape. • Horizontal runs should slope down . • If roof vents or ...

Installation Instructions
Page 4
...AND FRONT TO REAR. The accumulated lint could create a fire hazard. • Do not obstruct incoming or exhausted air. THIS DRYER COMES READY FOR REAR EXHAUSTING. NOTE: WE STRONGLY RECOMMEND SOLID METAL EXHAUST DUCTING. STANDARD REAR EXHAUST (Vented at floor level) STANDARD REAR ...EXHAUST (Vented above floor level) ELBOW HIGHLY RECOMMENDED RECOMMENDED CONFIGURATION TO MINIMIZE EXHAUST BLOCKAGE. LEVEL SIDE-TO-SIDE. (CORD NOT SUPPLIED WITH DRYER) CUT THE METAL EXHAUST DUCT (NOT SUPPLIED) TO THE PROPER LENGTH. IF SPACE IS LIMITED, USE THE INSTRUCTIONS IN SECTION 9 TO ...
...AND FRONT TO REAR. The accumulated lint could create a fire hazard. • Do not obstruct incoming or exhausted air. THIS DRYER COMES READY FOR REAR EXHAUSTING. NOTE: WE STRONGLY RECOMMEND SOLID METAL EXHAUST DUCTING. STANDARD REAR EXHAUST (Vented at floor level) STANDARD REAR ...EXHAUST (Vented above floor level) ELBOW HIGHLY RECOMMENDED RECOMMENDED CONFIGURATION TO MINIMIZE EXHAUST BLOCKAGE. LEVEL SIDE-TO-SIDE. (CORD NOT SUPPLIED WITH DRYER) CUT THE METAL EXHAUST DUCT (NOT SUPPLIED) TO THE PROPER LENGTH. IF SPACE IS LIMITED, USE THE INSTRUCTIONS IN SECTION 9 TO ...
Installation Instructions
Page 5
... (WE25X278) must be vented to the outdoors. If flexible transition duct is impossible to use only metal ducting, then UL-listed clothes dryer flexible metal transition duct may be vented to the outdoors. See EXHAUST INFORMATION section 3 & 4. • The installation must conform with...CODE, ANSI/NFPA NO. 70. 8 MOBILE OR MANUFACTURED HOME INSTALLATION • Installation must conform to Local Building Codes. is required between dryer cabinet and adjacent walls or other fastening devices which extend into the interior of the exhaust vent. 5 • See section 2 for ...
... (WE25X278) must be vented to the outdoors. If flexible transition duct is impossible to use only metal ducting, then UL-listed clothes dryer flexible metal transition duct may be vented to the outdoors. See EXHAUST INFORMATION section 3 & 4. • The installation must conform with...CODE, ANSI/NFPA NO. 70. 8 MOBILE OR MANUFACTURED HOME INSTALLATION • Installation must conform to Local Building Codes. is required between dryer cabinet and adjacent walls or other fastening devices which extend into the interior of the exhaust vent. 5 • See section 2 for ...
Installation Instructions
Page 6
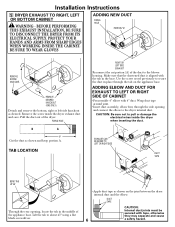
... Cut the duct as desired. Wrap duct tape around joint. • Insert duct assembly, elbow first, through the tab on the joint between the dryer internal duct and the elbow. DUCT TAPE CAUTION: Internal duct joints must be secured with 4" duct. Pull the duct out of the duct to about... BEND TAB UP 45o Through the rear opening and connect the elbow to pull or damage the electrical wires inside the dryer exhaust duct and save. Installation Instructions 9 DRYER EXHAUST TO RIGHT, LEFT OR BOTTOM CABINET WARNING - BEFORE PERFORMING THIS EXHAUST INSTALLATION, BE SURE TO DISCONNECT THE...
... Cut the duct as desired. Wrap duct tape around joint. • Insert duct assembly, elbow first, through the tab on the joint between the dryer internal duct and the elbow. DUCT TAPE CAUTION: Internal duct joints must be secured with 4" duct. Pull the duct out of the duct to about... BEND TAB UP 45o Through the rear opening and connect the elbow to pull or damage the electrical wires inside the dryer exhaust duct and save. Installation Instructions 9 DRYER EXHAUST TO RIGHT, LEFT OR BOTTOM CABINET WARNING - BEFORE PERFORMING THIS EXHAUST INSTALLATION, BE SURE TO DISCONNECT THE...

Installation Instructions
Page 7
... 11 SERVICING WARNING - PLATE (KIT WE1M454) Connect standard metal elbows and ducts to get the screw started. 2. TO REGISTER YOUR DRYER CALL TOLL-FREE 1-888-269-1192 Prompt registration confirms your right to protection under the terms of the door and the other information... WIRES PRIOR TO DISCONNECTING WHEN SERVICING CONTROLS. Apply firm pressure to complete the exhaust system. Reinsert the plastic plugs on the dryer face. Place dryer in step 1. 4. WIRING ERRORS CAN CAUSE IMPROPER AND DANGEROUS OPERATION AFTER SERVICING/INSTALLATION. With one hand holding the bottom, ...
... 11 SERVICING WARNING - PLATE (KIT WE1M454) Connect standard metal elbows and ducts to get the screw started. 2. TO REGISTER YOUR DRYER CALL TOLL-FREE 1-888-269-1192 Prompt registration confirms your right to protection under the terms of the door and the other information... WIRES PRIOR TO DISCONNECTING WHEN SERVICING CONTROLS. Apply firm pressure to complete the exhaust system. Reinsert the plastic plugs on the dryer face. Place dryer in step 1. 4. WIRING ERRORS CAN CAUSE IMPROPER AND DANGEROUS OPERATION AFTER SERVICING/INSTALLATION. With one hand holding the bottom, ...

Owners Manual
Page 1
Dryers ge.com Safety Instructions 2-4 Operating Instructions Control Panel 5, 6 Control Settings 7 Features 8 Loading and Using the Dryer 10 Reversing the Door 9 Venting the Dryer 11 Troubleshooting Tips . . . 12, 13 Consumer Support Consumer Support . . . . . Back Cover Warranty 15 Owner's Manual DBLR333 DBSR453 DBXR300 DBXR463 DHDSR45 DHDSR46 DJXR433 DLLSR33 DLSR483 DRSR483 ... DX2300 DX4500 DZSR483 EED4500 EGD4500 Write the model and serial numbers here: Model Serial You can find them on a label on the front of the dryer behind the door. 175D1807P565 49-90297 05-06 JR
Dryers ge.com Safety Instructions 2-4 Operating Instructions Control Panel 5, 6 Control Settings 7 Features 8 Loading and Using the Dryer 10 Reversing the Door 9 Venting the Dryer 11 Troubleshooting Tips . . . 12, 13 Consumer Support Consumer Support . . . . . Back Cover Warranty 15 Owner's Manual DBLR333 DBSR453 DBXR300 DBXR463 DHDSR45 DHDSR46 DJXR433 DLLSR33 DLSR483 DRSR483 ... DX2300 DX4500 DZSR483 EED4500 EGD4500 Write the model and serial numbers here: Model Serial You can find them on a label on the front of the dryer behind the door. 175D1807P565 49-90297 05-06 JR

Owners Manual
Page 2
...cause permanent damage and invalidate the warranty. Exhaust/Ducting 1 Gas dryers MUST be exposed to temperatures below freezing or exposed to four of these substances can receive one by visiting ge.com or by the incomplete combustion of fire or explosion, ... substances, namely benzene, carbon monoxide, formaldehyde and soot, caused primarily by calling 800.GE.CARES (800.432.2737). Troubleshooting Tips Consumer Support PROPER INSTALLATION This dryer must be properly installed and located in Installation Instructions. WARNING! Follow details in accordance with...
...cause permanent damage and invalidate the warranty. Exhaust/Ducting 1 Gas dryers MUST be exposed to temperatures below freezing or exposed to four of these substances can receive one by visiting ge.com or by the incomplete combustion of fire or explosion, ... substances, namely benzene, carbon monoxide, formaldehyde and soot, caused primarily by calling 800.GE.CARES (800.432.2737). Troubleshooting Tips Consumer Support PROPER INSTALLATION This dryer must be properly installed and located in Installation Instructions. WARNING! Follow details in accordance with...

Owners Manual
Page 3
... before each load to cooking oils in your washer or dryer during operation. Safety Instructions Operating Instructions ge.com WARNING! I The laundry process can under certain circumstances produce fire by clothing during subsequent dryer uses. I Do not store plastic, paper or clothing ...that may burn or melt on the dryer top. I Do not dry ...
... before each load to cooking oils in your washer or dryer during operation. Safety Instructions Operating Instructions ge.com WARNING! I The laundry process can under certain circumstances produce fire by clothing during subsequent dryer uses. I Do not store plastic, paper or clothing ...that may burn or melt on the dryer top. I Do not dry ...

Owners Manual
Page 4
...connection inside . SAVE THESE INSTRUCTIONS Troubleshooting Tips Consumer Support 4 I You may result from hiding inside the dryer should be cleaned at least once a year by using a dryer-applied fabric softener or an anti-static conditioner. We recommend you use of these products are not covered ...SAFETY INFORMATION CAREFULLY. I Do not attempt to carry out. DO NOT ATTEMPT TO LIGHT WITH A MATCH. WHEN USING YOUR DRYER (cont.) I Before discarding a dryer, or removing it will not be safely used in your laundered fabrics or reduce the static electricity in this appliance if it...
...connection inside . SAVE THESE INSTRUCTIONS Troubleshooting Tips Consumer Support 4 I You may result from hiding inside the dryer should be cleaned at least once a year by using a dryer-applied fabric softener or an anti-static conditioner. We recommend you use of these products are not covered ...SAFETY INFORMATION CAREFULLY. I Do not attempt to carry out. DO NOT ATTEMPT TO LIGHT WITH A MATCH. WHEN USING YOUR DRYER (cont.) I Before discarding a dryer, or removing it will not be safely used in your laundered fabrics or reduce the static electricity in this appliance if it...

Owners Manual
Page 5
... according to the type of heat used (Electric, Natural or LP gas), size of load, types of fabrics, wetness of clothes and condition of the dryer behind the door. About the dryer control panel. ge.com You can locate your model.
... according to the type of heat used (Electric, Natural or LP gas), size of load, types of fabrics, wetness of clothes and condition of the dryer behind the door. About the dryer control panel. ge.com You can locate your model.

Owners Manual
Page 6
About the dryer control panel. Model DBLR333 3 1 2 Models DJXR433, DRSR483, DWSR483, DWXR483, DLSR483, DQSR483 and DZSR483 Optional features (on the front of exhaust ducts. 6 Throughout this manual, features and appearance may vary from your model number on the label on some models) 3 1 2 Models EED4500 and EGD4500 3 1 2 Model DLLSR33 3 1 2 NOTE: Drying times will vary according to the type of heat used (Electric, Natural or LP gas), size of load, types of fabrics, wetness of clothes and condition of the dryer behind the door. You can locate your model.
About the dryer control panel. Model DBLR333 3 1 2 Models DJXR433, DRSR483, DWSR483, DWXR483, DLSR483, DQSR483 and DZSR483 Optional features (on the front of exhaust ducts. 6 Throughout this manual, features and appearance may vary from your model number on the label on some models) 3 1 2 Models EED4500 and EGD4500 3 1 2 Model DLLSR33 3 1 2 NOTE: Drying times will vary according to the type of heat used (Electric, Natural or LP gas), size of load, types of fabrics, wetness of clothes and condition of the dryer behind the door. You can locate your model.
Owners Manual
Page 7
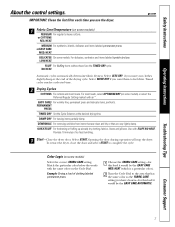
... START to the area that are clean and dry or that has the same color as the FABRIC CARE setting you use the dryer. ge.com 1 Fabric Care/Temperature (on some models. DEWRINKLE For removing wrinkles from items that are very lightly damp. Provides 10 minutes... below the words with FLUFF NO HEAT. NO HEAT Automatic cycles automatically determine fabric dryness. Opening the door during operation will stop the dryer. Color Logic (on some models) or select the Preferred Regular Setting marked with an *. Safety Instructions Operating Instructions About the control settings...
... START to the area that are clean and dry or that has the same color as the FABRIC CARE setting you use the dryer. ge.com 1 Fabric Care/Temperature (on some models. DEWRINKLE For removing wrinkles from items that are very lightly damp. Provides 10 minutes... below the words with FLUFF NO HEAT. NO HEAT Automatic cycles automatically determine fabric dryness. Opening the door during operation will stop the dryer. Color Logic (on some models) or select the Preferred Regular Setting marked with an *. Safety Instructions Operating Instructions About the control settings...

Owners Manual
Page 8
...at the end of no -heat tumbling after the laundry is dry. It provides approximately 15 minutes of the drying time and will available in a GE dryer. NOTE: I Use the Cycle Signal especially when drying fabrics like polyester knits and permanent press. Drying Rack (on some models) A handy drying ... or dented during this drying rack when there are dry. Remove the bulb and replace with the COTTONS and EASY CARE cycles. If the dryer drum not affect the function or durability of 8 should be removed so wrinkles won 't set in . If WRINKLE CARE is approximately 15 ...
...at the end of no -heat tumbling after the laundry is dry. It provides approximately 15 minutes of the drying time and will available in a GE dryer. NOTE: I Use the Cycle Signal especially when drying fabrics like polyester knits and permanent press. Drying Rack (on some models) A handy drying ... or dented during this drying rack when there are dry. Remove the bulb and replace with the COTTONS and EASY CARE cycles. If the dryer drum not affect the function or durability of 8 should be removed so wrinkles won 't set in . If WRINKLE CARE is approximately 15 ...

Owners Manual
Page 9
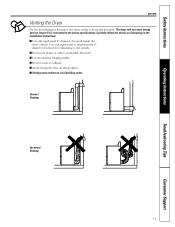
... screws inserted in new holes. 2 Loosen top screw from which the door was removed. With the door completely open, remove the bottom screw from the dryer by moving the door IN and DOWN until the top hinge and the bottom hinge are resting on the... dryer face half way. Insert these screws, secure each hinge, on the dryer face. ge.com Reversing the Door Tools needed: I Standard #2 I Tape-tipped I Phillips screwdriver I putty knife 1 Open the door and remove the filler...
... screws inserted in new holes. 2 Loosen top screw from which the door was removed. With the door completely open, remove the bottom screw from the dryer by moving the door IN and DOWN until the top hinge and the bottom hinge are resting on the... dryer face half way. Insert these screws, secure each hinge, on the dryer face. ge.com Reversing the Door Tools needed: I Standard #2 I Tape-tipped I Phillips screwdriver I putty knife 1 Open the door and remove the filler...

Owners Manual
Page 10
... to your warranty. Have a qualified technician vacuum the lint from the dryer. Follow these products away from the dryer once a year. Bounce® Fabric Conditioner Dryer Sheets have been approved for use in all GE Dryers when used with a clean cloth. WASH LABELS Machine wash cycle Normal ...warm. This wastes energy and causes wrinkling. Run your fingers and reach into the filter opening. The Exhaust Hood: Check from the dryer. 3 Vacuum the duct with the manufacturer's instructions. Sorting and Loading Hints As a general rule, if clothes are sorted properly for ...
... to your warranty. Have a qualified technician vacuum the lint from the dryer. Follow these products away from the dryer once a year. Bounce® Fabric Conditioner Dryer Sheets have been approved for use in all GE Dryers when used with a clean cloth. WASH LABELS Machine wash cycle Normal ...warm. This wastes energy and causes wrinkling. Run your fingers and reach into the filter opening. The Exhaust Hood: Check from the dryer. 3 Vacuum the duct with the manufacturer's instructions. Sorting and Loading Hints As a general rule, if clothes are sorted properly for ...
Owners Manual
Page 11
Safety Instructions Operating Instructions ge.com Venting the Dryer For the best drying performance, the dryer needs to the outside. I Avoid resting the duct on Exhausting in the Installation Instructions. I Do not use more energy and run longer if it is ... flexible metal 4″ diameter ductwork for exhausting to be properly vented. I Do not crush or collapse. I Use only rigid metal 4″ diameter ductwork inside the dryer cabinet. I Use the shortest length possible. The dryer will use plastic or other combustible ductwork. Carefully follow the details on sharp objects.
Safety Instructions Operating Instructions ge.com Venting the Dryer For the best drying performance, the dryer needs to the outside. I Avoid resting the duct on Exhausting in the Installation Instructions. I Do not use more energy and run longer if it is ... flexible metal 4″ diameter ductwork for exhausting to be properly vented. I Do not crush or collapse. I Use only rigid metal 4″ diameter ductwork inside the dryer cabinet. I Use the shortest length possible. The dryer will use plastic or other combustible ductwork. Carefully follow the details on sharp objects.
Owners Manual
Page 12
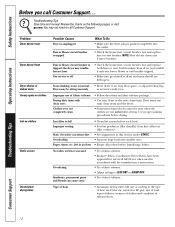
...were not completely clean • Follow directions on the following pages, or visit ge.com. Use proper washing procedures before laundering clothes. Problem Dryer doesn't start Dryer doesn't heat Dryer shakes or makes noise Greasy spots on clothes Lint on clothes Static occurs Inconsistent...fuse is full Improper sorting Static electricity can cause static • Try a fabric softener. • Bounce® Fabric Conditioner Dryer Sheets have been approved for use 2 fuses/breakers. Troubleshooting Tips Consumer Support 12 You may be seen when the clothes are ...
...were not completely clean • Follow directions on the following pages, or visit ge.com. Use proper washing procedures before laundering clothes. Problem Dryer doesn't start Dryer doesn't heat Dryer shakes or makes noise Greasy spots on clothes Lint on clothes Static occurs Inconsistent...fuse is full Improper sorting Static electricity can cause static • Try a fabric softener. • Bounce® Fabric Conditioner Dryer Sheets have been approved for use 2 fuses/breakers. Troubleshooting Tips Consumer Support 12 You may be seen when the clothes are ...

Owners Manual
Page 13
Safety Instructions Operating Instructions ge.com Problem Clothes take longer to dry. Overdrying Letting items sit in a particular item, do not machine wash or tumble dry it. Some fabrics will shrink in the dryer • To avoid shrinkage, follow garment care labels exactly. • Some ...items may be safely washed, but will naturally shrink when washed. Troubleshooting Tips Consumer Support 13 Since most dryers use 2 fuses/breakers, make sure the dryer venting is a well-sorted dryer load). • Large, heavy fabrics contain more than one or two items, add a few items to...
Safety Instructions Operating Instructions ge.com Problem Clothes take longer to dry. Overdrying Letting items sit in a particular item, do not machine wash or tumble dry it. Some fabrics will shrink in the dryer • To avoid shrinkage, follow garment care labels exactly. • Some ...items may be safely washed, but will naturally shrink when washed. Troubleshooting Tips Consumer Support 13 Since most dryers use 2 fuses/breakers, make sure the dryer venting is a well-sorted dryer load). • Large, heavy fabrics contain more than one or two items, add a few items to...


