
Owners Manual
Page 1
GEAppliances.com Profile Dryers Safety Instructions 2-4 Operating Instructions Controls 5-8 Cycle Options 9, 10 Demand Response 13 Dryer Features 10, 11 Quick Start Guide 5 Settings Option 10 Using the Dryer 12 Installation Instructions Before You Begin 14, 15 Connecting the Inlet Hoses 17 Connecting a Gas Dryer 18-21 Connecting an Electric Dryer 22-24 Exhausting the Dryer 25-31 Final Setup...
GEAppliances.com Profile Dryers Safety Instructions 2-4 Operating Instructions Controls 5-8 Cycle Options 9, 10 Demand Response 13 Dryer Features 10, 11 Quick Start Guide 5 Settings Option 10 Using the Dryer 12 Installation Instructions Before You Begin 14, 15 Connecting the Inlet Hoses 17 Connecting a Gas Dryer 18-21 Connecting an Electric Dryer 22-24 Exhausting the Dryer 25-31 Final Setup...
Owners Manual
Page 2
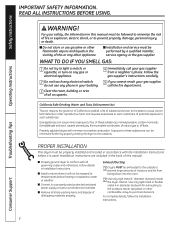
...any electrical switch; 5 If you cannot reach your gas supplier from being blown into the room. 2 Use only rigid metal 4″ diameter ductwork inside the dryer cabinet. WHAT TO DO IF YOU SMELL GAS: 1 Do not try to the outdoors. Gas appliances can cause minor exposure to four of natural... gas or LP fuels. Installation Instructions are included in accordance with all occupants. ...
...any electrical switch; 5 If you cannot reach your gas supplier from being blown into the room. 2 Use only rigid metal 4″ diameter ductwork inside the dryer cabinet. WHAT TO DO IF YOU SMELL GAS: 1 Do not try to the outdoors. Gas appliances can cause minor exposure to four of natural... gas or LP fuels. Installation Instructions are included in accordance with all occupants. ...
Owners Manual
Page 4
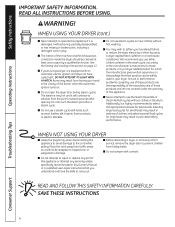
...at least once a year by a qualified technician. See the Sorting and Loading Hints section on page 12. ■ If yours is a gas dryer, it is very hot and it will not be safely used in your hand in the vicinity of the machine and the exhaust duct connection ...first washing. ■ You may wish to select the appropriate load size for best results. READ AND FOLLOW THIS SAFETY INFORMATION CAREFULLY. WHEN USING YOUR DRYER (cont.) ■ Never attempt to operate this appliance if it is damaged, malfunctioning, partially disassembled, or has missing or broken parts, including a ...
...at least once a year by a qualified technician. See the Sorting and Loading Hints section on page 12. ■ If yours is a gas dryer, it is very hot and it will not be safely used in your hand in the vicinity of the machine and the exhaust duct connection ...first washing. ■ You may wish to select the appropriate load size for best results. READ AND FOLLOW THIS SAFETY INFORMATION CAREFULLY. WHEN USING YOUR DRYER (cont.) ■ Never attempt to operate this appliance if it is damaged, malfunctioning, partially disassembled, or has missing or broken parts, including a ...
Owners Manual
Page 14
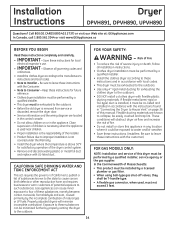
...IMPORTANT - In the Commonwealth of Massachusetts: • This product must be performed by a qualified installer. • Install the clothes dryer according to Consumer - Call 800.GE.CARES (800.432.2737) or visit our Web site at: GEAppliances.com In Canada, call 1.800.561.3344 or visit www.... with the instructions found in accordance with local codes. • This dryer must not exceed 3 feet. 14 Gas appliances can be minimized further by a licensed plumber or gas fitter. • When using ball-type gas shut-off valves, they shall be easily crushed and trap lint. Risk...
...IMPORTANT - In the Commonwealth of Massachusetts: • This product must be performed by a qualified installer. • Install the clothes dryer according to Consumer - Call 800.GE.CARES (800.432.2737) or visit our Web site at: GEAppliances.com In Canada, call 1.800.561.3344 or visit www.... with the instructions found in accordance with local codes. • This dryer must not exceed 3 feet. 14 Gas appliances can be minimized further by a licensed plumber or gas fitter. • When using ball-type gas shut-off valves, they shall be easily crushed and trap lint. Risk...

Owners Manual
Page 16
.... in an alcove or closet, as stated on a label on the dryer back. • The dryer MUST be installed in the supply line. • No other refastening devices which extend into the dryer room. 16 for gas dryers). BATHROOM OR BEDROOM INSTALLATION • The dryer MUST be vented to any other duct, vent or chimney. •...
.... in an alcove or closet, as stated on a label on the dryer back. • The dryer MUST be installed in the supply line. • No other refastening devices which extend into the dryer room. 16 for gas dryers). BATHROOM OR BEDROOM INSTALLATION • The dryer MUST be vented to any other duct, vent or chimney. •...
Owners Manual
Page 18
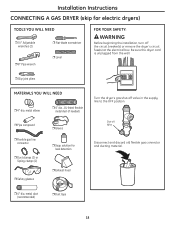
... installation, turn off valve in the supply line to the OFF position. Shut-off Valve Disconnect and discard old flexible gas connector and ducting material. ❒ 4″ dia. Be sure the dryer cord is unplugged from the wall. ❒ Slip-joint pliers MATERIALS YOU WILL NEED ❒ 4″ dia. metal duct (recommended...
... installation, turn off valve in the supply line to the OFF position. Shut-off Valve Disconnect and discard old flexible gas connector and ducting material. ❒ 4″ dia. Be sure the dryer cord is unplugged from the wall. ❒ Slip-joint pliers MATERIALS YOU WILL NEED ❒ 4″ dia. metal duct (recommended...

Owners Manual
Page 19
... This product must be installed by closing the equipment shut-off valves, they shall be installed immediately upstream of the gas supply connection to the dryer. elevation. GAS SUPPLY • A 1/8″ National Pipe Taper thread plugged tapping, accessible for each 1000 ft. above 2000 ft... codes and ordinances, or in their absence, the NATIONAL FUEL GAS CODE, ANSI Z223. • This gas dryer is to be adjusted for use Teflon® tape. • Connect flexible metal connector to dryer and gas supply. For operation at elevations above sea level. • Installation...
... This product must be installed by closing the equipment shut-off valves, they shall be installed immediately upstream of the gas supply connection to the dryer. elevation. GAS SUPPLY • A 1/8″ National Pipe Taper thread plugged tapping, accessible for each 1000 ft. above 2000 ft... codes and ordinances, or in their absence, the NATIONAL FUEL GAS CODE, ANSI Z223. • This gas dryer is to be adjusted for use Teflon® tape. • Connect flexible metal connector to dryer and gas supply. For operation at elevations above sea level. • Installation...

Owners Manual
Page 20
...adapter and plugged tapping. F Open the gas shut-off valve for Checking Gas Inlet Pressure Shut-Off Valve Pipe size at the end of the adapter and dryer gas inlet. Installation Instructions CONNECTING A GAS DRYER (cont.) CONNECTING THE DRYER TO THE GAS SUPPLY A Install a female 3/8″ NPT... elbow at least 1/2″ B Attach the flexible metal gas line connector to the dryer gas line shut-off valve. 20 ...
...adapter and plugged tapping. F Open the gas shut-off valve for Checking Gas Inlet Pressure Shut-Off Valve Pipe size at the end of the adapter and dryer gas inlet. Installation Instructions CONNECTING A GAS DRYER (cont.) CONNECTING THE DRYER TO THE GAS SUPPLY A Install a female 3/8″ NPT... elbow at least 1/2″ B Attach the flexible metal gas line connector to the dryer gas line shut-off valve. 20 ...

Owners Manual
Page 21
... of local codes, in accordance with soapy solution or equivalent. Check all connections for gas leaks. or 20-amp circuit breaker or time-delay fuse. Open Gas Valve ELECTRICAL REQUIREMENTS FOR GAS DRYERS This appliance must not contain ammonia, which meets local codes, may be electrically grounded ...in accordance with local codes and ordinances, or in the absence of the dryer, and to test for leaks with ...
... of local codes, in accordance with soapy solution or equivalent. Check all connections for gas leaks. or 20-amp circuit breaker or time-delay fuse. Open Gas Valve ELECTRICAL REQUIREMENTS FOR GAS DRYERS This appliance must not contain ammonia, which meets local codes, may be electrically grounded ...in accordance with local codes and ordinances, or in the absence of the dryer, and to test for leaks with ...
Owners Manual
Page 22
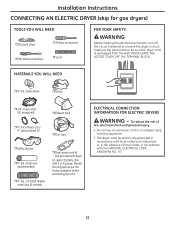
... 4″ spring clamps (2) ❒ Duct tape ❒ Safety glasses ❒ 4″ dia. ELECTRICAL CONNECTION INFORMATION FOR ELECTRIC DRYERS WARNING - MATERIALS YOU WILL NEED ❒ 4″ dia. Installation Instructions CONNECTING AN ELECTRIC DRYER (skip for gas dryers) TOOLS YOU WILL NEED ❒ Slip-joint pliers ❒ Phillips screwdriver ❒ Flat-blade screwdriver ❒ Level FOR...
... 4″ spring clamps (2) ❒ Duct tape ❒ Safety glasses ❒ 4″ dia. ELECTRICAL CONNECTION INFORMATION FOR ELECTRIC DRYERS WARNING - MATERIALS YOU WILL NEED ❒ 4″ dia. Installation Instructions CONNECTING AN ELECTRIC DRYER (skip for gas dryers) TOOLS YOU WILL NEED ❒ Slip-joint pliers ❒ Phillips screwdriver ❒ Flat-blade screwdriver ❒ Level FOR...
Owners Manual
Page 25
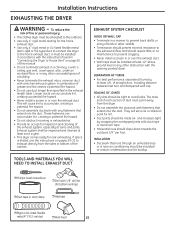
... hazard. • Do not use the instructions on page 26 of this manual. • Do not terminate exhaust in a chimney, a wall, a ceiling, gas vent, crawl space, attic, under an enclosed floor, or in any other concealed space of the exhaust system, especially at least once a year. • This...CHECKLIST HOOD OR WALL CAP • Terminate in a manner to prevent back drafts or entry of duct must be tight to exhaust directly from the dryer. • Do not assemble the ductwork with 1/8″ drill bit (for lint. • Duct joints should require little or no maintenance to prevent...
... hazard. • Do not use the instructions on page 26 of this manual. • Do not terminate exhaust in a chimney, a wall, a ceiling, gas vent, crawl space, attic, under an enclosed floor, or in any other concealed space of the exhaust system, especially at least once a year. • This...CHECKLIST HOOD OR WALL CAP • Terminate in a manner to prevent back drafts or entry of duct must be tight to exhaust directly from the dryer. • Do not assemble the ductwork with 1/8″ drill bit (for lint. • Duct joints should require little or no maintenance to prevent...

Owners Manual
Page 29
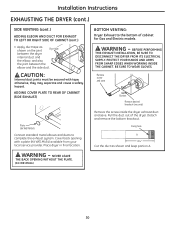
...duct. Remove Right screw and save . Installation Instructions SIDE VENTING: Dryer Exhaust to left side knockout as shown and keep portion A. Dryer Exhaust to right of the duct to the blower housing. WARNING - TAB LOCATION Not for gas Bend tab up 45° ADDING A NEW DUCT Fixing hole... Portion "A" Left side exhaust Reconnect the cut portion (A) of cabinet for Gas and Electric models. A slight...
...duct. Remove Right screw and save . Installation Instructions SIDE VENTING: Dryer Exhaust to left side knockout as shown and keep portion A. Dryer Exhaust to right of the duct to the blower housing. WARNING - TAB LOCATION Not for gas Bend tab up 45° ADDING A NEW DUCT Fixing hole... Portion "A" Left side exhaust Reconnect the cut portion (A) of cabinet for Gas and Electric models. A slight...
Owners Manual
Page 30
...the dryer. WARNING - PROTECT YOUR HANDS AND ARMS FROM SHARP EDGES WHEN WORKING INSIDE THE CABINET. Installation Instructions EXHAUSTING THE DRYER ...Dryer Exhaust to complete the exhaust system. BEFORE PERFORMING THIS EXHAUST INSTALLATION, BE SURE TO DISCONNECT THE DRYER FROM ITS ELECTRICAL SUPPLY. Place dryer... in final location. Remove screw and save Bottom Remove desired knockout (one only) Remove the screw inside the dryer...duct as shown on the joint Duct tape between the dryer internal duct and the elbow, and also the joint ...
...the dryer. WARNING - PROTECT YOUR HANDS AND ARMS FROM SHARP EDGES WHEN WORKING INSIDE THE CABINET. Installation Instructions EXHAUSTING THE DRYER ...Dryer Exhaust to complete the exhaust system. BEFORE PERFORMING THIS EXHAUST INSTALLATION, BE SURE TO DISCONNECT THE DRYER FROM ITS ELECTRICAL SUPPLY. Place dryer... in final location. Remove screw and save Bottom Remove desired knockout (one only) Remove the screw inside the dryer...duct as shown on the joint Duct tape between the dryer internal duct and the elbow, and also the joint ...

Owners Manual
Page 31
... must be secured with the previously saved screw. • Apply duct tape as shown in a 90-degree position to portion A. Dryer Exhaust to complete the exhaust system. ADDING COVER PLATE TO REAR OF CABINET (BOTTOM EXHAUST) Plate (Kit WE1M454) Connect standard metal elbows...in final location. Installation Instructions BOTTOM VENTING (cont.) ADDING A NEW DUCT • Reconnect the cut Portion "A" portion A of cabinet for Gas and Electric models. Cover back opening with a plate (Kit WE1M454) available from the rear opening • While holding down the pipe and ...
... must be secured with the previously saved screw. • Apply duct tape as shown in a 90-degree position to portion A. Dryer Exhaust to complete the exhaust system. ADDING COVER PLATE TO REAR OF CABINET (BOTTOM EXHAUST) Plate (Kit WE1M454) Connect standard metal elbows...in final location. Installation Instructions BOTTOM VENTING (cont.) ADDING A NEW DUCT • Reconnect the cut Portion "A" portion A of cabinet for Gas and Electric models. Cover back opening with a plate (Kit WE1M454) available from the rear opening • While holding down the pipe and ...

Owners Manual
Page 39
...8226; Electric Shock Hazard. Failure to do so could result in serious injury or death. • Potential Personal Injury. Stacking of a gas dryer is 52″. • Closet doors must be louvered or otherwise ventilated and have at least 60 square inches of open area equally distributed...Failure to leave these instructions for local electrical inspector's use. • IMPORTANT - Disconnect power before installing. Save these instructions with the dryer (gas models only). If the closet contains both sides, 1″ front and 3″ rear. Be sure to do so could result in...
...8226; Electric Shock Hazard. Failure to do so could result in serious injury or death. • Potential Personal Injury. Stacking of a gas dryer is 52″. • Closet doors must be louvered or otherwise ventilated and have at least 60 square inches of open area equally distributed...Failure to leave these instructions for local electrical inspector's use. • IMPORTANT - Disconnect power before installing. Save these instructions with the dryer (gas models only). If the closet contains both sides, 1″ front and 3″ rear. Be sure to do so could result in...

Owners Manual
Page 46
...heat when utility service is not displayed. Inconsistent drying times Type of heat Type of moisture. Clothes are still wet and dryer shut off • Make sure gas shutoff at dryer and main shutoff are fully open. Select a LESS DRY or DAMP setting. • Remove items when cycle ends and...wetness of clothes and the length and condition of the drum Heaters behind the drum • This is not level • Move dryer to a gas (natural or LP) dryer, or vice versa, the drying time could be visible at the rear of the exhaust system will disappear. The extended tumbling option...
...heat when utility service is not displayed. Inconsistent drying times Type of heat Type of moisture. Clothes are still wet and dryer shut off • Make sure gas shutoff at dryer and main shutoff are fully open. Select a LESS DRY or DAMP setting. • Remove items when cycle ends and...wetness of clothes and the length and condition of the drum Heaters behind the drum • This is not level • Move dryer to a gas (natural or LP) dryer, or vice versa, the drying time could be visible at the rear of the exhaust system will disappear. The extended tumbling option...


