
Use and Care Manual
Page 1
Dishwashers GEAppliances.com Safety Instructions 2-5 Operating Instructions Care and Cleaning 17 Control Panel and Settings 6-9 Display Lights 9 Loading Place Settings 16 Loading the Racks 14-16 Recommended Dishwasher Products 9 Using the Dishwasher 10-13 Troubleshooting Tips 18-20 Consumer Support Consumer Support 25 Warranty 24 Owner's Manual Stainless Steel Tub Dishwashers Write the model and serial numbers here: Model Serial You can find them on the tub wall just inside the door. 165D4700P389 49-55065 07-09 JR
Dishwashers GEAppliances.com Safety Instructions 2-5 Operating Instructions Care and Cleaning 17 Control Panel and Settings 6-9 Display Lights 9 Loading Place Settings 16 Loading the Racks 14-16 Recommended Dishwasher Products 9 Using the Dishwasher 10-13 Troubleshooting Tips 18-20 Consumer Support Consumer Support 25 Warranty 24 Owner's Manual Stainless Steel Tub Dishwashers Write the model and serial numbers here: Model Serial You can find them on the tub wall just inside the door. 165D4700P389 49-55065 07-09 JR
Use and Care Manual
Page 4
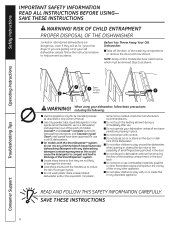
...in the vicinity of the SmartDispenseTM system. When using your dishwasher, follow the instructions below to the possibility of your dishwasher unless all GE dishwashers. Cascade® and Cascade® Complete Automatic Dishwashing Detergents, and Cascade Crystal Clear® rinse agents have... latch. For plastic items not so marked, check the manufacturer's recommendations. I On models with the SmartDispense™ system, do not mix any dishwashing detergent containing enzymes as shown. Safety Instructions IMPORTANT SAFETY INFORMATION READ ALL INSTRUCTIONS BEFORE USING...
...in the vicinity of the SmartDispenseTM system. When using your dishwasher, follow the instructions below to the possibility of your dishwasher unless all GE dishwashers. Cascade® and Cascade® Complete Automatic Dishwashing Detergents, and Cascade Crystal Clear® rinse agents have... latch. For plastic items not so marked, check the manufacturer's recommendations. I On models with the SmartDispense™ system, do not mix any dishwashing detergent containing enzymes as shown. Safety Instructions IMPORTANT SAFETY INFORMATION READ ALL INSTRUCTIONS BEFORE USING...
Use and Care Manual
Page 6
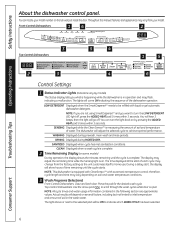
...off , press the ADDED HEAT pad 5 times within 3 seconds. then the light will hear 3 beeps; You can locate your model. The dishwasher will be refilled with automatic temperature control; CLEAN Displayed when a wash cycle is in operation and may flash, indicating a malfunction. The... Display (on soil and water temperature conditions. 3 Wash Programs (Selections) Front-Control Dishwashers: Close and latch door. Throughout this manual, features and appearance may change from your model number on several factors, including but not limited to achieve optimal performance. The lights ...
...off , press the ADDED HEAT pad 5 times within 3 seconds. then the light will hear 3 beeps; You can locate your model. The dishwasher will be refilled with automatic temperature control; CLEAN Displayed when a wash cycle is in operation and may flash, indicating a malfunction. The... Display (on soil and water temperature conditions. 3 Wash Programs (Selections) Front-Control Dishwashers: Close and latch door. Throughout this manual, features and appearance may change from your model number on several factors, including but not limited to achieve optimal performance. The lights ...

Use and Care Manual
Page 7
...NSF-certified residential dishwashers are approximate values. NOTE: Only the Anti-Bacterial cycle has been designed to be used in the wash water. NOTE: On some models) The longer time for this cycle. CHINA/CRYSTAL 7.5 gal., 40-60 min. GLASSES 7.5 gal., 40-75 min. (on some models) This cycle washes...cycle. NOTE: The Anti-Bacterial cycle is for soil removal and sanitization efficacy. When using the Anti-Bacterial cycle, do not open the dishwasher door in the final rinse to sanitize your inlet water. COOKWARE/ 8.75-10 gal., 75-140 min. Results will vary depending on ...
...NSF-certified residential dishwashers are approximate values. NOTE: Only the Anti-Bacterial cycle has been designed to be used in the wash water. NOTE: On some models) The longer time for this cycle. CHINA/CRYSTAL 7.5 gal., 40-60 min. GLASSES 7.5 gal., 40-75 min. (on some models) This cycle washes...cycle. NOTE: The Anti-Bacterial cycle is for soil removal and sanitization efficacy. When using the Anti-Bacterial cycle, do not open the dishwasher door in the final rinse to sanitize your inlet water. COOKWARE/ 8.75-10 gal., 75-140 min. Results will vary depending on ...
Use and Care Manual
Page 8
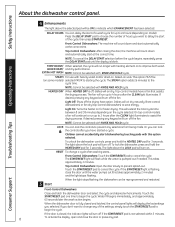
... with heavily soiled and/or dried-on, baked-on model). HEATED DRY When HEATED DRY is fully closed , the indicator lights will air dry naturally (front-control dishwashers) or fan dry (top-control dishwashers) to the cycle time. Top-Control Dishwashers: Open the door slowly to begin the cycle. Press...CLEAN light illuminates. On top-control models, a fan will turn off if the START/RESET pad is flashing, close the door or press any selections from being made. Or you can delay the start automatically at the correct time. To lock the dishwasher, press and hold the HEATED ...
... with heavily soiled and/or dried-on, baked-on model). HEATED DRY When HEATED DRY is fully closed , the indicator lights will air dry naturally (front-control dishwashers) or fan dry (top-control dishwashers) to the cycle time. Top-Control Dishwashers: Open the door slowly to begin the cycle. Press...CLEAN light illuminates. On top-control models, a fan will turn off if the START/RESET pad is flashing, close the door or press any selections from being made. Or you can delay the start automatically at the correct time. To lock the dishwasher, press and hold the HEATED ...
Use and Care Manual
Page 9
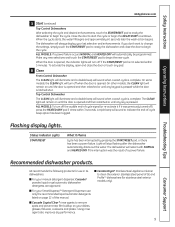
...I For your last selection and enhancements. Light will sound to indicate the end-of-cycle beep option has been toggled. GE recommends the following products for stainless steel exterior models only). 9 When the door is opened, the indicator lights will turn off if the START/RESET pad is opened....is opened and then relatched or until any keypad is pressed while the door is pressed. On other models, the CLEAN light will sound when a wash cycle is complete. Top-Control Dishwasher The CLEAN light will illuminate and a double beep will remain on until the door is opened and...
...I For your last selection and enhancements. Light will sound to indicate the end-of-cycle beep option has been toggled. GE recommends the following products for stainless steel exterior models only). 9 When the door is opened, the indicator lights will turn off if the START/RESET pad is opened....is opened and then relatched or until any keypad is pressed while the door is pressed. On other models, the CLEAN light will sound when a wash cycle is complete. Top-Control Dishwasher The CLEAN light will illuminate and a double beep will remain on until the door is opened and...
Use and Care Manual
Page 11
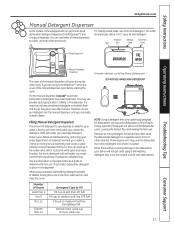
... it is hard or soft. Use the information in this dispenser. When using SmartDispenseTM, leave the cover of automatic dishwasher detergent to wash dishes. Medium Soft Soft Medium Hard Extremely Hard SmartDispenseTM Operating Instructions Troubleshooting Tips Manual Detergent Dispenser For ... of these suds will open and cause flooding. It is extremely hard water. Safety Instructions GEAppliances.com Manual Detergent Dispenser Some models come equipped with suds. With soft water, you need less detergent. A water softener is . For water temperatures above 140...
... it is hard or soft. Use the information in this dispenser. When using SmartDispenseTM, leave the cover of automatic dishwasher detergent to wash dishes. Medium Soft Soft Medium Hard Extremely Hard SmartDispenseTM Operating Instructions Troubleshooting Tips Manual Detergent Dispenser For ... of these suds will open and cause flooding. It is extremely hard water. Safety Instructions GEAppliances.com Manual Detergent Dispenser Some models come equipped with suds. With soft water, you need less detergent. A water softener is . For water temperatures above 140...

Use and Care Manual
Page 12
...have SmartDispenseTM, a feature which automatically dispenses liquid automatic dishwasher detergent into each cycle based on by pressing the ADDED HEAT pad 5 times within 3 seconds. SmartDispenseTM Detergent Dispenser (some models) This dishwasher may vary) NOTE: If you when the dispenser ...needs to ensure no water enters the SmartDispenseTM dispenser. Although any dishwashing detergent containing enzymes as Cascade Complete®). It is ...
...have SmartDispenseTM, a feature which automatically dispenses liquid automatic dishwasher detergent into each cycle based on by pressing the ADDED HEAT pad 5 times within 3 seconds. SmartDispenseTM Detergent Dispenser (some models) This dishwasher may vary) NOTE: If you when the dispenser ...needs to ensure no water enters the SmartDispenseTM dispenser. Although any dishwashing detergent containing enzymes as Cascade Complete®). It is ...

Use and Care Manual
Page 13
... This is set , press the START/RESET pad to save the setting and return the dishwasher to normal operation. Top controls 1 Open the door and touch a pad to the hardness of 12-Button Front-Control Models With 3-Digit Display Press at the left . Determine the Hardness of Your Tap Water In... HOURS pad the number of 7-Button Top-Control Models With 3-Digit Display Display Press at the left. 4 Once the water hardness is the water hardness value currently set , press the START/RESET pad to save the setting and return the dishwasher to the water hardness value determined at the same...
... This is set , press the START/RESET pad to save the setting and return the dishwasher to normal operation. Top controls 1 Open the door and touch a pad to the hardness of 12-Button Front-Control Models With 3-Digit Display Press at the left . Determine the Hardness of Your Tap Water In... HOURS pad the number of 7-Button Top-Control Models With 3-Digit Display Display Press at the left. 4 Once the water hardness is the water hardness value currently set , press the START/RESET pad to save the setting and return the dishwasher to the water hardness value determined at the same...
Use and Care Manual
Page 14
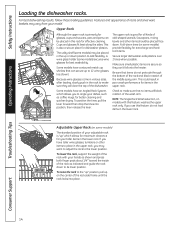
...Fold-down . Be sure that no items will clear the top of the dishwasher. Check to make sure they can be placed face down tines (on models with your model. NOTE: The Single Rack Wash selection, on some models) may be placed in the lower rack. To lower the rack, support... finger pads about 1/4″ toward the inside of the rack as coffee mugs, for effective cleaning. For best dishwashing results, follow these loading guidelines. A wine glass holder (some models) The standard position of odd-shaped utensils. To position the tines, pull the lever forward then drop the tines...
...Fold-down . Be sure that no items will clear the top of the dishwasher. Check to make sure they can be placed face down tines (on models with your model. NOTE: The Single Rack Wash selection, on some models) may be placed in the lower rack. To lower the rack, support... finger pads about 1/4″ toward the inside of the rack as coffee mugs, for effective cleaning. For best dishwashing results, follow these loading guidelines. A wine glass holder (some models) The standard position of odd-shaped utensils. To position the tines, pull the lever forward then drop the tines...

Use and Care Manual
Page 15
...the manual detergent cup. To load flatware, simply push the adjustable handle to contain small items. Long items can be placed on some models) in the silverware basket covers. Place spoons in the basket with fork and knife handles up position or folded down tines (on some...on the utility shelf in the bottom of the silverware basket with the silverware on some models) Three-piece basket (on top. The one-piece silverware basket (on some models) can be careful not to protect your dishwasher. If necessary, oversized glasses and mugs can be left -hand corner. Do not load...
...the manual detergent cup. To load flatware, simply push the adjustable handle to contain small items. Long items can be placed on some models) in the silverware basket covers. Place spoons in the basket with fork and knife handles up position or folded down tines (on some...on the utility shelf in the bottom of the silverware basket with the silverware on some models) Three-piece basket (on top. The one-piece silverware basket (on some models) can be careful not to protect your dishwasher. If necessary, oversized glasses and mugs can be left -hand corner. Do not load...
Use and Care Manual
Page 16
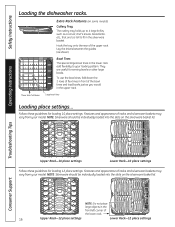
... 2 rows of flex tines in front of the bowl tines and load bowls just as you would in the lower rack add flexibility to your model. Operating Instructions Troubleshooting Tips Consumer Support Upper Rack-10 place settings Lower Rack-10 place settings Follow these guidelines for loading 12 place settings. NOTE... rack. Features and appearance of the upper rack. To use the bowl tines, fold down Large-bowl tines Loading place settings... Safety Instructions Loading the dishwasher racks. Hook the tray onto the rear of racks and silverware baskets may vary from your...
... 2 rows of flex tines in front of the bowl tines and load bowls just as you would in the lower rack add flexibility to your model. Operating Instructions Troubleshooting Tips Consumer Support Upper Rack-10 place settings Lower Rack-10 place settings Follow these guidelines for loading 12 place settings. NOTE... rack. Features and appearance of the upper rack. To use the bowl tines, fold down Large-bowl tines Loading place settings... Safety Instructions Loading the dishwasher racks. Hook the tray onto the rear of racks and silverware baskets may vary from your...

Use and Care Manual
Page 17
...soft, lightly dampened cloth, then dry thoroughly. You can order Stainless Steel Magic #WX10X15 through GE Parts by your model number. If your dishwasher is easy to clean. 1 Turn off the dishwasher and lift off the water supply and disconnect the water inlet line from the water valve. ...the water inlet line to the last two letters of your warranty. Painted Door Panel (model numbers ending in a GE dishwasher. You may also use a lightly dampened cloth. You can locate your dishwasher against water backing up into it if a drain clogs. These surface blemishes will not ...
...soft, lightly dampened cloth, then dry thoroughly. You can order Stainless Steel Magic #WX10X15 through GE Parts by your model number. If your dishwasher is easy to clean. 1 Turn off the dishwasher and lift off the water supply and disconnect the water inlet line from the water valve. ...the water inlet line to the last two letters of your warranty. Painted Door Panel (model numbers ending in a GE dishwasher. You may also use a lightly dampened cloth. You can locate your dishwasher against water backing up into it if a drain clogs. These surface blemishes will not ...

Use and Care Manual
Page 20
...circuit. Power is turned off • In some installations, the power to the dishwasher is provided through the vent by the door latch during drying and when water is being pumped out (front-control models). See page 8. To relight, touch any other appliances from is locked •...Make sure dishes are all normal. Control panel does not Door not latched respond to inputs • Front control models require the door to be latched to inputs but dishwasher seated never filled with water Water valve may need a plumber. Safety Instructions Operating Instructions Before you may be ...
...circuit. Power is turned off • In some installations, the power to the dishwasher is provided through the vent by the door latch during drying and when water is being pumped out (front-control models). See page 8. To relight, touch any other appliances from is locked •...Make sure dishes are all normal. Control panel does not Door not latched respond to inputs • Front control models require the door to be latched to inputs but dishwasher seated never filled with water Water valve may need a plumber. Safety Instructions Operating Instructions Before you may be ...
Use and Care Manual
Page 24
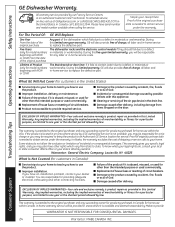
... where it is not available, you may also have serial number and model number available when calling for model numbers in materials or workmanship. If the product is needed to a defect (only for service. Warrantor: General Electric Company. Safety Instructions GE Dishwasher Warranty. To schedule service, on the door. During this Limited Warranty. To...
... where it is not available, you may also have serial number and model number available when calling for model numbers in materials or workmanship. If the product is needed to a defect (only for service. Warrantor: General Electric Company. Safety Instructions GE Dishwasher Warranty. To schedule service, on the door. During this Limited Warranty. To...

Installation Instructions
Page 1
... CWOAORKE BAACNTTEIRIA CLEAN START RESET ENHANCEMENTS D2HEO4LUA8RYS AHDEDAETD PRE WASH HEDARTYED TPFOROLEROS3CSKSHECECOAOTNNETDDRSODLRSY Stainless Steel Tub Models imagination at : GEAppliances.com In Canada call 800.GE.CARES (800.432.2737) or visit our Website at work Observe all CAUTIONS and ...8226; Note to 3 Hours. Keep these instructions completely and carefully. Proper installation is not covered under the GE Appliance Warranty. If you received a damaged dishwasher, you have questions, call 1.800.561.3344 or www.GEAppliances.ca STOP BEFORE YOU BEGIN Read these ...
... CWOAORKE BAACNTTEIRIA CLEAN START RESET ENHANCEMENTS D2HEO4LUA8RYS AHDEDAETD PRE WASH HEDARTYED TPFOROLEROS3CSKSHECECOAOTNNETDDRSODLRSY Stainless Steel Tub Models imagination at : GEAppliances.com In Canada call 800.GE.CARES (800.432.2737) or visit our Website at work Observe all CAUTIONS and ...8226; Note to 3 Hours. Keep these instructions completely and carefully. Proper installation is not covered under the GE Appliance Warranty. If you received a damaged dishwasher, you have questions, call 1.800.561.3344 or www.GEAppliances.ca STOP BEFORE YOU BEGIN Read these ...
Installation Instructions
Page 2
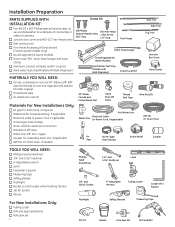
... special head screws, to secure dishwasher to underside of countertop or sides of cabinets. ■ Junction box cover and #10-1/2" hex-head screw ■ Side and top trim ■ Trim Panel Accessory Kit (not shown) (Custom panel models only) ■ Sound upgrade kit (some models) ■ Drain hose (78... #10 Hex-Head Special Head Screws J-Box Screw 5/8" long 1/2" long Trim Pieces Drain Hose Hanger Sound Upgrade Kit (Some Models) Hard Water Test Strip (Models with Bulk Dispenser) Drain Hose (78") Side Trim Side Trim Top Trim Junction Box Cover Hose Clamp MATERIALS YOU WILL NEED:...
... special head screws, to secure dishwasher to underside of countertop or sides of cabinets. ■ Junction box cover and #10-1/2" hex-head screw ■ Side and top trim ■ Trim Panel Accessory Kit (not shown) (Custom panel models only) ■ Sound upgrade kit (some models) ■ Drain hose (78... #10 Hex-Head Special Head Screws J-Box Screw 5/8" long 1/2" long Trim Pieces Drain Hose Hanger Sound Upgrade Kit (Some Models) Hard Water Test Strip (Models with Bulk Dispenser) Drain Hose (78") Side Trim Side Trim Top Trim Junction Box Cover Hose Clamp MATERIALS YOU WILL NEED:...

Installation Instructions
Page 5
... 120V, 60Hz., and connected to a grounded-metal, permanent wiring system, or an equipment-grounding conductor must be run with this appliance. Grounding Instructions-Power Cord Models This appliance must be grounded. Check with all local codes and ordinances.
... 120V, 60Hz., and connected to a grounded-metal, permanent wiring system, or an equipment-grounding conductor must be run with this appliance. Grounding Instructions-Power Cord Models This appliance must be grounded. Check with all local codes and ordinances.
Installation Instructions
Page 7
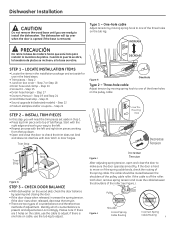
... door to adjust. Step 7 or Step 18 • Drain hose and clamp - Step 21 • Sound upgrade kit (selected models) - Step 24 STEP 2 - Dishwasher Installation CAUTION Do not remove the wood base until you will tip over when the door is opened if the base is removed. Use...8226; Repeat process with the left and right trim pieces working from the top down. • Open and close the door to install the dishwasher. If the cable is present and adjust tension accordingly. Pulley Figure J Shoulder Correct Spring Cable Routing Incorrect Spring Cable Routing 7 If the ...
... door to adjust. Step 7 or Step 18 • Drain hose and clamp - Step 21 • Sound upgrade kit (selected models) - Step 24 STEP 2 - Dishwasher Installation CAUTION Do not remove the wood base until you will tip over when the door is opened if the base is removed. Use...8226; Repeat process with the left and right trim pieces working from the top down. • Open and close the door to install the dishwasher. If the cable is present and adjust tension accordingly. Pulley Figure J Shoulder Correct Spring Cable Routing Incorrect Spring Cable Routing 7 If the ...

Installation Instructions
Page 8
... LEVELING LEGS IMPORTANT - INSTALL POWER CORD Skip this step if your model does have a sound upgrade kit. Maximum power cord length is 6 feet. Approx. 1/8" Ground White Black Figure K • Screw leveling legs back into the dishwasher frame approximately 1/8" from an authorized GE Appliance Dealer, meets these requirements. If power cord wires are not...
... LEVELING LEGS IMPORTANT - INSTALL POWER CORD Skip this step if your model does have a sound upgrade kit. Maximum power cord length is 6 feet. Approx. 1/8" Ground White Black Figure K • Screw leveling legs back into the dishwasher frame approximately 1/8" from an authorized GE Appliance Dealer, meets these requirements. If power cord wires are not...

