Use and Care Manual
Page 21
... heater temperature to see if your kitchen sink is normal Sanitized light does not illuminate at the end of the cycle (Anti-Bacteria cycle only) Noise The door was opened and the cycle was too low Normal operating sounds Detergent cup opening • Each pad must be touched within 30 seconds...
... heater temperature to see if your kitchen sink is normal Sanitized light does not illuminate at the end of the cycle (Anti-Bacteria cycle only) Noise The door was opened and the cycle was too low Normal operating sounds Detergent cup opening • Each pad must be touched within 30 seconds...
Installation Instructions
Page 7
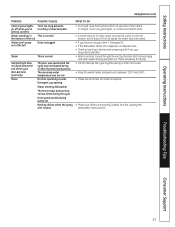
...clamp over the drain pump outlet being careful not to disturb the check valve. Power Cord Kit WX09X70910, available for purchase from an authorized GE appliance dealer. Position clamp so screw is approximately 78" long. Thread Seal Tape Figure K Figure L Tip: Avoid unnecessary service charges. ... clamp set aside in Step 1. Refer to the house electrical system. The 10' long hose is 6 feet. Tip: Reduce drain pump noise. Figure J • Install strain relief in junction box bracket. • Insert power cord through small hole in contact with the National Electrical...
...clamp over the drain pump outlet being careful not to disturb the check valve. Power Cord Kit WX09X70910, available for purchase from an authorized GE appliance dealer. Position clamp so screw is approximately 78" long. Thread Seal Tape Figure K Figure L Tip: Avoid unnecessary service charges. ... clamp set aside in Step 1. Refer to the house electrical system. The 10' long hose is 6 feet. Tip: Reduce drain pump noise. Figure J • Install strain relief in junction box bracket. • Insert power cord through small hole in contact with the National Electrical...
Installation Instructions
Page 8
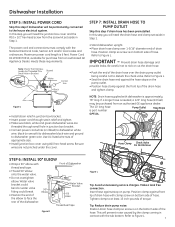
... with base of adjacent cabinets. • Make sure drain hose is not supplied with components under the sink. Repeat for no fill, drain or noise concerns. Position utility lines so they do not interfere with the dishwasher. Damage will occur. • As you will need the trim pieces set aside...
... with base of adjacent cabinets. • Make sure drain hose is not supplied with components under the sink. Repeat for no fill, drain or noise concerns. Position utility lines so they do not interfere with the dishwasher. Damage will occur. • As you will need the trim pieces set aside...
Installation Instructions
Page 11
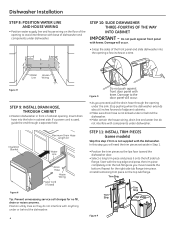
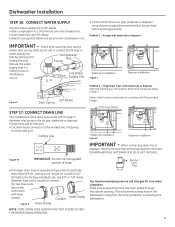
... clamp. Test by the dishwasher. 11 Fasten drain hose to fit the inlet port. Method 1 - Compression Nut Ferrule Reroute the water supply lines if a rubbing noise or interference occurs. 90° Elbow Hot Water Supply Line Waste Tee Installation Figure Y Disposer Installation Figure V 90° Elbow Door Spring STEP 17: CONNECT...
... clamp. Test by the dishwasher. 11 Fasten drain hose to fit the inlet port. Method 1 - Compression Nut Ferrule Reroute the water supply lines if a rubbing noise or interference occurs. 90° Elbow Hot Water Supply Line Waste Tee Installation Figure Y Disposer Installation Figure V 90° Elbow Door Spring STEP 17: CONNECT...

Installation Instructions
Page 12
... 15. ■ Pull lower rack out, about halfway. See Step 14. ■ Check door alignment with tub. Contact with motor or dishwasher frame could cause noise. ■ Turn on the door. Check for best wash performance. Tighten connections if needed. ■ Remove protective film if present from the screw kit set...
... 15. ■ Pull lower rack out, about halfway. See Step 14. ■ Check door alignment with tub. Contact with motor or dishwasher frame could cause noise. ■ Turn on the door. Check for best wash performance. Tighten connections if needed. ■ Remove protective film if present from the screw kit set...


