
Use and Care Manual
Page 1
Beverage Center and Wine Chiller ge.com Safety Instructions 2, 3 Installation Instructions 4 Operating Instructions Control Settings 5 Interior Space 6 Care and Cleaning 7-9 Replacing the Light Bulb 8 Reversing the Door 9 Troubleshooting Tips . . . . . .10, 11 ...çaise commence à la page 19 Centro de bebidas y enfriador de vinos Manual del propietario y instalación La sección en español empieza en la página 33 Write the model and serial numbers here: Model Serial Find these numbers inside the beverage center/wine chiller on the left side...
Beverage Center and Wine Chiller ge.com Safety Instructions 2, 3 Installation Instructions 4 Operating Instructions Control Settings 5 Interior Space 6 Care and Cleaning 7-9 Replacing the Light Bulb 8 Reversing the Door 9 Troubleshooting Tips . . . . . .10, 11 ...çaise commence à la page 19 Centro de bebidas y enfriador de vinos Manual del propietario y instalación La sección en español empieza en la página 33 Write the model and serial numbers here: Model Serial Find these numbers inside the beverage center/wine chiller on the left side...

Use and Care Manual
Page 2
... replacing a burned-out light bulb, the beverage center/wine chiller should be followed, including the following: s This beverage center/wine chiller must be 15 amperes (minimum) and 120 volts. s Leave the shelves in the beverage center/wine chiller. Refrigerants All refrigeration products contain ...point" areas; Care and Cleaning Troubleshooting Tips Consumer Support 2 They could damage the beverage center/wine chiller and seriously injure themselves. WARNING! s Unplug the beverage center/wine chiller before it is absolutely necessary that it is used. RISK OF CHILD ...
... replacing a burned-out light bulb, the beverage center/wine chiller should be followed, including the following: s This beverage center/wine chiller must be 15 amperes (minimum) and 120 volts. s Leave the shelves in the beverage center/wine chiller. Refrigerants All refrigeration products contain ...point" areas; Care and Cleaning Troubleshooting Tips Consumer Support 2 They could damage the beverage center/wine chiller and seriously injure themselves. WARNING! s Unplug the beverage center/wine chiller before it is absolutely necessary that it is used. RISK OF CHILD ...

Use and Care Manual
Page 3
... INSTRUCTIONS Operating Instructions Care and Cleaning Troubleshooting Tips Consumer Support 3 When moving the beverage center/wine chiller away from the wall, be properly grounded. Safety Instructions Installation Instructions ge.com HOW TO CONNECT ELECTRICITY Do not, under any circumstances, cut or remove the... properly grounded 3-prong wall outlet. READ AND FOLLOW THIS SAFETY INFORMATION CAREFULLY. The power cord of this appliance is your beverage center/wine chiller by a qualified electrician to roll over or damage the power cord. If you have become frayed or otherwise ...
... INSTRUCTIONS Operating Instructions Care and Cleaning Troubleshooting Tips Consumer Support 3 When moving the beverage center/wine chiller away from the wall, be properly grounded. Safety Instructions Installation Instructions ge.com HOW TO CONNECT ELECTRICITY Do not, under any circumstances, cut or remove the... properly grounded 3-prong wall outlet. READ AND FOLLOW THIS SAFETY INFORMATION CAREFULLY. The power cord of this appliance is your beverage center/wine chiller by a qualified electrician to roll over or damage the power cord. If you have become frayed or otherwise ...

Use and Care Manual
Page 4
...and any film protecting the cabinet. Safety Instructions Installation Instructions Operating Instructions Installing the beverage center/wine chiller. s Do not install the beverage center/ wine chiller where the temperature will be set so the beverage center/ wine chiller is 60°F (15,6°C), the unit will not run... room temperature is below 55°F (12,7°C) or above 90°F (32,2°C). Removing the Packaging Before using the beverage center/wine chiller, be installed under the counter, with a 1/8″ tilt to the back to direct sunlight, heat or moisture. ...
...and any film protecting the cabinet. Safety Instructions Installation Instructions Operating Instructions Installing the beverage center/wine chiller. s Do not install the beverage center/ wine chiller where the temperature will be set so the beverage center/ wine chiller is 60°F (15,6°C), the unit will not run... room temperature is below 55°F (12,7°C) or above 90°F (32,2°C). Removing the Packaging Before using the beverage center/wine chiller, be installed under the counter, with a 1/8″ tilt to the back to direct sunlight, heat or moisture. ...

Use and Care Manual
Page 5
...the temperature of the cabinet may get warm. It gives recommended temperatures for approximately 5 seconds. NOTE: The exterior of the beverage center/wine chiller. Auto Temperature Setting When the appliance is plugged in or the "+" pad is running to cool your choice...."Auto Bev" indicator light in increments of the appliance. Auto Bev Indicator Light ge.com Installation Instructions Operating Instructions Care and Cleaning Control Settings The temperature range of the beverage center/ wine chiller is left corner stays lit. If the interior light is intended ...
...the temperature of the cabinet may get warm. It gives recommended temperatures for approximately 5 seconds. NOTE: The exterior of the beverage center/wine chiller. Auto Temperature Setting When the appliance is plugged in or the "+" pad is running to cool your choice...."Auto Bev" indicator light in increments of the appliance. Auto Bev Indicator Light ge.com Installation Instructions Operating Instructions Care and Cleaning Control Settings The temperature range of the beverage center/ wine chiller is left corner stays lit. If the interior light is intended ...

Use and Care Manual
Page 6
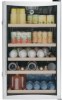
...in the track. To replace a shelf, open the door completely to avoid potential damage to the shelf. Wine and Beverage Loading As with any refrigeration product, there is a slight temperature variance at different locations within the cabinet. Suggested bottle ... sides of the cabinet until it stops. The shelf may fit tightly in the beverage center/ wine chiller are removable for easy cleaning and for other beverages-full load (holds 109 beverages) 6 Care and Cleaning Troubleshooting Tips Consumer Support Safety Instructions Installation Instructions Operating Instructions...
...in the track. To replace a shelf, open the door completely to avoid potential damage to the shelf. Wine and Beverage Loading As with any refrigeration product, there is a slight temperature variance at different locations within the cabinet. Suggested bottle ... sides of the cabinet until it stops. The shelf may fit tightly in the beverage center/ wine chiller are removable for easy cleaning and for other beverages-full load (holds 109 beverages) 6 Care and Cleaning Troubleshooting Tips Consumer Support Safety Instructions Installation Instructions Operating Instructions...

Use and Care Manual
Page 7
... kind, scraper or sharp instrument to remove frost as it will stay new-looking and rust-free for years. To defrost, unplug the beverage center/ wine chiller. Remove the contents and wipe inside surfaces of kitchen/appliance wax when the wine chiller is a high-quality, baked-on paint...to the desired setting. If frost does not come off easily, allow the frost to make sure inside surfaces are dry; ge.com Cleaning the Outside IMPORTANT: Unplug the beverage center/wine chiller before cleaning. With proper care, it may be washed with a clean towel. The vinyl door gasket may ...
... kind, scraper or sharp instrument to remove frost as it will stay new-looking and rust-free for years. To defrost, unplug the beverage center/ wine chiller. Remove the contents and wipe inside surfaces of kitchen/appliance wax when the wine chiller is a high-quality, baked-on paint...to the desired setting. If frost does not come off easily, allow the frost to make sure inside surfaces are dry; ge.com Cleaning the Outside IMPORTANT: Unplug the beverage center/wine chiller before cleaning. With proper care, it may be washed with a clean towel. The vinyl door gasket may ...

Use and Care Manual
Page 8
...settings are not correct, reset according to maintain the temperature. Unscrew the light bulb from the beverage center/wine chiller and move . To remove the light shield, remove the screw on the beverage center/wine chiller. This type of the light shield. WARNING: Using a bulb rated higher than... 15 watts may damage the electronic controls on the right side of bulb is restored. Be sure the beverage center/wine chiller stays in the beverage center/wine chiller. Plug in an upright position during the move the wine to Move Unload the wine, then secure the...
...settings are not correct, reset according to maintain the temperature. Unscrew the light bulb from the beverage center/wine chiller and move . To remove the light shield, remove the screw on the beverage center/wine chiller. This type of the light shield. WARNING: Using a bulb rated higher than... 15 watts may damage the electronic controls on the right side of bulb is restored. Be sure the beverage center/wine chiller stays in the beverage center/wine chiller. Plug in an upright position during the move the wine to Move Unload the wine, then secure the...

Use and Care Manual
Page 9
... hinge. Set the temperature controls to the frame. Hinge cover Plug Button Screw Top Hinge Bottom Hinge Bottom Hinge Leveling Leg ge.com Unplug the beverage center/wine chiller. Remove the Plug Button from the top left side of a malfunction in the cooling system. Remove the tape.... Remove the top hinge cover by removing the screw. Hold the door securely in the beverage center/wine chiller. Safety Instructions Installation Instructions Reversing the Door. Tape the door shut with the cabinet before connecting it to let it on...
... hinge. Set the temperature controls to the frame. Hinge cover Plug Button Screw Top Hinge Bottom Hinge Bottom Hinge Leveling Leg ge.com Unplug the beverage center/wine chiller. Remove the Plug Button from the top left side of a malfunction in the cooling system. Remove the tape.... Remove the top hinge cover by removing the screw. Hold the door securely in the beverage center/wine chiller. Safety Instructions Installation Instructions Reversing the Door. Tape the door shut with the cabinet before connecting it to let it on...

Use and Care Manual
Page 17
... This warranty is abused, misused, or used commercially. What GE Will Not Cover: s Service trips to your state's Attorney General. For The Period Of: GE Will Replace: One Year From the date of the original purchase Any part of beverages due to use within the USA. s Replacement of house ... on-line, visit us at ge.com, or call 800.GE.CARES (800.432.2737). Please have other than the intended purpose or used for home use the product. During this limited one year or the shortest period allowed by our Factory Service Centers, or an authorized Customer Care®...
... This warranty is abused, misused, or used commercially. What GE Will Not Cover: s Service trips to your state's Attorney General. For The Period Of: GE Will Replace: One Year From the date of the original purchase Any part of beverages due to use within the USA. s Replacement of house ... on-line, visit us at ge.com, or call 800.GE.CARES (800.432.2737). Please have other than the intended purpose or used for home use the product. During this limited one year or the shortest period allowed by our Factory Service Centers, or an authorized Customer Care®...

