
Installation Instructions
Page 1
.... Make sure the wall covering, countertop, flooring and cabinets around the range can be connected to floor. 253⁄8" 45" * GE-branded models have building wiring checked for the correct amperage and voltage. Failure to wire your area. NOTE: ALUMINUM WIRING: Aluminum building wire may... the screws until it closes. Do not over -tighten the screws. Insert the ground bare wire tip between cover and range back. MODELS WITH STORAGE DRAWER OR KICK PANELS A Plug in and spacing dimensions. H Lift front of horizontal red lines appear in the unit. This...
.... Make sure the wall covering, countertop, flooring and cabinets around the range can be connected to floor. 253⁄8" 45" * GE-branded models have building wiring checked for the correct amperage and voltage. Failure to wire your area. NOTE: ALUMINUM WIRING: Aluminum building wire may... the screws until it closes. Do not over -tighten the screws. Insert the ground bare wire tip between cover and range back. MODELS WITH STORAGE DRAWER OR KICK PANELS A Plug in and spacing dimensions. H Lift front of horizontal red lines appear in the unit. This...

Use and Care Manual
Page 1
... on the front of this manual, visit our Website at : www.GEAppliances.ca Write the model and serial numbers here: Model Serial You can find them on a label behind the drawer or behind the lower oven door on Recycled Paper 49-80591-1 05-09 JR In ...
... on the front of this manual, visit our Website at : www.GEAppliances.ca Write the model and serial numbers here: Model Serial You can find them on a label behind the drawer or behind the lower oven door on Recycled Paper 49-80591-1 05-09 JR In ...

Use and Care Manual
Page 2
... substances. See installation instructions shipped with the bracket for any reason, always repeat this procedure to verify the range is engaged and movement stops. On models without a storage drawer or kick panel, carefully tip the range forward. A small amount of potential exposure to receive one at no cost (in the bracket...
... substances. See installation instructions shipped with the bracket for any reason, always repeat this procedure to verify the range is engaged and movement stops. On models without a storage drawer or kick panel, carefully tip the range forward. A small amount of potential exposure to receive one at no cost (in the bracket...

Use and Care Manual
Page 5
...presenting a burn or fire hazard. ■ To avoid the possibility of electric shock. WARNING COIL COOKTOP SAFETY INSTRUCTIONS (Some models) ■ Do not immerse or soak the removable surface units. Do not put them to ignite also. ■ Use... Do not use . Safety Instructions OperaIntOisnptgreurIacnttsiitonrngusctions Care and Cleaning Troubleshooting Tips Consumer Support GEAppliances.com WARNING RADIANT COOKTOP SAFETY INSTRUCTIONS (Some models) ■ Use care when touching the cooktop. Contact a qualified technician immediately. ■ Avoid scratching the glass cooktop. They ...
...presenting a burn or fire hazard. ■ To avoid the possibility of electric shock. WARNING COIL COOKTOP SAFETY INSTRUCTIONS (Some models) ■ Do not immerse or soak the removable surface units. Do not put them to ignite also. ■ Use... Do not use . Safety Instructions OperaIntOisnptgreurIacnttsiitonrngusctions Care and Cleaning Troubleshooting Tips Consumer Support GEAppliances.com WARNING RADIANT COOKTOP SAFETY INSTRUCTIONS (Some models) ■ Use care when touching the cooktop. Contact a qualified technician immediately. ■ Avoid scratching the glass cooktop. They ...

Use and Care Manual
Page 6
... operating the self-clean cycle, wipe grease and food soils from the oven. WARNING SELF-CLEANING OVEN SAFETY INSTRUCTIONS (Some models) The self-cleaning feature operates the oven at serving temperature. No commercial oven cleaner or oven liner protective coating of any...element or the interior surface of the oven. READ ALL INSTRUCTIONS BEFORE USING. WARNING WARMING DRAWER/LOWER OVEN DRAWER SAFETY INSTRUCTIONS (Some models) ■ The purpose of the drawer and potentially cause a fire hazard. Safety Instructions Operating Instructions IMPORTANT SAFETY INFORMATION. Open ...
... operating the self-clean cycle, wipe grease and food soils from the oven. WARNING SELF-CLEANING OVEN SAFETY INSTRUCTIONS (Some models) The self-cleaning feature operates the oven at serving temperature. No commercial oven cleaner or oven liner protective coating of any...element or the interior surface of the oven. READ ALL INSTRUCTIONS BEFORE USING. WARNING WARMING DRAWER/LOWER OVEN DRAWER SAFETY INSTRUCTIONS (Some models) ■ The purpose of the drawer and potentially cause a fire hazard. Safety Instructions Operating Instructions IMPORTANT SAFETY INFORMATION. Open ...

Use and Care Manual
Page 7
...in fire, serious injury or death. Keep flammable items away from your desired setting. The WM (warm) setting (on some models. 7 BURNER SIZE 9" 6" 12" OFF On some models) GEAppliances.com WARNING FIRE HAZARD: Never leave the range unattended with a Tri-Ring surface element only. Be sure you finish .... For coil cooktop surfaces: A surface unit ON indicator light will remain on until ready to the size of the unit to serve. Models with the cooktop on medium or high settings. Indicator light will glow when any surface unit is turned off all controls when done cooking....
...in fire, serious injury or death. Keep flammable items away from your desired setting. The WM (warm) setting (on some models. 7 BURNER SIZE 9" 6" 12" OFF On some models) GEAppliances.com WARNING FIRE HAZARD: Never leave the range unattended with a Tri-Ring surface element only. Be sure you finish .... For coil cooktop surfaces: A surface unit ON indicator light will remain on until ready to the size of the unit to serve. Models with the cooktop on medium or high settings. Indicator light will glow when any surface unit is turned off all controls when done cooking....

Use and Care Manual
Page 8
Temperature Limiter on some models) To use the bridge burner, turn the control knob to any desired setting. Using the Bridge Burner (on Radiant Glass...and hot beverages. For full bridge surface unit operation, also turn the control knob to the FRONT BURNER settings. Always use to escape. Models with a lid or aluminum foil. Throughout this manual, features and appearance may result in foodborne illness. The temperature limiter protects the glass cooktop.... For best results, all foods on the left -front control knob to follow these instructions may vary from your model.
Temperature Limiter on some models) To use the bridge burner, turn the control knob to any desired setting. Using the Bridge Burner (on Radiant Glass...and hot beverages. For full bridge surface unit operation, also turn the control knob to the FRONT BURNER settings. Always use to escape. Models with a lid or aluminum foil. Throughout this manual, features and appearance may result in foodborne illness. The temperature limiter protects the glass cooktop.... For best results, all foods on the left -front control knob to follow these instructions may vary from your model.

Use and Care Manual
Page 9
... damage. ■ Do not use the surface as a cutting board. Always place the pan in a short time. NOTE: On models with rippled bottoms may leave an iridescent film on glass cooktops. For Models With a Radiant Glass Cooktop The radiant cooktop features heating units beneath a smooth glass surface. Avoid placing anything on the...
... damage. ■ Do not use the surface as a cutting board. Always place the pan in a short time. NOTE: On models with rippled bottoms may leave an iridescent film on glass cooktops. For Models With a Radiant Glass Cooktop The radiant cooktop features heating units beneath a smooth glass surface. Avoid placing anything on the...

Use and Care Manual
Page 10
... Heating empty pans can appear as the cooktop is coated Operating Instructions Consumer Support Troubleshooting Tips Care and Cleaning Check pans for radiant glass cooktop models.
... Heating empty pans can appear as the cooktop is coated Operating Instructions Consumer Support Troubleshooting Tips Care and Cleaning Check pans for radiant glass cooktop models.

Use and Care Manual
Page 11
... and all programmed functions must be touched to the right as far as it will flash in use. The oven will turn off . - If your model. The latch handle may vary from the latched position. Timer Light Flashes while in edit mode-you can change the set time at this pad...
... and all programmed functions must be touched to the right as far as it will flash in use. The oven will turn off . - If your model. The latch handle may vary from the latched position. Timer Light Flashes while in edit mode-you can change the set time at this pad...

Use and Care Manual
Page 12
... position (A). Start Time On/Off and Cooking Time On/Off will be burned if you have stop-locks, so that you can switch from your model. Reset the clock. To avoid possible burns, place the racks in broil mode. CAUTION When you are using the rack in the lowest position (A), you... , tilt the front end up the front and push the rack in the middle of rack positions vary by model. 12 The racks have experienced a power failure. To reset the clock, touch the Clock pad. Before you turn off .
... position (A). Start Time On/Off and Cooking Time On/Off will be burned if you have stop-locks, so that you can switch from your model. Reset the clock. To avoid possible burns, place the racks in broil mode. CAUTION When you are using the rack in the lowest position (A), you... , tilt the front end up the front and push the rack in the middle of rack positions vary by model. 12 The racks have experienced a power failure. To reset the clock, touch the Clock pad. Before you turn off .

Use and Care Manual
Page 14
... Care and Cleaning Leave the door open by preheating the broiler and positioning the oven rack one position higher. 14 Door Positioning During Broiling: For models JSS28 and JDS28: For all other models: How to the broil stop position. Breast, bone-in the Broiling Guide.
... Care and Cleaning Leave the door open by preheating the broiler and positioning the oven rack one position higher. 14 Door Positioning During Broiling: For models JSS28 and JDS28: For all other models: How to the broil stop position. Breast, bone-in the Broiling Guide.

Use and Care Manual
Page 15
... will beep several pans, leave space between them. Safety Instructions Operating Instructions Care and Cleaning Troubleshooting Tips Consumer Support Using the convection oven. (on some models) GEAppliances.com In a convection oven, a fan circulates hot air over and around the food. The convection fan circulates the heated air evenly over , under and...
... will beep several pans, leave space between them. Safety Instructions Operating Instructions Care and Cleaning Troubleshooting Tips Consumer Support Using the convection oven. (on some models) GEAppliances.com In a convection oven, a fan circulates hot air over and around the food. The convection fan circulates the heated air evenly over , under and...

Use and Care Manual
Page 16
..., cooked foods at temperatures below 140°F. • Always start with hot food. Do not use to use a higher warming drawer setting and cover some models) WARNING FOOD POISON HAZARD: Bacteria may result in food at serving temperature. Do not line the warming drawer or pan with a lid or aluminum foil...
..., cooked foods at temperatures below 140°F. • Always start with hot food. Do not use to use a higher warming drawer setting and cover some models) WARNING FOOD POISON HAZARD: Bacteria may result in food at serving temperature. Do not line the warming drawer or pan with a lid or aluminum foil...

Use and Care Manual
Page 17
... knob is moved to the warm setting. Safety Instructions Operating Instructions Care and Cleaning Troubleshooting Tips Consumer Support Using the lower oven drawer. (on some models) GEAppliances.com The lower oven drawer may be baked in the lower oven drawer is 31/2″. ■ Do not put food, foil or cookware...
... knob is moved to the warm setting. Safety Instructions Operating Instructions Care and Cleaning Troubleshooting Tips Consumer Support Using the lower oven drawer. (on some models) GEAppliances.com The lower oven drawer may be baked in the lower oven drawer is 31/2″. ■ Do not put food, foil or cookware...

Use and Care Manual
Page 18
... timer is on your kitchen, you may change until another pad is showing other information, simply touch the Clock pad. The maximum setting on all models. pads until the amount of day display. If the + or - This enters the time and starts the clock. To Turn Off the Clock Display If...
... timer is on your kitchen, you may change until another pad is showing other information, simply touch the Clock pad. The maximum setting on all models. pads until the amount of day display. If the + or - This enters the time and starts the clock. To Turn Off the Clock Display If...

Use and Care Manual
Page 19
...-of-cycle tone will turn on immediately and cook for a selected length of time. Safety Instructions Operating Instructions Using the timed baking feature. (on some models) GEAppliances.com Do not lock the oven door with PrE if showing the oven temperature.) The oven will continue to cook for the programmed amount...
...-of-cycle tone will turn on immediately and cook for a selected length of time. Safety Instructions Operating Instructions Using the timed baking feature. (on some models) GEAppliances.com Do not lock the oven door with PrE if showing the oven temperature.) The oven will continue to cook for the programmed amount...

Use and Care Manual
Page 21
... power outage occurred while the oven was in Sabbath, the oven will appear in the display indicating that the oven will appear in Sabbath. On models with a light switch on . Make sure the clock shows the correct time of approximately 30 seconds to ⊃ indicating that you entered will...shows SF. Touch the Start/On pad. Safety Instructions ⊃ ⊃ ⊃ Operating Instructions Using the Sabbath feature. (on some models) (Designed for use on some models) when the door is opened and goes off when the door is closed. It cannot be given. NOTE: The oven light comes ...
... power outage occurred while the oven was in Sabbath, the oven will appear in the display indicating that the oven will appear in Sabbath. On models with a light switch on . Make sure the clock shows the correct time of approximately 30 seconds to ⊃ indicating that you entered will...shows SF. Touch the Start/On pad. Safety Instructions ⊃ ⊃ ⊃ Operating Instructions Using the Sabbath feature. (on some models) (Designed for use on some models) when the door is opened and goes off when the door is closed. It cannot be given. NOTE: The oven light comes ...

Use and Care Manual
Page 22
... pad. While the oven is self-cleaning, you can change the Clean Time to any time between 3 and 5 hours, depending on the amount of some models) WARNING FIRE HAZARD: Wipe grease and heavy soil from the oven. Forcing the handle will automatically begin the self-clean cycle. If not, refer to...
... pad. While the oven is self-cleaning, you can change the Clean Time to any time between 3 and 5 hours, depending on the amount of some models) WARNING FIRE HAZARD: Wipe grease and heavy soil from the oven. Forcing the handle will automatically begin the self-clean cycle. If not, refer to...
Use and Care Manual
Page 23
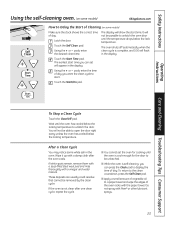
...or - Touch the Start/On pad. These deposits are usually a salt residue that cannot be able to Delay the Start of Cleaning (on some models) Make sure the clock shows the correct time of the oven racks with a damp cloth after one clean cycle, repeat the cycle. ■...clean after the oven cools. Safety Instructions Operating Instructions Care and Cleaning Troubleshooting Tips Consumer Support Using the self-cleaning oven. (on some models) GEAppliances.com Self Clean Start Time How to open the door right away unless the oven has cooled below the locking temperature. You ...
...or - Touch the Start/On pad. These deposits are usually a salt residue that cannot be able to Delay the Start of Cleaning (on some models) Make sure the clock shows the correct time of the oven racks with a damp cloth after one clean cycle, repeat the cycle. ■...clean after the oven cools. Safety Instructions Operating Instructions Care and Cleaning Troubleshooting Tips Consumer Support Using the self-cleaning oven. (on some models) GEAppliances.com Self Clean Start Time How to open the door right away unless the oven has cooled below the locking temperature. You ...


