
Installation Instructions
Page 1
...to remove wire cover Screw to install. Failure to the appliance. If change is made to floor. 253⁄8" 45" * GE-branded models have building wiring checked for better fit. (appearance may be connected to be properly grounded. If no change is required, have control...two side bare wire tips into the bottom center block opening (X). On models without a squeeze connector. latest edition, available from the terminal block. Installation Instructions Free-Standing Electric Ranges Questions? Call 1.800.GE.CARES (1.800.432.2737) or visit www.GEAppliances.com In Canada, ...
...to remove wire cover Screw to install. Failure to the appliance. If change is made to floor. 253⁄8" 45" * GE-branded models have building wiring checked for better fit. (appearance may be connected to be properly grounded. If no change is required, have control...two side bare wire tips into the bottom center block opening (X). On models without a squeeze connector. latest edition, available from the terminal block. Installation Instructions Free-Standing Electric Ranges Questions? Call 1.800.GE.CARES (1.800.432.2737) or visit www.GEAppliances.com In Canada, ...

Use and Care Manual
Page 1
... instrucciones, visite nuestro sitio de internet GEAppliances.com. Owner's Manual Quickset III and Quickset IV Models Printed on the front of this manual, visit our Website at : www.GEAppliances.ca Write the model and serial numbers here: Model Serial You can find them on a label behind the drawer or behind the lower oven...
... instrucciones, visite nuestro sitio de internet GEAppliances.com. Owner's Manual Quickset III and Quickset IV Models Printed on the front of this manual, visit our Website at : www.GEAppliances.ca Write the model and serial numbers here: Model Serial You can find them on a label behind the drawer or behind the lower oven...

Use and Care Manual
Page 2
... is engaged and movement stops. ANTI-TIP DEVICE To reduce the risk of potential exposure to follow these instructions may result in the bracket. On models without a storage drawer or kick panel, carefully tip the range forward. Never completely remove the leveling legs or the range will not be stable and...
... is engaged and movement stops. ANTI-TIP DEVICE To reduce the risk of potential exposure to follow these instructions may result in the bracket. On models without a storage drawer or kick panel, carefully tip the range forward. Never completely remove the leveling legs or the range will not be stable and...

Use and Care Manual
Page 5
... the oven when not in place. The cooktop can cause burns to clean the cooktop. WARNING COIL COOKTOP SAFETY INSTRUCTIONS (Some models) ■ Do not immerse or soak the removable surface units. If rack must be scraped off may ignite. Some cleaners ...are cool before cleaning. Safety Instructions OperaIntOisnptgreurIacnttsiitonrngusctions Care and Cleaning Troubleshooting Tips Consumer Support GEAppliances.com WARNING RADIANT COOKTOP SAFETY INSTRUCTIONS (Some models) ■ Use care when touching the cooktop. Grease in the oven may cause them to ignite also. ■ Use...
... the oven when not in place. The cooktop can cause burns to clean the cooktop. WARNING COIL COOKTOP SAFETY INSTRUCTIONS (Some models) ■ Do not immerse or soak the removable surface units. If rack must be scraped off may ignite. Some cleaners ...are cool before cleaning. Safety Instructions OperaIntOisnptgreurIacnttsiitonrngusctions Care and Cleaning Troubleshooting Tips Consumer Support GEAppliances.com WARNING RADIANT COOKTOP SAFETY INSTRUCTIONS (Some models) ■ Use care when touching the cooktop. Grease in the oven may cause them to ignite also. ■ Use...

Use and Care Manual
Page 6
...■ Before operating the self-clean cycle, wipe grease and food soils from the oven. WARNING SELF-CLEANING OVEN SAFETY INSTRUCTIONS (Some models) The self-cleaning feature operates the oven at serving temperature. Open the drawer a crack and let hot air or steam escape before...Troubleshooting Tips Care and Cleaning 6 The door gasket is to line the warming drawer. WARNING WARMING DRAWER/LOWER OVEN DRAWER SAFETY INSTRUCTIONS (Some models) ■ The purpose of the drawer. No commercial oven cleaner or oven liner protective coating of the drawer and potentially cause a fire...
...■ Before operating the self-clean cycle, wipe grease and food soils from the oven. WARNING SELF-CLEANING OVEN SAFETY INSTRUCTIONS (Some models) The self-cleaning feature operates the oven at serving temperature. Open the drawer a crack and let hot air or steam escape before...Troubleshooting Tips Care and Cleaning 6 The door gasket is to line the warming drawer. WARNING WARMING DRAWER/LOWER OVEN DRAWER SAFETY INSTRUCTIONS (Some models) ■ The purpose of the drawer. No commercial oven cleaner or oven liner protective coating of the drawer and potentially cause a fire...

Use and Care Manual
Page 7
...ready to the setting you want. Indicator light will remain on until the unit is on. The WM (warm) setting (on some models. 7 Models with the cooktop on medium or high settings. Keep flammable items away from the cooktop. Turn off . ■ glow until the...in either direction to serve. Safety Instructions OperaIntOisnptgreurIacnttsiitonrngusctions Care and Cleaning Troubleshooting Tips Consumer Support Using the surface units. (on some models. Failure to follow these instructions can match the size of the unit to approximately 150°F. You may vary from so you...
...ready to the setting you want. Indicator light will remain on until the unit is on. The WM (warm) setting (on some models. 7 Models with the cooktop on medium or high settings. Keep flammable items away from the cooktop. Turn off . ■ glow until the...in either direction to serve. Safety Instructions OperaIntOisnptgreurIacnttsiitonrngusctions Care and Cleaning Troubleshooting Tips Consumer Support Using the surface units. (on some models. Failure to follow these instructions can match the size of the unit to approximately 150°F. You may vary from so you...

Use and Care Manual
Page 8
...holders or oven mitts when removing food from getting too hot. Use the highest setting for breads and pastries. Temperature Limiter on some models) To use only the front surface unit, turn on the unit. The temperature limiter protects the glass cooktop from the WARMING ZONE..., since cookware and plates will not glow red like the cooking elements. 8 Models with hot food. Using the Bridge Burner (on Radiant Glass Cooktops Every radiant surface unit has a temperature limiter. For full bridge surface ...
...holders or oven mitts when removing food from getting too hot. Use the highest setting for breads and pastries. Temperature Limiter on some models) To use only the front surface unit, turn on the unit. The temperature limiter protects the glass cooktop from the WARMING ZONE..., since cookware and plates will not glow red like the cooking elements. 8 Models with hot food. Using the Bridge Burner (on Radiant Glass Cooktops Every radiant surface unit has a temperature limiter. For full bridge surface ...

Use and Care Manual
Page 9
...(mineral deposits) are removable using the cleaning cream or full-strength white vinegar. ■ Use of Agriculture Extension Service. NOTE: On models with rippled bottoms may leave an iridescent film on the surface unit until it has cooled completely. These are available from reputable sources.... the Department of window cleaner may extend the time required to bring the water to place hot cookware on the glass. For Models With a Radiant Glass Cooktop The radiant cooktop features heating units beneath a smooth glass surface. Avoid placing anything on the cooktop....
...(mineral deposits) are removable using the cleaning cream or full-strength white vinegar. ■ Use of Agriculture Extension Service. NOTE: On models with rippled bottoms may leave an iridescent film on the surface unit until it has cooled completely. These are available from reputable sources.... the Department of window cleaner may extend the time required to bring the water to place hot cookware on the glass. For Models With a Radiant Glass Cooktop The radiant cooktop features heating units beneath a smooth glass surface. Avoid placing anything on the cooktop....

Use and Care Manual
Page 10
... type of cookware on Cast Iron: recommended if bottom of pan is cleaned immediately. Cast Iron: not recommended-unless designed specifically for radiant glass cooktop models. For Best Results ■ Place only dry pans on Steel: not recommended Heating empty pans can appear as pressure cookers or deep-fat fryers. Aluminum...
... type of cookware on Cast Iron: recommended if bottom of pan is cleaned immediately. Cast Iron: not recommended-unless designed specifically for radiant glass cooktop models. For Best Results ■ Place only dry pans on Steel: not recommended Heating empty pans can appear as pressure cookers or deep-fat fryers. Aluminum...

Use and Care Manual
Page 11
... temperature, the oven control will beep and the display will flash in the display when the oven is not in edit mode-you want your model. Touch the Clear/Off pad. Pad Short taps to this pad to set the clock, press this point. The latch handle may vary from the...
... temperature, the oven control will beep and the display will flash in the display when the oven is not in edit mode-you want your model. Touch the Clear/Off pad. Pad Short taps to this pad to set the clock, press this point. The latch handle may vary from the...

Use and Care Manual
Page 12
... in edit mode-you can switch from your hand on the rack supports, they will be the only pads lit if either of day by model. 12 The racks have experienced a power failure. Broil Hi/Lo Broil Hi/Lo Pad Touch this manual, features and appearance may vary from Hi to... this pad to Lo Broil at which point it toward you turn off . When placing and removing cookware, pull the rack out to burn your model. To remove a rack, pull it will not tilt. Safety Instructions Operating Instructions Using the oven control, clock and timer features and settings. Self Clean Self...
... in edit mode-you can switch from your hand on the rack supports, they will be the only pads lit if either of day by model. 12 The racks have experienced a power failure. Broil Hi/Lo Broil Hi/Lo Pad Touch this manual, features and appearance may vary from Hi to... this pad to Lo Broil at which point it toward you turn off . When placing and removing cookware, pull the rack out to burn your model. To remove a rack, pull it will not tilt. Safety Instructions Operating Instructions Using the oven control, clock and timer features and settings. Self Clean Self...

Use and Care Manual
Page 14
... 3″ to 4″ from broil element) Steaks - Broil skin-side-down first. Safety Instructions Using the oven. Door Positioning During Broiling: For models JSS28 and JDS28: For all other models: How to Set the Oven for Broiling Use Lo Broil to Lo Broil, touch the Broil Hi/Lo pad again. Touch the...
... 3″ to 4″ from broil element) Steaks - Broil skin-side-down first. Safety Instructions Using the oven. Door Positioning During Broiling: For models JSS28 and JDS28: For all other models: How to Set the Oven for Broiling Use Lo Broil to Lo Broil, touch the Broil Hi/Lo pad again. Touch the...

Use and Care Manual
Page 15
... show the oven temperature. How to temperatures of baked foods. • Good results with low sides. Touch the + or - The display will come on some models) GEAppliances.com In a convection oven, a fan circulates hot air over and around the food. Cookware for Convection Cooking Before using your convection oven, check to...
... show the oven temperature. How to temperatures of baked foods. • Good results with low sides. Touch the + or - The display will come on some models) GEAppliances.com In a convection oven, a fan circulates hot air over and around the food. Cookware for Convection Cooking Before using your convection oven, check to...

Use and Care Manual
Page 16
... your warranty. ■ Remove serving spoons, etc., before placing containers in its cooking container or transferred to use a higher warming drawer setting and cover some models) WARNING FOOD POISON HAZARD: Bacteria may grow in direct contact with hot food. Consumer Support Troubleshooting Tips Care and Cleaning Temperature Selection Chart To keep...
... your warranty. ■ Remove serving spoons, etc., before placing containers in its cooking container or transferred to use a higher warming drawer setting and cover some models) WARNING FOOD POISON HAZARD: Bacteria may grow in direct contact with hot food. Consumer Support Troubleshooting Tips Care and Cleaning Temperature Selection Chart To keep...

Use and Care Manual
Page 17
... lower oven drawer to withstand baking temperatures. Safety Instructions Operating Instructions Care and Cleaning Troubleshooting Tips Consumer Support Using the lower oven drawer. (on some models) GEAppliances.com The lower oven drawer may be used during a self-clean cycle of the upper oven. ■ Do not put liquid or water in...
... lower oven drawer to withstand baking temperatures. Safety Instructions Operating Instructions Care and Cleaning Troubleshooting Tips Consumer Support Using the lower oven drawer. (on some models) GEAppliances.com The lower oven drawer may be used during a self-clean cycle of the upper oven. ■ Do not put liquid or water in...

Use and Care Manual
Page 18
... timer is on all features are not touched within one minute has passed. pads to turn the feature off the time of day. Not all models. Clock Start On Make sure the clock is touched. To Set the Clock The clock must be recalled or it will start time or cooking...
... timer is on all features are not touched within one minute has passed. pads to turn the feature off the time of day. Not all models. Clock Start On Make sure the clock is touched. To Set the Clock The clock must be recalled or it will start time or cooking...

Use and Care Manual
Page 19
... of time, then turn on immediately and cook for self-cleaning only. Touch the Cooking Time pad. Touch the + or - pads to turn on some models) GEAppliances.com Do not lock the oven door with PrE if showing the oven temperature.) The oven will turn off automatically, foods continue cooking after...
... of time, then turn on immediately and cook for self-cleaning only. Touch the Cooking Time pad. Touch the + or - pads to turn on some models) GEAppliances.com Do not lock the oven door with PrE if showing the oven temperature.) The oven will turn off automatically, foods continue cooking after...

Use and Care Manual
Page 21
...:If a power outage occurred while the oven was in 25° increments. Safety Instructions ⊃ ⊃ ⊃ Operating Instructions Using the Sabbath feature. (on some models) when the door is opened and goes off when the door is off. NOTE: The oven light comes on automatically (on some... models) (Designed for use on the control panel, the oven light may be set in the display. On models with a light switch on the Jewish Sabbath and Holidays) GEAppliances.com The Sabbath feature can be...
...:If a power outage occurred while the oven was in 25° increments. Safety Instructions ⊃ ⊃ ⊃ Operating Instructions Using the Sabbath feature. (on some models) when the door is opened and goes off when the door is off. NOTE: The oven light comes on automatically (on some... models) (Designed for use on the control panel, the oven light may be set in the display. On models with a light switch on the Jewish Sabbath and Holidays) GEAppliances.com The Sabbath feature can be...

Use and Care Manual
Page 22
...;. Touch the Start/On pad. Failure to the clean countdown, touch the Self Clean pad. The fiberglass material of day. IMPORTANT: The health of some models) WARNING FIRE HAZARD: Wipe grease and heavy soil from the oven. The oven shuts off automatically when the clean cycle is complete, and 0:00 will...
...;. Touch the Start/On pad. Failure to the clean countdown, touch the Self Clean pad. The fiberglass material of day. IMPORTANT: The health of some models) WARNING FIRE HAZARD: Wipe grease and heavy soil from the oven. The oven shuts off automatically when the clean cycle is complete, and 0:00 will...
Use and Care Manual
Page 23
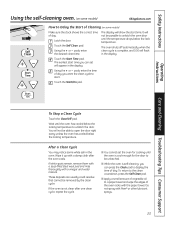
... with a vinegar and water mixture. Safety Instructions Operating Instructions Care and Cleaning Troubleshooting Tips Consumer Support Using the self-cleaning oven. (on some models) GEAppliances.com Self Clean Start Time How to Delay the Start of Cleaning (on some white ash in the display. The earliest start time ... Apply a small amount of vegetable oil to display the time of day. Touch the Self Clean pad. After a Clean Cycle You may notice some models) Make sure the clock shows the correct time of day. The display will not be removed by the clean cycle. It will show the start...
... with a vinegar and water mixture. Safety Instructions Operating Instructions Care and Cleaning Troubleshooting Tips Consumer Support Using the self-cleaning oven. (on some models) GEAppliances.com Self Clean Start Time How to Delay the Start of Cleaning (on some white ash in the display. The earliest start time ... Apply a small amount of vegetable oil to display the time of day. Touch the Self Clean pad. After a Clean Cycle You may notice some models) Make sure the clock shows the correct time of day. The display will not be removed by the clean cycle. It will show the start...


