

Owners Manual
Page 1
Microwave Oven GEAppliances.com Safety Instructions 2-6 Operating Instructions Convenience Features 12,13 Microwave Terms 15 Oven Features 7, 8 Other Features 14 Power Levels 9 Time Features 10,11 Care and Cleaning 16 Troubleshooting Tips 18 Things That Are Normal 18 Consumer Support Consumer Support 20 Warranty 19 Owner's Manual JES2150 Write the model and serial numbers here: Model Serial You can find them on a label inside the oven. 49-40635 08-10 GE
Microwave Oven GEAppliances.com Safety Instructions 2-6 Operating Instructions Convenience Features 12,13 Microwave Terms 15 Oven Features 7, 8 Other Features 14 Power Levels 9 Time Features 10,11 Care and Cleaning 16 Troubleshooting Tips 18 Things That Are Normal 18 Consumer Support Consumer Support 20 Warranty 19 Owner's Manual JES2150 Write the model and serial numbers here: Model Serial You can find them on a label inside the oven. 49-40635 08-10 GE

Owners Manual
Page 7
...Turntable Support. Removable Turntable. Turntable and support must be viewed while keeping microwaves confined in the display. Zero Standby Feature (on some models) Your GE microwave has a "Zero Standby" feature. Window with Metal Shield. Screen allows cooking to reset the clock in the oven. Door ...a standby mode. If you would like to open door. The turntable may vary from your clock continuously, do not use your model. 1200 Watts GEAppliances.com Features of the Oven Door Latches. Eliminating standby power can reduce your microwave oven. IMPORTANT: When using ...
...Turntable Support. Removable Turntable. Turntable and support must be viewed while keeping microwaves confined in the display. Zero Standby Feature (on some models) Your GE microwave has a "Zero Standby" feature. Window with Metal Shield. Screen allows cooking to reset the clock in the oven. Door ...a standby mode. If you would like to open door. The turntable may vary from your clock continuously, do not use your model. 1200 Watts GEAppliances.com Features of the Oven Door Latches. Eliminating standby power can reduce your microwave oven. IMPORTANT: When using ...
Owners Manual
Page 8
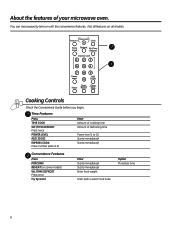
Convenience Features Press POPCORN REHEAT (on all features on some models) Wt./TIME DEFROST Press once My Pyramid Enter Option Starts immediately! Time Features Press TIME COOK WT./TIME DEFROST Press twice POWER LEVEL ADD 30 ... time Amount of your microwave oven. More/less time Starts immediately! About the features of defrosting time Power level 1 to select Food Code 8 Not all models. MyPyramid Popcorn Clock Time Reheat Wt./Time Cook Defrost Express Cook 1 23 4 56 7 Power Level 89 Add 0 30 Sec Start Clear Timer Pause Stop Cooking...
Convenience Features Press POPCORN REHEAT (on all features on some models) Wt./TIME DEFROST Press once My Pyramid Enter Option Starts immediately! Time Features Press TIME COOK WT./TIME DEFROST Press twice POWER LEVEL ADD 30 ... time Amount of your microwave oven. More/less time Starts immediately! About the features of defrosting time Power level 1 to select Food Code 8 Not all models. MyPyramid Popcorn Clock Time Reheat Wt./Time Cook Defrost Express Cook 1 23 4 56 7 Power Level 89 Add 0 30 Sec Start Clear Timer Pause Stop Cooking...

Owners Manual
Page 13
... will start with no serving selection needed. 4 Press START. Place the package of servings (1-4) for codes. 3 Enter the number of popcorn in succession on some models) Allows you to microwave healthy food choices by servings or with prepackaged microwave popcorn weighing 3.0 to 3.5 ounces. For Code 4-11, the oven can start immediately...
... will start with no serving selection needed. 4 Press START. Place the package of servings (1-4) for codes. 3 Enter the number of popcorn in succession on some models) Allows you to microwave healthy food choices by servings or with prepackaged microwave popcorn weighing 3.0 to 3.5 ounces. For Code 4-11, the oven can start immediately...

Owners Manual
Page 16
... rinse with a damp cloth. others may be used, but be certain to Clean the Inside Walls, Floor, Inside Window, Metal and Plastic Parts on some models) Do not use a hot, damp cloth with a dry, clean cloth. Removable Turntable and Turntable Support To prevent breakage, do not operate the oven without the...
... rinse with a damp cloth. others may be used, but be certain to Clean the Inside Walls, Floor, Inside Window, Metal and Plastic Parts on some models) Do not use a hot, damp cloth with a dry, clean cloth. Removable Turntable and Turntable Support To prevent breakage, do not operate the oven without the...


