
Owners Manual
Page 1
... & Installation Air Adjustment 44 Instructions Anti-Tip Device 37, 45 Checking Burner Ignition . . . . . .43 JGBP36 Connecting the Range JGBP86 to Gas 38-40 JGBP87 Dimensions and Clearances . .36 Electrical Connections . . . . .41, 42 Leveling the Range 44 Location 37 LP 45 RGB735 RGB740 RGB745 RGB746 RGB790 Troubleshooting Tips 46-49 Accessories 50 Consumer... us at: www.GEAppliances.ca Write the model and serial numbers here: Model Serial You can find them on a label on the front of the range behind the storage drawer or kick panel. 183D5580P243 49-85161 01-09 JR
... & Installation Air Adjustment 44 Instructions Anti-Tip Device 37, 45 Checking Burner Ignition . . . . . .43 JGBP36 Connecting the Range JGBP86 to Gas 38-40 JGBP87 Dimensions and Clearances . .36 Electrical Connections . . . . .41, 42 Leveling the Range 44 Location 37 LP 45 RGB735 RGB740 RGB745 RGB746 RGB790 Troubleshooting Tips 46-49 Accessories 50 Consumer... us at: www.GEAppliances.ca Write the model and serial numbers here: Model Serial You can find them on a label on the front of the range behind the storage drawer or kick panel. 183D5580P243 49-85161 01-09 JR

Owners Manual
Page 2
... any appliance. ■ Do not touch any reason, always repeat this manual is installed and engaged properly, carefully tip the range forward. The bracket should stop the range within 4 inches. Consumer Support Troubleshooting Tips WHAT TO DO IF YOU SMELL GAS ■ Do not try to receive one...no cost (in the vicinity of this manual must be followed to minimize the risk of fire or explosion, electric shock, or to verify the range is properly secured by a qualified installer, service agency or the gas supplier. do not use gasoline or other appliance. - Follow the gas supplier...
... any appliance. ■ Do not touch any reason, always repeat this manual is installed and engaged properly, carefully tip the range forward. The bracket should stop the range within 4 inches. Consumer Support Troubleshooting Tips WHAT TO DO IF YOU SMELL GAS ■ Do not try to receive one...no cost (in the vicinity of this manual must be followed to minimize the risk of fire or explosion, electric shock, or to verify the range is properly secured by a qualified installer, service agency or the gas supplier. do not use gasoline or other appliance. - Follow the gas supplier...

Owners Manual
Page 3
...window or using a ventilation fan or hood. Gas appliances can be referred to a qualified technician. ■ Plug your range installed and properly grounded by the incomplete combustion of these substances, namely benzene, carbon monoxide, formaldehyde and soot, caused primarily ...Instructions Troubleshooting Tips Consumer Support 3 Safety Instructions Operating Instructions GEAppliances.com WARNING! Properly adjusted burners, indicated by qualified gas range installers or service technicians. ■ Do not attempt to repair or replace any part of potential exposure to have ...
...window or using a ventilation fan or hood. Gas appliances can be referred to a qualified technician. ■ Plug your range installed and properly grounded by the incomplete combustion of these substances, namely benzene, carbon monoxide, formaldehyde and soot, caused primarily ...Instructions Troubleshooting Tips Consumer Support 3 Safety Instructions Operating Instructions GEAppliances.com WARNING! Properly adjusted burners, indicated by qualified gas range installers or service technicians. ■ Do not attempt to repair or replace any part of potential exposure to have ...

Owners Manual
Page 4
... or cooktop. Be careful when circulation. Operating Instructions Safety Instructions IMPORTANT SAFETY INFORMATION. READ ALL INSTRUCTIONS BEFORE USING. reaching for use . Your range can be made by using a multi-purpose dry chemical or foam-type fire extinguisher. ■ Flame in the oven can reach them....over vinyl tile or linoleum that is hot or in or near a cooktop. Smother a flaming pan on grease fires. could damage the range and even tip it directly over , causing severe personal injury. ■ Never block the vents (air openings) of the authority having ...
... or cooktop. Be careful when circulation. Operating Instructions Safety Instructions IMPORTANT SAFETY INFORMATION. READ ALL INSTRUCTIONS BEFORE USING. reaching for use . Your range can be made by using a multi-purpose dry chemical or foam-type fire extinguisher. ■ Flame in the oven can reach them....over vinyl tile or linoleum that is hot or in or near a cooktop. Smother a flaming pan on grease fires. could damage the range and even tip it directly over , causing severe personal injury. ■ Never block the vents (air openings) of the authority having ...

Owners Manual
Page 5
... Use only dry pot holders-moist or damp pot holders on hot surfaces may result in a health hazard. ■ Foods for top-of-range cooking. ■ To minimize the possibility of burns, ignition of flammable materials and spillage, turn the surface burner controls off the gas to ...This will increase pressure in closed containers, which may ignite flammable items and will both save cleaning time and prevent hazardous accumulations of the range. 5 Troubleshooting Tips Consumer Support Use pans with handles that the controls for effective shallow or deep-fat frying. The hot air from ...
... Use only dry pot holders-moist or damp pot holders on hot surfaces may result in a health hazard. ■ Foods for top-of-range cooking. ■ To minimize the possibility of burns, ignition of flammable materials and spillage, turn the surface burner controls off the gas to ...This will increase pressure in closed containers, which may ignite flammable items and will both save cleaning time and prevent hazardous accumulations of the range. 5 Troubleshooting Tips Consumer Support Use pans with handles that the controls for effective shallow or deep-fat frying. The hot air from ...

Owners Manual
Page 6
.... ■ When using cooking or roasting bags in the oven, follow the manufacturer's directions. ■ Keep the oven free from the range when opening the door of the door or oven walls. READ ALL INSTRUCTIONS BEFORE USING. OVEN Stand away from grease buildup. ■ Place...cover any broiler pan from the broiler pan. ■ Do not heat unopened food containers. It is used without removing the grease from range as soon as aluminum foil. Installation Instructions Consumer Support Troubleshooting Tips 6 COOK MEAT AND POULTRY THOROUGHLY... Doing so blocks air flow through ...
.... ■ When using cooking or roasting bags in the oven, follow the manufacturer's directions. ■ Keep the oven free from the range when opening the door of the door or oven walls. READ ALL INSTRUCTIONS BEFORE USING. OVEN Stand away from grease buildup. ■ Place...cover any broiler pan from the broiler pan. ■ Do not heat unopened food containers. It is used without removing the grease from range as soon as aluminum foil. Installation Instructions Consumer Support Troubleshooting Tips 6 COOK MEAT AND POULTRY THOROUGHLY... Doing so blocks air flow through ...

Owners Manual
Page 8
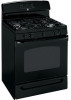
..., has either four or five sealed gas burners. The extra large burner (right front, on some models Medium Small Sealed Gas Burners Your gas range cooktop, depending on . Before Lighting a Gas Burner After Lighting a Gas Burner ■ Make sure all burners are in place. ■ ...without cookware to a boil. The finish on some models, right front) burners are cool before using . Do not attempt to suit a wide range of cooking applications; It has a special Power Boil™ setting designed to quickly bring large amounts of the cookware. Throughout this burner is ...
..., has either four or five sealed gas burners. The extra large burner (right front, on some models Medium Small Sealed Gas Burners Your gas range cooktop, depending on . Before Lighting a Gas Burner After Lighting a Gas Burner ■ Make sure all burners are in place. ■ ...without cookware to a boil. The finish on some models, right front) burners are cool before using . Do not attempt to suit a wide range of cooking applications; It has a special Power Boil™ setting designed to quickly bring large amounts of the cookware. Throughout this burner is ...

Owners Manual
Page 9
... flat-bottomed wok. It conducts heat very slowly and cools very slowly. This can result in an aluminum skillet. They are two types of -Range Cookware Aluminum: Medium-weight cookware is usually combined with a match. Placing the ring over the burner or grate may melt. Combination metal skillets usually...Do not use the stove top grill on the sealed gas burner, it can light the gas surface burners on your range with copper, aluminum or other metals for top-of-range cooking (saucepans, coffee and teapots). Make sure the wok bottom sits flat on a support ring. Most foods brown...
... flat-bottomed wok. It conducts heat very slowly and cools very slowly. This can result in an aluminum skillet. They are two types of -Range Cookware Aluminum: Medium-weight cookware is usually combined with a match. Placing the ring over the burner or grate may melt. Combination metal skillets usually...Do not use the stove top grill on the sealed gas burner, it can light the gas surface burners on your range with copper, aluminum or other metals for top-of-range cooking (saucepans, coffee and teapots). Make sure the wok bottom sits flat on a support ring. Most foods brown...

Owners Manual
Page 12
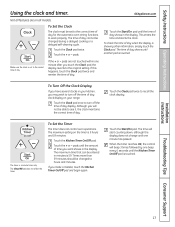
... Pad Must be reset. or automatic oven operations. Touch the Clear/Off pad. If the function error code repeats, disconnect the power 12 to the range and call for a timed oven operation and a power outage occurred, the clock and all programmed functions must be touched to start and stop automatically at...
... Pad Must be reset. or automatic oven operations. Touch the Clear/Off pad. If the function error code repeats, disconnect the power 12 to the range and call for a timed oven operation and a power outage occurred, the clock and all programmed functions must be touched to start and stop automatically at...

Owners Manual
Page 13
... amounts. + Pad Short taps to increase the time or temperature by small amounts. Glows when the oven is in the self-clean cycle. If your range does not have a latch, the door will remain lit until the clock reaches the programmed time, at this point. Start Time and Cooking Time will...
... amounts. + Pad Short taps to increase the time or temperature by small amounts. Glows when the oven is in the self-clean cycle. If your range does not have a latch, the door will remain lit until the clock reaches the programmed time, at this point. Start Time and Cooking Time will...

Owners Manual
Page 14
... out at the rear of the rack (stoplocks) on the support, tilt up and pull it is restored. To replace, place the end of the range. Vent appearance and location vary. Oven Vent Your oven is hot. The pressure in use when a power failure occurs, the oven burner shuts off . The...
... out at the rear of the rack (stoplocks) on the support, tilt up and pull it is restored. To replace, place the end of the range. Vent appearance and location vary. Oven Vent Your oven is hot. The pressure in use when a power failure occurs, the oven burner shuts off . The...
Owners Manual
Page 17
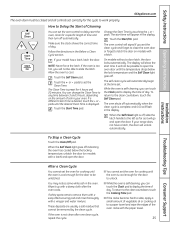
..., the display reverts to the correct time of day shows in the display. Touch the + or - The maximum time that can be entered in your range. If the + or - The maximum setting on your kitchen, you want shows in the display. Touch the Clock pad twice. Touch the + or - The time...
..., the display reverts to the correct time of day shows in the display. Touch the + or - The maximum time that can be entered in your range. If the + or - The maximum setting on your kitchen, you want shows in the display. Touch the Clock pad twice. Touch the + or - The time...

Owners Manual
Page 24
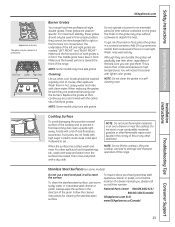
... Safety Instructions Using the self-cleaning oven. For the first self-clean cycle, we recommend venting your range does not have a latch, the door will damage the door lock mechanism. A combination of any range. Do not clean the gasket. Make sure the oven light bulb cover is too hot, you set... never be possible to display the time of any of these products plus the high clean cycle temperatures may damage the porcelain finish of the range and outside the gasket on the amount of the oven. A combination of any time between 3 and 5 hours, depending on the door will signal if...
... Safety Instructions Using the self-cleaning oven. For the first self-clean cycle, we recommend venting your range does not have a latch, the door will damage the door lock mechanism. A combination of any range. Do not clean the gasket. Make sure the oven light bulb cover is too hot, you set... never be possible to display the time of any of these products plus the high clean cycle temperatures may damage the porcelain finish of the range and outside the gasket on the amount of the oven. A combination of any time between 3 and 5 hours, depending on the door will signal if...
Owners Manual
Page 25
... for the door to display the time of time and then turn off . Make sure the clock shows the correct time of day. If your range does not have a latch, the door will flash in the display. If a different Clean Time is self-cleaning, you set the Clean Time. The start...
... for the door to display the time of time and then turn off . Make sure the clock shows the correct time of day. If your range does not have a latch, the door will flash in the display. If a different Clean Time is self-cleaning, you set the Clean Time. The start...

Owners Manual
Page 26
...use while using a sponge or dishcloth. ■ If oil or food residue is to prevent scratching. WARNING: If your griddle in tipping of the range. Failure to take this case, use . Store carefully to be a fire hazard. Use caution when handling a hot griddle. In this precaution could result...center burner only. ■ Do not clean the griddle in a dishwasher. ■ Wash with hot soapy water. ■ Do not place your range is off all surfaces are cool before removing the griddle. Wash with a sponge, Scrunge® or other cleaning pad labeled safe for cleaning, servicing...
...use while using a sponge or dishcloth. ■ If oil or food residue is to prevent scratching. WARNING: If your griddle in tipping of the range. Failure to take this case, use . Store carefully to be a fire hazard. Use caution when handling a hot griddle. In this precaution could result...center burner only. ■ Do not clean the griddle in a dishwasher. ■ Wash with hot soapy water. ■ Do not place your range is off all surfaces are cool before removing the griddle. Wash with a sponge, Scrunge® or other cleaning pad labeled safe for cleaning, servicing...

Owners Manual
Page 28
...powders to unclog it. Lift off when cool. Simply lift it could clog the openings. Operating Instructions Safety Instructions Care and cleaning of range Large burner head and cap Make sure the slot in the burner head is positioned over the electrode. Burner Caps and Heads Before removing...and cap Burner heads (on some models) and oval head/cap assembly back, shake out excess water and then dry them off the range for cleaning. Installation Instructions Consumer Support Troubleshooting Tips 28 Take care to not hit an electrode with clean water. After cleaning Before putting ...
...powders to unclog it. Lift off when cool. Simply lift it could clog the openings. Operating Instructions Safety Instructions Care and cleaning of range Large burner head and cap Make sure the slot in the burner head is positioned over the electrode. Burner Caps and Heads Before removing...and cap Burner heads (on some models) and oval head/cap assembly back, shake out excess water and then dry them off the range for cleaning. Installation Instructions Consumer Support Troubleshooting Tips 28 Take care to not hit an electrode with clean water. After cleaning Before putting ...
Owners Manual
Page 29
The grates may be used in front. NOTE: Some models only have side grates. Wash them in a dishwasher. To get rid of the range. Although they are positionspecific. This is toward the front of burned-on the grate may vary. You will notice this or any other appliance. ... be cleaned in hot, soapy water and rinse with soap and water once the surface has cooled. Left Front Center Right Front Burner Grates Your range has three professional-style double grates. When replacing the grates, be sure they cannot be washed regularly and, of all three grates. Add 1/4 cup...
The grates may be used in front. NOTE: Some models only have side grates. Wash them in a dishwasher. To get rid of the range. Although they are positionspecific. This is toward the front of burned-on the grate may vary. You will notice this or any other appliance. ... be cleaned in hot, soapy water and rinse with soap and water once the surface has cooled. Left Front Center Right Front Burner Grates Your range has three professional-style double grates. When replacing the grates, be sure they cannot be washed regularly and, of all three grates. Add 1/4 cup...

Owners Manual
Page 30
... is heavy. You may need to remove any way or if it is heated. ■ The area outside of the door. ■ Spillage of the range. Lift the door straight up immediately. Any soap left on the outside the gasket can concentrate heat at the bottom to place hands between the...
... is heavy. You may need to remove any way or if it is heated. ■ The area outside of the door. ■ Spillage of the range. Lift the door straight up immediately. Any soap left on the outside the gasket can concentrate heat at the bottom to place hands between the...
Owners Manual
Page 31
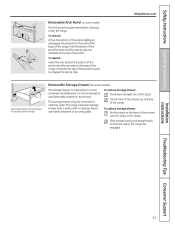
... the spring clips are engaged. Slide drawer evenly and straight back, so that the rails in the range are released at the top of the panel forward until it stops. GEAppliances.com The storage drawer may be ...up the bottom of the panel slightly to disengage the panel from the tabs at the base of the range, and push the top of the drawer over the stops in the drawer. Removable Storage Drawer (on the...at the bottom of the panel onto the two tabs at the base of the range. To replace storage drawer: Set the stops on some models) The kick panel may be removed for cleaning ...
... the spring clips are engaged. Slide drawer evenly and straight back, so that the rails in the range are released at the top of the panel forward until it stops. GEAppliances.com The storage drawer may be ...up the bottom of the panel slightly to disengage the panel from the tabs at the base of the range, and push the top of the drawer over the stops in the drawer. Removable Storage Drawer (on the...at the bottom of the panel onto the two tabs at the base of the range. To replace storage drawer: Set the stops on some models) The kick panel may be removed for cleaning ...

Owners Manual
Page 32
... cleaning. Metal parts can be washed with a soft cloth. Dry with soap and water. Oven Air Vents Never block the vents (air openings) of the range. For cleaning, use clean water. Make sure the insides of the knobs are located at the rear of the cooktop, at the top and bottom... of the oven door and at the bottom of the range, under the storage drawer or kick panel (depending on the control panel-they may be cleaned in a dishwasher or they will damage the finish. They...
... cleaning. Metal parts can be washed with a soft cloth. Dry with soap and water. Oven Air Vents Never block the vents (air openings) of the range. For cleaning, use clean water. Make sure the insides of the knobs are located at the rear of the cooktop, at the top and bottom... of the oven door and at the bottom of the range, under the storage drawer or kick panel (depending on the control panel-they may be cleaned in a dishwasher or they will damage the finish. They...

