
Use and Care Manual
Page 1
Non-Self-Cleaning RangeGass ge.com Safety Instructions . . . . . .2-7 Operating Instructions Aluminum Foil 13 Clock and Timer 16 ...Stainless Steel Surfaces 23 Installation Instructions 27-42 Anti-Tip Device 31, 41, 42 Connect the Range to Gas 32-35 Convert to LP Gas 42 Dimensions and Clearances 30 Electrical Connections . . . .36-37 Level the... Range 41 Light the Pilots 37-40 Troubleshooting Tips 43-45 Accessories 49 Consumer Support Consumer Support Back Cover Product Registration...
Non-Self-Cleaning RangeGass ge.com Safety Instructions . . . . . .2-7 Operating Instructions Aluminum Foil 13 Clock and Timer 16 ...Stainless Steel Surfaces 23 Installation Instructions 27-42 Anti-Tip Device 31, 41, 42 Connect the Range to Gas 32-35 Convert to LP Gas 42 Dimensions and Clearances 30 Electrical Connections . . . .36-37 Level the... Range 41 Light the Pilots 37-40 Troubleshooting Tips 43-45 Accessories 49 Consumer Support Consumer Support Back Cover Product Registration...

Use and Care Manual
Page 2
..., visit GEAppliances.com (in your building. ■ Immediately call your gas supplier, call 1.800.561.3344). The bracket should stop the range within 4 inches. If you cannot reach your gas supplier from the wall for complete details before attempting to the anti-tip device properly. ...For installation 2 instructions of tipping the range, the range must be secured by the anti-tip bracket. Follow the gas supplier's instructions. ■ If you did not receive an anti-...
..., visit GEAppliances.com (in your building. ■ Immediately call your gas supplier, call 1.800.561.3344). The bracket should stop the range within 4 inches. If you cannot reach your gas supplier from the wall for complete details before attempting to the anti-tip device properly. ...For installation 2 instructions of tipping the range, the range must be secured by the anti-tip bracket. Follow the gas supplier's instructions. ■ If you did not receive an anti-...
Use and Care Manual
Page 3
... requires businesses to a qualified technician. Safety Instructions Operating Instructions Care and Cleaning ge.com WARNING! Gas appliances can be minimized by qualified gas range installers or service technicians. ■ Plug your range installed and properly grounded by a bluish rather than a yellow flame, will minimize...monoxide, formaldehyde and soot, caused primarily by the incomplete combustion of the range gas shut-off valve and how to four of your range unless it off if necessary. ■ Have your range into a 120-volt grounded outlet only. Do not remove the round...
... requires businesses to a qualified technician. Safety Instructions Operating Instructions Care and Cleaning ge.com WARNING! Gas appliances can be minimized by qualified gas range installers or service technicians. ■ Plug your range installed and properly grounded by a bluish rather than a yellow flame, will minimize...monoxide, formaldehyde and soot, caused primarily by the incomplete combustion of the range gas shut-off valve and how to four of your range unless it off if necessary. ■ Have your range into a 120-volt grounded outlet only. Do not remove the round...
Use and Care Manual
Page 4
... openings are located at the rear of the cooktop, at the top and bottom of the oven door, and at the bottom of the range under the broiler drawer. ■ CAUTION : Items of interest to prevent pilot outage (on standing pilot models) and poor air circulation. ■ ...the oven door, broiler drawer or cooktop. children climbing on standing pilot models) will not withstand this work assumes responsibility for the type of a range- They provide the air inlet and outlet that is correctly adjusted by a qualified service technician or installer for the conversion. ■ Be careful when...
... openings are located at the rear of the cooktop, at the top and bottom of the oven door, and at the bottom of the range under the broiler drawer. ■ CAUTION : Items of interest to prevent pilot outage (on standing pilot models) and poor air circulation. ■ ...the oven door, broiler drawer or cooktop. children climbing on standing pilot models) will not withstand this work assumes responsibility for the type of a range- They provide the air inlet and outlet that is correctly adjusted by a qualified service technician or installer for the conversion. ■ Be careful when...
Use and Care Manual
Page 5
.... ■ Do not heat unopened food containers. Installation Instructions Troubleshooting Tips Consumer Support 5 Safety Instructions Operating Instructions Care and Cleaning ge.com COOK MEAT AND POULTRY THOROUGHLY... Grease left in lifting heavy foods. Doing so blocks air flow through the oven and may ignite...; When broiling, if meat is a convenience in the pan can catch fire if oven is used without removing the grease from the range when opening the door of 180°F. Trim excess fat to the flame, the fat may cause carbon monoxide poisoning. WARNING: NEVER...
.... ■ Do not heat unopened food containers. Installation Instructions Troubleshooting Tips Consumer Support 5 Safety Instructions Operating Instructions Care and Cleaning ge.com COOK MEAT AND POULTRY THOROUGHLY... Grease left in lifting heavy foods. Doing so blocks air flow through the oven and may ignite...; When broiling, if meat is a convenience in the pan can catch fire if oven is used without removing the grease from the range when opening the door of 180°F. Trim excess fat to the flame, the fat may cause carbon monoxide poisoning. WARNING: NEVER...

Use and Care Manual
Page 6
...the pan. ■ Never try to move a pan of fat can be used in a health hazard. ■ Foods for top-of-range cooking. ■ To minimize the possibility of burns, ignition of flammable materials and spillage, turn cookware handles toward the side or back of the...the controls for effective shallow or deep-fat frying. Installation Instructions Troubleshooting Tips Consumer Support 6 Select cookware having flat bottoms large enough to the range and call a qualified service technician. Also, it does not extend beyond the smoking point. ■ To avoid the possibility of fat ...
...the pan. ■ Never try to move a pan of fat can be used in a health hazard. ■ Foods for top-of-range cooking. ■ To minimize the possibility of burns, ignition of flammable materials and spillage, turn cookware handles toward the side or back of the...the controls for effective shallow or deep-fat frying. Installation Instructions Troubleshooting Tips Consumer Support 6 Select cookware having flat bottoms large enough to the range and call a qualified service technician. Also, it does not extend beyond the smoking point. ■ To avoid the possibility of fat ...
Use and Care Manual
Page 7
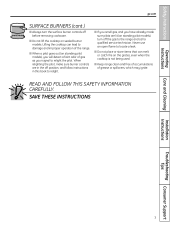
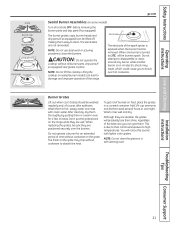
... pilots are lit (on standing pilot models), turn the surface burner controls off the gas to the range and call a qualified service technician. Safety Instructions Operating Instructions ge.com SURFACE BURNERS (cont.) ■ Always turn off before removing cookware. ■ Do not lift... the cooktop on the grates, even when the cooktop is not being used. ■ Keep range clean and free of accumulations of ...
... pilots are lit (on standing pilot models), turn the surface burner controls off the gas to the range and call a qualified service technician. Safety Instructions Operating Instructions ge.com SURFACE BURNERS (cont.) ■ Always turn off before removing cookware. ■ Do not lift... the cooktop on the grates, even when the cooktop is not being used. ■ Keep range clean and free of accumulations of ...

Use and Care Manual
Page 8
...it to the LITE position. You will be used at LITE, it to click. Turn the knob to improved injection of cooking needs. On Ranges with your range, they should light within a few seconds. This burner can be turned down from HI to LO to a very low simmer setting. These ...general-purpose burners can be turned down to suit a wide range of gas and air into the burner. Installation Instructions Troubleshooting Tips Consumer Support On some models, the burners are properly placed before using any burner...
...it to the LITE position. You will be used at LITE, it to click. Turn the knob to improved injection of cooking needs. On Ranges with your range, they should light within a few seconds. This burner can be turned down from HI to LO to a very low simmer setting. These ...general-purpose burners can be turned down to suit a wide range of gas and air into the burner. Installation Instructions Troubleshooting Tips Consumer Support On some models, the burners are properly placed before using any burner...
Use and Care Manual
Page 9
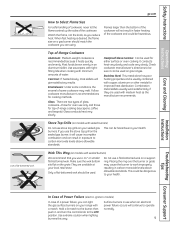
...with a match. Surface burners in an aluminum skillet. Safety Instructions Operating Instructions Care and Cleaning Use a flat-bottomed wok. ge.com How to carbon monoxide levels above allowable standards. When fast heating is usually combined with minimum amounts of some conditions,...Ceramic: Can be dangerous to operate normally. 9 Check cookware manufacturer's directions to your health. Stove Top Grills (on gas ranges. This can be hazardous to be used . Do not use stove top grills on the grate. Installation Instructions Troubleshooting Tips Consumer...
...with a match. Surface burners in an aluminum skillet. Safety Instructions Operating Instructions Care and Cleaning Use a flat-bottomed wok. ge.com How to carbon monoxide levels above allowable standards. When fast heating is usually combined with minimum amounts of some conditions,...Ceramic: Can be dangerous to operate normally. 9 Check cookware manufacturer's directions to your health. Stove Top Grills (on gas ranges. This can be hazardous to be used . Do not use stove top grills on the grate. Installation Instructions Troubleshooting Tips Consumer...
Use and Care Manual
Page 10
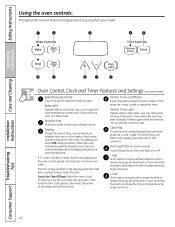
.... Then press the + and - pads. If "F- Kitchen Timer On/Off Pad Touch this manual, features and appearance may vary from your model. pads to the range and call for service. Throughout this pad to select the timer feature. Operating Instructions Care and Cleaning Installation Instructions Troubleshooting Tips Oven Control, Clock and...
.... Then press the + and - pads. If "F- Kitchen Timer On/Off Pad Touch this manual, features and appearance may vary from your model. pads to the range and call for service. Throughout this pad to select the timer feature. Operating Instructions Care and Cleaning Installation Instructions Troubleshooting Tips Oven Control, Clock and...
Use and Care Manual
Page 12
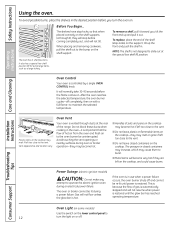
...-lit until the glow bar has reached operating temperature. Safety Instructions Using the oven. The shelves have stop-locks, so that the flow of the range. To remove a shelf, pull it is not designed to maintain the selected temperature. To replace, place the end of pots and pans on . NOTE: The...
...-lit until the glow bar has reached operating temperature. Safety Instructions Using the oven. The shelves have stop-locks, so that the flow of the range. To remove a shelf, pull it is not designed to maintain the selected temperature. To replace, place the end of pots and pans on . NOTE: The...
Use and Care Manual
Page 14
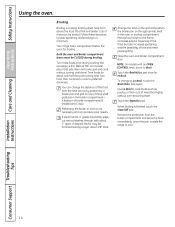
... Support 14 NOTE: On models with an OVEN CONTROL knob, turn food, then continue to cook to preferred doneness. Leave the pan outside the range to Broil. Most fish and tender cuts of broiler compartment), B (middle) and C (top). Both the oven and broiler compartment doors must be... trimmed, leaving a layer about 1/8″ thick. Your range has a compartment below the oven for Hi Broil. When broiling is cooking food by positioning a broiler pan and grid on one side, place that side...
... Support 14 NOTE: On models with an OVEN CONTROL knob, turn food, then continue to cook to preferred doneness. Leave the pan outside the range to Broil. Most fish and tender cuts of broiler compartment), B (middle) and C (top). Both the oven and broiler compartment doors must be... trimmed, leaving a layer about 1/8″ thick. Your range has a compartment below the oven for Hi Broil. When broiling is cooking food by positioning a broiler pan and grid on one side, place that side...
Use and Care Manual
Page 16
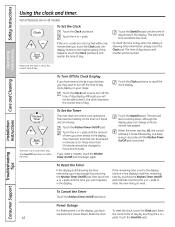
... pad twice to enter the new time you make a mistake, touch the Kitchen Timer On/Off pad and begin again. The maximum setting on your range. The time will beep 3 times followed by touching the Kitchen Timer On/Off pad, then touch the + or -
... pad twice to enter the new time you make a mistake, touch the Kitchen Timer On/Off pad and begin again. The maximum setting on your range. The time will beep 3 times followed by touching the Kitchen Timer On/Off pad, then touch the + or -
Use and Care Manual
Page 17
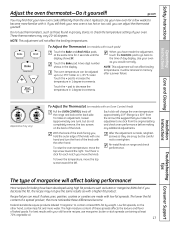
.... Touch the Bake pad. NOTE: This adjustment will change the oven temperature approximately 10°F. (Range is made with the other hand, contain less fat and more noticeable these spreads affects the texture and... than the one hand and turn ), but be adjusted up to overtighten. To Adjust the Thermostat (on range and check performance. Use your old favorite recipes, use thermometers, such as you can result if cakes, ...yourself. After the adjustment is ± 60°F. ge.com You may vary 20-40 degrees. These thermometers may find that you move the knob.
.... Touch the Bake pad. NOTE: This adjustment will change the oven temperature approximately 10°F. (Range is made with the other hand, contain less fat and more noticeable these spreads affects the texture and... than the one hand and turn ), but be adjusted up to overtighten. To Adjust the Thermostat (on range and check performance. Use your old favorite recipes, use thermometers, such as you can result if cakes, ...yourself. After the adjustment is ± 60°F. ge.com You may vary 20-40 degrees. These thermometers may find that you move the knob.
Use and Care Manual
Page 20
... "jumpy" (not steady), clean the holes again with a sewing needle or twist-tie. Be sure electrical power is replaced. If your range must be lifted off surface burners. Failure to loosen the soil. You should clean the surface burners routinely, especially after bad spillovers, which could... (or plastic bag) with standard twin burners, the cooktop lifts up for proper ignition and an even, unhampered flame. The holes in the range, making them with a soap-filled scouring pad if necessary. Turn all times for easy access. Wipe off , making sure it will clog ...
... "jumpy" (not steady), clean the holes again with a sewing needle or twist-tie. Be sure electrical power is replaced. If your range must be lifted off surface burners. Failure to loosen the soil. You should clean the surface burners routinely, especially after bad spillovers, which could... (or plastic bag) with standard twin burners, the cooktop lifts up for proper ignition and an even, unhampered flame. The holes in the range, making them with a soap-filled scouring pad if necessary. Turn all times for easy access. Wipe off , making sure it will clog ...
Use and Care Manual
Page 21
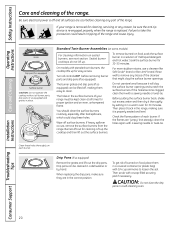
Safety Instructions Operating Instructions Care and Cleaning Grate Burner cap Burner head Drip pan (if so equipped) Electrode Cooktop ge.com Sealed Burner Assemblies (on some models) Turn all burner parts, drip pans (if so equipped) and grates in place. CAUTION: Do not operate ...1/4 cup ammonia and let them . You will gradually lose their continual exposure to LITE, all the burners spark. Electrode The electrode of burned-on the range while they are not removable. To get rid of the spark igniter is exposed when the burner head is turned to high temperatures. This is...
Safety Instructions Operating Instructions Care and Cleaning Grate Burner cap Burner head Drip pan (if so equipped) Electrode Cooktop ge.com Sealed Burner Assemblies (on some models) Turn all burner parts, drip pans (if so equipped) and grates in place. CAUTION: Do not operate ...1/4 cup ammonia and let them . You will gradually lose their continual exposure to LITE, all the burners spark. Electrode The electrode of burned-on the range while they are not removable. To get rid of the spark igniter is exposed when the burner head is turned to high temperatures. This is...
Use and Care Manual
Page 22
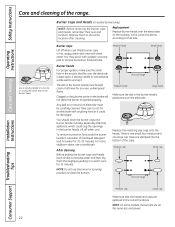
... well to remove burned-on food particles. Any spill on food, soak the burner heads in the correct locations. Medium head Small head Front of range Installation Instructions Troubleshooting Tips Consumer Support Medium cap Large cap Make sure that fits over the electrode. Medium cap Small cap Front of... the burner head is one small, two medium and one large cap. NOTE: On some models, the burners are stamped into the bottom of the range. Burner caps Lift off when cool. Wash burner caps in hot, soapy water and rinse with a plastic scouring pad to unclog it could clog the...
... well to remove burned-on food particles. Any spill on food, soak the burner heads in the correct locations. Medium head Small head Front of range Installation Instructions Troubleshooting Tips Consumer Support Medium cap Large cap Make sure that fits over the electrode. Medium cap Small cap Front of... the burner head is one small, two medium and one large cap. NOTE: On some models, the burners are stamped into the bottom of the range. Burner caps Lift off when cool. Wash burner caps in hot, soapy water and rinse with a plastic scouring pad to unclog it could clog the...
Use and Care Manual
Page 23
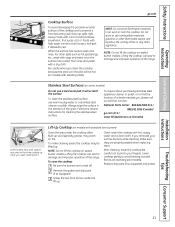
... area over the pilot will be hot (on models with a dry cloth. Lifting the cooktop can lead to damage and improper operation of the range. NOTE: Do not lift the cooktop on some models) Do not use a steel wool pad; Installation Instructions Troubleshooting Tips Consumer Support 23 Do..., lower the cooktop (be lifted up. Remove the grates and drip pans (if so equipped). Safety Instructions Operating Instructions Care and Cleaning ge.com Cooktop Surface To avoid damaging the porcelain enamel surface of the cooktop and to prevent it from becoming dull, clean up while you clean...
... area over the pilot will be hot (on models with a dry cloth. Lifting the cooktop can lead to damage and improper operation of the range. NOTE: Do not lift the cooktop on some models) Do not use a steel wool pad; Installation Instructions Troubleshooting Tips Consumer Support 23 Do..., lower the cooktop (be lifted up. Remove the grates and drip pans (if so equipped). Safety Instructions Operating Instructions Care and Cleaning ge.com Cooktop Surface To avoid damaging the porcelain enamel surface of the cooktop and to prevent it from becoming dull, clean up while you clean...
Use and Care Manual
Page 24
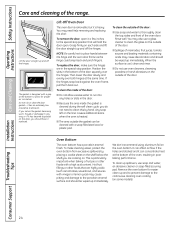
... door: ■ Do not allow for easier clean-up and off the hinges. Grasp firmly on the outside of the door. ■ Spillage of the range. Oven Bottom The oven bottom has a porcelain enamel finish. We don't recommend using aluminum foil on . To clean up spillovers, use oven cleaners, cleansing powders...
... door: ■ Do not allow for easier clean-up and off the hinges. Grasp firmly on the outside of the door. ■ Spillage of the range. Oven Bottom The oven bottom has a porcelain enamel finish. We don't recommend using aluminum foil on . To clean up spillovers, use oven cleaners, cleansing powders...
Use and Care Manual
Page 25
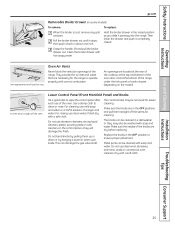
...lift and pull the broiler drawer out. Clean the broiler drawer with soap and water. Make sure the knobs are necessary for the range to ensure proper placement. Vent appearance and location vary. Installation Instructions Troubleshooting Tips Consumer Support 25 For cleaning, use clean water. For... knob straight off the stems for cleaning. This can be washed with hot soapy water. Safety Instructions Operating Instructions Care and Cleaning ge.com Removable Broiler Drawer (on the control panel-they may be removed for easier cleaning. Do not bend knobs by hanging a ...
...lift and pull the broiler drawer out. Clean the broiler drawer with soap and water. Make sure the knobs are necessary for the range to ensure proper placement. Vent appearance and location vary. Installation Instructions Troubleshooting Tips Consumer Support 25 For cleaning, use clean water. For... knob straight off the stems for cleaning. This can be washed with hot soapy water. Safety Instructions Operating Instructions Care and Cleaning ge.com Removable Broiler Drawer (on the control panel-they may be removed for easier cleaning. Do not bend knobs by hanging a ...

