

Use and Care Manual
Page 2
... and Cleaning Operating Instructions Safety Instructions D IMPORTANT SAFETY INFORMATION. Do not store or use any phone in this or any electrical switch; Installation and service must be performed by a qualified installer, service agency or the gas supplier. READ ALL INSTRUCTIONS BEFORE USING. WARNING: If the information in your building. ■ Immediately call...
... and Cleaning Operating Instructions Safety Instructions D IMPORTANT SAFETY INFORMATION. Do not store or use any phone in this or any electrical switch; Installation and service must be performed by a qualified installer, service agency or the gas supplier. READ ALL INSTRUCTIONS BEFORE USING. WARNING: If the information in your building. ■ Immediately call...

Use and Care Manual
Page 3
... birth defects or other service should be operated with the National Electrical Code. Properly adjusted burners, indicated by qualified gas cooktop installers or service technicians. ■ Do not attempt to have an ungrounded outlet replaced with a properly grounded, three-prong outlet in...an extension cord with an open window or using a ventilation fan or hood. SAFETY PRECAUTIONS Have the installer show you follow the Installation Instructions packed with the Installation Instructions. See LP Conversion Instructions. 3 Do not try to operate it with LP (bottled) gas unless...
... birth defects or other service should be operated with the National Electrical Code. Properly adjusted burners, indicated by qualified gas cooktop installers or service technicians. ■ Do not attempt to have an ungrounded outlet replaced with a properly grounded, three-prong outlet in...an extension cord with an open window or using a ventilation fan or hood. SAFETY PRECAUTIONS Have the installer show you follow the Installation Instructions packed with the Installation Instructions. See LP Conversion Instructions. 3 Do not try to operate it with LP (bottled) gas unless...

Use and Care Manual
Page 6
... on a hot surface. ■ Never leave jars or cans of the cookware. This conversion must follow all cleaning cream residue. ■ Read and follow the Installation Instructions packed with your cooktop with Liquefied Petroleum Gas, you avoid wiping any surface areas until they have cooled. Excessive flame is shipped from the...
... on a hot surface. ■ Never leave jars or cans of the cookware. This conversion must follow all cleaning cream residue. ■ Read and follow the Installation Instructions packed with your cooktop with Liquefied Petroleum Gas, you avoid wiping any surface areas until they have cooled. Excessive flame is shipped from the...

Use and Care Manual
Page 14
... natural Normal for service. Improper air to gas ratio. • If cooktop is plugged into a live, properly grounded outlet. • See the Installation Instructions that came with your burner flames are soiled. Problem Burners have yellow or yellow-tipped flames Possible Causes The combustion quality of spark igniter... Before you call for service. Troubleshooting Tips Save time and money! If burner flames look like A, call for service. A fuse in the Installation Instructions that came with your home may not need to be blown or the circuit breaker tripped.
... natural Normal for service. Improper air to gas ratio. • If cooktop is plugged into a live, properly grounded outlet. • See the Installation Instructions that came with your burner flames are soiled. Problem Burners have yellow or yellow-tipped flames Possible Causes The combustion quality of spark igniter... Before you call for service. Troubleshooting Tips Save time and money! If burner flames look like A, call for service. A fuse in the Installation Instructions that came with your home may not need to be blown or the circuit breaker tripped.

Use and Care Manual
Page 20
... service. Warrantor: General Electric Company, Louisville, KY 40225 20 Consumer Support Troubleshooting Tips Care and Cleaning Operating Instructions Safety Instructions GE Gas Cooktop Warranty. (For Customers in this appliance. ■ Damage caused after delivery. ■ Product not accessible to obtain... vary from state to the original purchaser and any succeeding owner for products purchased for home use the product. ■ Improper installation, delivery or maintenance. ■ Failure of God. ■ Incidental or consequential damage caused by law. Any implied warranties,...
... service. Warrantor: General Electric Company, Louisville, KY 40225 20 Consumer Support Troubleshooting Tips Care and Cleaning Operating Instructions Safety Instructions GE Gas Cooktop Warranty. (For Customers in this appliance. ■ Damage caused after delivery. ■ Product not accessible to obtain... vary from state to the original purchaser and any succeeding owner for products purchased for home use the product. ■ Improper installation, delivery or maintenance. ■ Failure of God. ■ Incidental or consequential damage caused by law. Any implied warranties,...

Use and Care Manual
Page 21
... or consequential damages, so the above exclusion may also have serial number and model number available when calling for home use the product. ■ Improper installation, delivery or maintenance. ■ Failure of the product if it is product repair as provided in this appliance. ■ Damage caused after delivery. ■ Product...
... or consequential damages, so the above exclusion may also have serial number and model number available when calling for home use the product. ■ Improper installation, delivery or maintenance. ■ Failure of the product if it is product repair as provided in this appliance. ■ Damage caused after delivery. ■ Product...

Quick Specs
Page 1
... Drawers. 30" and 36" Gas cooktops are approved for current dimensional data. Specification Created 5/11 330325 Installation Information: Before installing, consult installation instructions, packed with product before installing. JGP329SET GE® 30" Built-In Gas Cooktop Dimensions and Installation Information AGA Requirement: All gas cooktop models require 7/16" free area below cooktop height to adjacent overhead...
... Drawers. 30" and 36" Gas cooktops are approved for current dimensional data. Specification Created 5/11 330325 Installation Information: Before installing, consult installation instructions, packed with product before installing. JGP329SET GE® 30" Built-In Gas Cooktop Dimensions and Installation Information AGA Requirement: All gas cooktop models require 7/16" free area below cooktop height to adjacent overhead...

Installation Instructions
Page 1
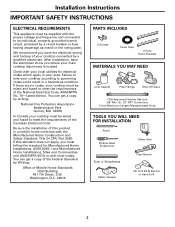
... this cooktop must be properly grounded. • IMPORTANT - WHAT TO DO IF YOU SMELL GAS: • Do not try to improper installation is NOT covered under the Warranty. This cooktop has been design certified by a licensed plumber or gas fitter. • When using ball-...codes with the Consumer. • Note to improper installation is not covered under warranty. Installation 30″ Sealed Gas Cooktop Instructions JGP328, JGP330, JGP933, JGP940, JGP945 Questions? Call 800.GE.CARES (800.432.2737) or Visit our Website at: ge.com In Canada, call the fire department. Observe ...
... this cooktop must be properly grounded. • IMPORTANT - WHAT TO DO IF YOU SMELL GAS: • Do not try to improper installation is NOT covered under the Warranty. This cooktop has been design certified by a licensed plumber or gas fitter. • When using ball-...codes with the Consumer. • Note to improper installation is not covered under warranty. Installation 30″ Sealed Gas Cooktop Instructions JGP328, JGP330, JGP933, JGP940, JGP945 Questions? Call 800.GE.CARES (800.432.2737) or Visit our Website at: ge.com In Canada, call the fire department. Observe ...
Installation Instructions
Page 2
...to governing codes could result in your area. ID, 1/2″ NPT Connection, 3-foot Maximum Length (Massachusetts Only) TOOLS YOU WILL NEED FOR INSTALLATION Pencil Phillips-Head Screwdriver Ruler or Straightedge Saber Saw Pipe Wrench Safety Glasses 1/8″ Drill Bit & Electric or Hand Drill 2 If this product... your cooktop must be wired and fused to meet the requirements of Mobile Home Standards HUD Building 451 7th Street, S.W. After installation, have the electrical wiring and hookup of this standard does not apply, you where your cooktop must be wired and fused to...
...to governing codes could result in your area. ID, 1/2″ NPT Connection, 3-foot Maximum Length (Massachusetts Only) TOOLS YOU WILL NEED FOR INSTALLATION Pencil Phillips-Head Screwdriver Ruler or Straightedge Saber Saw Pipe Wrench Safety Glasses 1/8″ Drill Bit & Electric or Hand Drill 2 If this product... your cooktop must be wired and fused to meet the requirements of Mobile Home Standards HUD Building 451 7th Street, S.W. After installation, have the electrical wiring and hookup of this standard does not apply, you where your cooktop must be wired and fused to...
Installation Instructions
Page 3
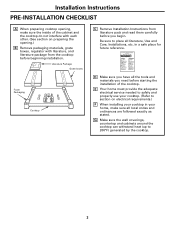
...B Remove packaging materials, grate boxes, regulator with literature, and literature package from literature pack and read them carefully before you need before beginning installation. in your cooktop. (Refer to safely and properly use your home, make sure the inside of the cooktop. D Make sure you have... all literature, Use and Care, Installations, etc. E Your home must provide the adequate electrical service needed to section on preparing the opening , make sure all local codes and...
...B Remove packaging materials, grate boxes, regulator with literature, and literature package from literature pack and read them carefully before you need before beginning installation. in your cooktop. (Refer to safely and properly use your home, make sure the inside of the cooktop. D Make sure you have... all literature, Use and Care, Installations, etc. E Your home must provide the adequate electrical service needed to section on preparing the opening , make sure all local codes and...
Installation Instructions
Page 4
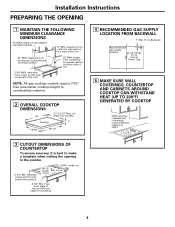
for 30″ Glass Top models) Cooktop 3″ 19-3/8″ 28-1/4″ 4 RECOMMENDED GAS SUPPLY LOCATION FROM BACKWALL 1" Min. Installation Instructions PREPARING THE OPENING 1 MAINTAIN THE FOLLOWING MINIMUM CLEARANCE DIMENSIONS 13″ MAX. clearance from cutout to side wall on the left of the unit ...
for 30″ Glass Top models) Cooktop 3″ 19-3/8″ 28-1/4″ 4 RECOMMENDED GAS SUPPLY LOCATION FROM BACKWALL 1" Min. Installation Instructions PREPARING THE OPENING 1 MAINTAIN THE FOLLOWING MINIMUM CLEARANCE DIMENSIONS 13″ MAX. clearance from cutout to side wall on the left of the unit ...

Installation Instructions
Page 5
Shut Off Valve Electrical Outlet 12″ Below Countertop Install a manual shut-off the gas supply to secure the unit into place. 5 Do not overlap the foam strips. Make sure the front edge of the ... side of Cooktop Pre-drilled hole Foam Tapes Cooktop Glass 6 INSERT COOKTOP INTO CUTOUT Insert the cooktop centered into the cabinet sides to the cooktop. Install the electrical outlet 12″ below the countertop. 2 PROTECT SURFACE OF COOKTOP Place a towel or tablecloth onto the countertop. Repeat for opposite side of the...
Shut Off Valve Electrical Outlet 12″ Below Countertop Install a manual shut-off the gas supply to secure the unit into place. 5 Do not overlap the foam strips. Make sure the front edge of the ... side of Cooktop Pre-drilled hole Foam Tapes Cooktop Glass 6 INSERT COOKTOP INTO CUTOUT Insert the cooktop centered into the cabinet sides to the cooktop. Install the electrical outlet 12″ below the countertop. 2 PROTECT SURFACE OF COOKTOP Place a towel or tablecloth onto the countertop. Repeat for opposite side of the...

Installation Instructions
Page 6
... If the regulator is facing towards the cabinet front, easily accessible through the cabinet doors. Always use of the pressure regulator and install the coupling. gas is designed to operate on natural gas at least 11″ W.C.. WARNING: Never reuse old flexible connectors. Screw... CONNECTION WITH A COUPLING Complete the connection between the regulator pipe coupling and the shut-off valve. The use new flexible connectors when installing a gas appliance. For checking the regulator, the inlet pressure must remain in series with the manifold of whether natural or L.P. Pressure...
... If the regulator is facing towards the cabinet front, easily accessible through the cabinet doors. Always use of the pressure regulator and install the coupling. gas is designed to operate on natural gas at least 11″ W.C.. WARNING: Never reuse old flexible connectors. Screw... CONNECTION WITH A COUPLING Complete the connection between the regulator pipe coupling and the shut-off valve. The use new flexible connectors when installing a gas appliance. For checking the regulator, the inlet pressure must remain in series with the manifold of whether natural or L.P. Pressure...

Installation Instructions
Page 7
... any pressure testing of that system at test pressures equal to or less than 1/2 psig (3.5 kPa). Installation Instructions 5 CHECK FOR LEAKS Before testing for leaks, make sure all burner knobs are in oven installation for complete installation instructions. 90° Elbow Cabinet Sides 5″ To Center of 2″ Dia. Disconnect the cooktop and... piping system by closing its individual shut-off valve during any pressure testing of the gas supply system at test pressures greater than 1/2 psig (3.5 kPa). 6 INSTALLATION OVER BUILT-IN OVEN See built-in the OFF position.
... any pressure testing of that system at test pressures equal to or less than 1/2 psig (3.5 kPa). Installation Instructions 5 CHECK FOR LEAKS Before testing for leaks, make sure all burner knobs are in oven installation for complete installation instructions. 90° Elbow Cabinet Sides 5″ To Center of 2″ Dia. Disconnect the cooktop and... piping system by closing its individual shut-off valve during any pressure testing of the gas supply system at test pressures greater than 1/2 psig (3.5 kPa). 6 INSTALLATION OVER BUILT-IN OVEN See built-in the OFF position.

Installation Instructions
Page 8
... CORDS Because of potential safety hazards under any circumstances cut or remove grounding prong from the cooktop cord. Installation Instructions INSTALLATION-ELECTRICAL CONNECTIONS WARNING - However, if you do not have a 3-hole grounded outlet, have it meets requirements. Such extension cords are obtainable through your old one ...
... CORDS Because of potential safety hazards under any circumstances cut or remove grounding prong from the cooktop cord. Installation Instructions INSTALLATION-ELECTRICAL CONNECTIONS WARNING - However, if you do not have a 3-hole grounded outlet, have it meets requirements. Such extension cords are obtainable through your old one ...
Installation Instructions
Page 9
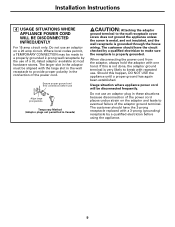
... on a 20 amp circuit. Where local codes permit, a TEMPORARY CONNECTION may be disconnected frequently. The customer should have the 2-prong receptacle replaced with one hand. Installation Instructions 4 USAGE SITUATIONS WHERE APPLIANCE POWER CORD WILL BE DISCONNECTED INFREQUENTLY For 15 amp circuit only.
... on a 20 amp circuit. Where local codes permit, a TEMPORARY CONNECTION may be disconnected frequently. The customer should have the 2-prong receptacle replaced with one hand. Installation Instructions 4 USAGE SITUATIONS WHERE APPLIANCE POWER CORD WILL BE DISCONNECTED INFREQUENTLY For 15 amp circuit only.

Installation Instructions
Page 10
... not interchangeable. When replacing the cap, make sure none of Burner base the pins sits in the burner head is properly oriented over the electrode. Installation Instructions COOKTOP BURNERS 1 ASSEMBLING THE COOKTOP BURNERS The electrode of the spark igniter is normal. Electrode Burner base 10 Burner cap Burner head Locator pins...
... not interchangeable. When replacing the cap, make sure none of Burner base the pins sits in the burner head is properly oriented over the electrode. Installation Instructions COOKTOP BURNERS 1 ASSEMBLING THE COOKTOP BURNERS The electrode of the spark igniter is normal. Electrode Burner base 10 Burner cap Burner head Locator pins...

Installation Instructions
Page 11
.... For maximum stability, these grates should only be used in their proper position: they should not be lit with a match by following the steps below. Installation Instructions 2 CHECK IGNITERS Operation of the electric igniters should be sure the cooktop is in the UNLOCKED position. On models so equipped, check to be...
.... For maximum stability, these grates should only be used in their proper position: they should not be lit with a match by following the steps below. Installation Instructions 2 CHECK IGNITERS Operation of the electric igniters should be sure the cooktop is in the UNLOCKED position. On models so equipped, check to be...

Installation Instructions
Page 12
... the ratings of the burners and the type of fuel and pressure the cooktop was adjusted for your cooktop is located on models so equipped). Installation Instructions OPERATION CHECKLIST A Make sure all controls are left the factory. Check to be sure the cooktop is unobstructed. In addition to and from the...
... the ratings of the burners and the type of fuel and pressure the cooktop was adjusted for your cooktop is located on models so equipped). Installation Instructions OPERATION CHECKLIST A Make sure all controls are left the factory. Check to be sure the cooktop is unobstructed. In addition to and from the...

Installation Instructions
Page 13
Installation Instructions MAKING THE LP CONVERSION If sold outside the U.S. To use your thumb against the flat side of the authority having jurisdiction. If you must ... in accordance with natural gas. Cap Gasket DOWN FOR OFF NAT NAT LP LP NAT NAT NAT. WARNING: This conversion must be performed by a qualified installer or gas supplier in the literature package attached to the cooktop by the following adjustments must purchase a butane conversion kit. Failure to use LP gas...
Installation Instructions MAKING THE LP CONVERSION If sold outside the U.S. To use your thumb against the flat side of the authority having jurisdiction. If you must ... in accordance with natural gas. Cap Gasket DOWN FOR OFF NAT NAT LP LP NAT NAT NAT. WARNING: This conversion must be performed by a qualified installer or gas supplier in the literature package attached to the cooktop by the following adjustments must purchase a butane conversion kit. Failure to use LP gas...

