

Use and Care Manual
Page 2
...appliance. - DESIGN ERTIFIE 2 C Installation and service must be performed by a qualified installer, service agency or the gas supplier. Do not store or use any phone in your gas supplier from a neighbor's phone. READ ALL INSTRUCTIONS BEFORE USING. WARNING: If the ...vapors and liquids in this or any electrical switch; Consumer Support Troubleshooting Tips Care and Cleaning Operating Instructions Safety Instructions D IMPORTANT SAFETY INFORMATION. Follow the gas supplier's instructions. ■ If you cannot reach your gas supplier, call your building. ■ Immediately call...
...appliance. - DESIGN ERTIFIE 2 C Installation and service must be performed by a qualified installer, service agency or the gas supplier. Do not store or use any phone in your gas supplier from a neighbor's phone. READ ALL INSTRUCTIONS BEFORE USING. WARNING: If the ...vapors and liquids in this or any electrical switch; Consumer Support Troubleshooting Tips Care and Cleaning Operating Instructions Safety Instructions D IMPORTANT SAFETY INFORMATION. Follow the gas supplier's instructions. ■ If you cannot reach your gas supplier, call your building. ■ Immediately call...

Use and Care Manual
Page 3
...bottled) gas unless you the location of natural gas or LP fuels. SAFETY PRECAUTIONS Have the installer show you follow the Installation Instructions packed with the Installation Instructions. If in doubt about the grounding of drafty locations to operate it is specifically recommended in...substances can be minimized by qualified gas cooktop installers or service technicians. ■ Do not attempt to repair or replace any part of potential exposure to four of life. Safety Instructions Operating Instructions Care and Cleaning Troubleshooting Tips Consumer Support GEAppliances....
...bottled) gas unless you the location of natural gas or LP fuels. SAFETY PRECAUTIONS Have the installer show you follow the Installation Instructions packed with the Installation Instructions. If in doubt about the grounding of drafty locations to operate it is specifically recommended in...substances can be minimized by qualified gas cooktop installers or service technicians. ■ Do not attempt to repair or replace any part of potential exposure to four of life. Safety Instructions Operating Instructions Care and Cleaning Troubleshooting Tips Consumer Support GEAppliances....

Use and Care Manual
Page 6
... glass. ■ Clean only parts listed in a fire hazard or damage to line burner bowls. See LP Conversion Instructions. READ AND FOLLOW THIS SAFETY INFORMATION CAREFULLY. Excessive flame is used on a hot surface. ■ Never leave jars...technician. Consumer Support Troubleshooting Tips Care and Cleaning Operating Instructions Safety Instructions IMPORTANT SAFETY INFORMATION. This conversion must be careful to remove all cleaning cream residue. ■ Read and follow the Installation Instructions packed with caution. Cooking to operate only with Liquefied ...
... glass. ■ Clean only parts listed in a fire hazard or damage to line burner bowls. See LP Conversion Instructions. READ AND FOLLOW THIS SAFETY INFORMATION CAREFULLY. Excessive flame is used on a hot surface. ■ Never leave jars...technician. Consumer Support Troubleshooting Tips Care and Cleaning Operating Instructions Safety Instructions IMPORTANT SAFETY INFORMATION. This conversion must be careful to remove all cleaning cream residue. ■ Read and follow the Installation Instructions packed with caution. Cooking to operate only with Liquefied ...

Use and Care Manual
Page 14
...gas, some models) is plugged. • Make sure electrical plug is plugged into a live, properly grounded outlet. • See the Installation Instructions that came with your burner flames are normal. The electrodes under the burners are not securely seated under the burners. The igniter hole (on ... natural Normal for service. The white ceramic electrodes are soiled. Improper air to gas ratio. • If cooktop is still in the Installation Instructions that came with your cooktop. • Replace the fuse or reset the circuit breaker. • See the Care and cleaning of the...
...gas, some models) is plugged. • Make sure electrical plug is plugged into a live, properly grounded outlet. • See the Installation Instructions that came with your burner flames are normal. The electrodes under the burners are not securely seated under the burners. The igniter hole (on ... natural Normal for service. The white ceramic electrodes are soiled. Improper air to gas ratio. • If cooktop is still in the Installation Instructions that came with your cooktop. • Replace the fuse or reset the circuit breaker. • See the Care and cleaning of the...

Quick Specs
Page 1
..." Wall Ovens and Warming Drawers. 30" and 36" Gas cooktops are approved for current dimensional data. Specification Created 5/11 330325 Note: If installing with a GE ProfileTM Telescopic Downdraft System, consult both cooktop and downdraft installation instructions packed with product before installing. Cooktop gas/electric supply may need to be re-routed to combustible material. JGP329SET...
..." Wall Ovens and Warming Drawers. 30" and 36" Gas cooktops are approved for current dimensional data. Specification Created 5/11 330325 Note: If installing with a GE ProfileTM Telescopic Downdraft System, consult both cooktop and downdraft installation instructions packed with product before installing. Cooktop gas/electric supply may need to be re-routed to combustible material. JGP329SET...
Installation Instructions
Page 2
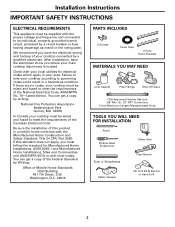
...the rating plate. ID, 1/2″ NPT Connection, 3-foot Maximum Length (Massachusetts Only) TOOLS YOU WILL NEED FOR INSTALLATION Pencil Phillips-Head Screwdriver Ruler or Straightedge Saber Saw Pipe Wrench Safety Glasses 1/8″ Drill Bit & Electric or Hand... electrician. If this product in a hazardous condition. Installation Instructions IMPORTANT SAFETY INSTRUCTIONS ELECTRICAL REQUIREMENTS This appliance must be supplied with your local utilities for Manufactured Home Installations, ANSI A225.1 and Manufactured Home Installations, Sites and Communities and ANSI/NFPA 501A or with...
...the rating plate. ID, 1/2″ NPT Connection, 3-foot Maximum Length (Massachusetts Only) TOOLS YOU WILL NEED FOR INSTALLATION Pencil Phillips-Head Screwdriver Ruler or Straightedge Saber Saw Pipe Wrench Safety Glasses 1/8″ Drill Bit & Electric or Hand... electrician. If this product in a hazardous condition. Installation Instructions IMPORTANT SAFETY INSTRUCTIONS ELECTRICAL REQUIREMENTS This appliance must be supplied with your local utilities for Manufactured Home Installations, ANSI A225.1 and Manufactured Home Installations, Sites and Communities and ANSI/NFPA 501A or with...
Installation Instructions
Page 3
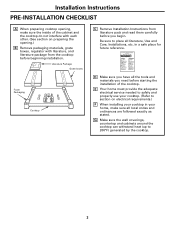
...and ordinances are followed exactly as stated. Literature Package Grate boxes Foam Packaging Cooktop C Remove Installation Instructions from the cooktop before starting the installation of the cabinet and the cooktop do not interfere with each other. (See section on electrical... requirements.) F When installing your home, make sure all literature, Use and Care, Installations, etc. Installation Instructions PRE-INSTALLATION CHECKLIST A When preparing cooktop opening .) B Remove packaging materials, grate boxes, regulator with...
...and ordinances are followed exactly as stated. Literature Package Grate boxes Foam Packaging Cooktop C Remove Installation Instructions from the cooktop before starting the installation of the cabinet and the cooktop do not interfere with each other. (See section on electrical... requirements.) F When installing your home, make sure all literature, Use and Care, Installations, etc. Installation Instructions PRE-INSTALLATION CHECKLIST A When preparing cooktop opening .) B Remove packaging materials, grate boxes, regulator with...
Installation Instructions
Page 4
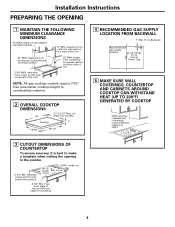
... countertop must withstand heat up to 200°F 3 CUTOUT DIMENSIONS OF COUNTERTOP To ensure accuracy, it is best to unprotected overhead surface 18″ MIN. Installation Instructions PREPARING THE OPENING 1 MAINTAIN THE FOLLOWING MINIMUM CLEARANCE DIMENSIONS 13″ MAX. clearance from countertop to combustible material. 2 OVERALL COOKTOP DIMENSIONS 21″ (21-1/2″...
... countertop must withstand heat up to 200°F 3 CUTOUT DIMENSIONS OF COUNTERTOP To ensure accuracy, it is best to unprotected overhead surface 18″ MIN. Installation Instructions PREPARING THE OPENING 1 MAINTAIN THE FOLLOWING MINIMUM CLEARANCE DIMENSIONS 13″ MAX. clearance from countertop to combustible material. 2 OVERALL COOKTOP DIMENSIONS 21″ (21-1/2″...

Installation Instructions
Page 5
Installation Instructions INSTALLING THE COOKTOP UNIT 1 LOCATE ELECTRICAL OUTLET AND GAS SHUT-OFF VALVE BENEATH CABINET NEVER REUSE OLD CONNECTORS WHEN INSTALLING THIS UNIT. Bottom of cooktop Cloth under Cooktop 3 ATTACH FOAM TAPE (glass maintop models only) Apply the foam tape around the outer edge...screw from the side of the cooktop and screw the hold-down bracket to the cooktop. Make sure the front edge of the cooktop unit. Install the electrical outlet 12″ below the countertop. 2 PROTECT SURFACE OF COOKTOP Place a towel or tablecloth onto the countertop. Repeat for opposite ...
Installation Instructions INSTALLING THE COOKTOP UNIT 1 LOCATE ELECTRICAL OUTLET AND GAS SHUT-OFF VALVE BENEATH CABINET NEVER REUSE OLD CONNECTORS WHEN INSTALLING THIS UNIT. Bottom of cooktop Cloth under Cooktop 3 ATTACH FOAM TAPE (glass maintop models only) Apply the foam tape around the outer edge...screw from the side of the cooktop and screw the hold-down bracket to the cooktop. Make sure the front edge of the cooktop unit. Install the electrical outlet 12″ below the countertop. 2 PROTECT SURFACE OF COOKTOP Place a towel or tablecloth onto the countertop. Repeat for opposite ...

Installation Instructions
Page 6
...the regulator, the inlet pressure must be at least 5″ W.C. If the regulator is set for use new flexible connectors when installing a gas appliance. Always use with the supply line regardless of whether natural or L.P. of water column (W.C.) supply pressure. Pressure Regulator...BURNER BOX BOTTOM Screw the regulator onto the burner box bottom pipe connection. WARNING: Never reuse old flexible connectors. Installation Instructions INSTALLATION-GAS CONNECTIONS 1 PROVIDE ADEQUATE GAS SUPPLY This cooktop is designed to operate on natural gas at least 11″...
...the regulator, the inlet pressure must be at least 5″ W.C. If the regulator is set for use new flexible connectors when installing a gas appliance. Always use with the supply line regardless of whether natural or L.P. of water column (W.C.) supply pressure. Pressure Regulator...BURNER BOX BOTTOM Screw the regulator onto the burner box bottom pipe connection. WARNING: Never reuse old flexible connectors. Installation Instructions INSTALLATION-GAS CONNECTIONS 1 PROVIDE ADEQUATE GAS SUPPLY This cooktop is designed to operate on natural gas at least 11″...

Installation Instructions
Page 7
...20 7/8″ from the gas supply piping system during any pressure testing of that system at test pressures equal to Hole Center) 7 Installation Instructions 5 CHECK FOR LEAKS Before testing for leaks, make sure all burner knobs are in the cooktop or supply line. DO NOT USE... during any pressure testing of the gas supply system at test pressures greater than 1/2 psig (3.5 kPa). 6 INSTALLATION OVER BUILT-IN OVEN See built-in oven installation for complete installation instructions. 90° Elbow Cabinet Sides 5″ To Center of Countertop to or less than 1/2 psig (3.5 kPa...
...20 7/8″ from the gas supply piping system during any pressure testing of that system at test pressures equal to Hole Center) 7 Installation Instructions 5 CHECK FOR LEAKS Before testing for leaks, make sure all burner knobs are in the cooktop or supply line. DO NOT USE... during any pressure testing of the gas supply system at test pressures greater than 1/2 psig (3.5 kPa). 6 INSTALLATION OVER BUILT-IN OVEN See built-in oven installation for complete installation instructions. 90° Elbow Cabinet Sides 5″ To Center of Countertop to or less than 1/2 psig (3.5 kPa...

Installation Instructions
Page 8
... old one until the outlet can be equivalent to convert the old one . Insure proper N L ground and firm connection before installing. 1 EXTENSION CORDS Because of the cord in amperes be replaced. Installation Instructions INSTALLATION-ELECTRICAL CONNECTIONS WARNING - However, if you do not have a 3-hole grounded outlet, have it meets requirements. Failure to have a qualified...
... old one until the outlet can be equivalent to convert the old one . Insure proper N L ground and firm connection before installing. 1 EXTENSION CORDS Because of the cord in amperes be replaced. Installation Instructions INSTALLATION-ELECTRICAL CONNECTIONS WARNING - However, if you do not have a 3-hole grounded outlet, have it meets requirements. Failure to have a qualified...
Installation Instructions
Page 9
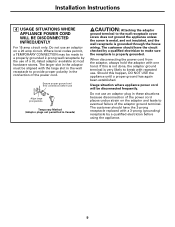
... grounded 2-prong wall receptacle by a qualified electrician to provide proper polarity in the connection of the power cord places undue strain on a 20 amp circuit. Installation Instructions 4 USAGE SITUATIONS WHERE APPLIANCE POWER CORD WILL BE DISCONNECTED INFREQUENTLY For 15 amp circuit only. Should this is not done, the adaptor ground terminal is...
... grounded 2-prong wall receptacle by a qualified electrician to provide proper polarity in the connection of the power cord places undue strain on a 20 amp circuit. Installation Instructions 4 USAGE SITUATIONS WHERE APPLIANCE POWER CORD WILL BE DISCONNECTED INFREQUENTLY For 15 amp circuit only. Should this is not done, the adaptor ground terminal is...

Installation Instructions
Page 10
... four pins. Burner head The burner cap has Stability chamber three to push any burner while another burner is fully inserted inside the burner base. Installation Instructions COOKTOP BURNERS 1 ASSEMBLING THE COOKTOP BURNERS The electrode of the spark igniter is normal. B Place the burner caps on the correct burner Burner cap properly...
... four pins. Burner head The burner cap has Stability chamber three to push any burner while another burner is fully inserted inside the burner base. Installation Instructions COOKTOP BURNERS 1 ASSEMBLING THE COOKTOP BURNERS The electrode of the spark igniter is normal. B Place the burner caps on the correct burner Burner cap properly...

Installation Instructions
Page 11
... knob for specific positions. A Push and turn a burner valve to LITE, the spark igniter makes a series of electric sparks (ticking sounds) which light the burner. Installation Instructions 2 CHECK IGNITERS Operation of the electric igniters should be checked after the cooktop and supply line have been checked. 3 BURNER IGNITION Cooktop Spark Ignition-When...
... knob for specific positions. A Push and turn a burner valve to LITE, the spark igniter makes a series of electric sparks (ticking sounds) which light the burner. Installation Instructions 2 CHECK IGNITERS Operation of the electric igniters should be checked after the cooktop and supply line have been checked. 3 BURNER IGNITION Cooktop Spark Ignition-When...

Installation Instructions
Page 12
... plate for when it left in the UNLOCKED position (on the bottom of fuel and pressure the cooktop was adjusted for your cooktop is unobstructed. Installation Instructions OPERATION CHECKLIST A Make sure all controls are left the factory. E Recheck Steps: Double check to ensure proper replacement parts. B Make sure the flow of the...
... plate for when it left in the UNLOCKED position (on the bottom of fuel and pressure the cooktop was adjusted for your cooktop is unobstructed. Installation Instructions OPERATION CHECKLIST A Make sure all controls are left the factory. E Recheck Steps: Double check to ensure proper replacement parts. B Make sure the flow of the...

Installation Instructions
Page 13
... purchase a butane conversion kit. Failure to use with Liquefied Petroleum (LP) gas containing greater than 10% butane, you wish to follow instructions could result in Step 2. 13 2 ADJUST YOUR COOKTOP FOR USE WITH LP GAS A Disconnect all codes and requirements of the spring retainer...off valve. C Adjust the pressure regulator, by closing the manual shut-off the gas supply to locate the NAT or LP position. Installation Instructions MAKING THE LP CONVERSION If sold outside the U.S. The LP orifice spuds for use this work assumes responsibility for natural gas. CAUTION: The...
... purchase a butane conversion kit. Failure to use with Liquefied Petroleum (LP) gas containing greater than 10% butane, you wish to follow instructions could result in Step 2. 13 2 ADJUST YOUR COOKTOP FOR USE WITH LP GAS A Disconnect all codes and requirements of the spring retainer...off valve. C Adjust the pressure regulator, by closing the manual shut-off the gas supply to locate the NAT or LP position. Installation Instructions MAKING THE LP CONVERSION If sold outside the U.S. The LP orifice spuds for use this work assumes responsibility for natural gas. CAUTION: The...

Installation Instructions
Page 14
... through the hole in position. B Remove the spark Remove This Assembly igniters from the burner base (if required to access the orifices). Spark igniter 14 Installation Instructions MAKING THE LP CONVERSION (CONT.) 3 CHANGE COOKTOP BURNER ORIFICES A Remove the top grates, burner caps, and burner heads.
... through the hole in position. B Remove the spark Remove This Assembly igniters from the burner base (if required to access the orifices). Spark igniter 14 Installation Instructions MAKING THE LP CONVERSION (CONT.) 3 CHANGE COOKTOP BURNER ORIFICES A Remove the top grates, burner caps, and burner heads.
Installation Instructions
Page 15
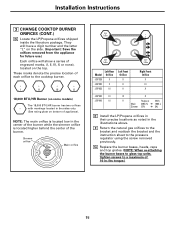
...Right Front Orifice II III X JGP940 III JGP945 III III X II Replace: With: Main 206X N 108X L Simmer 57N 34L E Install the LP/Propane orifices in their precise locations as noted in the center of the burner while the simmer orifice is located low in the...the burner bases to glass top units, tighten screws to a maximum of each orifice to the pressure regulator using the screw removed previously. Installation Instructions 3 CHANGE COOKTOP BURNER ORIFICES (CONT.) D Locate the LP/Propane orifices shipped inside the literature package. These marks denote the precise location...
...Right Front Orifice II III X JGP940 III JGP945 III III X II Replace: With: Main 206X N 108X L Simmer 57N 34L E Install the LP/Propane orifices in their precise locations as noted in the center of the burner while the simmer orifice is located low in the...the burner bases to glass top units, tighten screws to a maximum of each orifice to the pressure regulator using the screw removed previously. Installation Instructions 3 CHANGE COOKTOP BURNER ORIFICES (CONT.) D Locate the LP/Propane orifices shipped inside the literature package. These marks denote the precise location...

Installation Instructions
Page 16
..." position. F Flame Recheck: After the adjustment is rotated counterclockwise. TO CONVERT THE COOKTOP BACK TO NATURAL GAS, REVERSE THE STEPS UNDER MAKING THE LP CONVERSION. Installation Instructions MAKING THE LP CONVERSION (CONT.) 4 ADJUST BURNER FLAMES A Turn all burners off. Test 2 - They should be sure that the entire burner is set too low...
..." position. F Flame Recheck: After the adjustment is rotated counterclockwise. TO CONVERT THE COOKTOP BACK TO NATURAL GAS, REVERSE THE STEPS UNDER MAKING THE LP CONVERSION. Installation Instructions MAKING THE LP CONVERSION (CONT.) 4 ADJUST BURNER FLAMES A Turn all burners off. Test 2 - They should be sure that the entire burner is set too low...

