
Installation Instructions
Page 1
...Latest edition. • Be sure your Owner's Manual. This appliance must not exceed 3 feet. FOR YOUR SAFETY: WARNING - Do not store or use . 31-10835 (11-11 GE) 1 Call 800.GE.CARES (800.432.2737) or Visit our Website at: ge.com In Canada, call the fire department. If the information ...in the vicinity of the appliance shall be installed by CSA International. do not use . • IMPORTANT ...
...Latest edition. • Be sure your Owner's Manual. This appliance must not exceed 3 feet. FOR YOUR SAFETY: WARNING - Do not store or use . 31-10835 (11-11 GE) 1 Call 800.GE.CARES (800.432.2737) or Visit our Website at: ge.com In Canada, call the fire department. If the information ...in the vicinity of the appliance shall be installed by CSA International. do not use . • IMPORTANT ...

Installation Instructions
Page 2
... ANSI/NFPA 501A or with local codes. If this product in your main cooktop disconnect is located. Installation Instructions IMPORTANT SAFETY INSTRUCTIONS ELECTRICAL REQUIREMENTS This appliance must be supplied with the proper voltage and frequency and connected to an individual, properly grounded branch circuit, protected by Writing: Office of Mobile Home...
... ANSI/NFPA 501A or with local codes. If this product in your main cooktop disconnect is located. Installation Instructions IMPORTANT SAFETY INSTRUCTIONS ELECTRICAL REQUIREMENTS This appliance must be supplied with the proper voltage and frequency and connected to an individual, properly grounded branch circuit, protected by Writing: Office of Mobile Home...
Installation Instructions
Page 6
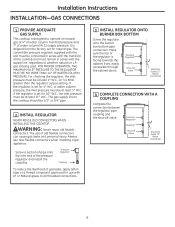
gas is shipped from the factory set for natural gas. If the regulator is set for use new flexible connectors when installing a gas appliance. Always use with the supply line regardless of the cooktop and must be at least 1″ W.C.. (or 3.4 KPA) greater than the regulator output setting. Pressure ...
gas is shipped from the factory set for natural gas. If the regulator is set for use new flexible connectors when installing a gas appliance. Always use with the supply line regardless of the cooktop and must be at least 1″ W.C.. (or 3.4 KPA) greater than the regulator output setting. Pressure ...

Installation Instructions
Page 8
...hazards under any circumstances cut or remove grounding prong from the cooktop cord. IMPORTANT: (Please read carefully) FOR PERSONAL SAFETY, THIS APPLIANCE MUST BE PROPERLY GROUNDED. 2 ELECTRICAL SUPPLY AND OUTLET An adequate electrical supply and outlet must be equivalent to use an extension cord,... cord of the cord in amperes be used to operate the electrical parts of the customer to have a qualified electrician change your local appliance dealer. This method is the personal responsibility and obligation of your cooktop. Failure to be replaced. However, if you do not have...
...hazards under any circumstances cut or remove grounding prong from the cooktop cord. IMPORTANT: (Please read carefully) FOR PERSONAL SAFETY, THIS APPLIANCE MUST BE PROPERLY GROUNDED. 2 ELECTRICAL SUPPLY AND OUTLET An adequate electrical supply and outlet must be equivalent to use an extension cord,... cord of the cord in amperes be used to operate the electrical parts of the customer to have a qualified electrician change your local appliance dealer. This method is the personal responsibility and obligation of your cooktop. Failure to be replaced. However, if you do not have...

Installation Instructions
Page 9
...the use . The customer should have the 2-prong receptacle replaced with one hand. Ensure proper ground and firm connection before using the appliance. 9 When disconnecting the power cord from the adaptor, always hold the adaptor with a 3-prong (grounding) receptacle by a qualified...slots Temporary Method (Adaptor plugs not permitted in these situations because disconnection of the adaptor ground terminal. Usage situation where appliance power cord will be disconnected frequently. The customer should have the circuit checked by a qualified electrician before use an adaptor...
...the use . The customer should have the 2-prong receptacle replaced with one hand. Ensure proper ground and firm connection before using the appliance. 9 When disconnecting the power cord from the adaptor, always hold the adaptor with a 3-prong (grounding) receptacle by a qualified...slots Temporary Method (Adaptor plugs not permitted in these situations because disconnection of the adaptor ground terminal. Usage situation where appliance power cord will be disconnected frequently. The customer should have the circuit checked by a qualified electrician before use an adaptor...
Installation Instructions
Page 15
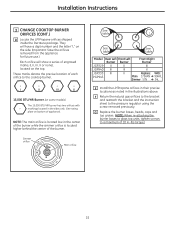
...shipped inside the literature package. They will have a digit number and the letter "L" on the side. (Important: Save the orifices removed from the appliance for future use.) Each orifice will show a series of the burner. NOTE: The main orifice is located low in the center of the burner ... the burner bases, heads, caps and top grates. (NOTE: When re-attaching the burner bases to glass top units, tighten screws to a maximum of appliance). Simmer orifice Main orifice See table See table See table Model Rear Left Front Left Burner Burner Front Right Burner JGP329 II II III JGP940...
...shipped inside the literature package. They will have a digit number and the letter "L" on the side. (Important: Save the orifices removed from the appliance for future use.) Each orifice will show a series of the burner. NOTE: The main orifice is located low in the center of the burner ... the burner bases, heads, caps and top grates. (NOTE: When re-attaching the burner bases to glass top units, tighten screws to a maximum of appliance). Simmer orifice Main orifice See table See table See table Model Rear Left Front Left Burner Burner Front Right Burner JGP329 II II III JGP940...
Installation Instructions
Page 16
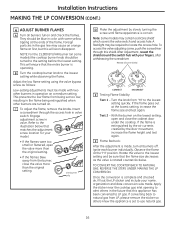
... the LP sticker and include your name, organization and date conversion was made , turn all burners full on some yellow tipping at first, but this appliance has been converted to locate the access hole. Apply the sticker near the cooktop gas inlet opening to alert others know the... appliance is correct. Foreign particles in valve. Note: Some models may cause an orange flame at the ends of the flame. Rotate the valve to natural ...
... the LP sticker and include your name, organization and date conversion was made , turn all burners full on some yellow tipping at first, but this appliance has been converted to locate the access hole. Apply the sticker near the cooktop gas inlet opening to alert others know the... appliance is correct. Foreign particles in valve. Note: Some models may cause an orange flame at the ends of the flame. Rotate the valve to natural ...

Installation Instructions
Page 17
...ANSI Z223.1/NFPA 54-Latest edition. • Be sure your gas supplier from a neighbor's phone. This appliance must be installed by CSA International. do not use . 31-10835 (11-11 GE) 1 Leak testing of the installer and product failure due to light any electrical switch; Do not store... manual is not covered under warranty. Call 800.GE.CARES (800.432.2737) or Visit our Website at: ge.com In Canada, call the fire department. BEFORE YOU BEGIN Read these instructions for local inspector's use gasoline or other appliance! Observe all electrical power at : www.geappliances....
...ANSI Z223.1/NFPA 54-Latest edition. • Be sure your gas supplier from a neighbor's phone. This appliance must be installed by CSA International. do not use . 31-10835 (11-11 GE) 1 Leak testing of the installer and product failure due to light any electrical switch; Do not store... manual is not covered under warranty. Call 800.GE.CARES (800.432.2737) or Visit our Website at: ge.com In Canada, call the fire department. BEFORE YOU BEGIN Read these instructions for local inspector's use gasoline or other appliance! Observe all electrical power at : www.geappliances....

Installation Instructions
Page 18
... Screwdriver Ruler or Straightedge Saber Saw Pipe Wrench Safety Glasses 1/8″ Drill Bit & Electric or Hand Drill 2 Installation Instructions IMPORTANT SAFETY INSTRUCTIONS ELECTRICAL REQUIREMENTS This appliance must be supplied with the Manufactured Home Construction and Safety Standard, Title 24 CFR, Part 3280. After installation, have the electrical wiring and hookup of...
... Screwdriver Ruler or Straightedge Saber Saw Pipe Wrench Safety Glasses 1/8″ Drill Bit & Electric or Hand Drill 2 Installation Instructions IMPORTANT SAFETY INSTRUCTIONS ELECTRICAL REQUIREMENTS This appliance must be supplied with the Manufactured Home Construction and Safety Standard, Title 24 CFR, Part 3280. After installation, have the electrical wiring and hookup of...

Installation Instructions
Page 22
... MUST BE NO MORE THAN 14″ OF WATER COLUMN PRESSURE. WARNING: Never reuse old flexible connectors. The use new flexible connectors when installing a gas appliance. Screw a section of pipe onto the inlet end of the regulator is facing towards the cabinet front, easily accessible through the cabinet doors. Pressure Regulator...
... MUST BE NO MORE THAN 14″ OF WATER COLUMN PRESSURE. WARNING: Never reuse old flexible connectors. The use new flexible connectors when installing a gas appliance. Screw a section of pipe onto the inlet end of the regulator is facing towards the cabinet front, easily accessible through the cabinet doors. Pressure Regulator...
Installation Instructions
Page 24
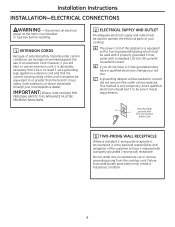
... Where a standard 2-prong wall receptacle is encountered, it is absolutely necessary that it be a UL listed 3-wire grounding type appliance extension cord and that the current carrying rating of an extension cord. N Insure proper L ground and firm connection before installing.... than the branch circuit rating. Installation Instructions INSTALLATION-ELECTRICAL CONNECTIONS WARNING - IMPORTANT: (Please read carefully) FOR PERSONAL SAFETY, THIS APPLIANCE MUST BE PROPERLY GROUNDED. 2 ELECTRICAL SUPPLY AND OUTLET An adequate electrical supply and outlet must be sure it replaced with a ...
... Where a standard 2-prong wall receptacle is encountered, it is absolutely necessary that it be a UL listed 3-wire grounding type appliance extension cord and that the current carrying rating of an extension cord. N Insure proper L ground and firm connection before installing.... than the branch circuit rating. Installation Instructions INSTALLATION-ELECTRICAL CONNECTIONS WARNING - IMPORTANT: (Please read carefully) FOR PERSONAL SAFETY, THIS APPLIANCE MUST BE PROPERLY GROUNDED. 2 ELECTRICAL SUPPLY AND OUTLET An adequate electrical supply and outlet must be sure it replaced with a ...
Installation Instructions
Page 25
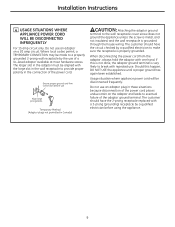
.../slots Temporary Method (Adaptor plugs not permitted in the wall receptacle to break with one hand. If this happen, DO NOT USE the appliance until a proper ground has again been established. The customer should have the 2-prong receptacle replaced with the large slot in Canada) CAUTION:... Attaching the adaptor ground terminal to eventual failure of the power cord. Installation Instructions 4 USAGE SITUATIONS WHERE APPLIANCE POWER CORD WILL BE DISCONNECTED INFREQUENTLY For 15 amp circuit only. Ensure proper ground and firm connection before using the...
.../slots Temporary Method (Adaptor plugs not permitted in the wall receptacle to break with one hand. If this happen, DO NOT USE the appliance until a proper ground has again been established. The customer should have the 2-prong receptacle replaced with the large slot in Canada) CAUTION:... Attaching the adaptor ground terminal to eventual failure of the power cord. Installation Instructions 4 USAGE SITUATIONS WHERE APPLIANCE POWER CORD WILL BE DISCONNECTED INFREQUENTLY For 15 amp circuit only. Ensure proper ground and firm connection before using the...

Installation Instructions
Page 31
... the instruction sheet to the cooktop burner. They will have a digit number and the letter "L" on the side. (Important: Save the orifices removed from the appliance for future use.) Each orifice will show a series of engraved marks, (I II III X 15,000 BTU/HR Burner (on bottom of the burner. NOTE: The.../HR burner has two orifices with markings located in the center of the burner while the simmer orifice is located higher behind the center of appliance).
... the instruction sheet to the cooktop burner. They will have a digit number and the letter "L" on the side. (Important: Save the orifices removed from the appliance for future use.) Each orifice will show a series of engraved marks, (I II III X 15,000 BTU/HR Burner (on bottom of the burner. NOTE: The.../HR burner has two orifices with markings located in the center of the burner while the simmer orifice is located higher behind the center of appliance).

Installation Instructions
Page 32
... burners full on a medium setting. Apply the sticker near the cooktop gas inlet opening to LP gas. Insert a screwdriver through this appliance has been converted to alert others know the appliance is set too low, resulting in operation on and check the flames. A flashlight may contain a silicone shield which covers the valve...
... burners full on a medium setting. Apply the sticker near the cooktop gas inlet opening to LP gas. Insert a screwdriver through this appliance has been converted to alert others know the appliance is set too low, resulting in operation on and check the flames. A flashlight may contain a silicone shield which covers the valve...